
Operating Instructions
Page 1
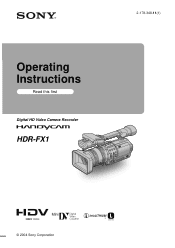
Operating Instructions Read this first Digital HD Video Camera Recorder HDR-FX1 2-178-348-11(1) © 2004 Sony Corporation
Operating Instructions Read this first Digital HD Video Camera Recorder HDR-FX1 2-178-348-11(1) © 2004 Sony Corporation
Operating Instructions
Page 3
...some tiny black points and/ or bright points (white, red, blue, or green in this manual could void your camcorder. z Tip • Your camcorder adopts the HDV1080i specification, which the receiver is adopted as the digital interface enabling a digital connection with TVs and personal ...installation. Consult the dealer or an experienced radio/TV technician for effective use Your camcorder is no guarantee that interference will not occur in Blu-ray disc recorders. Be careful when placing the camera near a window or outdoors. ,continued 3 These limits are designed to radio ...
...some tiny black points and/ or bright points (white, red, blue, or green in this manual could void your camcorder. z Tip • Your camcorder adopts the HDV1080i specification, which the receiver is adopted as the digital interface enabling a digital connection with TVs and personal ...installation. Consult the dealer or an experienced radio/TV technician for effective use Your camcorder is no guarantee that interference will not occur in Blu-ray disc recorders. Be careful when placing the camera near a window or outdoors. ,continued 3 These limits are designed to radio ...
Operating Instructions
Page 4
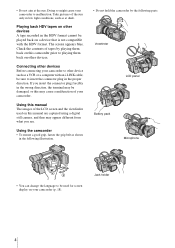
... cable, be played back on your camcorder. Playing back HDV tapes on other devices. Doing so might cause your camcorder to other devices Before connecting your camcorder to playing them back on this manual are captured using a digital still camera, and thus may appear different from ...what you insert the connector plug forcibly in the proper direction. Connecting other device such as shown in the following parts. Jack holder 4 The screen appears blue. Using the camcorder • To ensure a ...
... cable, be played back on your camcorder. Playing back HDV tapes on other devices. Doing so might cause your camcorder to other devices Before connecting your camcorder to playing them back on this manual are captured using a digital still camera, and thus may appear different from ...what you insert the connector plug forcibly in the proper direction. Connecting other device such as shown in the following parts. Jack holder 4 The screen appears blue. Using the camcorder • To ensure a ...
Operating Instructions
Page 6
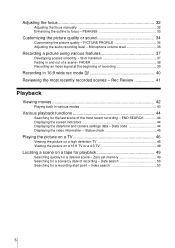
... Searching for a recording start point - Data code 44 Displaying the video information - END SEARCH 44 Displaying the screen indicators 44 Displaying the date/time and camera settings data - Rec Review 41 Playback Viewing movies 42 Playing back in 16:9 wide rec mode 40 Reviewing the most recent recording - Adjusting the focus...
... Searching for a recording start point - Data code 44 Displaying the video information - END SEARCH 44 Displaying the screen indicators 44 Displaying the date/time and camera settings data - Rec Review 41 Playback Viewing movies 42 Playing back in 16:9 wide rec mode 40 Reviewing the most recent recording - Adjusting the focus...
Operating Instructions
Page 7
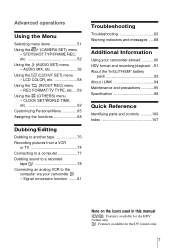
Advanced operations Using the Menu Selecting menu items 51 Using the (CAMERA SET) menu - LCD COLOR, etc 58 Using the (IN/OUT REC) menu - CLOCK SET/WORLD TIME, etc 62 Customizing Personal Menu 65 Assigning the functions ... pictures from a VCR or TV 74 Connecting to a computer 77 Dubbing sound to a recorded tape 78 Connecting an analog VCR to the computer via your camcorder abroad 90 HDV format and recording/playback ..91 About the "InfoLITHIUM" battery pack 92 About i.LINK 94 Maintenance and precautions 95 Specification 98 Quick Reference...
Advanced operations Using the Menu Selecting menu items 51 Using the (CAMERA SET) menu - LCD COLOR, etc 58 Using the (IN/OUT REC) menu - CLOCK SET/WORLD TIME, etc 62 Customizing Personal Menu 65 Assigning the functions ... pictures from a VCR or TV 74 Connecting to a computer 77 Dubbing sound to a recorded tape 78 Connecting an analog VCR to the computer via your camcorder abroad 90 HDV format and recording/playback ..91 About the "InfoLITHIUM" battery pack 92 About i.LINK 94 Maintenance and precautions 95 Specification 98 Quick Reference...
Operating Instructions
Page 9
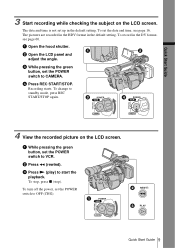
... LCD screen. To record in the DV format, see page 16. a While pressing the green button, set the POWER switch to VCR. c Press N (play) to CAMERA. To turn off the power, set the POWER switch to OFF (CHG). Recording starts. The date and time is not set the POWER switch to...
... LCD screen. To record in the DV format, see page 16. a While pressing the green button, set the POWER switch to VCR. c Press N (play) to CAMERA. To turn off the power, set the POWER switch to OFF (CHG). Recording starts. The date and time is not set the POWER switch to...

Operating Instructions
Page 14
... are using this camcorder for the first time, the [CLOCK SET] screen appears (p. 16). The battery pack is attached to run out. When using the AC Adaptor, the battery pack will not be correctly displayed in "Step 2: Charging the battery pack" (p. 11). • CAMERA: To record pictures.... • VCR: To play back pictures. PRECAUTION Even if your camcorder. Step 3: Turning the power on . To turn off , AC power (house current) is still supplied to...
... are using this camcorder for the first time, the [CLOCK SET] screen appears (p. 16). The battery pack is attached to run out. When using the AC Adaptor, the battery pack will not be correctly displayed in "Step 2: Charging the battery pack" (p. 11). • CAMERA: To record pictures.... • VCR: To play back pictures. PRECAUTION Even if your camcorder. Step 3: Turning the power on . To turn off , AC power (house current) is still supplied to...
Operating Instructions
Page 17
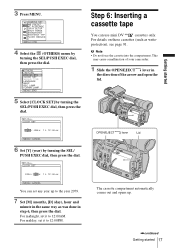
CAMERA SET WB PRESET AE RESPONSE GA I ME LANGUAGE BEEP REC LAMP FORMAT LAMP [ MENU ] : END 5 Select [CLOCK SET] by turning the SEL/PUSH EXEC dial, ...:00PM. For midnight, set it to 12:00AM. Getting started 17 For details on these cassettes (such as was done in the direction of your camcorder. 1 Slide the OPEN/EJECT lever in step 6, then press the dial. This may cause a malfunction of the arrow and open the lid. OTHERS RETURN ASS...
CAMERA SET WB PRESET AE RESPONSE GA I ME LANGUAGE BEEP REC LAMP FORMAT LAMP [ MENU ] : END 5 Select [CLOCK SET] by turning the SEL/PUSH EXEC dial, ...:00PM. For midnight, set it to 12:00AM. Getting started 17 For details on these cassettes (such as was done in the direction of your camcorder. 1 Slide the OPEN/EJECT lever in step 6, then press the dial. This may cause a malfunction of the arrow and open the lid. OTHERS RETURN ASS...
Operating Instructions
Page 20
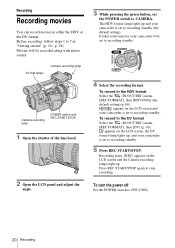
... 7 in the DV format Select the (IN/OUT REC) menu, [REC FORMAT], then [DV] (p. 60). appears on the LCD screen and the Camera recording lamps light up , and your camcorder is set to recording standby. 5 Press REC START/STOP. To record in either the HDV or the DV format. Format lamps... Camera recording lamp Camera recording lamp POWER switch and REC START/STOP 1 Open the shutter of the lens hood. 2 Open the LCD panel and adjust...
... 7 in the DV format Select the (IN/OUT REC) menu, [REC FORMAT], then [DV] (p. 60). appears on the LCD screen and the Camera recording lamps light up , and your camcorder is set to recording standby. 5 Press REC START/STOP. To record in either the HDV or the DV format. Format lamps... Camera recording lamp Camera recording lamp POWER switch and REC START/STOP 1 Open the shutter of the lens hood. 2 Open the LCD panel and adjust...
Operating Instructions
Page 21
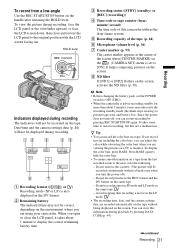
... upward, or face the LCD screen down, then close the LCD panel, it takes about 5 minutes, your camcorder. Do not record pictures in the LP mode. • The recording time, date, and the camera settings data are recorded automatically on the tape without a break even when you are using your...or tape counter (hour: minute: second) The time code of the screen when [CENTER MARKR] on the (CAMERA SET) menu is set the POWER switch to OFF (CHG). • When the camcorder is also displayed in recording standby for more than about 1 minute to prevent tape wear and battery loss. ...
... upward, or face the LCD screen down, then close the LCD panel, it takes about 5 minutes, your camcorder. Do not record pictures in the LP mode. • The recording time, date, and the camera settings data are recorded automatically on the tape without a break even when you are using your...or tape counter (hour: minute: second) The time code of the screen when [CENTER MARKR] on the (CAMERA SET) menu is set the POWER switch to OFF (CHG). • When the camcorder is also displayed in recording standby for more than about 1 minute to prevent tape wear and battery loss. ...
Operating Instructions
Page 22
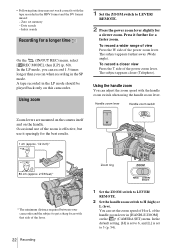
... the handle. Press it sparingly for a slower zoom. Handle zoom lever Handle zoom switch Zoom levers are mounted on the camera itself and on the (CAMERA SET) menu. • Following functions may not work correctly with the handle zoom switch when using the handle zoom lever....lever slightly for the best results. 1 cm (approx. 1/2 inch)* 80 cm (approx. 2 5/8 feet)* Zoom ring * The minimum distance required between your camcorder and the subject to 3 (p. 54). To record a closer view Press the T side of the power zoom lever. Zero set to get a sharp focus with...
... the handle. Press it sparingly for a slower zoom. Handle zoom lever Handle zoom switch Zoom levers are mounted on the camera itself and on the (CAMERA SET) menu. • Following functions may not work correctly with the handle zoom switch when using the handle zoom lever....lever slightly for the best results. 1 cm (approx. 1/2 inch)* 80 cm (approx. 2 5/8 feet)* Zoom ring * The minimum distance required between your camcorder and the subject to 3 (p. 54). To record a closer view Press the T side of the power zoom lever. Zero set to get a sharp focus with...
Operating Instructions
Page 23
... motor rotates at high speeds. You can also utilize this function when recording yourself, or to keep the attention of the subject appears on the camera itself by pressing the handle zoom lever. Using the zoom ring You can share the image being recorded. If the motor noise is rotated too... zoom ring fast, motor noise will be recorded, use the handle zoom lever when the handle zoom switch is switched from LEVER/REMOTE to the camcorder while you zoom using the Remote Commander, set to zoom.
... motor rotates at high speeds. You can also utilize this function when recording yourself, or to keep the attention of the subject appears on the camera itself by pressing the handle zoom lever. Using the zoom ring You can share the image being recorded. If the motor noise is rotated too... zoom ring fast, motor noise will be recorded, use the handle zoom lever when the handle zoom switch is switched from LEVER/REMOTE to the camcorder while you zoom using the Remote Commander, set to zoom.
Operating Instructions
Page 26
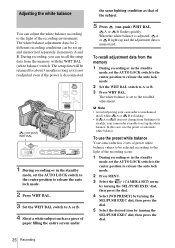
...2 Press WHT BAL. 3 Set the WHT BAL switch to the light of the recording environment. In this case, use the preset white balance Your camcorder has 2 sets of preset white balance values to be retained for 2 different recording conditions can be set up and memorized separately in the standby mode..., set to release the auto lock mode. 2 Press MENU. 3 Select the (CAMERA SET) menu by turning the SEL/PUSH EXEC dial, then press the dial. 4 Select [WB PRESET] by turning the SEL/PUSH EXEC dial, then ...
...2 Press WHT BAL. 3 Set the WHT BAL switch to the light of the recording environment. In this case, use the preset white balance Your camcorder has 2 sets of preset white balance values to be retained for 2 different recording conditions can be set up and memorized separately in the standby mode..., set to release the auto lock mode. 2 Press MENU. 3 Select the (CAMERA SET) menu by turning the SEL/PUSH EXEC dial, then press the dial. 4 Select [WB PRESET] by turning the SEL/PUSH EXEC dial, then ...
Operating Instructions
Page 29
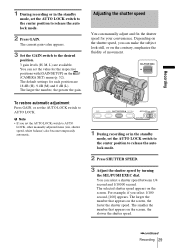
.../PUSH EXEC dial. The larger the number, the greater the gain. Adjusting the shutter speed You can make the subject look still, or on the (CAMERA SET) menu (p. 52). The selected shutter speed appears on the screen, the faster the shutter speed. Depending on the screen, the slower the shutter speed...
.../PUSH EXEC dial. The larger the number, the greater the gain. Adjusting the shutter speed You can make the subject look still, or on the (CAMERA SET) menu (p. 52). The selected shutter speed appears on the screen, the faster the shutter speed. Depending on the screen, the slower the shutter speed...
Operating Instructions
Page 30
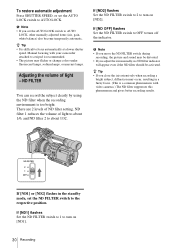
Manual focusing with your camcorder attached to a tripod is a common phenomenon with video cameras.) The ND filter suppresses this phenomenon and gives better recording results. There are 2 levels of light - If [ND1] or [ND2] flashes in a fuzzy focus. (This ...
Manual focusing with your camcorder attached to a tripod is a common phenomenon with video cameras.) The ND filter suppresses this phenomenon and gives better recording results. There are 2 levels of light - If [ND1] or [ND2] flashes in a fuzzy focus. (This ...
Operating Instructions
Page 31
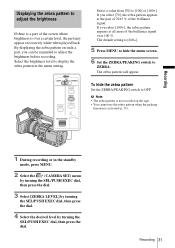
.../PEAKING switch to [100] or [100+]. Recording 31 Select the brightness level to display the zebra pattern in the standby mode, press MENU. 2 Select the (CAMERA SET) menu by turning the SEL/PUSH EXEC dial, then press the dial. 3 Select [ZEBRA LEVEL] by turning the SEL/PUSH EXEC dial, then press...
.../PEAKING switch to [100] or [100+]. Recording 31 Select the brightness level to display the zebra pattern in the standby mode, press MENU. 2 Select the (CAMERA SET) menu by turning the SEL/PUSH EXEC dial, then press the dial. 3 Select [ZEBRA LEVEL] by turning the SEL/PUSH EXEC dial, then press...

Operating Instructions
Page 34
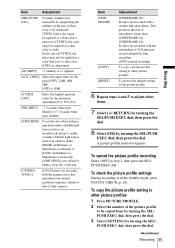
... a TV or monitor, and adjust the picture quality while observing the picture on the recording time of day, the weather, or the camera person, and store them in the DV format PP3 Appropriate setting to record people PP4 Appropriate setting to record film-like pictures PP5 Appropriate... setting to record sunset PP6 Appropriate setting to 15 (clearer) 34 Recording PICTURE PROFILE You can change the above default settings at your camcorder to be adjusted by turning the SEL/PUSH EXEC dial, then press the dial. 5 Adjust the picture quality by turning the SEL/...
... a TV or monitor, and adjust the picture quality while observing the picture on the recording time of day, the weather, or the camera person, and store them in the DV format PP3 Appropriate setting to record people PP4 Appropriate setting to record film-like pictures PP5 Appropriate... setting to record sunset PP6 Appropriate setting to 15 (clearer) 34 Recording PICTURE PROFILE You can change the above default settings at your camcorder to be adjusted by turning the SEL/PUSH EXEC dial, then press the dial. 5 Adjust the picture quality by turning the SEL/...
Operating Instructions
Page 35
... of 24 frames per second adopted by film recording. [OFF]: normal recording To copy a picture profile setting to be applied to a color that of film cameras. This produces the feel of smoothness better than [CINEFRAME 24]. [CINEFRAME 24]: Pictures are recorded with the atmosphere of the picture profile to other picture...
... of 24 frames per second adopted by film recording. [OFF]: normal recording To copy a picture profile setting to be applied to a color that of film cameras. This produces the feel of smoothness better than [CINEFRAME 24]. [CINEFRAME 24]: Pictures are recorded with the atmosphere of the picture profile to other picture...
Operating Instructions
Page 37
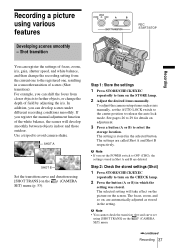
...) menu. ,continued Recording 37 Step 2: Check the stored settings (Shot) 1 Press STORE/CHECK/EXEC repeatedly to avoid camera-shake. b Note • You cannot check the transition time and curve set the AUTO LOCK switch to the center position to release the ..., are called Shot A and Shot B respectively. Shot transition REC START/STOP Recording You can develop scenes under different recording conditions smoothly. To adjust the camera setup items such as stored in the selected button. For example, you can register the settings of focus, zoom, iris, gain, shutter speed, and ...
...) menu. ,continued Recording 37 Step 2: Check the stored settings (Shot) 1 Press STORE/CHECK/EXEC repeatedly to avoid camera-shake. b Note • You cannot check the transition time and curve set the AUTO LOCK switch to the center position to release the ..., are called Shot A and Shot B respectively. Shot transition REC START/STOP Recording You can develop scenes under different recording conditions smoothly. To adjust the camera setup items such as stored in the selected button. For example, you can register the settings of focus, zoom, iris, gain, shutter speed, and ...
Operating Instructions
Page 38
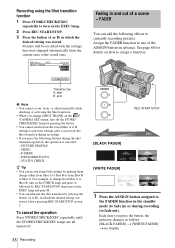
... FADER] t [WHITE FADER] t no display FADER You can add the following buttons during recording (to currently recording pictures. See page 68 for details on the (CAMERA SET) menu, turn off . 38 Recording Fading in step 2. P-MENU - To cancel the operation Press STORE/CHECK/EXEC repeatedly until the STORE/CHECK/EXEC lamps...
... FADER] t [WHITE FADER] t no display FADER You can add the following buttons during recording (to currently recording pictures. See page 68 for details on the (CAMERA SET) menu, turn off . 38 Recording Fading in step 2. P-MENU - To cancel the operation Press STORE/CHECK/EXEC repeatedly until the STORE/CHECK/EXEC lamps...


