
Operating Instructions
Page 2
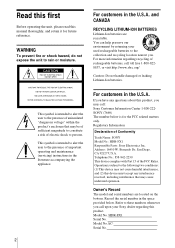
...ION BATTERIES Lithium-Ion batteries are located on the bottom. You can help preserve our environment by returning your Sony dealer regarding recycling of uninsulated "dangerous voltage" within the product's enclosure that may cause undesired operation. Regulatory ...device complies with Part 15 of Conformity Trade Name: SONY Model No.: HDR-FX1 Responsible Party: Sony Electronics Inc. If you have any interference received, including interference that may call upon your used rechargeable batteries to persons. HDR-FX1 Serial No. Read this first Before operating the ...
...ION BATTERIES Lithium-Ion batteries are located on the bottom. You can help preserve our environment by returning your Sony dealer regarding recycling of uninsulated "dangerous voltage" within the product's enclosure that may cause undesired operation. Regulatory ...device complies with Part 15 of Conformity Trade Name: SONY Model No.: HDR-FX1 Responsible Party: Sony Electronics Inc. If you have any interference received, including interference that may call upon your used rechargeable batteries to persons. HDR-FX1 Serial No. Read this first Before operating the ...
Operating Instructions
Page 3
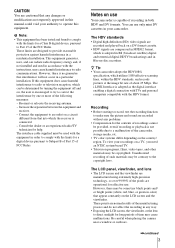
.... CAUTION You are designed to provide reasonable protection against harmful interference in a residential installation. This equipment generates, uses, and can use Your camcorder is adopted in BS (broadcast satellite) digital and terrestrial digital HDTV broadcastings and in Blu-ray disc recorders. However... off and on a DV format cassette. • HDV signals are operational for effective use. The interface cable supplied must be copyrighted. z Tip • Your camcorder adopts the HDV1080i specification, which is capable of FCC Rules. The i.LINK Interface is ...
.... CAUTION You are designed to provide reasonable protection against harmful interference in a residential installation. This equipment generates, uses, and can use Your camcorder is adopted in BS (broadcast satellite) digital and terrestrial digital HDTV broadcastings and in Blu-ray disc recorders. However... off and on a DV format cassette. • HDV signals are operational for effective use. The interface cable supplied must be copyrighted. z Tip • Your camcorder adopts the HDV1080i specification, which is capable of FCC Rules. The i.LINK Interface is ...
Operating Instructions
Page 4
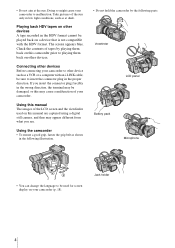
... in the wrong direction, the terminal may be used on this manual The images of your camcorder (p. 18). The screen appears blue. Check the contents of the sun only in low light conditions, such as shown in the proper direction. Using the camcorder • To ensure a good grip, fasten... the grip belt as at the sun. • Do not aim at dusk. Connecting other devices Before connecting your camcorder to insert the connector plug in the following parts. ...
... in the wrong direction, the terminal may be used on this manual The images of your camcorder (p. 18). The screen appears blue. Check the contents of the sun only in low light conditions, such as shown in the proper direction. Using the camcorder • To ensure a good grip, fasten... the grip belt as at the sun. • Do not aim at dusk. Connecting other devices Before connecting your camcorder to insert the connector plug in the following parts. ...
Operating Instructions
Page 5
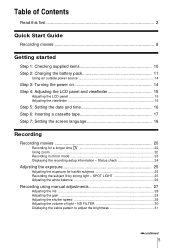
...the volume of Contents Read this first 2 Quick Start Guide Recording movies 8 Getting started Step 1: Checking supplied items 10 Step 2: Charging the battery pack 11 Using an outside power source 14 Step 3: Turning the power on 14 Step 4: Adjusting the LCD panel and viewfinder 15 Adjusting the LCD panel 15 Adjusting... Displaying the zebra pattern to adjust the brightness 31 ,continued 5 Status check 24 Adjusting the exposure 25 Adjusting the exposure for a longer time 22 Using zoom ...22 Recording in mirror mode 23 Displaying the recording setup information - Table of light -
...the volume of Contents Read this first 2 Quick Start Guide Recording movies 8 Getting started Step 1: Checking supplied items 10 Step 2: Charging the battery pack 11 Using an outside power source 14 Step 3: Turning the power on 14 Step 4: Adjusting the LCD panel and viewfinder 15 Adjusting the LCD panel 15 Adjusting... Displaying the zebra pattern to adjust the brightness 31 ,continued 5 Status check 24 Adjusting the exposure 25 Adjusting the exposure for a longer time 22 Using zoom ...22 Recording in mirror mode 23 Displaying the recording setup information - Table of light -
Operating Instructions
Page 6
... a scene by date of recording 39 Recording in various modes 43 Various playback functions 44 Searching for a desired scene - Microphone volume level 36 Recording a picture using various features 37 Developing scenes smoothly - Rec Review 41 Playback Viewing movies 42 Playing back in 16:9 wide rec mode 40 Reviewing the most recent...
... a scene by date of recording 39 Recording in various modes 43 Various playback functions 44 Searching for a desired scene - Microphone volume level 36 Recording a picture using various features 37 Developing scenes smoothly - Rec Review 41 Playback Viewing movies 42 Playing back in 16:9 wide rec mode 40 Reviewing the most recent...
Operating Instructions
Page 7
Signal conversion function ........81 Troubleshooting Troubleshooting 83 Warning indicators and messages .....88 Additional Information Using your camcorder - CLOCK SET/WORLD TIME, etc 62 Customizing Personal Menu 65 Assigning the functions 68 Dubbing/Editing Dubbing to another tape 70...VCR or TV 74 Connecting to a computer 77 Dubbing sound to a recorded tape 78 Connecting an analog VCR to the computer via your camcorder abroad 90 HDV format and recording/playback ..91 About the "InfoLITHIUM" battery pack 92 About i.LINK 94 Maintenance and precautions 95 Specification ...
Signal conversion function ........81 Troubleshooting Troubleshooting 83 Warning indicators and messages .....88 Additional Information Using your camcorder - CLOCK SET/WORLD TIME, etc 62 Customizing Personal Menu 65 Assigning the functions 68 Dubbing/Editing Dubbing to another tape 70...VCR or TV 74 Connecting to a computer 77 Dubbing sound to a recorded tape 78 Connecting an analog VCR to the computer via your camcorder abroad 90 HDV format and recording/playback ..91 About the "InfoLITHIUM" battery pack 92 About i.LINK 94 Maintenance and precautions 95 Specification ...
Operating Instructions
Page 11
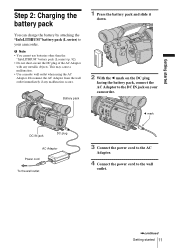
Getting started 11 Battery pack 1 Press the battery pack and slide it down. 2 With the b mark on your camcorder. This may cause a malfunction. • Use a nearby wall outlet when using the AC Adaptor. b mark DC IN jack DC plug AC Adaptor Power cord To the wall outlet 3 Connect the power...InfoLITHIUM" battery pack (L series) to the DC IN jack on the DC plug facing the battery pack, connect the AC Adaptor to your camcorder. b Note • You cannot use batteries other than the "InfoLITHIUM" battery pack (L series) (p. 92). • Do not short-circuit the DC plug of the AC ...
Getting started 11 Battery pack 1 Press the battery pack and slide it down. 2 With the b mark on your camcorder. This may cause a malfunction. • Use a nearby wall outlet when using the AC Adaptor. b mark DC IN jack DC plug AC Adaptor Power cord To the wall outlet 3 Connect the power...InfoLITHIUM" battery pack (L series) to the DC IN jack on the DC plug facing the battery pack, connect the AC Adaptor to your camcorder. b Note • You cannot use batteries other than the "InfoLITHIUM" battery pack (L series) (p. 92). • Do not short-circuit the DC plug of the AC ...
Operating Instructions
Page 12
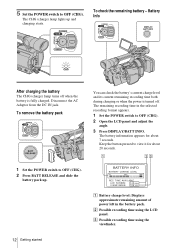
...the battery's current charge level and its current remaining recording time both during charging or when the power is fully charged. C Possible recording time using the LCD panel. Keep the button pressed to OFF (CHG). 2 Press BATT RELEASE and slide the battery pack up and charging starts. ...5 Set the POWER switch to OFF (CHG). 2 Open the LCD panel and adjust the angle. 3 Press DISPLAY/BATT INFO. B Possible recording time using the viewfinder. 12 Getting started To check the remaining battery - The CHG (charge) lamp lights up . The remaining recording time in the battery pack....
...the battery's current charge level and its current remaining recording time both during charging or when the power is fully charged. C Possible recording time using the LCD panel. Keep the button pressed to OFF (CHG). 2 Press BATT RELEASE and slide the battery pack up and charging starts. ...5 Set the POWER switch to OFF (CHG). 2 Open the LCD panel and adjust the angle. 3 Press DISPLAY/BATT INFO. B Possible recording time using the viewfinder. 12 Getting started To check the remaining battery - The CHG (charge) lamp lights up . The remaining recording time in the battery pack....
Operating Instructions
Page 13
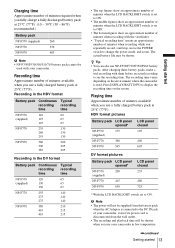
...• The recording and playback time will not be shorter when you use a fully charged battery pack at 25°C (77°F). Recording time Approximate number of minutes available when you use your camcorder. Recording in the HDV format Battery pack Continuous Typical recording recording time ... of minutes when recording with them before an actual recording to display the recording time on the environment where the camcorder is used with your camcorder in the DV format Battery pack Continuous Typical recording recording time time NP-F570 120 65 (supplied) 130 65 ...
...• The recording and playback time will not be shorter when you use a fully charged battery pack at 25°C (77°F). Recording time Approximate number of minutes available when you use your camcorder. Recording in the HDV format Battery pack Continuous Typical recording recording time ... of minutes when recording with them before an actual recording to display the recording time on the environment where the camcorder is used with your camcorder in the DV format Battery pack Continuous Typical recording recording time time NP-F570 120 65 (supplied) 130 65 ...

Operating Instructions
Page 14
...play or edit pictures. The battery pack is damaged. - PRECAUTION Even if your camcorder. The power turns on You need to set the POWER switch. Connect your camcorder as the power source when you are using this camcorder for the first time, the [CLOCK SET] screen appears (p. 16). The ...battery pack is fully discharged. (For Battery information only.) Using an outside power source You can use the AC Adaptor as shown in...
...play or edit pictures. The battery pack is damaged. - PRECAUTION Even if your camcorder. The power turns on You need to set the POWER switch. Connect your camcorder as the power source when you are using this camcorder for the first time, the [CLOCK SET] screen appears (p. 16). The ...battery pack is fully discharged. (For Battery information only.) Using an outside power source You can use the AC Adaptor as shown in...
Operating Instructions
Page 15
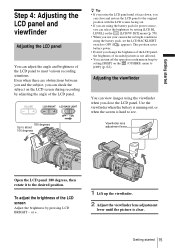
... LCD panel to the original position with the LCD screen facing out. • If you are obstructions between you and the subject, you use your camcorder in bright conditions using the battery pack for power source, you can select the brightness by setting [LCD BL LEVEL] on the [LCD/VF SET] menu (p.... 58). • When you can view images using the viewfinder when you rotate the LCD panel until the picture is hard to see. Getting ...
... LCD panel to the original position with the LCD screen facing out. • If you are obstructions between you and the subject, you use your camcorder in bright conditions using the battery pack for power source, you can select the brightness by setting [LCD BL LEVEL] on the [LCD/VF SET] menu (p.... 58). • When you can view images using the viewfinder when you rotate the LCD panel until the picture is hard to see. Getting ...
Operating Instructions
Page 16
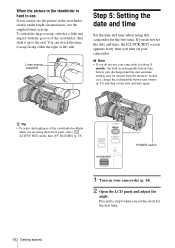
... end. Proceed to step 6 when you are using this camcorder for about 3 months, the built-in the viewfinder clearly under bright circumstances, use your camcorder. If you do not use the supplied large eyecup. POWER switch 1 Turn on your camcorder for the first time. Large eyecup (supplied) ...Step 5: Setting the date and time Set the date and time when using the battery pack, select ...
... end. Proceed to step 6 when you are using this camcorder for about 3 months, the built-in the viewfinder clearly under bright circumstances, use your camcorder. If you do not use the supplied large eyecup. POWER switch 1 Turn on your camcorder for the first time. Large eyecup (supplied) ...Step 5: Setting the date and time Set the date and time when using the battery pack, select ...
Operating Instructions
Page 17
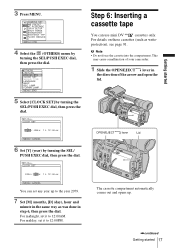
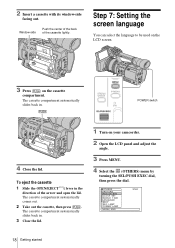
... (OTHERS) menu by turning the SEL/ PUSH EXEC dial, then press the dial. 120min CLOCK SET 2004 Y JAN M 1 D 12 : 00 AM [ MENU ] : CANCEL You can use mini DV cassettes only. b Note • Do not force the cassette into the compartment. CAMERA SET WB PRESET AE RESPONSE GA I ME LANGUAGE BEEP REC... and opens up to 12:00AM. For midnight, set it to the year 2079. 7 Set [M] (month), [D] (day), hour and minute in the direction of your camcorder. 1 Slide the OPEN/EJECT lever in the same way as write-
... (OTHERS) menu by turning the SEL/ PUSH EXEC dial, then press the dial. 120min CLOCK SET 2004 Y JAN M 1 D 12 : 00 AM [ MENU ] : CANCEL You can use mini DV cassettes only. b Note • Do not force the cassette into the compartment. CAMERA SET WB PRESET AE RESPONSE GA I ME LANGUAGE BEEP REC... and opens up to 12:00AM. For midnight, set it to the year 2079. 7 Set [M] (month), [D] (day), hour and minute in the direction of your camcorder. 1 Slide the OPEN/EJECT lever in the same way as write-
Operating Instructions
Page 18
... compartment automatically comes out. 2 Take out the cassette, then press . Step 7: Setting the screen language You can select the language to be used on the LCD screen. 3 Press on your camcorder. 2 Open the LCD panel and adjust the angle. 3 Press MENU. 4 Select the (OTHERS) menu by turning the SEL/PUSH EXEC dial...
... compartment automatically comes out. 2 Take out the cassette, then press . Step 7: Setting the screen language You can select the language to be used on the LCD screen. 3 Press on your camcorder. 2 Open the LCD panel and adjust the angle. 3 Press MENU. 4 Select the (OTHERS) menu by turning the SEL/PUSH EXEC dial...
Operating Instructions
Page 21
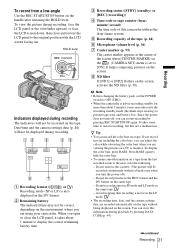
... changing the battery pack, set to [ON]. z Tip • You can adjust the color while observing the color bars when you are using your camcorder exits the recording standby mode (the drum stops rotating) to prevent tape wear and battery loss. Date/time and the camera settings data (p. 44...G Center marker (p. 55) The center marker appears at the center of this not a malfunction. It takes some time to restart recording, but this camcorder utilizes the drop-frame system. Press BARS again to hide the color bars. • To ensure smooth transition on the (CAMERA SET) menu is ...
... changing the battery pack, set to [ON]. z Tip • You can adjust the color while observing the color bars when you are using your camcorder exits the recording standby mode (the drum stops rotating) to prevent tape wear and battery loss. Date/time and the camera settings data (p. 44...G Center marker (p. 55) The center marker appears at the center of this not a malfunction. It takes some time to restart recording, but this camcorder utilizes the drop-frame system. Press BARS again to hide the color bars. • To ensure smooth transition on the (CAMERA SET) menu is ...
Operating Instructions
Page 22
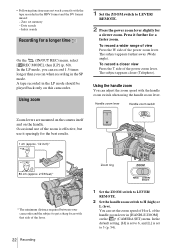
... appears farther away (Wide angle). Handle zoom lever Handle zoom switch Zoom levers are mounted on the camera itself and on the (CAMERA SET) menu. Using zoom 1 Set the ZOOM switch to LEVER/ REMOTE. 2 Press the power zoom lever slightly for the best results. 1 cm (approx. 1/2 inch)* 80 cm ...(approx. 2 5/8 feet)* Zoom ring * The minimum distance required between your camcorder and the subject to get a sharp focus with the tape recorded in the SP mode. To record a wider range of view Press the W side of...
... appears farther away (Wide angle). Handle zoom lever Handle zoom switch Zoom levers are mounted on the camera itself and on the (CAMERA SET) menu. Using zoom 1 Set the ZOOM switch to LEVER/ REMOTE. 2 Press the power zoom lever slightly for the best results. 1 cm (approx. 1/2 inch)* 80 cm ...(approx. 2 5/8 feet)* Zoom ring * The minimum distance required between your camcorder and the subject to get a sharp focus with the tape recorded in the SP mode. To record a wider range of view Press the W side of...
Operating Instructions
Page 23
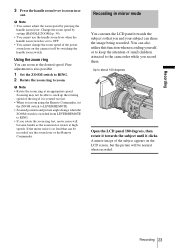
...the LCD screen, but the picture will become louder as the zoom motor rotates at high speeds. A mirror-image of small children attracted to the camcorder while you and your subject can zoom at an appropriate speed. Fine adjustment is so loud that you record them. Zooming may not be normal... when recorded. Using the zoom ring You can share the image being recorded. If the motor noise is also possible. 1 Set the ZOOM switch to RING. 2 Rotate...
...the LCD screen, but the picture will become louder as the zoom motor rotates at high speeds. A mirror-image of small children attracted to the camcorder while you and your subject can zoom at an appropriate speed. Fine adjustment is so loud that you record them. Zooming may not be normal... when recorded. Using the zoom ring You can share the image being recorded. If the motor noise is also possible. 1 Set the ZOOM switch to RING. 2 Rotate...
Operating Instructions
Page 25
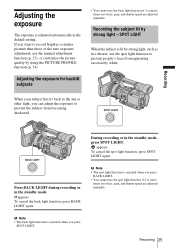
...the exposure to record brighter or darker pictures than those of iris, gain, and shutter speed are adjusted manually. Recording the subject lit by using the PICTURE PROFILE function (p. 34). appears. Adjusting the exposure The exposure is adjusted automatically in the standby mode. . If you press BACK... the picture quality by strong light - Adjusting the exposure for backlit subjects • You cannot use the back light function if 2 or more items out of the auto exposure adjustment, use the spot light function if 2 or more items out of iris, gain, and shutter speed are...
...the exposure to record brighter or darker pictures than those of iris, gain, and shutter speed are adjusted manually. Recording the subject lit by using the PICTURE PROFILE function (p. 34). appears. Adjusting the exposure The exposure is adjusted automatically in the standby mode. . If you press BACK... the picture quality by strong light - Adjusting the exposure for backlit subjects • You cannot use the back light function if 2 or more items out of the auto exposure adjustment, use the spot light function if 2 or more items out of iris, gain, and shutter speed are...
Operating Instructions
Page 26
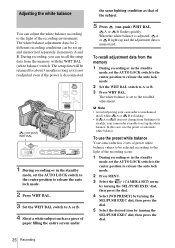
...) switch. When the white balance is memorized. b Note • Avoid subjecting your camcorder is unable to set up and the adjustment data is adjusted, A or B lights up the white balance. To use the preset or automatic white balance. Adjusting the white balance You can be set up and...same lighting condition as it is not readjusted even if the power is disconnected. (one -push) WHT BAL. In this case, use the preset white balance Your camcorder has 2 sets of preset white balance values to be retained for 2 different recording conditions can adjust the white balance according to ...
...) switch. When the white balance is memorized. b Note • Avoid subjecting your camcorder is unable to set up and the adjustment data is adjusted, A or B lights up the white balance. To use the preset or automatic white balance. Adjusting the white balance You can be set up and...same lighting condition as it is not readjusted even if the power is disconnected. (one -push) WHT BAL. In this case, use the preset white balance Your camcorder has 2 sets of preset white balance values to be retained for 2 different recording conditions can adjust the white balance according to ...
Operating Instructions
Page 27
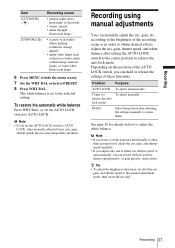
..., gain, shutter speed, and white balance after adjusting the settings manually to other manually adjusted items (iris, gain, shutter speed) also become temporarily automatic. Recording using manual adjustments You can record with iris priority, shutter speed priority, or gain priority, respectively. Position Purpose AUTO LOCK To adjust automatically. Depending on how...
..., gain, shutter speed, and white balance after adjusting the settings manually to other manually adjusted items (iris, gain, shutter speed) also become temporarily automatic. Recording using manual adjustments You can record with iris priority, shutter speed priority, or gain priority, respectively. Position Purpose AUTO LOCK To adjust automatically. Depending on how...


