
Operating Instructions
Page 10
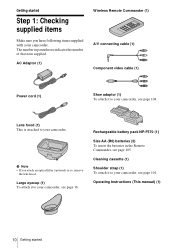
...; If you have following items supplied with your camcorder. Large eyecup (1) To attach it to your camcorder, see page 16. AC Adaptor (1) Wireless Remote Commander (1) A/V connecting cable (1) Component video cable (1) Power cord (1) Shoe adaptor (1) To attach it to your camcorder. Cleaning cassette (1) Shoulder strap (1) To attach it to your camcorder, see page 105. Operating Instructions (This manual...
...; If you have following items supplied with your camcorder. Large eyecup (1) To attach it to your camcorder, see page 16. AC Adaptor (1) Wireless Remote Commander (1) A/V connecting cable (1) Component video cable (1) Power cord (1) Shoe adaptor (1) To attach it to your camcorder. Cleaning cassette (1) Shoulder strap (1) To attach it to your camcorder, see page 105. Operating Instructions (This manual...
Operating Instructions
Page 46
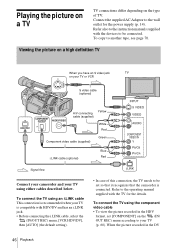
... S video jack TV on the (IN/ OUT REC) menu according to be set [COMPONENT] on your TV or VCR S video cable (optional) Yellow A/V connecting cable (supplied) White Red Component video cable (supplied) Green i.LINK cable (optional) Blue Red Signal flow Connect your camcorder and your TV (p. 60). Refer also to the instruction manuals supplied with HDV/DV...
... S video jack TV on the (IN/ OUT REC) menu according to be set [COMPONENT] on your TV or VCR S video cable (optional) Yellow A/V connecting cable (supplied) White Red Component video cable (supplied) Green i.LINK cable (optional) Blue Red Signal flow Connect your camcorder and your TV (p. 60). Refer also to the instruction manuals supplied with HDV/DV...
Operating Instructions
Page 47
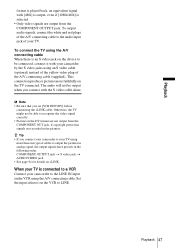
...the output signals have priority in the following order: COMPONENT OUTPUT jack t S video jack t AUDIO/VIDEO jack • See page 94 for details on the TV connected. format is played back, an equivalent signal with [480i] is output, even if [1080i/480i] is selected. • Only video signals...of the A/V connecting cable to the audio input jack of your camcorder by the S video jacks using an S video cable (optional) instead of the yellow video plug of cables to recognize the video signal correctly. • Pictures in the DV format are not output from the COMPONENT OUT jack, if copyright...
...the output signals have priority in the following order: COMPONENT OUTPUT jack t S video jack t AUDIO/VIDEO jack • See page 94 for details on the TV connected. format is played back, an equivalent signal with [480i] is output, even if [1080i/480i] is selected. • Only video signals...of the A/V connecting cable to the audio input jack of your camcorder by the S video jacks using an S video cable (optional) instead of the yellow video plug of cables to recognize the video signal correctly. • Pictures in the DV format are not output from the COMPONENT OUT jack, if copyright...
Operating Instructions
Page 48
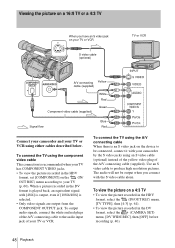
..., connect it with [480i] is output, even if [1080i/480i] is recommended when your TV or VCR. To output audio signals, connect the white and red plugs of the A/V connecting cable to your TV or VCR using the A/V connecting cable When there is an S video jack on the device to... be output when you have an S video jack on your TV or VCR S video cable (optional) TV or VCR A/V connecting Yellow cable (supplied) Component video cable (supplied) White Red Green Signal flow Blue Red Connect your camcorder and your TV (p. 60). To view the picture on a 4:3 TV • To view the picture ...
..., connect it with [480i] is output, even if [1080i/480i] is recommended when your TV or VCR. To output audio signals, connect the white and red plugs of the A/V connecting cable to your TV or VCR using the A/V connecting cable When there is an S video jack on the device to... be output when you have an S video jack on your TV or VCR S video cable (optional) TV or VCR A/V connecting Yellow cable (supplied) Component video cable (supplied) White Red Green Signal flow Blue Red Connect your camcorder and your TV (p. 60). To view the picture on a 4:3 TV • To view the picture ...

Operating Instructions
Page 49
... or VCR. Set the input selector on the tape counter. ,continued Playback 49 The playback starts from the COMPONENT OUT jack, if copyright protection signals are recorded in monaural mode, use a connecting cable (optional) for a desired scene - When your TV is reset to "0:00:00" and appears on the... tape counter reaches "0:00:00." 4 Press N (play the sound in the pictures. If the tape counter is connected to a VCR Connect your camcorder to the LINE IN input on a tape for playback Searching quickly for that purpose. Zero set memory Playback 1 During playback, press ZERO SET MEMORY ...
... or VCR. Set the input selector on the tape counter. ,continued Playback 49 The playback starts from the COMPONENT OUT jack, if copyright protection signals are recorded in monaural mode, use a connecting cable (optional) for a desired scene - When your TV is reset to "0:00:00" and appears on the... tape counter reaches "0:00:00." 4 Press N (play the sound in the pictures. If the tape counter is connected to a VCR Connect your camcorder to the LINE IN input on a tape for playback Searching quickly for that purpose. Zero set memory Playback 1 During playback, press ZERO SET MEMORY ...

Operating Instructions
Page 59
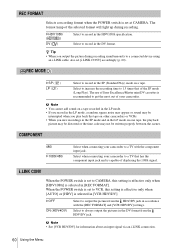
... DV REC MODE COMPONENT i . b Note • Disconnect the i.LINK cable before setting [VCR HDV/DV]. at [DV], a DV signal is output as it is not output. ,continued Using the Menu 59 The screen shows the items you can adjust vary depending on the power mode of your camcorder. Normally select [...this to [ON], pictures are marked with G. The default settings are output as it is recorded or played back. Select this when connecting the camcorder to a computer, etc. (p. 77). • Select this to record/play back signals input/output from the HDV/DV jack. Select this to...
... DV REC MODE COMPONENT i . b Note • Disconnect the i.LINK cable before setting [VCR HDV/DV]. at [DV], a DV signal is output as it is not output. ,continued Using the Menu 59 The screen shows the items you can adjust vary depending on the power mode of your camcorder. Normally select [...this to [ON], pictures are marked with G. The default settings are output as it is recorded or played back. Select this when connecting the camcorder to a computer, etc. (p. 77). • Select this to record/play back signals input/output from the HDV/DV jack. Select this to...
Operating Instructions
Page 60
...ON (HDVcDV) Select to record in accordance with the component input jack. Select when connecting your camcorder to VCR, this setting is effective only when [HDV1080i] is selected in the SP (Standard Play) mode on a tape. The use of Sony Excellence/Master mini DV cassettes is capable of the selected ... to a connected device using an i.LINK cable, also set [i.LINK CONV] accordingly (p. 60). i.LINK CONV When the POWER switch is set to CAMERA, this setting is effective only when [AUTO] or [HDV] is set to a TV that of your camcorder to record in the DV format from the...
...ON (HDVcDV) Select to record in accordance with the component input jack. Select when connecting your camcorder to VCR, this setting is effective only when [HDV1080i] is selected in the SP (Standard Play) mode on a tape. The use of Sony Excellence/Master mini DV cassettes is capable of the selected ... to a connected device using an i.LINK cable, also set [i.LINK CONV] accordingly (p. 60). i.LINK CONV When the POWER switch is set to CAMERA, this setting is effective only when [AUTO] or [HDV] is set to a TV that of your camcorder to record in the DV format from the...

Operating Instructions
Page 86
... (p. 25). cTurn up the volume (p. 42). "---" is displayed on the screen. • The tape you are using an S VIDEO cable or a component video cable, make sure the red and white plugs of the A/V connecting cable are playing was recorded without setting the date and time. • A blank section on the tape is a blank section...
... (p. 25). cTurn up the volume (p. 42). "---" is displayed on the screen. • The tape you are using an S VIDEO cable or a component video cable, make sure the red and white plugs of the A/V connecting cable are playing was recorded without setting the date and time. • A blank section on the tape is a blank section...

Operating Instructions
Page 87
... device (p. 59). Symptom Cannot view the picture or hear the sound on the TV connected with the 4-channel microphone recording standard. This camcorder does not comply with the component video cable. cIn the (AUDIO SET) menu, adjust [AUDIO MIX] from the [ST1] (original sound) side until the sound is not heard. appears on...
... device (p. 59). Symptom Cannot view the picture or hear the sound on the TV connected with the 4-channel microphone recording standard. This camcorder does not comply with the component video cable. cIn the (AUDIO SET) menu, adjust [AUDIO MIX] from the [ST1] (original sound) side until the sound is not heard. appears on...

Operating Instructions
Page 90
...in the DV format on the (OTHERS) menu, then set the clock to the local time by time difference You can use an i.LINK cable to connect these TVs. On HDV compatible TVs An HDV compatible TV with the AUDIO/VIDEO input jack. As of the wall outlet [b]. Brazil...NTSC system-based TV (see following list) with the component input jack is required to view playback pictures recorded in the HDV format. Additional Information Using your camcorder abroad Power supply You can easily set the time difference (p. 62). 90 Additional Information Sony TV models KD-34XBR960, KD-36XS955, KD-34XS955,...
...in the DV format on the (OTHERS) menu, then set the clock to the local time by time difference You can use an i.LINK cable to connect these TVs. On HDV compatible TVs An HDV compatible TV with the AUDIO/VIDEO input jack. As of the wall outlet [b]. Brazil...NTSC system-based TV (see following list) with the component input jack is required to view playback pictures recorded in the HDV format. Additional Information Using your camcorder abroad Power supply You can easily set the time difference (p. 62). 90 Additional Information Sony TV models KD-34XBR960, KD-36XS955, KD-34XS955,...
Operating Instructions
Page 107
...-type battery 97 CINEFRAME 35 CINEMATONE 35 Cleaning cassette 96 Clock set (CLOCK SET) ...16 Color bar 21 COLOR LEVEL 34 COLOR PHASE 34 COMPONENT 60 Component video cable 46, 48 Computer connection ........ 77 Customizing Personal Menu 65 D Data code (DATA CODE 44, 63 Date search 50 Date/time 16, 44 Display ... 11 G Gain 28 GAIN SETUP 52 Grip belt 4 H HANDLE ZOOM 54 Handle zoom speed 22 HDV 3, 90, 91 Headphones jack 103 I i.LINK 94 i.LINK cable 46, 70, 71, 74, 75, 77, 81 i.LINK CONV 60 Index search 50 Index signal 39 "InfoLITHIUM" battery pack 92 Iris 28 IRIS DIAL 63...
...-type battery 97 CINEFRAME 35 CINEMATONE 35 Cleaning cassette 96 Clock set (CLOCK SET) ...16 Color bar 21 COLOR LEVEL 34 COLOR PHASE 34 COMPONENT 60 Component video cable 46, 48 Computer connection ........ 77 Customizing Personal Menu 65 D Data code (DATA CODE 44, 63 Date search 50 Date/time 16, 44 Display ... 11 G Gain 28 GAIN SETUP 52 Grip belt 4 H HANDLE ZOOM 54 Handle zoom speed 22 HDV 3, 90, 91 Headphones jack 103 I i.LINK 94 i.LINK cable 46, 70, 71, 74, 75, 77, 81 i.LINK CONV 60 Index search 50 Index signal 39 "InfoLITHIUM" battery pack 92 Iris 28 IRIS DIAL 63...


