
Operating Instructions
Page 1
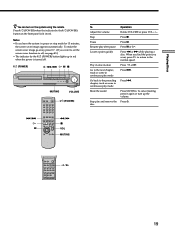
Refer to them whenever you call upon your Sony dealer regarding this product. Model No. 4-232-189-11(1) Compact AV System Operating Instructions Owner's Record The model and serial numbers are located at the rear of the unit. DAV-S300 Serial No TV SLEEP FUNCTION 1 SOUND FIELD 4 BAND 7 DISPLAY >10 23 56 89 ENTER 10/0 P.MODE AUDIO ANGLE SUBTITLE PRESET PREV NEXT TUNING PLAY/SELECT PAUSE STOP TITLE DVD MENU VOL ENTER DVD DISPLAY RETURN MUTING DAV-S300 © 2000 Sony Corporation Record the serial number in the space provided below.
Refer to them whenever you call upon your Sony dealer regarding this product. Model No. 4-232-189-11(1) Compact AV System Operating Instructions Owner's Record The model and serial numbers are located at the rear of the unit. DAV-S300 Serial No TV SLEEP FUNCTION 1 SOUND FIELD 4 BAND 7 DISPLAY >10 23 56 89 ENTER 10/0 P.MODE AUDIO ANGLE SUBTITLE PRESET PREV NEXT TUNING PLAY/SELECT PAUSE STOP TITLE DVD MENU VOL ENTER DVD DISPLAY RETURN MUTING DAV-S300 © 2000 Sony Corporation Record the serial number in the space provided below.
Operating Instructions
Page 3
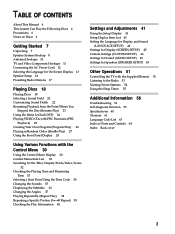
... Unpacking 7 Speaker System Hookup 8 Antenna Hookups 10 TV and Video Component Hookups 11 Connecting the AC Power Cord 12 Selecting the Language for On-Screen Display 13 Speaker Setup 14 Presetting Radio Stations 17 Playing Discs 18 Playing Discs 18 Selecting a Sound Field 20 Customizing Sound Fields 22 Resuming ...Chapter/Track/Index/Scene 32 Checking the Playing Time and Remaining Time 33 Selecting a Start Point Using the Time Code 34 Changing the Sounds 35 Displaying the Subtitles 36 Changing the Angles 37 Playing Repeatedly (Repeat Play) 38 Repeating a Specific Portion (AyB Repeat) 38 ...
... Unpacking 7 Speaker System Hookup 8 Antenna Hookups 10 TV and Video Component Hookups 11 Connecting the AC Power Cord 12 Selecting the Language for On-Screen Display 13 Speaker Setup 14 Presetting Radio Stations 17 Playing Discs 18 Playing Discs 18 Selecting a Sound Field 20 Customizing Sound Fields 22 Resuming ...Chapter/Track/Index/Scene 32 Checking the Playing Time and Remaining Time 33 Selecting a Start Point Using the Time Code 34 Changing the Sounds 35 Displaying the Subtitles 36 Changing the Angles 37 Playing Repeatedly (Repeat Play) 38 Repeating a Specific Portion (AyB Repeat) 38 ...
Operating Instructions
Page 8
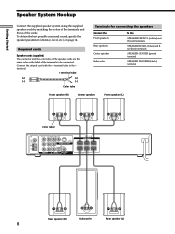
Connect the striped cord with the + terminal tube to be connected. To obtain the best possible surround sound, specify the speaker parameters (distance, level, etc.) on page 14. Getting Started Speaker System Hookup Connect the supplied speaker system using the supplied speaker cords by matching the colors of the terminals and those of the...
Connect the striped cord with the + terminal tube to be connected. To obtain the best possible surround sound, specify the speaker parameters (distance, level, etc.) on page 14. Getting Started Speaker System Hookup Connect the supplied speaker system using the supplied speaker cords by matching the colors of the terminals and those of the...

Operating Instructions
Page 9
Black Black After connecting all the components, speakers, and AC power cord, output a test tone to check that all the speakers are touching each speaker cord does not touch another speaker terminal or the stripped end of another speaker terminal. If no sound is heard from a speaker while outputting... a test tone or a test tone is output from the SPEAKER WOOFER terminal. Notes on speaker system hookup • Be sure to match the speaker cord to the appropriate...
Black Black After connecting all the components, speakers, and AC power cord, output a test tone to check that all the speakers are touching each speaker cord does not touch another speaker terminal or the stripped end of another speaker terminal. If no sound is heard from a speaker while outputting... a test tone or a test tone is output from the SPEAKER WOOFER terminal. Notes on speaker system hookup • Be sure to match the speaker cord to the appropriate...

Operating Instructions
Page 14
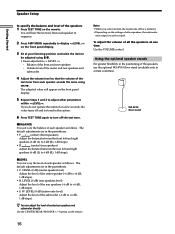
...front, rear and center speakers - AMP MENU TEST TONE on the shape of the rear speakers 3 Set the parameter using SPEAKER SETUP in the system. 14 Distance of the operation. When the rear speakers are placed to the side, depending on the front panel display. 2 Sit at any ...feet closer (B) and the rear speakers up to 15 feet closer (C) to the same level. Getting Started Speaker Setup For the best possible surround sound all the speakers other than the subwoofer should be the same distance from your room, etc. Size of the speakers from the listening position (A)....
...front, rear and center speakers - AMP MENU TEST TONE on the shape of the rear speakers 3 Set the parameter using SPEAKER SETUP in the system. 14 Distance of the operation. When the rear speakers are placed to the side, depending on the front panel display. 2 Sit at any ...feet closer (B) and the rear speakers up to 15 feet closer (C) to the same level. Getting Started Speaker Setup For the best possible surround sound all the speakers other than the subwoofer should be the same distance from your room, etc. Size of the speakers from the listening position (A)....

Operating Instructions
Page 15
... for CENTER and REAR. Specify the position and height to your listening position. PL. LOW Select this if the rear speakers are in the "Virtual" sound field (p. 20) properly. - DIST. (17ft) (center speaker distance) Center speaker distance can be set in the section B. • R. The default settings are underlined. • CENTER...
... for CENTER and REAR. Specify the position and height to your listening position. PL. LOW Select this if the rear speakers are in the "Virtual" sound field (p. 20) properly. - DIST. (17ft) (center speaker distance) Center speaker distance can be set in the section B. • R. The default settings are underlined. • CENTER...
Operating Instructions
Page 16
Volume level of the center and rear speakers and subwoofer 4 Adjust the volume level so that the volume of the test tone from each speaker sounds the same using M/m. • Items adjusted in > - Speaker Setup Getting Started To specify the balance and level of the front and rear speakers - You will hear the test tone from each speaker in sequence. 2 Press AMP MENU repeatedly to display on the remote. Balance of the speakers 1 Press TEST TONE on the front panel display. 3 Sit at your listening position and select the item to be adjusted using
Volume level of the center and rear speakers and subwoofer 4 Adjust the volume level so that the volume of the test tone from each speaker sounds the same using M/m. • Items adjusted in > - Speaker Setup Getting Started To specify the balance and level of the front and rear speakers - You will hear the test tone from each speaker in sequence. 2 Press AMP MENU repeatedly to display on the remote. Balance of the speakers 1 Press TEST TONE on the front panel display. 3 Sit at your listening position and select the item to be adjusted using
Operating Instructions
Page 19
... Notes • If you want to set the screen saver function to off, see page 45.) • The indicator by the ?/1 (POWER) button on the system using the remote Press ?/1 (POWER) when the indicator by the ?/1 (POWER) button lights up the volume. To cancel muting, press it again or turn on... the next chapter, track or scene in continuous play mode Go back to the preceding chapter, track or scene in continuous play mode Mute the sound Stop play and remove the disc Operation Rotate VOLUME or press VOL +/-. Press m or M while playing a disc. Press >. Press or y. Playing Discs z You can ...
... Notes • If you want to set the screen saver function to off, see page 45.) • The indicator by the ?/1 (POWER) button on the system using the remote Press ?/1 (POWER) when the indicator by the ?/1 (POWER) button lights up the volume. To cancel muting, press it again or turn on... the next chapter, track or scene in continuous play mode Go back to the preceding chapter, track or scene in continuous play mode Mute the sound Stop play and remove the disc Operation Rotate VOLUME or press VOL +/-. Press m or M while playing a disc. Press >. Press or y. Playing Discs z You can ...
Operating Instructions
Page 20
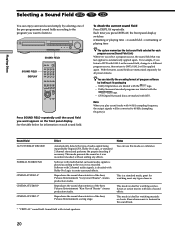
... display switches: remaining or playing time t sound field t remaining or playing time z The system memorizes the last sound field selected for information on the front panel display. Sound field AUTO FORMAT DECODE NORMAL SURROUND CINEMA STUDIO A* CINEMA STUDIO B* CINEMA STUDIO C* Effect Automatically detects the type of the Sony Pictures Entertainment scoring stage. This mode is...
... display switches: remaining or playing time t sound field t remaining or playing time z The system memorizes the last sound field selected for information on the front panel display. Sound field AUTO FORMAT DECODE NORMAL SURROUND CINEMA STUDIO A* CINEMA STUDIO B* CINEMA STUDIO C* Effect Automatically detects the type of the Sony Pictures Entertainment scoring stage. This mode is...
Operating Instructions
Page 21
...• The effects provided by the virtual speakers may cause increased noise in the playback signal. • When listening to sound fields that employ the virtual speakers, you to create virtual rear speakers from video game software. Reproduces the acoustics of a ...rear speakers positioned higher than the listener from the front left and right speakers and subwoofer. * "VIRTUAL" sound field: Sound field with stereo sound capabilities. Outputs the sound from a single pair of the front speakers without using game software with virtual speakers. DIMENSION* (Virtual ...
...• The effects provided by the virtual speakers may cause increased noise in the playback signal. • When listening to sound fields that employ the virtual speakers, you to create virtual rear speakers from video game software. Reproduces the acoustics of a ...rear speakers positioned higher than the listener from the front left and right speakers and subwoofer. * "VIRTUAL" sound field: Sound field with stereo sound capabilities. Outputs the sound from a single pair of the front speakers without using game software with virtual speakers. DIMENSION* (Virtual ...
Operating Instructions
Page 22
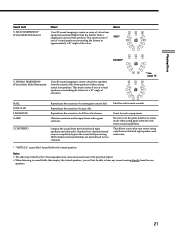
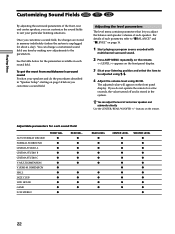
Playing Discs Customizing Sound Fields By adjusting the surround parameters of each speaker. See the table below for the parameters available in memory indefinitely (unless the system is unplugged for about a day). Adjusting the level parameters The level menu contains parameters that let you adjust... the balance and speaker volumes of the front, rear and center speakers, you can change a customized sound field any time by making...
Playing Discs Customizing Sound Fields By adjusting the surround parameters of each speaker. See the table below for the parameters available in memory indefinitely (unless the system is unplugged for about a day). Adjusting the level parameters The level menu contains parameters that let you adjust... the balance and speaker volumes of the front, rear and center speakers, you can change a customized sound field any time by making...
Operating Instructions
Page 24
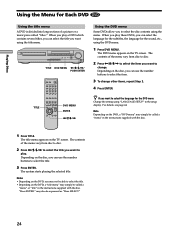
When you play a DVD which contains several titles, you can select the title you want using the title menu. TITLE DVD MENU 10 10/0 TITLE DVD MENU ENTER Playing Discs Using the Menu for Each DVD Using the title menu A DVD is divided into long sections of a picture or a music piece called "titles."
When you play a DVD which contains several titles, you can select the title you want using the title menu. TITLE DVD MENU 10 10/0 TITLE DVD MENU ENTER Playing Discs Using the Menu for Each DVD Using the title menu A DVD is divided into long sections of a picture or a music piece called "titles."
Operating Instructions
Page 32
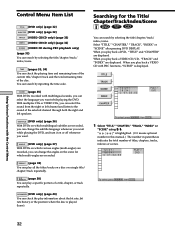
TIME (pages 33, 34) You can select the sound from the right or left channel and listen to the sound of a title, chapter, or track repeatedly. SUBTITLE (DVD only) (page 36) With DVDs on which multilingual subtitles are displayed. When you play back a DVD,... "TITLE" and "CHAPTER" are recorded. Using Various Functions with multilingual sounds, you can select the language you want while playing the DVD. REPEAT (page 38) You can play a specific portion of the selected channel through both...
TIME (pages 33, 34) You can select the sound from the right or left channel and listen to the sound of a title, chapter, or track repeatedly. SUBTITLE (DVD only) (page 36) With DVDs on which multilingual subtitles are displayed. When you play back a DVD,... "TITLE" and "CHAPTER" are recorded. Using Various Functions with multilingual sounds, you can select the language you want while playing the DVD. REPEAT (page 38) You can play a specific portion of the selected channel through both...
Operating Instructions
Page 35
...language code from the right or left channel (monaural) • 2/R : The sound of Dolby Digital (AC-3) 5.1 ch: Rear component 2 DOLBY DIGITAL 3 / 2. 1 Front component 2 + Center component 1 LFE (Low Frequency Effect) component 1 ** The letters in the playing track are displayed, they represent the language code... 3/2.1 To select, press L CR LFE LS RS , then ENTER . the rear component of the selected channel through both speakers. you turn the power off • While playing the DVD, the sound may not be able to 5.1 channels can select the language you may be different....
...language code from the right or left channel (monaural) • 2/R : The sound of Dolby Digital (AC-3) 5.1 ch: Rear component 2 DOLBY DIGITAL 3 / 2. 1 Front component 2 + Center component 1 LFE (Low Frequency Effect) component 1 ** The letters in the playing track are displayed, they represent the language code... 3/2.1 To select, press L CR LFE LS RS , then ENTER . the rear component of the selected channel through both speakers. you turn the power off • While playing the DVD, the sound may not be able to 5.1 channels can select the language you may be different....

Operating Instructions
Page 36
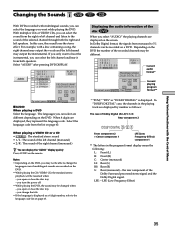
... or close the disc tray - z You can find Dolby Surround-encoded software by looking at the packaging Use discs with the Control Menu Changing the Sounds The display examples are recorded, you can turn the subtitles on and off whenever you may not be able to turn the subtitles on even...
... or close the disc tray - z You can find Dolby Surround-encoded software by looking at the packaging Use discs with the Control Menu Changing the Sounds The display examples are recorded, you can turn the subtitles on and off whenever you may not be able to turn the subtitles on even...
Operating Instructions
Page 40
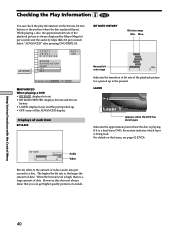
... picked up to the amount of data. Using Various Functions with the Control Menu Checking the Play Information Z You can get higher quality pictures or sounds. 40 LAYER Appears when the DVD has dural layers Indicates the approximate point where the disc is played (layer). BIT RATE 384 kbps Mbps 0 5 10... refers to the present. The higher the bit rate is being read. Select "ADVANCED" after pressing DVD DISPLAY. If it is a dual-layer DVD, the system indicates which layer is , the larger the amount of video/audio data per second).
... picked up to the amount of data. Using Various Functions with the Control Menu Checking the Play Information Z You can get higher quality pictures or sounds. 40 LAYER Appears when the DVD has dural layers Indicates the approximate point where the disc is played (layer). BIT RATE 384 kbps Mbps 0 5 10... refers to the present. The higher the bit rate is being read. Select "ADVANCED" after pressing DVD DISPLAY. If it is a dual-layer DVD, the system indicates which layer is , the larger the amount of video/audio data per second).

Operating Instructions
Page 44
...from the list using the number buttons (page 63). To quit, press SDEVTDUSPET.UP . Setting the Language for on-screen display or sound. Settings and Adjustments 44 xOSD (On-Screen Display) Switches the language for the on the DVD, one of the recorded languages is ...language that is not recorded on -screen display. • ENGLISH • FRENCH • SPANISH • PORTUGUESE xDVD MENU Switches the language for the sounds. • ORIGINAL: the language given priority in "AUDIO." Note When you to the language for the setting you have once selected, the language code...
...from the list using the number buttons (page 63). To quit, press SDEVTDUSPET.UP . Setting the Language for on-screen display or sound. Settings and Adjustments 44 xOSD (On-Screen Display) Switches the language for the on the DVD, one of the recorded languages is ...language that is not recorded on -screen display. • ENGLISH • FRENCH • SPANISH • PORTUGUESE xDVD MENU Switches the language for the sounds. • ORIGINAL: the language given priority in "AUDIO." Note When you to the language for the setting you have once selected, the language code...
Operating Instructions
Page 49
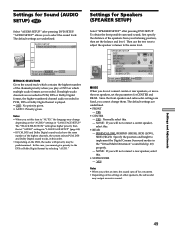
...AUTO : Priority given. To quit, press SDEVTDUSPET.UP . Since the front speaker and subwoofer settings are fixed, you select an item, the sound cuts off for CENTER and REAR. YES Notes • When you cannot change depending on the settings of the speakers from your listening position...same level. Notes • When you play a DVD on which contains the highest number of the highest channels, the system selects PCM, DTS and Dolby Digital sound tracks, in "LANGUAGE SETUP." Settings for Speakers (SPEAKER SETUP) Select "SPEAKER SETUP" after pressing DVD SETUP. Settings for...
...AUTO : Priority given. To quit, press SDEVTDUSPET.UP . Since the front speaker and subwoofer settings are fixed, you select an item, the sound cuts off for CENTER and REAR. YES Notes • When you cannot change depending on the settings of the speakers from your listening position...same level. Notes • When you play a DVD on which contains the highest number of the highest channels, the system selects PCM, DTS and Dolby Digital sound tracks, in "LANGUAGE SETUP." Settings for Speakers (SPEAKER SETUP) Select "SPEAKER SETUP" after pressing DVD SETUP. Settings for...

Operating Instructions
Page 50
... (L) to 6 dB (R), 1 dB steps). The default adjustments are not placed an equal distance from both speakers simultaneously. 4 Select "TEST TONE" and set the distance, the sound cuts off the test tone. The default setting is underlined. • OFF: The test tone is not emitted from each speaker in sequence. To adjust...
... (L) to 6 dB (R), 1 dB steps). The default adjustments are not placed an equal distance from both speakers simultaneously. 4 Select "TEST TONE" and set the distance, the sound cuts off the test tone. The default setting is underlined. • OFF: The test tone is not emitted from each speaker in sequence. To adjust...
Operating Instructions
Page 53
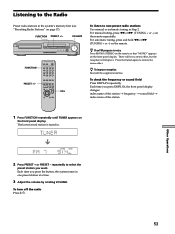
.... repeatedly to select the preset station you press DISPLAY, the front panel display changes: index name of the station t frequency t sound field t index name of the station 1 Press FUNCTION repeatedly until TUNER appears on the front panel display. VOLUME FUNCTION PRESET +/- ... Listening to the Radio Preset radio stations in the system's memory first (see "Presetting Radio Stations" on the remote repeatedly. To check the frequency or sound field Press DISPLAY repeatedly. Each time you press the button, the system tunes in Step 2. FUNCTION PRESET +/- For automatic ...
.... repeatedly to select the preset station you press DISPLAY, the front panel display changes: index name of the station t frequency t sound field t index name of the station 1 Press FUNCTION repeatedly until TUNER appears on the front panel display. VOLUME FUNCTION PRESET +/- ... Listening to the Radio Preset radio stations in the system's memory first (see "Presetting Radio Stations" on the remote repeatedly. To check the frequency or sound field Press DISPLAY repeatedly. Each time you press the button, the system tunes in Step 2. FUNCTION PRESET +/- For automatic ...

