
Operating Instructions
Page 2
... the unit. Owner's Record The model and serial numbers are located at the rear of the FCC Rules. Model No. Increase the separation between the equipment and receiver. - The use of the following measures: - And don't place lighted candles on , the user is connected. - Refer to them whenever you call the CATV system installer's attention to the presence of cable entry as...
... the unit. Owner's Record The model and serial numbers are located at the rear of the FCC Rules. Model No. Increase the separation between the equipment and receiver. - The use of the following measures: - And don't place lighted candles on , the user is connected. - Refer to them whenever you call the CATV system installer's attention to the presence of cable entry as...
Operating Instructions
Page 4
... This Manual 6 This System Can Play the Following Discs 6 Guide to the Control Menu Display........9 Getting Started Unpacking 12 Inserting Batteries into the Remote....... 12 Hookup Overview 13 Step 1: Speaker System Hookup........... 14 Step 2: Antenna (Aerial) Hookup ......... 18 Step 3: TV Hookup 19 Step 4: Other Component Hookup........ 23 Step 5: Connecting the AC Power Cord (Mains Lead 25 Step 6: Turning off the Demonstration 25 Step 7: Performing the Quick Setup ..... 26 Speaker Setup 28 Playing Discs Playing Discs 29 Using the DVD's Menu 34 Selecting...
... This Manual 6 This System Can Play the Following Discs 6 Guide to the Control Menu Display........9 Getting Started Unpacking 12 Inserting Batteries into the Remote....... 12 Hookup Overview 13 Step 1: Speaker System Hookup........... 14 Step 2: Antenna (Aerial) Hookup ......... 18 Step 3: TV Hookup 19 Step 4: Other Component Hookup........ 23 Step 5: Connecting the AC Power Cord (Mains Lead 25 Step 6: Turning off the Demonstration 25 Step 7: Performing the Quick Setup ..... 26 Speaker Setup 28 Playing Discs Playing Discs 29 Using the DVD's Menu 34 Selecting...
Operating Instructions
Page 5
Settings and Adjustments Using the Setup Display 71 Setting the Display or Sound Track Language 72 [LANGUAGE SETUP] Settings for the Display 73 [SCREEN SETUP] Custom Settings 75 [CUSTOM SETUP] Settings for the Speakers 76 [SPEAKER SETUP] Additional Information Precautions 79 Notes about the Discs 80 Troubleshooting 80 Self-diagnosis Function 83 (When letters/numbers appear in the display) Specifications 84 Glossary 86 Language Code List 89 Index to Parts and Controls 90 DVD Setup Display List 94 AMP Menu List 96 Index 97 5GB
Settings and Adjustments Using the Setup Display 71 Setting the Display or Sound Track Language 72 [LANGUAGE SETUP] Settings for the Display 73 [SCREEN SETUP] Custom Settings 75 [CUSTOM SETUP] Settings for the Speakers 76 [SPEAKER SETUP] Additional Information Precautions 79 Notes about the Discs 80 Troubleshooting 80 Self-diagnosis Function 83 (When letters/numbers appear in the display) Specifications 84 Glossary 86 Language Code List 89 Index to Parts and Controls 90 DVD Setup Display List 94 AMP Menu List 96 Index 97 5GB

Operating Instructions
Page 10
Control Menu items Selected item Currently playing title number*1 Currently playing chapter number*2 Total number of titles*1 Total number of chapters*2 Playback status (N Playback, X Pause, x Stop, etc.) 12 (27) 18 (34) T 1:32:55 OFF OFF DISC TITLE CHAPTER DVD VIDEO Type of disc being played*3 Playing time*4 Current setting Options Function name of titles (DVD-RW) to play in the order you want. 10GB To turn off the display Press DISPLAY. List of...
Control Menu items Selected item Currently playing title number*1 Currently playing chapter number*2 Total number of titles*1 Total number of chapters*2 Playback status (N Playback, X Pause, x Stop, etc.) 12 (27) 18 (34) T 1:32:55 OFF OFF DISC TITLE CHAPTER DVD VIDEO Type of disc being played*3 Playing time*4 Current setting Options Function name of titles (DVD-RW) to play in the order you want. 10GB To turn off the display Press DISPLAY. List of...
Operating Instructions
Page 21
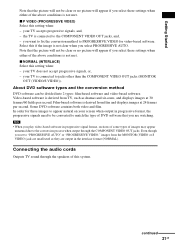
... signals, or, - Connecting the audio cords Outputs TV sound through the COMPONENT VIDEO OUT jacks. Getting Started Note that the picture will not be clear or no picture will appear if you select these settings when either of the above conditions is not met. Note • When you play video-based software in progressive format, the progressive signals need to be converted to jacks other than the COMPONENT VIDEO OUT jacks (MONITOR OUT (VIDEO/S VIDEO...
... signals, or, - Connecting the audio cords Outputs TV sound through the COMPONENT VIDEO OUT jacks. Getting Started Note that the picture will not be clear or no picture will appear if you select these settings when either of the above conditions is not met. Note • When you play video-based software in progressive format, the progressive signals need to be converted to jacks other than the COMPONENT VIDEO OUT jacks (MONITOR OUT (VIDEO/S VIDEO...
Operating Instructions
Page 22
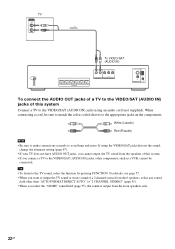
... sound, select the function by pressing FUNCTION. TV AUDIO OUT L R To VIDEO/SAT (AUDIO IN) FRONT R FRONT L SURR R SURR L CENTER WOOFER SPEAKER AUDIO IN Y PB/CB PR/CR R L VIDEO/SAT DVD ONLY COMPONENT VIDEO OUT S VIDEO (DVD ONLY) AM VIDEO MONITOR OUT COAXIAL FM 75 To connect the AUDIO OUT jacks of a TV to the VIDEO/SAT (AUDIO IN) jacks of this system. • If you connect a TV to the VIDEO/SAT (AUDIO IN) jacks, other than "AUTO FORMAT DIRECT AUTO" or "2 CHANNEL STEREO...
... sound, select the function by pressing FUNCTION. TV AUDIO OUT L R To VIDEO/SAT (AUDIO IN) FRONT R FRONT L SURR R SURR L CENTER WOOFER SPEAKER AUDIO IN Y PB/CB PR/CR R L VIDEO/SAT DVD ONLY COMPONENT VIDEO OUT S VIDEO (DVD ONLY) AM VIDEO MONITOR OUT COAXIAL FM 75 To connect the AUDIO OUT jacks of a TV to the VIDEO/SAT (AUDIO IN) jacks of this system. • If you connect a TV to the VIDEO/SAT (AUDIO IN) jacks, other than "AUTO FORMAT DIRECT AUTO" or "2 CHANNEL STEREO...
Operating Instructions
Page 23
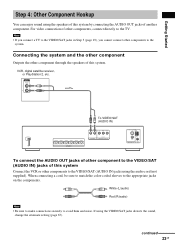
... L CENTER WOOFER SPEAKER AUDIO IN Y PB/CB PR/CR R L VIDEO/SAT DVD ONLY COMPONENT VIDEO OUT S VIDEO (DVD ONLY) AM VIDEO MONITOR OUT COAXIAL FM 75 To connect the AUDIO OUT jacks of other component to the VIDEO/SAT (AUDIO IN) jacks of this system Connect the VCR or other components, connect directly to avoid hum and noise. If using the VIDEO/SAT jacks distorts the sound, change the attenuate setting (page 67). Getting Started Step 4: Other Component Hookup You...
... L CENTER WOOFER SPEAKER AUDIO IN Y PB/CB PR/CR R L VIDEO/SAT DVD ONLY COMPONENT VIDEO OUT S VIDEO (DVD ONLY) AM VIDEO MONITOR OUT COAXIAL FM 75 To connect the AUDIO OUT jacks of other component to the VIDEO/SAT (AUDIO IN) jacks of this system Connect the VCR or other components, connect directly to avoid hum and noise. If using the VIDEO/SAT jacks distorts the sound, change the attenuate setting (page 67). Getting Started Step 4: Other Component Hookup You...

Operating Instructions
Page 27
... Control Menu appears. 2 Press X/x to select then press ENTER. [SETUP], The options for [SETUP] appear. 1 2 ( 2 7 ) 1 8 ( 3 4 ) : : DVD VIDEO QUICK QUICK CUSTOM RESET BNR 3 Press X/x to change each setting, see "Using the Setup Display" (page 71). To quit the Quick Setup Press DISPLAY in stop mode. You can set from the listening position. Quick Setup is in any Step. To recall the Quick Setup display 1 Press DISPLAY when the system is finished. The Quick Setup display appears. 27GB SPEAKER SETUP SIZE: DISTANCE: LEVEL(FRONT): LEVEL(SURROUND): TEST TONE...
... Control Menu appears. 2 Press X/x to select then press ENTER. [SETUP], The options for [SETUP] appear. 1 2 ( 2 7 ) 1 8 ( 3 4 ) : : DVD VIDEO QUICK QUICK CUSTOM RESET BNR 3 Press X/x to change each setting, see "Using the Setup Display" (page 71). To quit the Quick Setup Press DISPLAY in stop mode. You can set from the listening position. Quick Setup is in any Step. To recall the Quick Setup display 1 Press DISPLAY when the system is finished. The Quick Setup display appears. 27GB SPEAKER SETUP SIZE: DISTANCE: LEVEL(FRONT): LEVEL(SURROUND): TEST TONE...

Operating Instructions
Page 47
... using the time code (DVD VIDEO only) 1 In Step 2, select [TIME/TEXT]. [T **:**:**] (playing time of titles, chapters, tracks, indexes, scenes, albums or files. 1 2 ( 2 7 ) 1 8 ( 3 4 ) T 1:32:55 DVD VIDEO Selected row 3 Press ENTER. [** (**)] changes to [- - (**)]. 1 2 ( 2 7 ) ( 3 4 ) T 1:32:55 DVD VIDEO 4 Press X/x or the number buttons to a number). The system starts playback from the selected number. To search for . Tip • When the Control Menu display is selected. 2 Press ENTER. [T **:**:**] changes to [T --:--:--]. 3 Input the time code using the time code...
... using the time code (DVD VIDEO only) 1 In Step 2, select [TIME/TEXT]. [T **:**:**] (playing time of titles, chapters, tracks, indexes, scenes, albums or files. 1 2 ( 2 7 ) 1 8 ( 3 4 ) T 1:32:55 DVD VIDEO Selected row 3 Press ENTER. [** (**)] changes to [- - (**)]. 1 2 ( 2 7 ) ( 3 4 ) T 1:32:55 DVD VIDEO 4 Press X/x or the number buttons to a number). The system starts playback from the selected number. To search for . Tip • When the Control Menu display is selected. 2 Press ENTER. [T **:**:**] changes to [T --:--:--]. 3 Input the time code using the time code...

Operating Instructions
Page 62
... new password. To turn off the Parental Control function Set [LEVEL] to select [LEVEL], then press ENTER. After you enter a new 4-digit password, replace the disc in the table on the disc, you select [OTHERS t], select and enter a standard code in the system and press H. When the display for which do not have the Parental Control function, playback cannot be asked to 3 of "Preventing playback of specific discs [CUSTOM PARENTAL CONTROL]." In...
... new password. To turn off the Parental Control function Set [LEVEL] to select [LEVEL], then press ENTER. After you enter a new 4-digit password, replace the disc in the table on the disc, you select [OTHERS t], select and enter a standard code in the system and press H. When the display for which do not have the Parental Control function, playback cannot be asked to 3 of "Preventing playback of specific discs [CUSTOM PARENTAL CONTROL]." In...

Operating Instructions
Page 65
... work, change the transmit time Press and hold TV/VIDEO while entering the code for the THEATRE SYNC function Point the remote to this system, then press THEATRE SYNC once. Operating for the TV's input source connected to the direction of your TV. Press and hold TV CH + while entering the code for North American models. Other Operations Using the THEATRE SYNC Function THEATRE SYNC allows you to turn on the TV. The TV's input source is selected...
... work, change the transmit time Press and hold TV/VIDEO while entering the code for the THEATRE SYNC function Point the remote to this system, then press THEATRE SYNC once. Operating for the TV's input source connected to the direction of your TV. Press and hold TV CH + while entering the code for North American models. Other Operations Using the THEATRE SYNC Function THEATRE SYNC allows you to turn on the TV. The TV's input source is selected...

Operating Instructions
Page 66
... front panel display. When "ATTENUATE" is set to "ATT ON." DVD t TUNER FM t TUNER AM t VIDEO t DVD t ... Press FUNCTION repeatedly until "VIDEO" or "SAT" appears in the following sequence. When "ATTENUATE" is set to "ATT OFF." For details on the rear panel. Note • This function is only for further information on the operation. Each time you press FUNCTION, the mode of Other Components AMP MENU FUNCTION X/x/c ENTER Selecting the connected component You can use...
... front panel display. When "ATTENUATE" is set to "ATT ON." DVD t TUNER FM t TUNER AM t VIDEO t DVD t ... Press FUNCTION repeatedly until "VIDEO" or "SAT" appears in the following sequence. When "ATTENUATE" is set to "ATT OFF." For details on the rear panel. Note • This function is only for further information on the operation. Each time you press FUNCTION, the mode of Other Components AMP MENU FUNCTION X/x/c ENTER Selecting the connected component You can use...

Operating Instructions
Page 67
... front panel display. continued 67GB "TUNED" and "ST" (for stereo program) appear in the front panel display. 3 Press TUNER MENU. 4 Press C/X/x/c repeatedly until the auto scanning starts. The output level is changed. until "MEMORY" appears in the front panel display. 5 Press ENTER. The function name in the front panel display changes to the VIDEO function, select "ATT OFF" at Step 4. Enjoying the Radio TUNER MENU TUNER/ BAND CLEAR C/X/x/c ENTER TUNING -/+ FUNCTION VOLUME +/- Other Operations Using a digital satellite receiver or other components with a high audio output level...
... front panel display. continued 67GB "TUNED" and "ST" (for stereo program) appear in the front panel display. 3 Press TUNER MENU. 4 Press C/X/x/c repeatedly until the auto scanning starts. The output level is changed. until "MEMORY" appears in the front panel display. 5 Press ENTER. The function name in the front panel display changes to the VIDEO function, select "ATT OFF" at Step 4. Enjoying the Radio TUNER MENU TUNER/ BAND CLEAR C/X/x/c ENTER TUNING -/+ FUNCTION VOLUME +/- Other Operations Using a digital satellite receiver or other components with a high audio output level...

Operating Instructions
Page 73
... the disc itself. • On Asian and Australian models, you play back a CD or DATA CD (MP3 audio) for the Display [SCREEN SETUP] Choose settings according to the TV to turn off the portions that do not fit. [16:9] Select this unit according to the connected TV. Displays a wide picture with a wide mode function. [4:3 LETTER BOX] [4:3 PAN SCAN] [16:9] Settings and Adjustments Note • Depending on the DVD, [4:3 LETTER BOX...
... the disc itself. • On Asian and Australian models, you play back a CD or DATA CD (MP3 audio) for the Display [SCREEN SETUP] Choose settings according to the TV to turn off the portions that do not fit. [16:9] Select this unit according to the connected TV. Displays a wide picture with a wide mode function. [4:3 LETTER BOX] [4:3 PAN SCAN] [16:9] Settings and Adjustments Note • Depending on the DVD, [4:3 LETTER BOX...

Operating Instructions
Page 75
... jitter. x [TRACK SELECTION] (DVD VIDEO only) Gives the sound track which multiple audio formats (PCM, DTS, MPEG audio, or Dolby Digital format) are underlined. For more information, go to Dolby Digital sources. Select [CUSTOM SETUP] in the system. Note • When you play a DVD VIDEO on or off. To use the display, see "Using the Setup Display" (page 71). x [DivX] (Asian, Australian, and Saudi Arabian models only) Displays the registration code for up playback related and other settings.
... jitter. x [TRACK SELECTION] (DVD VIDEO only) Gives the sound track which multiple audio formats (PCM, DTS, MPEG audio, or Dolby Digital format) are underlined. For more information, go to Dolby Digital sources. Select [CUSTOM SETUP] in the system. Note • When you play a DVD VIDEO on or off. To use the display, see "Using the Setup Display" (page 71). x [DivX] (Asian, Australian, and Saudi Arabian models only) Displays the registration code for up playback related and other settings.

Operating Instructions
Page 76
Then use the test tone to adjust the level and the balance of the speakers to the default setting. Select [SPEAKER SETUP] in relation to the listening position is fixed, you select an item, the sound cuts off for a moment. • Depending on the settings of other speakers, subwoofer may be excessive. For details, see "Using the Setup Display" (page 71). x [DISTANCE] The default distance setting for the speakers in the Setup Display. The default settings are located...
Then use the test tone to adjust the level and the balance of the speakers to the default setting. Select [SPEAKER SETUP] in relation to the listening position is fixed, you select an item, the sound cuts off for a moment. • Depending on the settings of other speakers, subwoofer may be excessive. For details, see "Using the Setup Display" (page 71). x [DISTANCE] The default distance setting for the speakers in the Setup Display. The default settings are located...

Operating Instructions
Page 79
... not operate properly. On cleaning • Clean the cabinet, panel, and controls with a soft cloth slightly moistened with a high power amplifier. Additional Information Additional Information Precautions On power sources • AC power cord (mains lead) must be changed only at once then turn it is connected to the wall outlet, even if the system itself has been turned off the TV at the qualified service...
... not operate properly. On cleaning • Clean the cabinet, panel, and controls with a soft cloth slightly moistened with a high power amplifier. Additional Information Additional Information Precautions On power sources • AC power cord (mains lead) must be changed only at once then turn it is connected to the wall outlet, even if the system itself has been turned off the TV at the qualified service...

Operating Instructions
Page 80
..., return the setting to help remedy the problem before requesting repairs. Do not use this troubleshooting guide to interlace format (the default setting) (page 20). • Even if your nearest Sony dealer. In this case, return the setting to some DVD programs 80GB Power The power is not turned on the TV is connected securely. If "PROTECT" and "UNPLUG" appears alternately in progressive format. Notes about the Discs On handling discs •...
..., return the setting to help remedy the problem before requesting repairs. Do not use this troubleshooting guide to interlace format (the default setting) (page 20). • Even if your nearest Sony dealer. In this case, return the setting to some DVD programs 80GB Power The power is not turned on the TV is connected securely. If "PROTECT" and "UNPLUG" appears alternately in progressive format. Notes about the Discs On handling discs •...
Operating Instructions
Page 81
... region code on the source, the effect of [SCREEN SETUP], the picture does not fill the screen. • The aspect ratio on the disc is no sound from the center speaker. • Check the speaker connections and settings. • Make sure the sound field function is on (page 55). • Depending on the disc, the sound may be less noticeable. Severe hum or noise is recorded in the remote are playing a Dolby Digital...
... region code on the source, the effect of [SCREEN SETUP], the picture does not fill the screen. • The aspect ratio on the disc is no sound from the center speaker. • Check the speaker connections and settings. • Make sure the sound field function is on (page 55). • Depending on the disc, the sound may be less noticeable. Severe hum or noise is recorded in the remote are playing a Dolby Digital...
Operating Instructions
Page 97
... function 59, 87 MULTI-DISC RESUME 75 Multilingual function 87 Muting 30 N Naming preset stations 68 O On-screen display Control Menu display 9 Setup Display 71 ORIGINAL 35 OSD 72 Other Component Hookup 23 P PARENTAL CONTROL 61, 87 PAUSE MODE 75 PBC Playback 7, 35, 87 PICTURE NAVI 39, 48 PLAY LIST 35 Preset Station 67 Program Play 31 PROGRESSIVE AUTO 20 Progressive format 20, 87 PROGRESSIVE VIDEO 21 Q Quick Setup 26 R Radio 68 Rear Panel 92 Region Code 7, 87 Remote 12, 64, 93 Repeat Play 33 RESET...
... function 59, 87 MULTI-DISC RESUME 75 Multilingual function 87 Muting 30 N Naming preset stations 68 O On-screen display Control Menu display 9 Setup Display 71 ORIGINAL 35 OSD 72 Other Component Hookup 23 P PARENTAL CONTROL 61, 87 PAUSE MODE 75 PBC Playback 7, 35, 87 PICTURE NAVI 39, 48 PLAY LIST 35 Preset Station 67 Program Play 31 PROGRESSIVE AUTO 20 Progressive format 20, 87 PROGRESSIVE VIDEO 21 Q Quick Setup 26 R Radio 68 Rear Panel 92 Region Code 7, 87 Remote 12, 64, 93 Repeat Play 33 RESET...


