
Operating Instructions
Page 4
...is capable of time, the cabinet becomes hot to 30 minutes. Though the LED remains lit for a while, the system is not a malfunction. On your TV's color If the speakers cause the TV screen to have color irregularity, turn off by the POWER switch on after 15 to the touch. ... cleaning discs Do not use any further. It may be damaged. 4GB • For power saving purposes, the system can overheat and malfunction. • Do not place the system on your nearest Sony dealer. The use of time you don't, the disc may condense on your television screen. On operation • ...
...is capable of time, the cabinet becomes hot to 30 minutes. Though the LED remains lit for a while, the system is not a malfunction. On your TV's color If the speakers cause the TV screen to have color irregularity, turn off by the POWER switch on after 15 to the touch. ... cleaning discs Do not use any further. It may be damaged. 4GB • For power saving purposes, the system can overheat and malfunction. • Do not place the system on your nearest Sony dealer. The use of time you don't, the disc may condense on your television screen. On operation • ...
Operating Instructions
Page 5
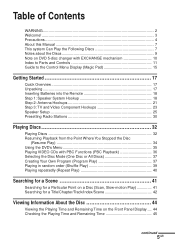
... (Magic Pad 15 Getting Started 17 Quick Overview 17 Unpacking ...17 Inserting Batteries into the Remote 18 Step 1: Speaker System Hookup 18 Step 2: Antenna Hookups 21 Step 3: TV and Video Component Hookups 23 Speaker Setup 25 Presetting Radio Stations 30 Playing Discs 32 Playing Discs 32 Resuming Playback from the Point Where You...
... (Magic Pad 15 Getting Started 17 Quick Overview 17 Unpacking ...17 Inserting Batteries into the Remote 18 Step 1: Speaker System Hookup 18 Step 2: Antenna Hookups 21 Step 3: TV and Video Component Hookups 23 Speaker Setup 25 Presetting Radio Stations 30 Playing Discs 32 Playing Discs 32 Resuming Playback from the Point Where You...
Operating Instructions
Page 6
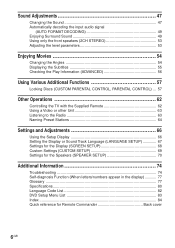
... the Sound 47 Automatically decoding the input audio signal (AUTO FORMAT DECODING 49 Enjoying Surround Sound 49 Using only the front speakers (2CH STEREO 53 Adjusting the level parameters 53 Enjoying Movies 54 Changing the Angles 54 Displaying the Subtitles 55 Checking the ...Sound Track Language (LANGUAGE SETUP 67 Settings for the Display (SCREEN SETUP 68 Custom Settings (CUSTOM SETUP 69 Settings for the Speakers (SPEAKER SETUP 70 Additional Information 74 Troubleshooting 74 Self-diagnosis Function (When letters/numbers appear in the display 77 Glossary ...77 Specifications 80...
... the Sound 47 Automatically decoding the input audio signal (AUTO FORMAT DECODING 49 Enjoying Surround Sound 49 Using only the front speakers (2CH STEREO 53 Adjusting the level parameters 53 Enjoying Movies 54 Changing the Angles 54 Displaying the Subtitles 55 Checking the ...Sound Track Language (LANGUAGE SETUP 67 Settings for the Display (SCREEN SETUP 68 Custom Settings (CUSTOM SETUP 69 Settings for the Speakers (SPEAKER SETUP 70 Additional Information 74 Troubleshooting 74 Self-diagnosis Function (When letters/numbers appear in the display 77 Glossary ...77 Specifications 80...
Operating Instructions
Page 17
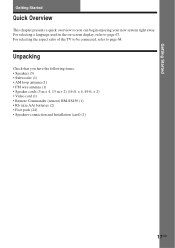
...system right away. For selecting the aspect ratio of the TV to be connected, refer to page 67. For selecting a language used in the on-screen display, refer to page 68. Getting Started Getting Started Quick Overview This chapter presents a quick overview so you have the following items: • Speakers... (5) • Subwoofer (1) • AM loop antenna (1) • FM wire antenna (1) • Speaker cords (5 m × 4, 15 m × 2) (16 ft. × 4, 49 ft....
...system right away. For selecting the aspect ratio of the TV to be connected, refer to page 67. For selecting a language used in the on-screen display, refer to page 68. Getting Started Getting Started Quick Overview This chapter presents a quick overview so you have the following items: • Speakers... (5) • Subwoofer (1) • AM loop antenna (1) • FM wire antenna (1) • Speaker cords (5 m × 4, 15 m × 2) (16 ft. × 4, 49 ft....
Operating Instructions
Page 18
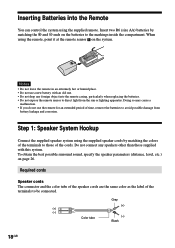
... you do not use a new battery with an old one. • Do not drop any speakers other than those of the terminals to those supplied with this system. Do not connect any foreign object into the Remote You can control the system using the remote, point it at the remote sensor on the... system. Required cords Speaker cords The connector and the color tube of the speaker cords are the same color as the label of time, remove the batteries to avoid possible...
... you do not use a new battery with an old one. • Do not drop any speakers other than those of the terminals to those supplied with this system. Do not connect any foreign object into the Remote You can control the system using the remote, point it at the remote sensor on the... system. Required cords Speaker cords The connector and the color tube of the speaker cords are the same color as the label of time, remove the batteries to avoid possible...

Operating Instructions
Page 19
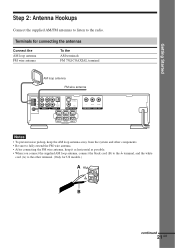
Getting Started Terminals for connecting the speakers Connect the Front speakers Rear speakers Center speaker Subwoofer To the SPEAKER FRONT L (white) and R (red) terminals SPEAKER REAR L (blue) and R (gray) terminals SPEAKER CENTER (green) terminal SPEAKER WOOFER (purple) terminal Front speaker (R) Center speaker Front speaker (L) Color label AM COAXIAL FM 75Ω OUT IN L R AUDIO 1 IN L S VIDEO (DVD ONLY) R OPTICAL DIGITAL IN AUDIO...
Getting Started Terminals for connecting the speakers Connect the Front speakers Rear speakers Center speaker Subwoofer To the SPEAKER FRONT L (white) and R (red) terminals SPEAKER REAR L (blue) and R (gray) terminals SPEAKER CENTER (green) terminal SPEAKER WOOFER (purple) terminal Front speaker (R) Center speaker Front speaker (L) Color label AM COAXIAL FM 75Ω OUT IN L R AUDIO 1 IN L S VIDEO (DVD ONLY) R OPTICAL DIGITAL IN AUDIO...
Operating Instructions
Page 20
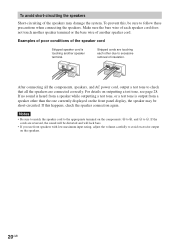
... a test tone, or a test tone is touching another speaker terminal. To prevent this happens, check the speaker connection again. After connecting all the speakers are touching each speaker cord does not touch another speaker cord. For details on the front panel display, the speaker may damage the system. If the cords are reversed, the sound will lack...
... a test tone, or a test tone is touching another speaker terminal. To prevent this happens, check the speaker connection again. After connecting all the speakers are touching each speaker cord does not touch another speaker cord. For details on the front panel display, the speaker may damage the system. If the cords are reversed, the sound will lack...
Operating Instructions
Page 21
... IN AUDIO 2 FRONT R VIDEO MONITOR OUT CENTER FRONT L Y PB/CB PR/CR COMPONENT VIDEO OUT REAR R WOOFER REAR L SPEAKER Notes • To prevent noise pickup, keep the AM loop antenna away from the system and other components. • Be sure to fully extend the FM wire antenna. • After connecting the FM...
... IN AUDIO 2 FRONT R VIDEO MONITOR OUT CENTER FRONT L Y PB/CB PR/CR COMPONENT VIDEO OUT REAR R WOOFER REAR L SPEAKER Notes • To prevent noise pickup, keep the AM loop antenna away from the system and other components. • Be sure to fully extend the FM wire antenna. • After connecting the FM...
Operating Instructions
Page 23
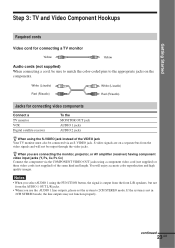
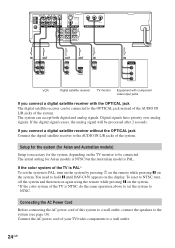
...be sure to match the color-coded pins to 2CH STEREO mode. Notes • When you use the AUDIO 1 line outputs, please set the system to the appropriate jacks on the components. White (L/audio) Red (R/audio) White (L/audio) Red (R/audio) Jacks for connecting a TV monitor Yellow ...(receiver) having component video input jacks (Y, PB, CB, PR, CR) Connect the component via an S-VIDEO jack. If the system is output from the front L/R speakers, but not from the video signals and will enjoy accurate color reproduction and high quality images. Getting Started Step 3: TV and Video...
...be sure to match the color-coded pins to 2CH STEREO mode. Notes • When you use the AUDIO 1 line outputs, please set the system to the appropriate jacks on the components. White (L/audio) Red (R/audio) White (L/audio) Red (R/audio) Jacks for connecting a TV monitor Yellow ...(receiver) having component video input jacks (Y, PB, CB, PR, CR) Connect the component via an S-VIDEO jack. If the system is output from the front L/R speakers, but not from the video signals and will enjoy accurate color reproduction and high quality images. Getting Started Step 3: TV and Video...
Operating Instructions
Page 24
... cord of your TV/video components to hold X until DAV-C450 appears on the system. To reset to NTSC, turn off the system and then turn on the system by pressing 1 on the remote while pressing X on the display. The system can be processed after 2 seconds. Connecting the AC Power Cord... Before connecting the AC power cord of this system to a wall outlet, connect the speakers to the OPTICAL jack instead of the AUDIO IN L/R jacks of the system. OUT IN L AM COAXIAL FM 75Ω R AUDIO 1 IN L S VIDEO (DVD ONLY) R ...
... cord of your TV/video components to hold X until DAV-C450 appears on the system. To reset to NTSC, turn off the system and then turn on the system by pressing 1 on the remote while pressing X on the display. The system can be processed after 2 seconds. Connecting the AC Power Cord... Before connecting the AC power cord of this system to a wall outlet, connect the speakers to the OPTICAL jack instead of the AUDIO IN L/R jacks of the system. OUT IN L AM COAXIAL FM 75Ω R AUDIO 1 IN L S VIDEO (DVD ONLY) R ...
Operating Instructions
Page 25
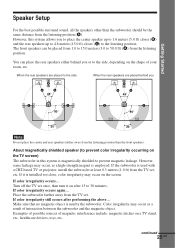
...include: magnetic latches on the TV screen) The subwoofer in this system allows you B A A 45° B A A 45° C C 90° C C 90° 20° 20° Note Do not place the center and rear speakers farther away from the listening position (A). However, some leakage may ... listening position. You can be the same distance from the listening position than the front speakers. If color irregularity occurs... Color irregularity may occur on after performing the above... However, this system is magnetically shielded to 50.0 ft) (A) from the TV set , etc. If the...
...include: magnetic latches on the TV screen) The subwoofer in this system allows you B A A 45° B A A 45° C C 90° C C 90° 20° 20° Note Do not place the center and rear speakers farther away from the listening position (A). However, some leakage may ... listening position. You can be the same distance from the listening position than the front speakers. If color irregularity occurs... Color irregularity may occur on after performing the above... However, this system is magnetically shielded to 50.0 ft) (A) from the TV set , etc. If the...
Operating Instructions
Page 26
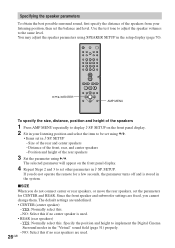
... in the "Virtual" sound field (page 51) properly. -NO: Select this if no center speaker is stored in the system. Use the test tone to adjust the speaker volumes to be set in 9 SP. The selected parameter will appear on the front panel display. 2 Sit in your listening position, then set other parameters...
... in the "Virtual" sound field (page 51) properly. -NO: Select this if no center speaker is stored in the system. Use the test tone to adjust the speaker volumes to be set in 9 SP. The selected parameter will appear on the front panel display. 2 Sit in your listening position, then set other parameters...

Operating Instructions
Page 27
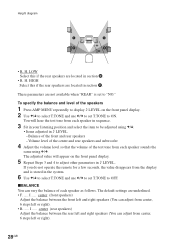
...other models display metric measurements only. BEHIND Select this if the rear speakers are located in section B. • R. D. 5.0 meters (17 ft) (front speakers distance) Front speaker distance can be set in 0.2 meters (1.0 ft) steps from the front speaker distance to 1.6 meters (5.0 ft) closer to your listening position. &#... 27GB Getting Started xDISTANCE You can be set in 0.2 meters (1.0 ft) steps from a distance equal to the front speaker distance to a distance 4.6 meters (15.0 ft) closer to your listening position. Position diagram A B 90 A 45 B 20 • R. The ...
...other models display metric measurements only. BEHIND Select this if the rear speakers are located in section B. • R. D. 5.0 meters (17 ft) (front speakers distance) Front speaker distance can be set in 0.2 meters (1.0 ft) steps from the front speaker distance to 1.6 meters (5.0 ft) closer to your listening position. &#... 27GB Getting Started xDISTANCE You can be set in 0.2 meters (1.0 ft) steps from a distance equal to the front speaker distance to a distance 4.6 meters (15.0 ft) closer to your listening position. Position diagram A B 90 A 45 B 20 • R. The ...
Operating Instructions
Page 28
... Steps 3 and 4 to adjust other parameters in the system. 6 Use X/x to select T.TONE and use C/c to set T.TONE to "NO." center (front speakers) Adjust the balance between the rear left and right speakers (You can adjust from each speaker as follows. LOW Select this if the rear speakers are underlined. • F. ..... xBALANCE You can adjust...
... Steps 3 and 4 to adjust other parameters in the system. 6 Use X/x to select T.TONE and use C/c to set T.TONE to "NO." center (front speakers) Adjust the balance between the rear left and right speakers (You can adjust from each speaker as follows. LOW Select this if the rear speakers are underlined. • F. ..... xBALANCE You can adjust...
Operating Instructions
Page 29
.... Use C/c to display 9 CUSTOMIZE. If you select an item, the sound cuts off for a moment. • Depending on the system. W. xMEMO. LEVEL 0 dB (rear speakers level) Adjust the level of the rear speakers (You can change the brightness of the front panel display by two ways. To adjust the volume of the subwoofer...
.... Use C/c to display 9 CUSTOMIZE. If you select an item, the sound cuts off for a moment. • Depending on the system. W. xMEMO. LEVEL 0 dB (rear speakers level) Adjust the level of the rear speakers (You can change the brightness of the front panel display by two ways. To adjust the volume of the subwoofer...
Operating Instructions
Page 47
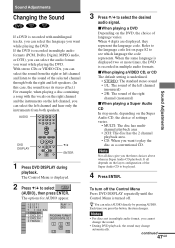
...sound may change automatically. xWhen playing a DVD Depending on the DVD, the choice of the selected channel through both the right and left speakers. (In this case, the sound loses its stereo effect.) For example, when playing a disc containing a song with multilingual tracks, you ...can select the sound from both speakers. The Control Menu is displayed. 2 Press X/x to the sound of language varies. Note Not all depends on the layer configuration of settings ...
...sound may change automatically. xWhen playing a DVD Depending on the DVD, the choice of the selected channel through both the right and left speakers. (In this case, the sound loses its stereo effect.) For example, when playing a disc containing a song with multilingual tracks, you ...can select the sound from both speakers. The Control Menu is displayed. 2 Press X/x to the sound of language varies. Note Not all depends on the layer configuration of settings ...
Operating Instructions
Page 50
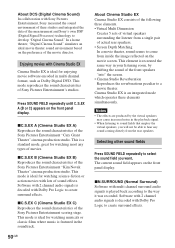
... image reflected on the preference of actual rear speakers. • Screen Depth Matching In a movie theater, sound seems to the way it was recorded. xC.S.EX A (Cinema Studio EX A) Reproduces the sound characteristics of Sony Pictures Entertainment's studios. Notes • The ...effects are produced by shifting the sound of the front speakers "into" the screen. • Cinema Studio Reverberation Reproduces the reverberations peculiar to create...
... image reflected on the preference of actual rear speakers. • Screen Depth Matching In a movie theater, sound seems to the way it was recorded. xC.S.EX A (Cinema Studio EX A) Reproduces the sound characteristics of Sony Pictures Entertainment's studios. Notes • The ...effects are produced by shifting the sound of the front speakers "into" the screen. • Cinema Studio Reverberation Reproduces the reverberations peculiar to create...

Operating Instructions
Page 51
...RS LS LS RS RS xV.S.M.D.* (Virtual Semi Multi Dimension) Uses 3D sound imaging to create virtual rear speakers from a single pair of actual rear speakers. This mode is very effective with virtual speakers. Selecting any Sound Field (except A.F.D or 2CH STEREO) enables the mode. * "VIRTUAL" sound field:... like Dolby Digital and DTS. THEATER mode allows you connect your headphones to the PHONES jack of the system, the HP. This mode creates 5 sets of virtual speakers surrounding the listener at approximately a 30° angle of elevation. xLIVE HOUSE Reproduces the acoustics of a...
...RS LS LS RS RS xV.S.M.D.* (Virtual Semi Multi Dimension) Uses 3D sound imaging to create virtual rear speakers from a single pair of actual rear speakers. This mode is very effective with virtual speakers. Selecting any Sound Field (except A.F.D or 2CH STEREO) enables the mode. * "VIRTUAL" sound field:... like Dolby Digital and DTS. THEATER mode allows you connect your headphones to the PHONES jack of the system, the HP. This mode creates 5 sets of virtual speakers surrounding the listener at approximately a 30° angle of elevation. xLIVE HOUSE Reproduces the acoustics of a...
Operating Instructions
Page 53
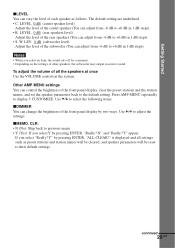
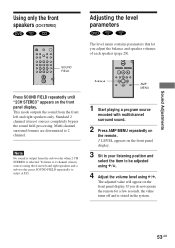
... encoded with multichannel surround sound. 2 Press AMP MENU repeatedly on the remote. 9 LEVEL appears on the front panel display. 3 Sit in the system. 53GB Standard 2 channel (stereo) sources completely bypass the sound field processing. To listen to 2 channel. Note No sound is output from the.... The adjusted value will appear on the front panel display. If you adjust the balance and speaker volumes of each speaker (page 28). Sound Adjustments Using only the front speakers (2CH STEREO) Adjusting the level parameters 1 23 4 56 7 89 >10 10/0 SOUND FIELD Press SOUND FIELD ...
... encoded with multichannel surround sound. 2 Press AMP MENU repeatedly on the remote. 9 LEVEL appears on the front panel display. 3 Sit in the system. 53GB Standard 2 channel (stereo) sources completely bypass the sound field processing. To listen to 2 channel. Note No sound is output from the.... The adjusted value will appear on the front panel display. If you adjust the balance and speaker volumes of each speaker (page 28). Sound Adjustments Using only the front speakers (2CH STEREO) Adjusting the level parameters 1 23 4 56 7 89 >10 10/0 SOUND FIELD Press SOUND FIELD ...

Operating Instructions
Page 66
... DVD SETUP, you can go to Step 3 directly. 4 Press X/x to select the setup item from the displayed list: "LANGUAGE SETUP," "SCREEN SETUP," "CUSTOM SETUP," and "SPEAKER SETUP." Settings and Adjustments Using the Setup Display By using the Setup Display, you can make various adjustments to items such as picture and sound...
... DVD SETUP, you can go to Step 3 directly. 4 Press X/x to select the setup item from the displayed list: "LANGUAGE SETUP," "SCREEN SETUP," "CUSTOM SETUP," and "SPEAKER SETUP." Settings and Adjustments Using the Setup Display By using the Setup Display, you can make various adjustments to items such as picture and sound...


