
Operating Instructions
Page 49
Table of Contents Introduction Precautions ...4 Recommendations on Installation 6 Location and Function of Parts and Controls Front Panel...7 Side Panel...8 Optional Adaptors ...10 Rear Panel ...11 Remote Control ...12 Button Description...12 Special Buttons on the Remote Control 14 GB Using the Wide Mode...14 Using the PAP Setting 15 ... Screen Saver Settings ...31 Network Functions Preparations for Using the Network Functions 32 PC Operation ...34 Other Information Troubleshooting ...37 Input Signal Reference Chart 39 Specifications ...41 Index ...43 3 GB
Table of Contents Introduction Precautions ...4 Recommendations on Installation 6 Location and Function of Parts and Controls Front Panel...7 Side Panel...8 Optional Adaptors ...10 Rear Panel ...11 Remote Control ...12 Button Description...12 Special Buttons on the Remote Control 14 GB Using the Wide Mode...14 Using the PAP Setting 15 ... Screen Saver Settings ...31 Network Functions Preparations for Using the Network Functions 32 PC Operation ...34 Other Information Troubleshooting ...37 Input Signal Reference Chart 39 Specifications ...41 Index ...43 3 GB
Operating Instructions
Page 59
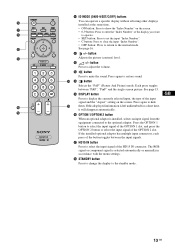
... automatically. If this displayed information is selected automatically or manually in accordance with the menu settings. 0 ID MODE (ON/0-9/SET/C/OFF) buttons You can operate a specific display without affecting other displays installed at the same time. • ON button: Press to show the "Index Number" on the screen. button Adjusts the...
... automatically. If this displayed information is selected automatically or manually in accordance with the menu settings. 0 ID MODE (ON/0-9/SET/C/OFF) buttons You can operate a specific display without affecting other displays installed at the same time. • ON button: Press to show the "Index Number" on the screen. button Adjusts the...
Operating Instructions
Page 62
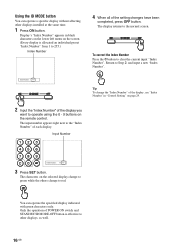
... to other displays installed at the same time. 1 Press ON button. Only the operation of each display. Return to the normal screen. You can operate a specific display without affecting other displays, as well. 16 GB The input number appears right next to the "Index Number" of POWER ON switch and STANDBY...
... to other displays installed at the same time. 1 Press ON button. Only the operation of each display. Return to the normal screen. You can operate a specific display without affecting other displays, as well. 16 GB The input number appears right next to the "Index Number" of POWER ON switch and STANDBY...
Operating Instructions
Page 68
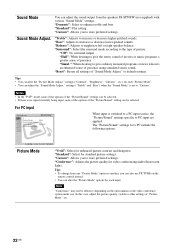
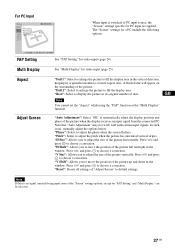
... contrast and sharpness. "Simul.": When desiring to another, you can be selected. • If there is switched to a PC input source, the "Picture/Sound" settings specific to give ordinary monaural programs or news telecasts an enhanced sense of picture. Notes • In the "PAP" mode, none of the options of the...
... contrast and sharpness. "Simul.": When desiring to another, you can be selected. • If there is switched to a PC input source, the "Picture/Sound" settings specific to give ordinary monaural programs or news telecasts an enhanced sense of picture. Notes • In the "PAP" mode, none of the options of the...
Operating Instructions
Page 73
... Note that "Auto Adjustment" may not work well with certain input signals. "Full 2": Select to enlarge the picture to PC input source, the "Screen" settings specific for PC input are applied. "Phase": Select to choose a correction. Press G/g and press to adjust the phase when the screen flickers.
... Note that "Auto Adjustment" may not work well with certain input signals. "Full 2": Select to enlarge the picture to PC input source, the "Screen" settings specific for PC input are applied. "Phase": Select to choose a correction. Press G/g and press to adjust the phase when the screen flickers.
Operating Instructions
Page 78
... this method should be connected to a network with 10BASE-T/100BASE-TX LAN cable. Network Functions Preparations for Using the Network Functions Precautions • The software specifications of this display are subject to change every time the display in which the display is turned on. When connected to a LAN, the IP addresses...
... this method should be connected to a network with 10BASE-T/100BASE-TX LAN cable. Network Functions Preparations for Using the Network Functions Precautions • The software specifications of this display are subject to change every time the display in which the display is turned on. When connected to a LAN, the IP addresses...