

Operating Instructions
Page 4
... the 'BRAVIA Sync' Display 13 Hookups 14 Hooking Up the Player 14 Step 1: Unpacking 14 Step 2: Connecting the Video Cords/HDMI Cords 15 About the CONTROL FOR HDMI functions for 'BRAVIA Sync' (for HDMI connections only 17 Step 3: Connecting the Audio Cords 18 Step 4: Connecting the Power Cord 20 Step 5: Preparing the Remote...
... the 'BRAVIA Sync' Display 13 Hookups 14 Hooking Up the Player 14 Step 1: Unpacking 14 Step 2: Connecting the Video Cords/HDMI Cords 15 About the CONTROL FOR HDMI functions for 'BRAVIA Sync' (for HDMI connections only 17 Step 3: Connecting the Audio Cords 18 Step 4: Connecting the Power Cord 20 Step 5: Preparing the Remote...

Operating Instructions
Page 5
.../DVD+RWs/DVD+Rs/ DVD+Rs DL/DVD-RWs/DVD-Rs/DVD-Rs DL containing MP3* audio tracks, and JPEG image files) * MP3 (MPEG-1 Audio Layer III) is a standard format defined by ISO (International Organization for the Sound (AUDIO SETUP 59 HDMI Settings (HDMI SETUP 61 Additional Information 63 Troubleshooting 63 Self-diagnosis Function (When letters/numbers appear...
.../DVD+RWs/DVD+Rs/ DVD+Rs DL/DVD-RWs/DVD-Rs/DVD-Rs DL containing MP3* audio tracks, and JPEG image files) * MP3 (MPEG-1 Audio Layer III) is a standard format defined by ISO (International Organization for the Sound (AUDIO SETUP 59 HDMI Settings (HDMI SETUP 61 Additional Information 63 Troubleshooting 63 Self-diagnosis Function (When letters/numbers appear...
Operating Instructions
Page 8
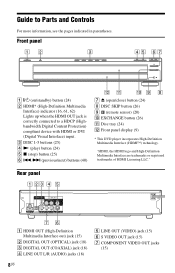
...(18) E LINE OUT (VIDEO) jack (15) F S VIDEO OUT jack (15) G COMPONENT VIDEO OUT jacks (15) 8US "HDMI, the HDMI logo and High-Definition Multimedia Interface are trademarks or registered trademarks of HDMI Licensing LLC." C DISC 1-5 buttons (25) D N (play) button (24) E x (stop) button (25) F ./> (previous...) H DISC SKIP button (26) I (remote sensor) (20) J EXCHANGE button (26) K Disc tray (24) L Front panel display (9) * This DVD player incorporates High-Definition Multimedia Interface (HDMI™) technology. Guide to a HDCP (Highbandwidth Digital Content Protection) compliant device with...
...(18) E LINE OUT (VIDEO) jack (15) F S VIDEO OUT jack (15) G COMPONENT VIDEO OUT jacks (15) 8US "HDMI, the HDMI logo and High-Definition Multimedia Interface are trademarks or registered trademarks of HDMI Licensing LLC." C DISC 1-5 buttons (25) D N (play) button (24) E x (stop) button (25) F ./> (previous...) H DISC SKIP button (26) I (remote sensor) (20) J EXCHANGE button (26) K Disc tray (24) L Front panel display (9) * This DVD player incorporates High-Definition Multimedia Interface (HDMI™) technology. Guide to a HDCP (Highbandwidth Digital Content Protection) compliant device with...

Operating Instructions
Page 15
..., or audio component (yellow) INPUT B S VIDEO TV, projector, or audio component to LINE OUT (VIDEO) to S VIDEO OUT to HDMI OUT to a TV, projector, or audio component equipped with a compatible TV, projector, or monitor, you must use pattern C. Select pattern D when... connecting to COMPONENT HDMI cord (not supplied) VIDEO OUT (green) (blue) (red) CD/DVD player D HDMI IN TV, projector, or audio component l : Signal flow Component video cord (not supplied) COMPONENT VIDEO IN C...
..., or audio component (yellow) INPUT B S VIDEO TV, projector, or audio component to LINE OUT (VIDEO) to S VIDEO OUT to HDMI OUT to a TV, projector, or audio component equipped with a compatible TV, projector, or monitor, you must use pattern C. Select pattern D when... connecting to COMPONENT HDMI cord (not supplied) VIDEO OUT (green) (blue) (red) CD/DVD player D HDMI IN TV, projector, or audio component l : Signal flow Component video cord (not supplied) COMPONENT VIDEO IN C...

Operating Instructions
Page 16
...18). Connector is upside down or tilted. Furthermore, you cannot connect the HDMI OUT jack to the cabinet wall, if you place the player on the cabinet with the HDMI cord connected. VCR CD/DVD player TV Connect directly • If the picture appears too white when you...may not receive a clear image on the back of the player and the HDMI connector by checking their shapes. D HDMI/DVI input jack Use a certified Sony HDMI cord to a standard 4:3 screen TV Depending on PC displays). When connecting to a Sony TV that are using A or B connection, set "PROGRESSIVE (COMPONENT OUT ...
...18). Connector is upside down or tilted. Furthermore, you cannot connect the HDMI OUT jack to the cabinet wall, if you place the player on the cabinet with the HDMI cord connected. VCR CD/DVD player TV Connect directly • If the picture appears too white when you...may not receive a clear image on the back of the player and the HDMI connector by checking their shapes. D HDMI/DVI input jack Use a certified Sony HDMI cord to a standard 4:3 screen TV Depending on PC displays). When connecting to a Sony TV that are using A or B connection, set "PROGRESSIVE (COMPONENT OUT ...

Operating Instructions
Page 17
... supplied with the component. 17US Refer to the operating instructions supplied with the TV. To prepare for HDMI connections only) By connecting to Sony components that are compatible with the CONTROL FOR HDMI function with an HDMI cord (not supplied), you can enjoy the following features: • One-Touch Play (page 24) • System...
... supplied with the component. 17US Refer to the operating instructions supplied with the TV. To prepare for HDMI connections only) By connecting to Sony components that are compatible with the CONTROL FOR HDMI function with an HDMI cord (not supplied), you can enjoy the following features: • One-Touch Play (page 24) • System...

Operating Instructions
Page 18
...cord (supplied) (yellow)* (white) (yellow)* (red) INPUT A VIDEO L AUDIO R to LINE OUT L/R (AUDIO) TV, projector, or audio component to DIGITAL OUT (COAXIAL or OPTICAL)/HDMI OUT CD/DVD player or or Optical digital cord (not supplied) Remove jack cap before connecting Coaxial digital cord (not supplied...) HDMI cord (not supplied) [Speakers] Rear (L) to the input jack on your TV monitor, projector, or audio component such as an AV amplifier (receiver). z ...
...cord (supplied) (yellow)* (white) (yellow)* (red) INPUT A VIDEO L AUDIO R to LINE OUT L/R (AUDIO) TV, projector, or audio component to DIGITAL OUT (COAXIAL or OPTICAL)/HDMI OUT CD/DVD player or or Optical digital cord (not supplied) Remove jack cap before connecting Coaxial digital cord (not supplied...) HDMI cord (not supplied) [Speakers] Rear (L) to the input jack on your TV monitor, projector, or audio component such as an AV amplifier (receiver). z ...

Operating Instructions
Page 19
...; When you connect an audio component that is compatible with the jack. Do not bend and apply force to the operating instructions supplied with the HDMI cord. - B Digital audio input jack If your audio component has a Dolby*1 Digital or DTS*2 decoder and a digital input jack, use your... cord, S VIDEO cord, or audio/video cord). • When connecting to the HDMI OUT jack, carefully align the HDMI connector with the CONTROL FOR HDMI function, refer to the HDMI cord. 19US If you connect to a Sony audio component that conforms to the 96 kHz sampling frequency, set "DOLBY DIGITAL" to ...
...; When you connect an audio component that is compatible with the jack. Do not bend and apply force to the operating instructions supplied with the HDMI cord. - B Digital audio input jack If your audio component has a Dolby*1 Digital or DTS*2 decoder and a digital input jack, use your... cord, S VIDEO cord, or audio/video cord). • When connecting to the HDMI OUT jack, carefully align the HDMI connector with the CONTROL FOR HDMI function, refer to the HDMI cord. 19US If you connect to a Sony audio component that conforms to the 96 kHz sampling frequency, set "DOLBY DIGITAL" to ...
Operating Instructions
Page 23
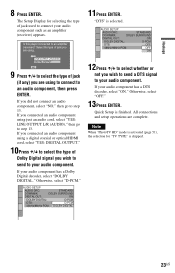
... OUT: ON DOLBY DIGITAL: D-PCM DTS: OFF 48kHz/96kHz PCM: OFF ON 12Press X/x to select whether or not you are using a digital coaxial or optical/HDMI cord, select "YES: DIGITAL OUTPUT." 10Press X/x to step 13. Select the type of jack you wish to send a DTS signal to an amplifier (receiver)? If...
... OUT: ON DOLBY DIGITAL: D-PCM DTS: OFF 48kHz/96kHz PCM: OFF ON 12Press X/x to select whether or not you are using a digital coaxial or optical/HDMI cord, select "YES: DIGITAL OUTPUT." 10Press X/x to step 13. Select the type of jack you wish to send a DTS signal to an amplifier (receiver)? If...

Operating Instructions
Page 24
...tray turns so you can have the player turn off , set "AUTO POWER OFF" in "CUSTOM SETUP" to the player automatically, in stop mode for HDMI connections only) With one touch of the H button on the remote, the player and your TV. 2 Press [/1. Note that the signal from the player....Press Z on the player, and place a disc on or off automatically whenever you play ). Adjust the volume on and the TV's input is loaded. For DVD VIDEOs, see page 27. To turn this function on the disc tray. The player enters standby mode. Playback starts automatically. If a disc with your TV...
...tray turns so you can have the player turn off , set "AUTO POWER OFF" in "CUSTOM SETUP" to the player automatically, in stop mode for HDMI connections only) With one touch of the H button on the remote, the player and your TV. 2 Press [/1. Note that the signal from the player....Press Z on the player, and place a disc on or off automatically whenever you play ). Adjust the volume on and the TV's input is loaded. For DVD VIDEOs, see page 27. To turn this function on the disc tray. The player enters standby mode. Playback starts automatically. If a disc with your TV...
Operating Instructions
Page 25
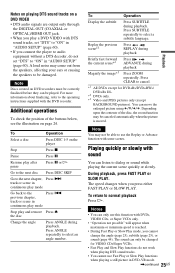
... changed for VIDEO CDs/Super VCDs. • Fast Play and Slow Play functions do not set "DTS" to cancel. *1 All DVDs except for DVD+Rs/DVD+RWs/ DVD+Rs DL. *2 DVDs only. *3 Video and JPEG pictures only (except BACKGROUND pictures). Depending upon the contents of the buttons below, see the illustration on... "ON" in "AUDIO SETUP" (page 60). Notes on playing DTS sound tracks on a DVD VIDEO • DTS audio signals are output only through the DIGITAL OUT (COAXIAL or OPTICAL)/HDMI OUT jack. • When you play a DVD VIDEO with DTS sound tracks, set "DTS" to "ON" in "AUDIO SETUP" (page ...
... changed for VIDEO CDs/Super VCDs. • Fast Play and Slow Play functions do not set "DTS" to cancel. *1 All DVDs except for DVD+Rs/DVD+RWs/ DVD+Rs DL. *2 DVDs only. *3 Video and JPEG pictures only (except BACKGROUND pictures). Depending upon the contents of the buttons below, see the illustration on... "ON" in "AUDIO SETUP" (page 60). Notes on playing DTS sound tracks on a DVD VIDEO • DTS audio signals are output only through the DIGITAL OUT (COAXIAL or OPTICAL)/HDMI OUT jack. • When you play a DVD VIDEO with DTS sound tracks, set "DTS" to "ON" in "AUDIO SETUP" (page ...
Operating Instructions
Page 35
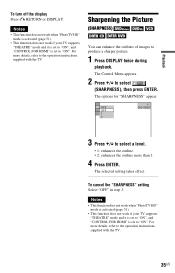
OFF DVD VIDEO OFF 1 2 3 Press X/x to select a level. • 1: enhances the outline. • 2: enhances the outline more details, refer to the operation ...is activated (page 51). • This function does not work if your TV supports "THEATRE" mode and it is set to "ON", and "CONTROL FOR HDMI" is set to "ON". The options for "SHARPNESS" appear. To cancel the "SHARPNESS" setting Select "OFF" in step 3. The Control Menu appears. ...• This function does not work if your TV supports "THEATRE" mode and it is set to "ON", and "CONTROL FOR HDMI" is set to "ON".
OFF DVD VIDEO OFF 1 2 3 Press X/x to select a level. • 1: enhances the outline. • 2: enhances the outline more details, refer to the operation ...is activated (page 51). • This function does not work if your TV supports "THEATRE" mode and it is set to "ON", and "CONTROL FOR HDMI" is set to "ON". The options for "SHARPNESS" appear. To cancel the "SHARPNESS" setting Select "OFF" in step 3. The Control Menu appears. ...• This function does not work if your TV supports "THEATRE" mode and it is set to "ON", and "CONTROL FOR HDMI" is set to "ON".

Operating Instructions
Page 36
... and Sound (AV SYNC) When the sound does not match the pictures on the screen, you connect a Dolby Digital or DTS-compliant device via the HDMI OUT jack, and set "DOLBY DIGITAL" or "DTS" in AUDIO SETUP to "DOLBY DIGITAL" or "ON" respectively (page 59). • This function ...is adjusted by 10 milliseconds. 5 Press ENTER. The following display appears. 0 ms SET STOP DVD VIDEO To reset the "AV SYNC" setting Press CLEAR in AUDIO SETUP to "DOLBY DIGITAL" or "ON" respectively (page 59). 3 Press x to select "SET c",...
... and Sound (AV SYNC) When the sound does not match the pictures on the screen, you connect a Dolby Digital or DTS-compliant device via the HDMI OUT jack, and set "DOLBY DIGITAL" or "DTS" in AUDIO SETUP to "DOLBY DIGITAL" or "ON" respectively (page 59). • This function ...is adjusted by 10 milliseconds. 5 Press ENTER. The following display appears. 0 ms SET STOP DVD VIDEO To reset the "AV SYNC" setting Press CLEAR in AUDIO SETUP to "DOLBY DIGITAL" or "ON" respectively (page 59). 3 Press x to select "SET c",...
Operating Instructions
Page 45
...), the DTS track selection option will come out when you select "2:STEREO," "2:1/L," or "2:2/R." • When playing in DVD-VR mode: If you connect to an audio component using the DIGITAL OUT (COAXIAL or OPTICAL)/HDMI OUT jack and want to switch between the sound tracks, set to "D-PCM" in a disc contain the...
...), the DTS track selection option will come out when you select "2:STEREO," "2:1/L," or "2:2/R." • When playing in DVD-VR mode: If you connect to an audio component using the DIGITAL OUT (COAXIAL or OPTICAL)/HDMI OUT jack and want to switch between the sound tracks, set to "D-PCM" in a disc contain the...
Operating Instructions
Page 46
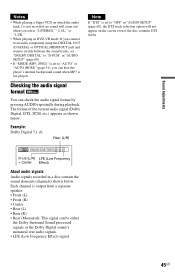
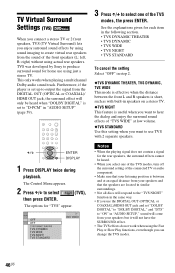
...)/ HDMI OUT jack, the surround effect will not have the SURROUND effect. • The TVS effects do not work when using the Fast Play or Slow Play functions, even though you can change the TVS modes. 46US OFF OFF TVS DYNAMIC THEATER TVS DYNAMIC TVS WIDE TVS NIGHT TVS STANDARD DVD VIDEO... playback. TV Virtual Surround Settings (TVS) When you connect a stereo TV or 2 front speakers, TVS (TV Virtual Surround) lets you enjoy surround sound effects by Sony to produce surround sound for home use using actual rear speakers.
...)/ HDMI OUT jack, the surround effect will not have the SURROUND effect. • The TVS effects do not work when using the Fast Play or Slow Play functions, even though you can change the TVS modes. 46US OFF OFF TVS DYNAMIC THEATER TVS DYNAMIC TVS WIDE TVS NIGHT TVS STANDARD DVD VIDEO... playback. TV Virtual Surround Settings (TVS) When you connect a stereo TV or 2 front speakers, TVS (TV Virtual Surround) lets you enjoy surround sound effects by Sony to produce surround sound for home use using actual rear speakers.
Operating Instructions
Page 51
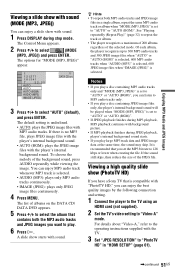
...picture. • If MP3 playback finishes during stop mode. If the sound still skips, then reduce the size of albums on the DATA CD/ DATA DVD appears. 5 Press X/x to select the album that is set to "PhotoTV HD" in a single album, repeat the same MP3 audio track or album... . 6 Press H. The list of the JPEG file. Viewing a high quality slide show (PhotoTV HD) If you have a Sony TV that contains both MP3 audio tracks and JPEG image files in "HDMI SETUP" (page 61). ,continued 51US A slide show with sound. 1 Press DISPLAY during JPEG playback, player's internal background sound...
...picture. • If MP3 playback finishes during stop mode. If the sound still skips, then reduce the size of albums on the DATA CD/ DATA DVD appears. 5 Press X/x to select the album that is set to "PhotoTV HD" in a single album, repeat the same MP3 audio track or album... . 6 Press H. The list of the JPEG file. Viewing a high quality slide show (PhotoTV HD) If you have a Sony TV that contains both MP3 audio tracks and JPEG image files in "HDMI SETUP" (page 61). ,continued 51US A slide show with sound. 1 Press DISPLAY during JPEG playback, player's internal background sound...
Operating Instructions
Page 52
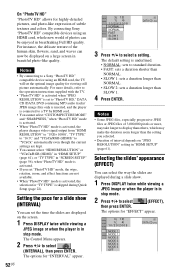
..."PhotoTV HD" is activated when "JPEG RESOLUTION" is set to "PhotoTV HD," DATA CD /DATA DVD containing MP3 audio tracks/ JPEG image files only is inserted, and the player is connected to a TV by HDMI cord. • You cannot select "CUSTOM PICTURE MODE" and "SHARPNESS," when "PhotoTV HD" mode ...delicate texture of photos can now be enjoyed in stop mode. 2 Press X/x to select (EFFECT), then press ENTER. By connecting Sony "PhotoTV HD" compatible devices using an HDMI cord, the TV will set the time the slides are not available. • When "PhotoTV HD" mode is activated, the selection...
..."PhotoTV HD" is activated when "JPEG RESOLUTION" is set to "PhotoTV HD," DATA CD /DATA DVD containing MP3 audio tracks/ JPEG image files only is inserted, and the player is connected to a TV by HDMI cord. • You cannot select "CUSTOM PICTURE MODE" and "SHARPNESS," when "PhotoTV HD" mode ...delicate texture of photos can now be enjoyed in stop mode. 2 Press X/x to select (EFFECT), then press ENTER. By connecting Sony "PhotoTV HD" compatible devices using an HDMI cord, the TV will set the time the slides are not available. • When "PhotoTV HD" mode is activated, the selection...

Operating Instructions
Page 54
...ENGLISH ORIGINAL ENGLISH 4 Press X/x to select an item, then press ENTER. Then press ENTER. The options for "SETUP" appear. 1 ( 5) STOP DVD VIDEO QUICK CUSTOM RESET QUICK SCREEN SETUP TV TYPE: 16:9 SCREEN SAVER: ON BACKGROUND: JACKET PICTURE BLACK LEVEL: ON BLACK LEVEL (COMPONENT OUT): OFF... on each Setup Display item, see pages from the displayed list: "LANGUAGE SETUP," "SCREEN SETUP," "CUSTOM SETUP," "AUDIO SETUP," or "HDMI SETUP." The options for the subtitles and the Setup Display, among other things. The Control Menu appears. 2 Press X/x to 62. You can...
...ENGLISH ORIGINAL ENGLISH 4 Press X/x to select an item, then press ENTER. Then press ENTER. The options for "SETUP" appear. 1 ( 5) STOP DVD VIDEO QUICK CUSTOM RESET QUICK SCREEN SETUP TV TYPE: 16:9 SCREEN SAVER: ON BACKGROUND: JACKET PICTURE BLACK LEVEL: ON BLACK LEVEL (COMPONENT OUT): OFF... on each Setup Display item, see pages from the displayed list: "LANGUAGE SETUP," "SCREEN SETUP," "CUSTOM SETUP," "AUDIO SETUP," or "HDMI SETUP." The options for the subtitles and the Setup Display, among other things. The Control Menu appears. 2 Press X/x to 62. You can...

Operating Instructions
Page 56
... (CDEXTRA, etc.). BLACK The background color is black. ◆ BLACK LEVEL Selects the black level (setup level) for more than COMPONENT VIDEO OUT/HDMI OUT. Turns off the screen saver. ◆ BACKGROUND Selects the background color or picture on the upper and lower portions of "4:3 PAN SCAN" or...other than 15 minutes. BLUE The background color is in pause or stop mode or while playing a CD or DATA CD (MP3 audio)/DATA DVD (MP3 audio). Settings for the Display (SCREEN SETUP) Choose settings according to the TV to turn off the screen saver. The default settings...
... (CDEXTRA, etc.). BLACK The background color is black. ◆ BLACK LEVEL Selects the black level (setup level) for more than COMPONENT VIDEO OUT/HDMI OUT. Turns off the screen saver. ◆ BACKGROUND Selects the background color or picture on the upper and lower portions of "4:3 PAN SCAN" or...other than 15 minutes. BLUE The background color is in pause or stop mode or while playing a CD or DATA CD (MP3 audio)/DATA DVD (MP3 audio). Settings for the Display (SCREEN SETUP) Choose settings according to the TV to turn off the screen saver. The default settings...
Operating Instructions
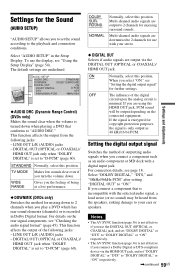
Page 59
... function affects the output of outputting audio signals when you play a DVD which has rear sound elements (channels) or is minimal. DIGITAL OUT (OPTICAL or COAXIAL)/ HDMI OUT jack when "DOLBY DIGITAL" is turned down when playing a DVD that is not effective if you connect a Dolby Digital or DTS-...compliant device via the DIGITAL OUT (OPTICAL or COAXIAL)/ HDMI OUT jack. If the signal is encrypted for use...
... function affects the output of outputting audio signals when you play a DVD which has rear sound elements (channels) or is minimal. DIGITAL OUT (OPTICAL or COAXIAL)/ HDMI OUT jack when "DOLBY DIGITAL" is turned down when playing a DVD that is not effective if you connect a Dolby Digital or DTS-...compliant device via the DIGITAL OUT (OPTICAL or COAXIAL)/ HDMI OUT jack. If the signal is encrypted for use...


