Limited Warranty (CD/DVD Player)
Page 1
3-977-330-13 ® CD/DVD Player LIMITED WARRANTY Sony Electronics Inc. ("Sony") warrants this Product is determined to be presented to obtain warranty service. LABOR: For a period of one (1) year from your convenience, Sony Electronics Inc. To obtain warranty service, you . This warranty does not cover damage due... sale or receipted invoice which vary from the Product. After the Warranty Period, you enter into a service contract with the Sony Partnership within the Warranty period must take the Product, or deliver the Product freight prepaid, in either its original packaging or...
3-977-330-13 ® CD/DVD Player LIMITED WARRANTY Sony Electronics Inc. ("Sony") warrants this Product is determined to be presented to obtain warranty service. LABOR: For a period of one (1) year from your convenience, Sony Electronics Inc. To obtain warranty service, you . This warranty does not cover damage due... sale or receipted invoice which vary from the Product. After the Warranty Period, you enter into a service contract with the Sony Partnership within the Warranty period must take the Product, or deliver the Product freight prepaid, in either its original packaging or...

Operating Instructions
Page 2
... To prevent fire or shock hazard, do not open the cabinet. As the laser beam used in this manual could void your Sony dealer regarding this product will not occur in the U.S.A Owner's Record The model and serial numbers are designed to rain or moisture... maintenance (servicing) instructions in this CD/DVD player is no guarantee that may cause harmful interference to persons. This symbol is encouraged to try to which can radiate radio frequency energy and, if not installed and used in the literature accompanying the appliance. DVP-FX1/DVP-F5 Serial No CAUTION You are...
... To prevent fire or shock hazard, do not open the cabinet. As the laser beam used in this manual could void your Sony dealer regarding this product will not occur in the U.S.A Owner's Record The model and serial numbers are designed to rain or moisture... maintenance (servicing) instructions in this CD/DVD player is no guarantee that may cause harmful interference to persons. This symbol is encouraged to try to which can radiate radio frequency energy and, if not installed and used in the literature accompanying the appliance. DVP-FX1/DVP-F5 Serial No CAUTION You are...

Operating Instructions
Page 3
... the remote if they have the same or similar names as those on the player. DVP-FX1 is for example, "DVP-FX1 only." Indicates that the function is clearly indicated in this manual are used for Audio CDs. Any difference in this Sony CD/DVD Player. Note: In some areas the disposal of the unit. Thank you , call 1800-222...
... the remote if they have the same or similar names as those on the player. DVP-FX1 is for example, "DVP-FX1 only." Indicates that the function is clearly indicated in this manual are used for Audio CDs. Any difference in this Sony CD/DVD Player. Note: In some areas the disposal of the unit. Thank you , call 1800-222...

Operating Instructions
Page 4
Table of contents 3 About this manual 6 This Player Can Play the Following Discs 9 Precautions 12 Notes about the Discs Getting Started 13 Unpacking 14 Using the LCD Screen (DVP-FX1 only) 16 TV Hookups 19 Receiver (Amplifier) Hookups 22 5.1 Channel Surround Hookups 25 Connecting the AC Power Adaptor 26 Using the... a Particular Point on a Disc 35 Resuming Playback from the Point Where You Stopped the Disc (Resume Play) 37 Using the DVD's Menu 39 Playing VIDEO CDs with PBC Functions (PBC Playback) 41 Using the Display Window Using Various Functions with the Control Menu 45 Using the Control Menu ...
Table of contents 3 About this manual 6 This Player Can Play the Following Discs 9 Precautions 12 Notes about the Discs Getting Started 13 Unpacking 14 Using the LCD Screen (DVP-FX1 only) 16 TV Hookups 19 Receiver (Amplifier) Hookups 22 5.1 Channel Surround Hookups 25 Connecting the AC Power Adaptor 26 Using the... a Particular Point on a Disc 35 Resuming Playback from the Point Where You Stopped the Disc (Resume Play) 37 Using the DVD's Menu 39 Playing VIDEO CDs with PBC Functions (PBC Playback) 41 Using the Display Window Using Various Functions with the Control Menu 45 Using the Control Menu ...

Operating Instructions
Page 6
... area restrictions. DVP-XX PORTABLE CD/DVD PLAYER Region code DVDs labeled ALL will also play DVDs that are labeled with the DVDs or VIDEO CDs. 6 Introduction will only play on the screen. Also refer to play any other color systems such as PAL or SECAM. This Player Can Play the Following Discs Disc logo DVD VIDEOs VIDEO CDs Audio CDs Contents Audio...
... area restrictions. DVP-XX PORTABLE CD/DVD PLAYER Region code DVDs labeled ALL will also play DVDs that are labeled with the DVDs or VIDEO CDs. 6 Introduction will only play on the screen. Also refer to play any other color systems such as PAL or SECAM. This Player Can Play the Following Discs Disc logo DVD VIDEOs VIDEO CDs Audio CDs Contents Audio...

Operating Instructions
Page 7
...; Track Sections of a picture or music feature on a DVD, the movie, etc. DVD structure Disc Title Chapter VIDEO CD or CD structure Disc Track Index • Index (CD) / Video Index (VIDEO CD) A number that the player cannot play The player cannot play discs other than titles. Depending on the disc,... • Title The longest section of a picture or a music feature on a VIDEO CD or a CD. CD-ROMs including PHOTO CDs, data sections in the table on PBC (Playback Control) (VIDEO CDs) This player conforms to easily locate the point you want . Each scene is assigned a chapter number ...
...; Track Sections of a picture or music feature on a DVD, the movie, etc. DVD structure Disc Title Chapter VIDEO CD or CD structure Disc Track Index • Index (CD) / Video Index (VIDEO CD) A number that the player cannot play The player cannot play discs other than titles. Depending on the disc,... • Title The longest section of a picture or a music feature on a VIDEO CD or a CD. CD-ROMs including PHOTO CDs, data sections in the table on PBC (Playback Control) (VIDEO CDs) This player conforms to easily locate the point you want . Each scene is assigned a chapter number ...

Operating Instructions
Page 8
...avoid possible damage to the audio system, the consumer should take proper precautions when the analog stereo outputs of the DVD player are trademarks of Digital Theater Systems, Inc. 8 Introduction patents and other intellectual property rights owned by method claims... copyright protection technology must be heard from the analog stereo outputs. This Player Can Play the Following Discs (continued) When playing DTS*-encoded CDs, excessive noise will be connected to the digital output of the DVD player. This product incorporates copyright protection technology that is prohibited. * "DTS...
...avoid possible damage to the audio system, the consumer should take proper precautions when the analog stereo outputs of the DVD player are trademarks of Digital Theater Systems, Inc. 8 Introduction patents and other intellectual property rights owned by method claims... copyright protection technology must be heard from the analog stereo outputs. This Player Can Play the Following Discs (continued) When playing DTS*-encoded CDs, excessive noise will be connected to the digital output of the DVD player. This product incorporates copyright protection technology that is prohibited. * "DTS...

Operating Instructions
Page 10
...damaged or leaking lithium-ion battery with Sony NP-FX1 only. If 10 Introduction Should this occur, the player may be damaged when a peak level section is not subject to the player. On adjusting volume Do not turn off the player or move , shake, or otherwise allow...dust or sand, moisture, rain, mechanical shock, unleveled surface, or in a car with its windows closed. • If the player causes interference to a section with Sony Portable CD/DVD Player. • Burn hazard if mistreated. Do not disassemble, heat above 100 ˚C (212 ˚F) or incinerate. • Danger...
...damaged or leaking lithium-ion battery with Sony NP-FX1 only. If 10 Introduction Should this occur, the player may be damaged when a peak level section is not subject to the player. On adjusting volume Do not turn off the player or move , shake, or otherwise allow...dust or sand, moisture, rain, mechanical shock, unleveled surface, or in a car with its windows closed. • If the player causes interference to a section with Sony Portable CD/DVD Player. • Burn hazard if mistreated. Do not disassemble, heat above 100 ˚C (212 ˚F) or incinerate. • Danger...

Operating Instructions
Page 12
... image on your television screen. If there is capable of time you risk permanent damage to your television screen indefinitely. or star-shaped CDs as they may rise considerably inside the car. • After playing, store the disc in direct sunlight as the temperature may cause the... malfunction. On cleaning • Before playing, clean the disc with a cleaning cloth. Precautions (continued) IMPORTANT NOTICE Caution: The enclosed DVD player is glue (or a similar substance) on the disc, remove the glue completely before using the disc. • Do not expose the disc to direct...
... image on your television screen. If there is capable of time you risk permanent damage to your television screen indefinitely. or star-shaped CDs as they may rise considerably inside the car. • After playing, store the disc in direct sunlight as the temperature may cause the... malfunction. On cleaning • Before playing, clean the disc with a cleaning cloth. Precautions (continued) IMPORTANT NOTICE Caution: The enclosed DVD player is glue (or a similar substance) on the disc, remove the glue completely before using the disc. • Do not expose the disc to direct...

Operating Instructions
Page 15
... t Normal t Off Getting Started Selecting the display mode accodring to the aspect ratio of the picteur The aspect ratio of the picture recorded on the DVD is . The 4:3 pictur e will have black bands on all sides. You can select the display mode accor ding to fit the 16:9 screen. The 16... e will have black bands on both sides. Adjusting the volume When you pr ess DISPLAY MODE, the mode changes as it is printed on the DVD, the edges of f the black bands to the aspect ratio (4:3 or 16:9) of the...
... t Normal t Off Getting Started Selecting the display mode accodring to the aspect ratio of the picteur The aspect ratio of the picture recorded on the DVD is . The 4:3 pictur e will have black bands on all sides. You can select the display mode accor ding to fit the 16:9 screen. The 16... e will have black bands on both sides. Adjusting the volume When you pr ess DISPLAY MODE, the mode changes as it is printed on the DVD, the edges of f the black bands to the aspect ratio (4:3 or 16:9) of the...

Operating Instructions
Page 17
continued Getting Started 17 CD/DVD player Getting Started Set LINE SELECT to OUT IN OUT LINE SELECT OPTICAL OUT AUDIO VIDEO DC OUT 5V S VIDEO OUT To AUDIO OUT To VIDEO OUT To S VIDEO OUT To S VIDEO input TV To VIDEO input To AUDIO input INPUT VIDEO L AUDIO R S VIDEO : Signal flow For DVP-FX1 • To tur n of f the LCD screen: press the DISPLAY MODE button on the player r epeatedly . • To adjust the volume of the built-in speakers: turn the VOL dial on the player .
continued Getting Started 17 CD/DVD player Getting Started Set LINE SELECT to OUT IN OUT LINE SELECT OPTICAL OUT AUDIO VIDEO DC OUT 5V S VIDEO OUT To AUDIO OUT To VIDEO OUT To S VIDEO OUT To S VIDEO input TV To VIDEO input To AUDIO input INPUT VIDEO L AUDIO R S VIDEO : Signal flow For DVP-FX1 • To tur n of f the LCD screen: press the DISPLAY MODE button on the player r epeatedly . • To adjust the volume of the built-in speakers: turn the VOL dial on the player .
Operating Instructions
Page 18
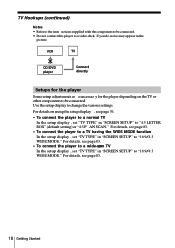
... supplied with the component to be connected. Use the setup display to a video deck. For details, see page 76. • To connect the player to a normal TV In the setup display , set "TV TYPE" in "SCREEN SETUP" to be connected. • Do not connect this...:9/4:3 WIDE MODE." For details, see page 83. 18 Getting Started VCR TV CD/DVD player Connect directly Setups for the player Some setup adjustments ar e necessar y for the player depending on using the setup display , see page 83. • To connect the player to a TV having the WIDE MODE function In the setup display , set...
... supplied with the component to be connected. Use the setup display to a video deck. For details, see page 76. • To connect the player to a normal TV In the setup display , set "TV TYPE" in "SCREEN SETUP" to be connected. • Do not connect this...:9/4:3 WIDE MODE." For details, see page 83. 18 Getting Started VCR TV CD/DVD player Connect directly Setups for the player Some setup adjustments ar e necessar y for the player depending on using the setup display , see page 83. • To connect the player to a TV having the WIDE MODE function In the setup display , set...

Operating Instructions
Page 20
To audio input CD L Receiver (Amplifier) R Note You cannot enjoy a pictur e with your TV . 20 Getting Started Refer to the instr uctions supplied with an S video signal if your ... VIDEO L AUDIO S VIDEO R To optical digital input DIGITAL IN Receiver (Amplifier) with a digital OPTICAL connector, MD deck, COAXIAL DAT deck, etc. Receiver (Amplifier) Hookups (continued) CD/DVD player Set LINE SELECT to the S video signal.
To audio input CD L Receiver (Amplifier) R Note You cannot enjoy a pictur e with your TV . 20 Getting Started Refer to the instr uctions supplied with an S video signal if your ... VIDEO L AUDIO S VIDEO R To optical digital input DIGITAL IN Receiver (Amplifier) with a digital OPTICAL connector, MD deck, COAXIAL DAT deck, etc. Receiver (Amplifier) Hookups (continued) CD/DVD player Set LINE SELECT to the S video signal.

Operating Instructions
Page 22
For DVP-FX1 Be sur e to set the LINE SELECT switch to be connected. • The cord connectors should... may cause hum and noise. 22 Getting Started See the figur e on the next page. 5.1 Channel Surround Hookups With DVDs which contain DTS or Dolby Digital sound, you can enjoy the sur round sound while pr oducing the ef fect of your... own home. The player outputs the surround sound signals fr om the OPTICAL OUT connector. Using a r eceiver (amplifier) having the OPTICAL OUT connector...
For DVP-FX1 Be sur e to set the LINE SELECT switch to be connected. • The cord connectors should... may cause hum and noise. 22 Getting Started See the figur e on the next page. 5.1 Channel Surround Hookups With DVDs which contain DTS or Dolby Digital sound, you can enjoy the sur round sound while pr oducing the ef fect of your... own home. The player outputs the surround sound signals fr om the OPTICAL OUT connector. Using a r eceiver (amplifier) having the OPTICAL OUT connector...

Operating Instructions
Page 23
...AC OUTLET Center speaker Front speaker (R) INPUT Subwoofer (Active type) Rear speaker (R) : Signal flow Front speaker (L) Rear speaker (L) continued Getting Started 23 Getting Started CD/DVD player S VIDEO TV Set LINE SELECT to OUT To S VIDEO input IN OUT LINE SELECT OPTICAL OUT AUDIO VIDEO DC OUT 5V To OPTICAL OUT To...a built-in DTS decoder or DOLBY DIGITAL decoder DIGITAL TV/LD IN AC-3 RF DVD IN COAX DVD IN OPT TV/LD IN OPT CD IN OPT MD/DAT IN OPT SIGNAL GND IN MD/DAT OUT OPT TV/LD DVD VIDEO 2 VIDEO 1 MONITOR S-LINK CTRL A1 5.1 INPUT FRONT REAR CENTER PRE OUT...
...AC OUTLET Center speaker Front speaker (R) INPUT Subwoofer (Active type) Rear speaker (R) : Signal flow Front speaker (L) Rear speaker (L) continued Getting Started 23 Getting Started CD/DVD player S VIDEO TV Set LINE SELECT to OUT To S VIDEO input IN OUT LINE SELECT OPTICAL OUT AUDIO VIDEO DC OUT 5V To OPTICAL OUT To...a built-in DTS decoder or DOLBY DIGITAL decoder DIGITAL TV/LD IN AC-3 RF DVD IN COAX DVD IN OPT TV/LD IN OPT CD IN OPT MD/DAT IN OPT SIGNAL GND IN MD/DAT OUT OPT TV/LD DVD VIDEO 2 VIDEO 1 MONITOR S-LINK CTRL A1 5.1 INPUT FRONT REAR CENTER PRE OUT...

Operating Instructions
Page 25
Getting Started Connecting the AC Power Adaptor 1 Connect the supplied AC power cor d to the AC power adaptor . 2 Connect the AC power adaptor to stop playback. Getting Started 25 Note When you disconnect the AC power cor d, be sur e to the player and then plug the cor d into the AC outlet. Disconnecting the AC power cor d during playback may cause a malfunction. CD/DVD player To DC IN 10V AC power adaptor (supplied) To an AC outlet z You can attach a battery pack See "Using the r echar geable batter y pack" on the next page.
Getting Started Connecting the AC Power Adaptor 1 Connect the supplied AC power cor d to the AC power adaptor . 2 Connect the AC power adaptor to stop playback. Getting Started 25 Note When you disconnect the AC power cor d, be sur e to the player and then plug the cor d into the AC outlet. Disconnecting the AC power cor d during playback may cause a malfunction. CD/DVD player To DC IN 10V AC power adaptor (supplied) To an AC outlet z You can attach a battery pack See "Using the r echar geable batter y pack" on the next page.

Operating Instructions
Page 26
... and batter y. using the power saving function (DVP-FX1 only , page 90) - using the headphones - Note Do not touch the ter minals on the bottom of the player, as shown below . 2 Slide the player for ward in the dir ection of the ar... may cause a malfunction. 26 Getting Started Using the Rechargeable Battery Pack You can use the NP-FX1 r echar geable batter y pack (supplied with DVD VIDEO VIDEO CD AUDIO CD DVP-FX1 (LCD screen: On) 4.5 4.5 4.5 DVP-FX1 (LCD screen: Of f) 8.0 8.0 8.0 DVP-F5 8.0 8.0 8.0 * Approximate hours when played continuously at r oom temperatur e (20°...
... and batter y. using the power saving function (DVP-FX1 only , page 90) - using the headphones - Note Do not touch the ter minals on the bottom of the player, as shown below . 2 Slide the player for ward in the dir ection of the ar... may cause a malfunction. 26 Getting Started Using the Rechargeable Battery Pack You can use the NP-FX1 r echar geable batter y pack (supplied with DVD VIDEO VIDEO CD AUDIO CD DVP-FX1 (LCD screen: On) 4.5 4.5 4.5 DVP-FX1 (LCD screen: Of f) 8.0 8.0 8.0 DVP-F5 8.0 8.0 8.0 * Approximate hours when played continuously at r oom temperatur e (20°...

Operating Instructions
Page 28
The default setting is "ENGLISH." ?/>/.///ENTER DISPLAY ?/>/./// ENTER DISPLAY 1 When the player is a disc in stop mode, pr ess DISPLAY and select "SETUP" using M/m. LANGUAGE SETUP OSD: DVD MENU: AUDIO: SUBTITLE: ENGLISH ENGLISH ORIGINAL AUDIO FOLLOW To set, press , then ENTER . Selected item SETUP Select: ...ENTER 2 Press ENTER. The on-scr een menu STOP items ar e dif ferent DVD depending on whether ther e is in the player or not. To quit, press DISPLAY . 28 Getting Started The setup display appears on the scr een. Selecting the...
The default setting is "ENGLISH." ?/>/.///ENTER DISPLAY ?/>/./// ENTER DISPLAY 1 When the player is a disc in stop mode, pr ess DISPLAY and select "SETUP" using M/m. LANGUAGE SETUP OSD: DVD MENU: AUDIO: SUBTITLE: ENGLISH ENGLISH ORIGINAL AUDIO FOLLOW To set, press , then ENTER . Selected item SETUP Select: ...ENTER 2 Press ENTER. The on-scr een menu STOP items ar e dif ferent DVD depending on whether ther e is in the player or not. To quit, press DISPLAY . 28 Getting Started The setup display appears on the scr een. Selecting the...

Operating Instructions
Page 29
...To quit while making a selection Press DISPLAY. To set , press , then ENTER . To quit, press DISPLAY . CHOIX DE LA LANGUE ECRANS: MENU DVD : AUDIO: SOUS-TITRE: FRANÇAIS ENGLISH ORIGINAL IDEM AUDIO 6 Press DISPLAY. Getting Started 29 Pour régler, appuyez sur , puis sur ENTER... . Pour quitter, appuyez sur DISPLAY . To quit, press DISPLAY . To return to tur n off the on-scr een display . LANGUAGE SETUP OSD: DVD MENU: AUDIO: SUBTITLE: ENGLISH ENGLISH ORIGINAL AUDIO FOLLOW Getting Started 4 Select "OSD" using M/m, then pr ess , or ENTER. For details, see page ...
...To quit while making a selection Press DISPLAY. To set , press , then ENTER . To quit, press DISPLAY . CHOIX DE LA LANGUE ECRANS: MENU DVD : AUDIO: SOUS-TITRE: FRANÇAIS ENGLISH ORIGINAL IDEM AUDIO 6 Press DISPLAY. Getting Started 29 Pour régler, appuyez sur , puis sur ENTER... . Pour quitter, appuyez sur DISPLAY . To quit, press DISPLAY . To return to tur n off the on-scr een display . LANGUAGE SETUP OSD: DVD MENU: AUDIO: SUBTITLE: ENGLISH ENGLISH ORIGINAL AUDIO FOLLOW Getting Started 4 Select "OSD" using M/m, then pr ess , or ENTER. For details, see page ...

Operating Instructions
Page 30
...turn on the remote. Make sure the disc clicks into the position. Adjust the volume on the DVD or VIDEO CD, some operations may be different or restricted. For DVP-FX1 Be sure to set the LINE SELECT switch to the instructions supplied with your disc. The display ... Close the lid, then press ·. OPEN POWER LINE SELECT · 1 Press POWER to open the lid. 3 Insert a disc horizontally. The player starts playback (continuous play). When using a receiver (amplifier) Turn on the receiver (amplifier) and select the appropriate position so that you can listen to...
...turn on the remote. Make sure the disc clicks into the position. Adjust the volume on the DVD or VIDEO CD, some operations may be different or restricted. For DVP-FX1 Be sure to set the LINE SELECT switch to the instructions supplied with your disc. The display ... Close the lid, then press ·. OPEN POWER LINE SELECT · 1 Press POWER to open the lid. 3 Insert a disc horizontally. The player starts playback (continuous play). When using a receiver (amplifier) Turn on the receiver (amplifier) and select the appropriate position so that you can listen to...


