
Operating Instructions
Page 1
... For the connection/installation, see page 12. DSX-A200UI Serial No. 4-576-780-42(2) FM/AM Digital Media Player Operating Instructions GB Mode d'emploi FR Owner's Record The model and serial numbers are located on the bottom of the unit. Pour le raccordement/l'installation, reportez-vous à...; la page 21. To cancel the demonstration (DEMO) display, see page 20. DSX-A200UI Record the serial number in the space provided below. Pour annuler l'affichage de dé...
... For the connection/installation, see page 12. DSX-A200UI Serial No. 4-576-780-42(2) FM/AM Digital Media Player Operating Instructions GB Mode d'emploi FR Owner's Record The model and serial numbers are located on the bottom of the unit. Pour le raccordement/l'installation, reportez-vous à...; la page 21. To cancel the demonstration (DEMO) display, see page 20. DSX-A200UI Record the serial number in the space provided below. Pour annuler l'affichage de dé...

Operating Instructions
Page 2
... receiver. Connect the equipment into an outlet on a circuit different from that interference will not occur in a residential installation. For safety, be determined by one or more of the FCC Rules. The nameplate indicating operating voltage, etc., is connected....an experienced radio/TV technician for a Class B digital device, pursuant to provide reasonable protection against harmful interference in a particular installation. These limits are cautioned that any changes or modifications not expressly approved in accordance with the limits for help. If this ...
... receiver. Connect the equipment into an outlet on a circuit different from that interference will not occur in a residential installation. For safety, be determined by one or more of the FCC Rules. The nameplate indicating operating voltage, etc., is connected....an experienced radio/TV technician for a Class B digital device, pursuant to provide reasonable protection against harmful interference in a particular installation. These limits are cautioned that any changes or modifications not expressly approved in accordance with the limits for help. If this ...

Operating Instructions
Page 4
... Operation 12 General Setup (GENERAL 13 Sound Setup (SOUND 13 Display Setup (DISPLAY 13 Additional Information Precautions 14 Maintenance 15 Specifications 15 Troubleshooting 17 Connection/Installation Cautions 20 Parts List for Installation 20 Connection 21 Installation 23 4GB
... Operation 12 General Setup (GENERAL 13 Sound Setup (SOUND 13 Display Setup (DISPLAY 13 Additional Information Precautions 14 Maintenance 15 Specifications 15 Troubleshooting 17 Connection/Installation Cautions 20 Parts List for Installation 20 Connection 21 Installation 23 4GB

Operating Instructions
Page 15
...: -1,956.5 to -487.3 kHz and +500.0 to +2,095.4 kHz Usable sensitivity: 7 dBf Selectivity: 75 dB at 400 kHz Signal-to observe the correct polarity when installing the battery. Do not hold the battery with any questions or problems concerning your unit that are not clean. In order to prevent this..., turn off the ignition before cleaning the connectors, and remove the key from the ignition switch. Never touch the connectors directly with your nearest Sony dealer.
...: -1,956.5 to -487.3 kHz and +500.0 to +2,095.4 kHz Usable sensitivity: 7 dBf Selectivity: 75 dB at 400 kHz Signal-to observe the correct polarity when installing the battery. Do not hold the battery with any questions or problems concerning your unit that are not clean. In order to prevent this..., turn off the ignition before cleaning the connectors, and remove the key from the ignition switch. Never touch the connectors directly with your nearest Sony dealer.

Operating Instructions
Page 16
... are subject to change without modification, are trademarks of Apple Inc., registered in the United States and/or other countries. Please ask the dealer for installation and connections (1 set) Your dealer may not handle some of the above copyright notice, this product is prohibited without a license from Fraunhofer IIS and Thomson...
... are subject to change without modification, are trademarks of Apple Inc., registered in the United States and/or other countries. Please ask the dealer for installation and connections (1 set) Your dealer may not handle some of the above copyright notice, this product is prohibited without a license from Fraunhofer IIS and Thomson...

Operating Instructions
Page 17
... battery has been disconnected or not connected properly. General No power is being supplied to endorse or promote products derived from the dashboard, see "Connection/Installation" (page 20). THIS SOFTWARE IS PROVIDED BY THE COPYRIGHT HOLDERS AND CONTRIBUTORS "AS IS" AND ANY EXPRESS OR IMPLIED WARRANTIES, INCLUDING, BUT NOT LIMITED TO...
... battery has been disconnected or not connected properly. General No power is being supplied to endorse or promote products derived from the dashboard, see "Connection/Installation" (page 20). THIS SOFTWARE IS PROVIDED BY THE COPYRIGHT HOLDERS AND CONTRIBUTORS "AS IS" AND ANY EXPRESS OR IMPLIED WARRANTIES, INCLUDING, BUT NOT LIMITED TO...
Operating Instructions
Page 20
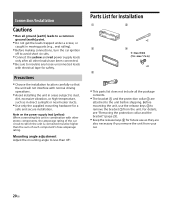
...; from your car. 20GB Parts List for safety. Note on the power supply lead (yellow) When connecting this unit in combination with electrical tape for Installation × 2 5 × max. 8 mm (7/32 × max. 5/16 in) × 4 ... details, see "Removing the protection collar and the bracket" (page 23). Keep the release keys for a safe and secure installation. Connection/Installation Cautions Run all ground (earth) leads to a common ground (earth) point. Do not get the leads trapped under a ...
...; from your car. 20GB Parts List for safety. Note on the power supply lead (yellow) When connecting this unit in combination with electrical tape for Installation × 2 5 × max. 8 mm (7/32 × max. 5/16 in) × 4 ... details, see "Removing the protection collar and the bracket" (page 23). Keep the release keys for a safe and secure installation. Connection/Installation Cautions Run all ground (earth) leads to a common ground (earth) point. Do not get the leads trapped under a ...
Operating Instructions
Page 23
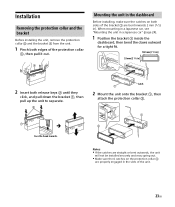
...; from the unit. 1 Pinch both edges of the protection collar , then pull it out. Mounting the unit in the dashboard Before installing, make sure the catches on both release keys until they click, and pull down the bracket , then pull up the unit to separate...58261;, then attach the protection collar . Notes If the catches are straight or bent outwards, the unit will not be installed securely and may spring out. Make sure the 4 catches on the protection collar are bent inwards 2 mm (3/32 in the slots of ...
...; from the unit. 1 Pinch both edges of the protection collar , then pull it out. Mounting the unit in the dashboard Before installing, make sure the catches on both release keys until they click, and pull down the bracket , then pull up the unit to separate...58261;, then attach the protection collar . Notes If the catches are straight or bent outwards, the unit will not be installed securely and may spring out. Make sure the 4 catches on the protection collar are bent inwards 2 mm (3/32 in the slots of ...
Operating Instructions
Page 24
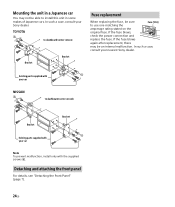
...your car Bracket Note To prevent malfunction, install only with the supplied screws . TOYOTA to dashboard/center console Bracket Bracket Fuse replacement When replacing the fuse, be an internal malfunction. In such a case, consult your nearest Sony dealer. Existing parts supplied with your car... blows, check the power connection and replace the fuse. If the fuse blows again after replacement, there may not be able to install this unit in some makes of Japanese cars. Mounting the unit in a Japanese car You may be sure Fuse (10 A) to...
...your car Bracket Note To prevent malfunction, install only with the supplied screws . TOYOTA to dashboard/center console Bracket Bracket Fuse replacement When replacing the fuse, be an internal malfunction. In such a case, consult your nearest Sony dealer. Existing parts supplied with your car... blows, check the power connection and replace the fuse. If the fuse blows again after replacement, there may not be able to install this unit in some makes of Japanese cars. Mounting the unit in a Japanese car You may be sure Fuse (10 A) to...
