

Operating Instructions
Page 3
... the power supply 8 Step 3 Inserting a cassette 13 Recording - Sound recording level 54 Connecting an optional external microphone 56 Using an external audio system or microphone 58 Backing up recordings to tapes 146 Playing back images continuously - MEMORY MIX 71 Self-diagnosis display 168 Interval recording 74 Warning indicators and messages 169 Frame by date - Cut recording ... 76 Using your own titles 114 Labeling a cassette 116 Erasing the cassette memory data 118 Customizing Your Camcorder Advanced Recording Operations Changing the menu settings 120 Shooting...
... the power supply 8 Step 3 Inserting a cassette 13 Recording - Sound recording level 54 Connecting an optional external microphone 56 Using an external audio system or microphone 58 Backing up recordings to tapes 146 Playing back images continuously - MEMORY MIX 71 Self-diagnosis display 168 Interval recording 74 Warning indicators and messages 169 Frame by date - Cut recording ... 76 Using your own titles 114 Labeling a cassette 116 Erasing the cassette memory data 118 Customizing Your Camcorder Advanced Recording Operations Changing the menu settings 120 Shooting...
Operating Instructions
Page 17
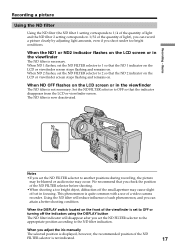
... OFF flashes on the LCD screen or in the viewfinder The ND filter is now deactivated. The ND filter is not necessary. Using the ND filter will disappear after you set to OFF or turning off the indicators using the DISPLAY button The ND filter indicator will reduce influence of such phenomenon, and you can record a picture clearly by adjusting light amounts, even...
... OFF flashes on the LCD screen or in the viewfinder The ND filter is now deactivated. The ND filter is not necessary. Using the ND filter will disappear after you set to OFF or turning off the indicators using the DISPLAY button The ND filter indicator will reduce influence of such phenomenon, and you can record a picture clearly by adjusting light amounts, even...
Operating Instructions
Page 18
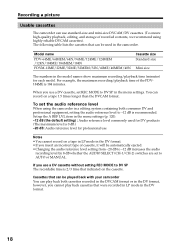
You can use a DV cassette without setting REC MODE to AUTO or MANUAL. If you use standard-size and mini-size DVCAM/DV cassettes. (To ensure high-quality playback, editing, and storage of recorded contents, we recommend using the camcorder in a editing system containing both cassettes recorded in the DVCAM format or in the camcorder. When you use Notes •You cannot record on a tape in LP mode in the DV format. •If you cannot play back cassettes that...
You can use a DV cassette without setting REC MODE to AUTO or MANUAL. If you use standard-size and mini-size DVCAM/DV cassettes. (To ensure high-quality playback, editing, and storage of recorded contents, we recommend using the camcorder in a editing system containing both cassettes recorded in the DVCAM format or in the camcorder. When you use Notes •You cannot record on a tape in LP mode in the DV format. •If you cannot play back cassettes that...
Operating Instructions
Page 35
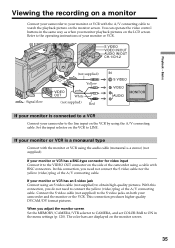
... the line input on the LCD screen. This connection produces higher quality DVCAM/DV format pictures. Playback - When you do not need not connect the S video cable nor the yellow (video) plug of the camcorder using the A/V connecting cable. Refer to the S video jacks on the monitor screen. The color bars are displayed on the side of the A/V connecting cable. You can operate the video control buttons in the menu settings (p. 120). Set the input selector on the VCR to the VIDEO OUT connector...
... the line input on the LCD screen. This connection produces higher quality DVCAM/DV format pictures. Playback - When you do not need not connect the S video cable nor the yellow (video) plug of the camcorder using the A/V connecting cable. Refer to the S video jacks on the monitor screen. The color bars are displayed on the side of the A/V connecting cable. You can operate the video control buttons in the menu settings (p. 120). Set the input selector on the VCR to the VIDEO OUT connector...
Operating Instructions
Page 40
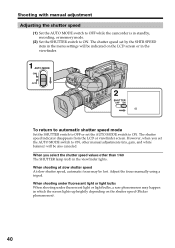
...the shutter speed (Flicker phenomenon). 40 Adjust the focus manually using a tripod. Shooting with manual adjustment Adjusting the shutter speed (1) Set the AUTO MODE switch to OFF while the camcorder is in standby, recording, or memory mode. (2) Set the SHUTTER switch to ON. However, when you select the shutter speed values other manual adjustments (iris, gain, and white balance) will be lost. The shutter speed indicator disappears from the LCD or viewfinder screen. When shooting at slow shutter speed At slow shutter speed, automatic focus may happen in which the screen lights...
...the shutter speed (Flicker phenomenon). 40 Adjust the focus manually using a tripod. Shooting with manual adjustment Adjusting the shutter speed (1) Set the AUTO MODE switch to OFF while the camcorder is in standby, recording, or memory mode. (2) Set the SHUTTER switch to ON. However, when you select the shutter speed values other manual adjustments (iris, gain, and white balance) will be lost. The shutter speed indicator disappears from the LCD or viewfinder screen. When shooting at slow shutter speed At slow shutter speed, automatic focus may happen in which the screen lights...
Operating Instructions
Page 46
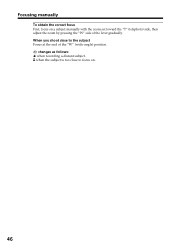
When you shoot close to the subject Focus at the end of the lever gradually. when the subject is too close to focus on a subject manually with the zoom set toward the "T" (telephoto) side, then adjust the zoom by pressing the "W" side of the "W" (wide-angle) position. 9 changes as follows: when recording a distant subject. Focusing manually To obtain the correct focus First, focus on . 46
When you shoot close to the subject Focus at the end of the lever gradually. when the subject is too close to focus on a subject manually with the zoom set toward the "T" (telephoto) side, then adjust the zoom by pressing the "W" side of the "W" (wide-angle) position. 9 changes as follows: when recording a distant subject. Focusing manually To obtain the correct focus First, focus on . 46
Operating Instructions
Page 60
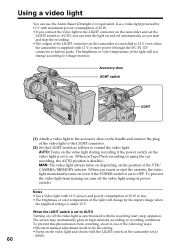
... video light is set to on. (When in Tape Photo recording or using the cut recording, the AUTO position is disable.) MAN: The video light always turns on depending on the position of the VTR/ CAMERA/MEMORY selector. (When you connect the video light to the LIGHT connector on the camcorder and set to AUTO Turning on/off the video light using its power switch.) Notes •Use a video light with the LIGHT switch on the camcorder set to recording conditions. The screen may momentarily glow in manual adjustment mode...
... video light is set to on. (When in Tape Photo recording or using the cut recording, the AUTO position is disable.) MAN: The video light always turns on depending on the position of the VTR/ CAMERA/MEMORY selector. (When you connect the video light to the LIGHT connector on the camcorder and set to AUTO Turning on/off the video light using its power switch.) Notes •Use a video light with the LIGHT switch on the camcorder set to recording conditions. The screen may momentarily glow in manual adjustment mode...
Operating Instructions
Page 62
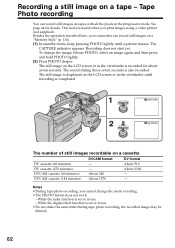
... recorded for details. The still image on the LCD screen or in the viewfinder until a picture freezes. See page 64 for about seven seconds. The CAPTURE indicator appears. While the fader function is set or in use . - Tape Photo recording You can record still images on a cassette DV cassette (60 minutes) DV cassette (270 minutes) DVCAM cassette (40 minutes) DVCAM cassette (184 minutes) DVCAM format - - Besides the operation described here, your camcorder can record still images on a tape - Recording...
... recorded for details. The still image on the LCD screen or in the viewfinder until a picture freezes. See page 64 for about seven seconds. The CAPTURE indicator appears. While the fader function is set or in use . - Tape Photo recording You can record still images on a cassette DV cassette (60 minutes) DV cassette (270 minutes) DVCAM cassette (40 minutes) DVCAM cassette (184 minutes) DVCAM format - - Besides the operation described here, your camcorder can record still images on a tape - Recording...

Operating Instructions
Page 69
... an old movie type atmosphere to pictures. OLD MOVIE You can add special effects to SEPIA. The black bands appear on a moving picture. FLASH (FLASH MOTION) You can record the picture so that it is superimposed on the upper and lower of the screen to change the virtual screen size to the cinemascope size, and the picture effect is set to recorded pictures using the various digital functions. TRAIL You can record still images successively...
... an old movie type atmosphere to pictures. OLD MOVIE You can add special effects to SEPIA. The black bands appear on a moving picture. FLASH (FLASH MOTION) You can record the picture so that it is superimposed on the upper and lower of the screen to change the virtual screen size to the cinemascope size, and the picture effect is set to recorded pictures using the various digital functions. TRAIL You can record still images successively...
Operating Instructions
Page 72
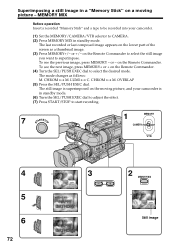
... a recorded "Memory Stick" and a tape to be recorded into your camcorder is in standby mode. The last recorded or last composed image appears on the Remote Commander. (4) Turn the SEL/PUSH EXEC dial to CAMERA. (2) Press MEMORY MIX in standby mode. (6) Turn the SEL/PUSH EXEC dial to adjust the effect. (7) Press START/STOP to superimpose. To see the next image, press MEMORY+ or + on the lower part of the screen...
... a recorded "Memory Stick" and a tape to be recorded into your camcorder is in standby mode. The last recorded or last composed image appears on the Remote Commander. (4) Turn the SEL/PUSH EXEC dial to CAMERA. (2) Press MEMORY MIX in standby mode. (6) Turn the SEL/PUSH EXEC dial to adjust the effect. (7) Press START/STOP to superimpose. To see the next image, press MEMORY+ or + on the lower part of the screen...
Operating Instructions
Page 96
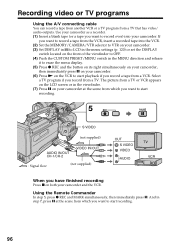
... has video/ audio outputs. Use your camcorder as a recorder. (1) Insert a blank tape (or a tape you want to start playback if you have finished recording Press x on the VCR to record over) into the VCR. (2) Set the MEMORY/CAMERA/VTR selector to VTR on your camcorder. (3) Set DISPLAY in to LCD in the menu settings (p. 120) or set the DISPLAY switch located on the front of the viewfinder to OFF. (4) Push the CUSTOM PRESET/MENU switch in the MENU direction...
... has video/ audio outputs. Use your camcorder as a recorder. (1) Insert a blank tape (or a tape you want to start playback if you have finished recording Press x on the VCR to record over) into the VCR. (2) Set the MEMORY/CAMERA/VTR selector to VTR on your camcorder. (3) Set DISPLAY in to LCD in the menu settings (p. 120) or set the DISPLAY switch located on the front of the viewfinder to OFF. (4) Push the CUSTOM PRESET/MENU switch in the MENU direction...

Operating Instructions
Page 99
... LCD screen or in the viewfinder. If you dub a picture in the commander mode VTR 2, we recommend changing the commander mode or covering the sensor of the VCR with black paper. 99 Before recording Set the DISPLAY switch located on the front of the viewfinder to avoid remote control misoperation. And when you play back the picture using the DV connecting cable (i.LINK cable) When you use another Sony VCR in digital form The color...
... LCD screen or in the viewfinder. If you dub a picture in the commander mode VTR 2, we recommend changing the commander mode or covering the sensor of the VCR with black paper. 99 Before recording Set the DISPLAY switch located on the front of the viewfinder to avoid remote control misoperation. And when you play back the picture using the DV connecting cable (i.LINK cable) When you use another Sony VCR in digital form The color...
Operating Instructions
Page 121
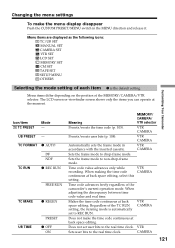
... SET MANUAL SET CAMERA SET VTR SET LCD SET MEMORY SET CM SET TAPE SET SETUP MENU OTHERS Selecting the mode setting of the MEMORY/CAMERA/VTR selector. VTR CAMERA Presets/resets user bits (p. 108). When adjusting the discrepancy between time code value and real time. TC FORMAT z AUTO DF NDF TC RUN z REC RUN FREE RUN TC MAKE z REGEN UB TIME PRESET z OFF ON Meaning MEMORY/ CAMERA/ VTR selector Presets/resets the time code (p. 105). VTR CAMERA Does not make the menu display disappear Push the CUSTOM PRESET/MENU switch...
... SET MANUAL SET CAMERA SET VTR SET LCD SET MEMORY SET CM SET TAPE SET SETUP MENU OTHERS Selecting the mode setting of the MEMORY/CAMERA/VTR selector. VTR CAMERA Presets/resets user bits (p. 108). When adjusting the discrepancy between time code value and real time. TC FORMAT z AUTO DF NDF TC RUN z REC RUN FREE RUN TC MAKE z REGEN UB TIME PRESET z OFF ON Meaning MEMORY/ CAMERA/ VTR selector Presets/resets the time code (p. 105). VTR CAMERA Does not make the menu display disappear Push the CUSTOM PRESET/MENU switch...

Operating Instructions
Page 122
... performed digitally. REC z OFF ON ON z OFF SET Meaning MEMORY/ CAMERA/ VTR selector Adjusts the shutter speed. CAMERA MEMORY To fix the electronic shutter speed. CAMERA To activate the digital zoom. Changing the menu settings Icon/item Mode SHTR SPEED - Sets the interval time and recording time. To compensate for camera-shake. 122 Up to 48× (p. 25). - CAMERA Makes a cut recording. Your camcorder prevents excessive compensation for camera-shake. Records still/moving pictures in the interlace format. If you cancel the SteadyShot function...
... performed digitally. REC z OFF ON ON z OFF SET Meaning MEMORY/ CAMERA/ VTR selector Adjusts the shutter speed. CAMERA MEMORY To fix the electronic shutter speed. CAMERA To activate the digital zoom. Changing the menu settings Icon/item Mode SHTR SPEED - Sets the interval time and recording time. To compensate for camera-shake. 122 Up to 48× (p. 25). - CAMERA Makes a cut recording. Your camcorder prevents excessive compensation for camera-shake. Records still/moving pictures in the interlace format. If you cancel the SteadyShot function...

Operating Instructions
Page 137
... image displayed on the screen will be recorded on a "Memory Stick." Otherwise, image data breakdown may occur. If you press PHOTO lightly in the viewfinder. When the auto logo insert function is flashing Never shake or strike the unit. "CAPTURE" appears on the LCD screen or in the playback mode The playback pauses momentarily. Also, do not turn the power off , eject a "Memory Stick" or remove the battery pack. If " " appears on the LCD screen or in moving picture data recorded on a tape...
... image displayed on the screen will be recorded on a "Memory Stick." Otherwise, image data breakdown may occur. If you press PHOTO lightly in the viewfinder. When the auto logo insert function is flashing Never shake or strike the unit. "CAPTURE" appears on the LCD screen or in the playback mode The playback pauses momentarily. Also, do not turn the power off , eject a "Memory Stick" or remove the battery pack. If " " appears on the LCD screen or in moving picture data recorded on a tape...
Operating Instructions
Page 145
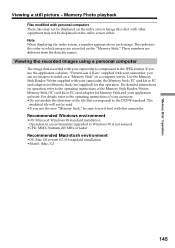
... The image data recorded with your camcorder, the Memory Stick/PC card kit or PC card adaptor for Memory Stick (not supplied) for Memory Stick and your camcorder, you use the new "Memory Stick," be displayed on operation, refer to the operating instructions of the file that corresponds to use the application software, "PictureGear 4.1Lite" supplied with personal computers These files may not be displayed on the index screen either. For detailed instructions on the index screen. "Memory Stick" Operations Viewing a still picture -
... The image data recorded with your camcorder, the Memory Stick/PC card kit or PC card adaptor for Memory Stick (not supplied) for Memory Stick and your camcorder, you use the new "Memory Stick," be displayed on operation, refer to the operating instructions of the file that corresponds to use the application software, "PictureGear 4.1Lite" supplied with personal computers These files may not be displayed on the index screen either. For detailed instructions on the index screen. "Memory Stick" Operations Viewing a still picture -

Operating Instructions
Page 147
... use this function. However, when you press DISPLAY in standby or recording mode You can see memory playback and the file name indicators in addition to the indicators pertinent to copy them with other equipment You may not be displayed. If you set the DISPLAY switch located on the index screen You cannot record the index screen. Image data modified with personal computers or shot with your camcorder. "Memory Stick" Operations Copying an image recorded...
... use this function. However, when you press DISPLAY in standby or recording mode You can see memory playback and the file name indicators in addition to the indicators pertinent to copy them with other equipment You may not be displayed. If you set the DISPLAY switch located on the index screen You cannot record the index screen. Image data modified with personal computers or shot with your camcorder. "Memory Stick" Operations Copying an image recorded...
Operating Instructions
Page 159
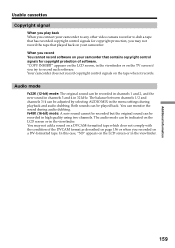
... playback and audio dubbing. Your camcorder does not record copyright control signals on your camcorder. Additional Information Usable cassettes Copyright signal When you play back When you connect your camcorder to any other video camera recorder to record such software. When you recorded on your camcorder that has recorded copyright control signals for copyright protection of the DVCAM format as described on page 156 or when you record You cannot record software on a DV-formatted tape. "COPY...
... playback and audio dubbing. Your camcorder does not record copyright control signals on your camcorder. Additional Information Usable cassettes Copyright signal When you play back When you connect your camcorder to any other video camera recorder to record such software. When you recorded on your camcorder that has recorded copyright control signals for copyright protection of the DVCAM format as described on page 156 or when you record You cannot record software on a DV-formatted tape. "COPY...
Operating Instructions
Page 164
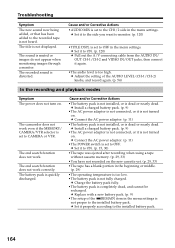
... images through a monitor. The end search function does not work correctly. c Set it to the side you want to monitor. (p. 120) •TITLE DSPL is not fully charged. c Replace with a new battery pack. (p. 9) •The setup of the AUDIO LEVEL (CH-1/CH-2) knobs, and record again. (p. 54) In the recording and playback modes Symptom The power does not turn on . The sound is not proper to the installed battery...
... images through a monitor. The end search function does not work correctly. c Set it to the side you want to monitor. (p. 120) •TITLE DSPL is not fully charged. c Replace with a new battery pack. (p. 9) •The setup of the AUDIO LEVEL (CH-1/CH-2) knobs, and record again. (p. 54) In the recording and playback modes Symptom The power does not turn on . The sound is not proper to the installed battery...
Operating Instructions
Page 176
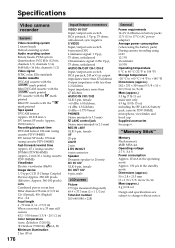
... mark printed Tape speed DVCAM format: Approx. 28.218 mm/s DV format SP mode: Approx. 18.812 mm/s Recording/playback time DVCAM format: 184 min (using cassette PDV-184ME) DV format SP mode: 270 min (using cassette PDV-184ME) Fast-forward/rewind time Approx. 45 s (using cassette DVM60/PDVM-40ME) Approx. 2 min 30 s (using cassette PDV-184ME) Viewfinder Electric viewfinder (B&W) Image device 1/3 type CCD (3 Charge Coupled Device) Approx. 380 000 pixels (Effective: Approx. 340 000 pixels) Lens Combined power zoom lens Filter...
... mark printed Tape speed DVCAM format: Approx. 28.218 mm/s DV format SP mode: Approx. 18.812 mm/s Recording/playback time DVCAM format: 184 min (using cassette PDV-184ME) DV format SP mode: 270 min (using cassette PDV-184ME) Fast-forward/rewind time Approx. 45 s (using cassette DVM60/PDVM-40ME) Approx. 2 min 30 s (using cassette PDV-184ME) Viewfinder Electric viewfinder (B&W) Image device 1/3 type CCD (3 Charge Coupled Device) Approx. 380 000 pixels (Effective: Approx. 340 000 pixels) Lens Combined power zoom lens Filter...


