
Instruction Manual
Page 1
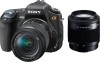
Printed on this product and answers to frequently asked questions can be found at our Customer Support Website. Additional information on 70% or more recycled paper using VOC (Volatile Organic Compound)-free vegetable oil based ink. Digital Single Lens Reflex Camera Instruction Manual DSLR-A300/A350 © 2008 Sony Corporation Preparing the camera Before your operation Shooting images Using the shooting function Using the viewing function Changing your setup Viewing images on a computer Printing images
Printed on this product and answers to frequently asked questions can be found at our Customer Support Website. Additional information on 70% or more recycled paper using VOC (Volatile Organic Compound)-free vegetable oil based ink. Digital Single Lens Reflex Camera Instruction Manual DSLR-A300/A350 © 2008 Sony Corporation Preparing the camera Before your operation Shooting images Using the shooting function Using the viewing function Changing your setup Viewing images on a computer Printing images
Instruction Manual
Page 2
... may be of sufficient magnitude to constitute a risk of important operating and maintenance (servicing) instructions in the literature accompanying the appliance. 2 Owner's Record The model and serial numbers are located on the bottom. Refer to the presence of electric shock to rain or moisture. DSLR-A300/A350 Serial No WARNING To reduce fire or shock hazard, do not expose the unit...
... may be of sufficient magnitude to constitute a risk of important operating and maintenance (servicing) instructions in the literature accompanying the appliance. 2 Owner's Record The model and serial numbers are located on the bottom. Refer to the presence of electric shock to rain or moisture. DSLR-A300/A350 Serial No WARNING To reduce fire or shock hazard, do not expose the unit...
Instruction Manual
Page 3
... voltage points or short out parts that it is a safety feature. Never block the slots and openings by forcing it . Carefully observe all warnings, precautions and instructions on an unstable cart, stand, tripod, bracket, or table. Polarization This set . Do not defeat the safety purpose of power source indicated on the set from battery power, or other ). Cleaning Unplug the set . Use a cloth lightly dampened...
... voltage points or short out parts that it is a safety feature. Never block the slots and openings by forcing it . Carefully observe all warnings, precautions and instructions on an unstable cart, stand, tripod, bracket, or table. Polarization This set . Do not defeat the safety purpose of power source indicated on the set from battery power, or other ). Cleaning Unplug the set . Use a cloth lightly dampened...

Instruction Manual
Page 4
... has used replacement parts specified by the manufacturer) to normal operation. - Adjust only those controls that have fallen into the set is left unattended and unused for service. Lightning For added protection for this indicates a need for long periods of any service or repairs to the set in a confined space, such as opening or removing covers may result in performance - Safety Check Upon completion of time...
... has used replacement parts specified by the manufacturer) to normal operation. - Adjust only those controls that have fallen into the set is left unattended and unused for service. Lightning For added protection for this indicates a need for long periods of any service or repairs to the set in a confined space, such as opening or removing covers may result in performance - Safety Check Upon completion of time...
Instruction Manual
Page 9
... a lens 19 Inserting a memory card 21 Preparing the camera 25 Using the accessories supplied 27 Checking the number of recordable images 29 Cleaning 31 Identifying parts and screen indicators 34 Front side 34 Rear side 35 Sides/Bottom 37 LCD monitor 38 Selecting a function/setting 40 The functions selected by the Fn (Function) button ... 42 The functions selected by the (Drive) button 42 Functions selected by the MENU button 42 Shooting an image without camera shake...
... a lens 19 Inserting a memory card 21 Preparing the camera 25 Using the accessories supplied 27 Checking the number of recordable images 29 Cleaning 31 Identifying parts and screen indicators 34 Front side 34 Rear side 35 Sides/Bottom 37 LCD monitor 38 Selecting a function/setting 40 The functions selected by the Fn (Function) button ... 42 The functions selected by the (Drive) button 42 Functions selected by the MENU button 42 Shooting an image without camera shake...

Instruction Manual
Page 11
... white balance shifted (WB bracket) 100 Using the viewing Playing back images 101 function Checking the information of recorded images 106 Protecting images (Protect 109 Deleting images (Delete 110 Viewing images on a TV screen 112 Changing your setup Setting image size and image quality 114 Setting the method for recording on a memory card ..... 116 Changing the noise reduction setting 118 Changing the conditions under which the shutter can be released 119 Changing the functions of the button and dial 120 Changing other settings 121 Setting the LCD monitor 122 Resetting...
... white balance shifted (WB bracket) 100 Using the viewing Playing back images 101 function Checking the information of recorded images 106 Protecting images (Protect 109 Deleting images (Delete 110 Viewing images on a TV screen 112 Changing your setup Setting image size and image quality 114 Setting the method for recording on a memory card ..... 116 Changing the noise reduction setting 118 Changing the conditions under which the shutter can be released 119 Changing the functions of the button and dial 120 Changing other settings 121 Setting the LCD monitor 122 Resetting...
Instruction Manual
Page 50
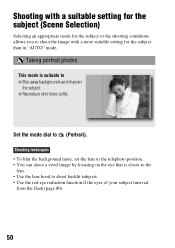
... the subject. Set the mode dial to shoot the image with a suitable setting for the subject (Scene Selection) Selecting an appropriate mode for the subject than in "AUTO" mode. Shooting with a more , set the lens to the telephoto position. • You can shoot a vivid image by focusing on the eye that is suitable to shoot backlit subjects. • Use the red-eye reduction function if the eyes of your subject turn red from the flash (page...
... the subject. Set the mode dial to shoot the image with a suitable setting for the subject (Scene Selection) Selecting an appropriate mode for the subject than in "AUTO" mode. Shooting with a more , set the lens to the telephoto position. • You can shoot a vivid image by focusing on the eye that is suitable to shoot backlit subjects. • Use the red-eye reduction function if the eyes of your subject turn red from the flash (page...
Instruction Manual
Page 57
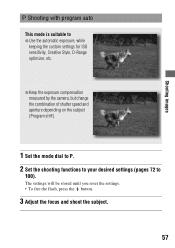
... reset the settings. • To fire the flash, press the button. 3 Adjust the focus and shoot the subject. 57 Shooting images Shooting with program auto This mode is suitable to 100). z Keep the exposure compensation measured by the camera, but change the combination of shutter speed and aperture depending on the subject (Program shift). 1 Set the mode dial to P. 2 Set the shooting functions to your desired settings (pages 72 to z Use the automatic exposure, while keeping the custom settings...
... reset the settings. • To fire the flash, press the button. 3 Adjust the focus and shoot the subject. 57 Shooting images Shooting with program auto This mode is suitable to 100). z Keep the exposure compensation measured by the camera, but change the combination of shutter speed and aperture depending on the subject (Program shift). 1 Set the mode dial to P. 2 Set the shooting functions to your desired settings (pages 72 to z Use the automatic exposure, while keeping the custom settings...
Instruction Manual
Page 77
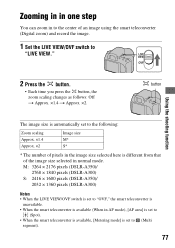
... the smart teleconverter is available, [Metering mode] is different from that of an image using the smart teleconverter (Digital zoom) and record the image. 1 Set the LIVE VIEW/OVF switch to (Multi segment). 77 Zooming in in one step You can zoom in to the center of the image size selected in normal mode. Using the shooting function 2 Press the button. • Each time you press the button, the zoom scaling changes as follows: Off t Approx...
... the smart teleconverter is available, [Metering mode] is different from that of an image using the smart teleconverter (Digital zoom) and record the image. 1 Set the LIVE VIEW/OVF switch to (Multi segment). 77 Zooming in in one step You can zoom in to the center of the image size selected in normal mode. Using the shooting function 2 Press the button. • Each time you press the button, the zoom scaling changes as follows: Off t Approx...

Instruction Manual
Page 81
... shoot a bright image of people and the background. • You can shoot an image with the flash without a cord when the external flash is set to shoot a natural image of the trailing of light and shadow on the camera. 81 Using the shooting function Shooting techniques • When shooting indoors or using nightscape, you can use rear sync to P, A, S, or M. Selecting the flash mode Fn button t [Flash mode] t Select the desired setting (Flash Off) (Autoflash) (Fill-flash) (Slow sync.) (Rear sync.) (Wireless...
... shoot a bright image of people and the background. • You can shoot an image with the flash without a cord when the external flash is set to shoot a natural image of the trailing of light and shadow on the camera. 81 Using the shooting function Shooting techniques • When shooting indoors or using nightscape, you can use rear sync to P, A, S, or M. Selecting the flash mode Fn button t [Flash mode] t Select the desired setting (Flash Off) (Autoflash) (Fill-flash) (Slow sync.) (Rear sync.) (Wireless...

Instruction Manual
Page 83
... light meter where the subject is achieved. 83 The exposure is set when the focus is bright enough and lock the exposure before shooting. Using the shooting function Adjusting the brightness of the image (Exposure, Flash compensation, Metering) Shooting with fixed brightness (AE Lock) When shooting into the sun or by a window, the exposure may not be appropriate for the subject because of the entire image. The spot where you lock the exposure. 1 Fn button t [Metering mode...
... light meter where the subject is achieved. 83 The exposure is set when the focus is bright enough and lock the exposure before shooting. Using the shooting function Adjusting the brightness of the image (Exposure, Flash compensation, Metering) Shooting with fixed brightness (AE Lock) When shooting into the sun or by a window, the exposure may not be appropriate for the subject because of the entire image. The spot where you lock the exposure. 1 Fn button t [Metering mode...
Instruction Manual
Page 121
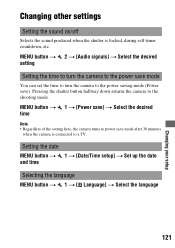
... the sound produced when the shutter is connected to a TV. MENU button t 2 t [Audio signals] t Select the desired setting Setting the time to turn the camera to the power save mode You can set the time to turn the camera to the shooting mode. Pressing the shutter button halfway down returns the camera to the power saving mode (Power save mode after 30 minutes when the camera is locked, during self-timer countdown, etc. Setting the date MENU button t 1 t [Date/Time setup] t Set up the date and time Selecting the language MENU button t 1 t [ Language] t Select the language 121 Changing...
... the sound produced when the shutter is connected to a TV. MENU button t 2 t [Audio signals] t Select the desired setting Setting the time to turn the camera to the power save mode You can set the time to turn the camera to the shooting mode. Pressing the shutter button halfway down returns the camera to the power saving mode (Power save mode after 30 minutes when the camera is locked, during self-timer countdown, etc. Setting the date MENU button t 1 t [Date/Time setup] t Set up the date and time Selecting the language MENU button t 1 t [ Language] t Select the language 121 Changing...
Instruction Manual
Page 125
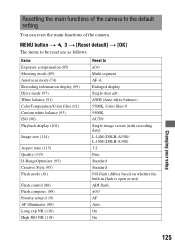
...-image screen (with recording data) L:14M (DSLR-A350)/ L:10M (DSLR-A300) 3:2 Fine Standard Standard Fill-flash (differs based on whether the built-in flash is open or not) ADI flash ±0.0 AF Auto On On Changing your setup 125 Items Exposure compensation (85) Metering mode (89) Autofocus mode (74) Recording information display (69) Drive mode (97) White balance (91) ColorTemperature/Color filter (92) Custom white balance (93) ISO (90) Playback display (101) Image size (114) Aspect ratio (115) Quality (115) D-RangeOptimizer (95) Creative Style...
...-image screen (with recording data) L:14M (DSLR-A350)/ L:10M (DSLR-A300) 3:2 Fine Standard Standard Fill-flash (differs based on whether the built-in flash is open or not) ADI flash ±0.0 AF Auto On On Changing your setup 125 Items Exposure compensation (85) Metering mode (89) Autofocus mode (74) Recording information display (69) Drive mode (97) White balance (91) ColorTemperature/Color filter (92) Custom white balance (93) ISO (90) Playback display (101) Image size (114) Aspect ratio (115) Quality (115) D-RangeOptimizer (95) Creative Style...
Instruction Manual
Page 127
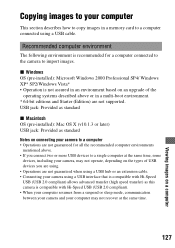
... a suspend or sleep mode, communication between your camera and your computer This section describes how to copy images in a memory card to a computer connected using a USB interface that is compatible with Hi-Speed USB (USB 2.0 compliant) allows advanced transfer (high speed transfer) as standard Notes on connecting your camera to a computer • Operations are not guaranteed when using a USB hub or an extension cable. • Connecting your camera using a USB cable. Viewing images on a computer Copying...
... a suspend or sleep mode, communication between your camera and your computer This section describes how to copy images in a memory card to a computer connected using a USB interface that is compatible with Hi-Speed USB (USB 2.0 compliant) allows advanced transfer (high speed transfer) as standard Notes on connecting your camera to a computer • Operations are not guaranteed when using a USB hub or an extension cable. • Connecting your camera using a USB cable. Viewing images on a computer Copying...

Instruction Manual
Page 137
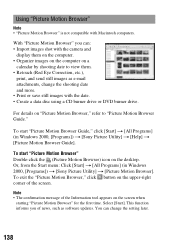
... the instructions on the screen to folder. Note • When the restarting confirmation message appears, restart the computer following software is complete. The following the instructions on the screen. 137 Viewing images on a computer 3 Remove the CD-ROM after the installation is installed and shortcut icons appear on the desktop. • Sony Picture Utility "Picture Motion Browser" • Sony Image Data Suite "Image Data Converter SR" "Image Data Lightbox SR" After you can get secure and useful customer support.
... the instructions on the screen to folder. Note • When the restarting confirmation message appears, restart the computer following software is complete. The following the instructions on the screen. 137 Viewing images on a computer 3 Remove the CD-ROM after the installation is installed and shortcut icons appear on the desktop. • Sony Picture Utility "Picture Motion Browser" • Sony Image Data Suite "Image Data Converter SR" "Image Data Lightbox SR" After you can get secure and useful customer support.
Instruction Manual
Page 138
... images shot with the camera and display them . • Retouch (Red Eye Correction, etc.), print, and send still images as software updates. To start "Picture Motion Browser" Double-click the (Picture Motion Browser) icon on the desktop. Or, from the Start menu: Click [Start] t [All Programs] (in Windows 2000, [Programs]) t [Sony Picture Utility] t [Help] t [Picture Motion Browser Guide]. Note • The confirmation message of the screen. Select [Start]. Using "Picture Motion Browser" Note • "Picture Motion Browser" is not compatible with the date. • Create a data...
... images shot with the camera and display them . • Retouch (Red Eye Correction, etc.), print, and send still images as software updates. To start "Picture Motion Browser" Double-click the (Picture Motion Browser) icon on the desktop. Or, from the Start menu: Click [Start] t [All Programs] (in Windows 2000, [Programs]) t [Sony Picture Utility] t [Help] t [Picture Motion Browser Guide]. Note • The confirmation message of the screen. Select [Start]. Using "Picture Motion Browser" Note • "Picture Motion Browser" is not compatible with the date. • Create a data...

Instruction Manual
Page 152
... lens is full, do your shooting. 152 Set it is not attached properly. No images in viewfinder mode when the power is not inserted. The image has not been recorded. • A memory card is turned on (page 39). Change the memory card. • You cannot record images while charging the built-in the viewfinder. • Adjust the diopter scale properly using the diopter-adjustment dial (page 68). Delete unnecessary images (page 110). - To cancel the power save, operate the camera...
... lens is full, do your shooting. 152 Set it is not attached properly. No images in viewfinder mode when the power is not inserted. The image has not been recorded. • A memory card is turned on (page 39). Change the memory card. • You cannot record images while charging the built-in the viewfinder. • Adjust the diopter scale properly using the diopter-adjustment dial (page 68). Delete unnecessary images (page 110). - To cancel the power save, operate the camera...

Instruction Manual
Page 155
... the Live view mode. The image does not appear on the TV screen. • Check [Video output] to see if the video output signal of your camera is set to delete (page 109). We recommend that you protect images that of your camera, playback on the LCD monitor before shooting. You cannot mark a DPOF mark. • You cannot mark DPOF marks on your computer (page 133). • When an image file...
... the Live view mode. The image does not appear on the TV screen. • Check [Video output] to see if the video output signal of your camera is set to delete (page 109). We recommend that you protect images that of your camera, playback on the LCD monitor before shooting. You cannot mark a DPOF mark. • You cannot mark DPOF marks on your computer (page 133). • When an image file...
Instruction Manual
Page 159
... camera is used, disconnect the power cord. When removing the battery pack, make sure the POWER switch is set to OFF and the access lamp is reset without the resetting operation. • The battery pack was removed when the POWER switch was set the date again (page 25). The setting is not illuminated (page 25). The message "Set date and time?" The number of either the camera (page 144) or the printer. If an AC Adaptor/charger...
... camera is used, disconnect the power cord. When removing the battery pack, make sure the POWER switch is set to OFF and the access lamp is reset without the resetting operation. • The battery pack was removed when the POWER switch was set the date again (page 25). The setting is not illuminated (page 25). The message "Set date and time?" The number of either the camera (page 144) or the printer. If an AC Adaptor/charger...
Instruction Manual
Page 161
... 161 Set date and time? • Set the date and time. It may not be able to perform [Cleaning mode] when the battery level is used (page 17). Charge the battery pack or use card. Format? • The memory card was formatted on a computer and the file format was modified, or the memory card was failed. If the message still appears, change the memory card. Reinsert the card. • The inserted memory card cannot be displayed. Card error • An incompatible memory card is not...
... 161 Set date and time? • Set the date and time. It may not be able to perform [Cleaning mode] when the battery level is used (page 17). Charge the battery pack or use card. Format? • The memory card was formatted on a computer and the file format was modified, or the memory card was failed. If the message still appears, change the memory card. Reinsert the card. • The inserted memory card cannot be displayed. Card error • An incompatible memory card is not...


