
User Guide
Page 1
... be found at our Customer Support Website. Index Operating Instructions Before operating the unit, please read this product. Record the serial number in Malaysia 2-681-187-11 (1) Before your operation Using the shooting functions Digital Single Lens Reflex Camera User's Guide/ Troubleshooting 100 DSLR-A100 Using the viewing functions Using the menu Using your computer Printing images Troubleshooting Others "Read This First" (separate volume) Explains the set-up and basic operations for shooting/ playback with your Sony dealer regarding this manual and "Read This...
... be found at our Customer Support Website. Index Operating Instructions Before operating the unit, please read this product. Record the serial number in Malaysia 2-681-187-11 (1) Before your operation Using the shooting functions Digital Single Lens Reflex Camera User's Guide/ Troubleshooting 100 DSLR-A100 Using the viewing functions Using the menu Using your computer Printing images Troubleshooting Others "Read This First" (separate volume) Explains the set-up and basic operations for shooting/ playback with your Sony dealer regarding this manual and "Read This...
User Guide
Page 3
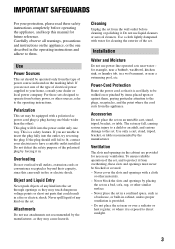
... protect it from overheating, these safety instructions completely before cleaning or polishing it. This is provided. - Do not use power-line operated sets near water - Installation Water and Moisture Do not use liquid cleaners or aerosol cleaners. To ensure reliable operation of the set through openings as they may touch dangerous voltage points or short out parts that it in cabinet, unless proper...
... protect it from overheating, these safety instructions completely before cleaning or polishing it. This is provided. - Do not use power-line operated sets near water - Installation Water and Moisture Do not use liquid cleaners or aerosol cleaners. To ensure reliable operation of the set through openings as they may touch dangerous voltage points or short out parts that it in cabinet, unless proper...
User Guide
Page 4
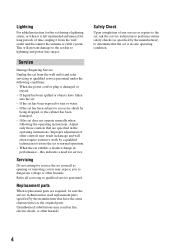
... of any service or repairs to the set, ask the service technician to perform routine safety checks (as opening or removing covers may result in performance - Service Damage Requiring Service Unplug the set to qualified service personnel. When the power cord or plug is damaged or frayed. - If the set exhibits a distinct change in fire, electric shock, or other controls may result in the operating instructions.
... of any service or repairs to the set, ask the service technician to perform routine safety checks (as opening or removing covers may result in performance - Service Damage Requiring Service Unplug the set to qualified service personnel. When the power cord or plug is damaged or frayed. - If the set exhibits a distinct change in fire, electric shock, or other controls may result in the operating instructions.
User Guide
Page 7
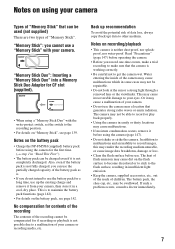
..., remove it in "Read This First") • The battery pack can be charged even if it may render the recording medium unusable, or cause image data breakdown, damage or loss. • Clean the flash surface before operating the camera. • Before you cannot use a "Memory Stick" with the write-protect switch, set the switch to other medium. Read "Precautions" (page 147) before use. "Memory Stick Duo": Inserting a "Memory...
..., remove it in "Read This First") • The battery pack can be charged even if it may render the recording medium unusable, or cause image data breakdown, damage or loss. • Clean the flash surface before operating the camera. • Before you cannot use a "Memory Stick" with the write-protect switch, set the switch to other medium. Read "Precautions" (page 147) before use. "Memory Stick Duo": Inserting a "Memory...
User Guide
Page 11
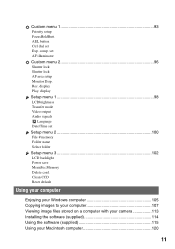
AEL button Ctrl dial set AF illuminator Custom menu 2 96 Shutter lock Shutter lock AF area setup Monitor Disp. display Play. set Exp. Rec. comp. display Setup menu 1 98 LCDbrightness Transfer mode Video output Audio signals Language Date/Time set Setup menu 2 100 File # memory Folder name Select folder Setup menu 3 102 LCD backlight Power save MenuSec.Memory Delete conf. Clean CCD Reset default Using your computer Enjoying your Windows computer 105 Copying images to your computer 107 Viewing image files stored on a computer with your camera 113 Installing the software (...
AEL button Ctrl dial set AF illuminator Custom menu 2 96 Shutter lock Shutter lock AF area setup Monitor Disp. display Play. set Exp. Rec. comp. display Setup menu 1 98 LCDbrightness Transfer mode Video output Audio signals Language Date/Time set Setup menu 2 100 File # memory Folder name Select folder Setup menu 3 102 LCD backlight Power save MenuSec.Memory Delete conf. Clean CCD Reset default Using your computer Enjoying your Windows computer 105 Copying images to your computer 107 Viewing image files stored on a computer with your camera 113 Installing the software (...

User Guide
Page 24
... length (8) Shutter speed (36) Ev scale (65) Aperture (34) Flash-compensation (57) Mode dial (31) AWB +1 5500K M1 ISO100 100MSDCF0002 2006.01.01 Metering mode (58) White balance (Auto, Preset, Color temperature, CC filter, Custom) (46) ISO sensitivity (ISO) (44) Super SteadyShot (t step 5 in "Read This First") Date of recording Protect (89) DPOF set (91) Folder - file number (112) Battery remaining (t step 1 in "Read This First") Folder - LCD monitor (single-image playback) LCD monitor (Histogram display) Display L:10M M:5.6M...
... length (8) Shutter speed (36) Ev scale (65) Aperture (34) Flash-compensation (57) Mode dial (31) AWB +1 5500K M1 ISO100 100MSDCF0002 2006.01.01 Metering mode (58) White balance (Auto, Preset, Color temperature, CC filter, Custom) (46) ISO sensitivity (ISO) (44) Super SteadyShot (t step 5 in "Read This First") Date of recording Protect (89) DPOF set (91) Folder - file number (112) Battery remaining (t step 1 in "Read This First") Folder - LCD monitor (single-image playback) LCD monitor (Histogram display) Display L:10M M:5.6M...
User Guide
Page 30
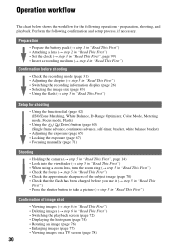
...a TV screen (page 78) 30 Perform the following operations - preparation, shooting, and playback. Operation workflow The chart below shows the workflow for shooting • Using the function dial (page 42) (ISO/Zone Matching, White Balance, D-Range Optimizer, Color Mode, Metering mode, Focus mode, Flash) • Using the (Drive) button (page 60) (Single frame advance, continuous advance, self-timer, bracket, white balance bracket) • Adjusting the exposure (page 65) • Locking the exposure (page 67) • Focusing manually (page 71) Shooting • Holding the camera...
...a TV screen (page 78) 30 Perform the following operations - preparation, shooting, and playback. Operation workflow The chart below shows the workflow for shooting • Using the function dial (page 42) (ISO/Zone Matching, White Balance, D-Range Optimizer, Color Mode, Metering mode, Focus mode, Flash) • Using the (Drive) button (page 60) (Single frame advance, continuous advance, self-timer, bracket, white balance bracket) • Adjusting the exposure (page 65) • Locking the exposure (page 67) • Focusing manually (page 71) Shooting • Holding the camera...
User Guide
Page 32
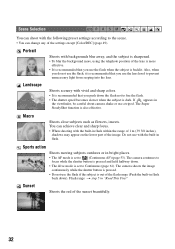
...). Portrait Shoots with vivid and sharp colors. • It is recommended that you use the flash if the subject is out of the sunset beautifully. 32 The camera continues to focus while the shutter button is pressed and held halfway down the flash not to fire the flash. • The shutter speed becomes slower when the subject is set to prevent unnecessary light from...
...). Portrait Shoots with vivid and sharp colors. • It is recommended that you use the flash if the subject is out of the sunset beautifully. 32 The camera continues to focus while the shutter button is pressed and held halfway down the flash not to fire the flash. • The shutter speed becomes slower when the subject is set to prevent unnecessary light from...

User Guide
Page 46
...a specific light source. Adjusting the white balance ISO WB D-R DEC Normally, the camera automatically adjusts the color tones. Use this function if you can adjust the white balance between +3 and -3 (in color temperature filters. 46 AWB (Auto white balance) Adjusts the white balance automatically. (Preset white balance) K* (Color temperature) Adjusts the white balance to each procedure. However, you cannot get your desired color in [AWB]. 1 Display the White-balance mode screen with the function dial and the Fn button (page 43). 2 Display the Preset white balance screen...
...a specific light source. Adjusting the white balance ISO WB D-R DEC Normally, the camera automatically adjusts the color tones. Use this function if you can adjust the white balance between +3 and -3 (in color temperature filters. 46 AWB (Auto white balance) Adjusts the white balance automatically. (Preset white balance) K* (Color temperature) Adjusts the white balance to each procedure. However, you cannot get your desired color in [AWB]. 1 Display the White-balance mode screen with the function dial and the Fn button (page 43). 2 Display the Preset white balance screen...

User Guide
Page 48
... controller. • The custom white balance setting registered in close proximity or a subject with the memorized custom white balance setting retained. This compensation can shoot at this operation is effective until a new setting is registered. (The setting is recommended that the white area fully covers the spot-metering circle and press the shutter button down. Custom white balance In a scene where the ambient light consists of multiple types of light source, use of custom white balance is registered with the flash...
... controller. • The custom white balance setting registered in close proximity or a subject with the memorized custom white balance setting retained. This compensation can shoot at this operation is effective until a new setting is registered. (The setting is recommended that the white area fully covers the spot-metering circle and press the shutter button down. Custom white balance In a scene where the ambient light consists of multiple types of light source, use of custom white balance is registered with the flash...

User Guide
Page 51
... focus mode switch to get the proper focus. 1 Display the focus mode screen with the function dial and the Fn button (page 43). 2 Display the AF area screen with v on the controller, then press the center of color reproduction, compared to set the AF area and the AF mode. • When shooting in Adobe RGB To display or print the image, use an application such as "Picture Motion Browser", that supports color management, such as "Picture Motion Browser...
... focus mode switch to get the proper focus. 1 Display the focus mode screen with the function dial and the Fn button (page 43). 2 Display the AF area screen with v on the controller, then press the center of color reproduction, compared to set the AF area and the AF mode. • When shooting in Adobe RGB To display or print the image, use an application such as "Picture Motion Browser", that supports color management, such as "Picture Motion Browser...

User Guide
Page 56
...; Place the external flash in the viewfinder and on the LCD monitor. To set the external flash, refer to set [AEL button] (page 93) to [AE hold] or [ AE hold] in flash to send a signal to the off-camera flash to take a picture. • Turn off . About the position of the camera and the flash This camera uses the flash light of the following points to the camera and select a different flash mode, as illustrated below...
...; Place the external flash in the viewfinder and on the LCD monitor. To set the external flash, refer to set [AEL button] (page 93) to [AE hold] or [ AE hold] in flash to send a signal to the off-camera flash to take a picture. • Turn off . About the position of the camera and the flash This camera uses the flash light of the following points to the camera and select a different flash mode, as illustrated below...

User Guide
Page 57
...) • The camera's flash sync speed is . 1 Display the Flash mode screen with the function dial and the Fn button (page 43). 2 Select the Flash compensation with V. 3 Select the desired value with b/B on and 1/160 second with the Super SteadyShot function off. • Double the maximum distance when using a wireless flash nearby and his/her built-in flash light triggers firing of the controller. 57 Using the shooting functions Specifications with wireless flashes at ISO 400...
...) • The camera's flash sync speed is . 1 Display the Flash mode screen with the function dial and the Fn button (page 43). 2 Select the Flash compensation with V. 3 Select the desired value with b/B on and 1/160 second with the Super SteadyShot function off. • Double the maximum distance when using a wireless flash nearby and his/her built-in flash light triggers firing of the controller. 57 Using the shooting functions Specifications with wireless flashes at ISO 400...

User Guide
Page 62
... self-timer lamp located on the front side flashes and lights up beforehand. Press and hold the shutter button until the recording stops. Press and hold the shutter button until the recording stops. You cannot cancel the 2-second self-timer in a photo and the 2-second self-timer is convenient to prevent unnecessary lighting from the correct exposure image. The self-timer indicator located on the shoulder strap to reduce the camera-shake because the mirror is turned...
... self-timer lamp located on the front side flashes and lights up beforehand. Press and hold the shutter button until the recording stops. Press and hold the shutter button until the recording stops. You cannot cancel the 2-second self-timer in a photo and the 2-second self-timer is convenient to prevent unnecessary lighting from the correct exposure image. The self-timer indicator located on the shoulder strap to reduce the camera-shake because the mirror is turned...

User Guide
Page 93
... level. 93 Release (RP*) The shutter can be changed. The AEL button has two modes of -field preview button. There is no need to hold the AEL (AE Lock) button down . FocusHoldButt. If you can be released even when the focus is recommended that temporarily performs spot metering and locks the acquired exposure value. The AEL (AE Lock) button has two functions; Custom menu 1 Custom menu For details on the recording information display. Focus hold button...
... level. 93 Release (RP*) The shutter can be changed. The AEL button has two modes of -field preview button. There is no need to hold the AEL (AE Lock) button down . FocusHoldButt. If you can be released even when the focus is recommended that temporarily performs spot metering and locks the acquired exposure value. The AEL (AE Lock) button has two functions; Custom menu 1 Custom menu For details on the recording information display. Focus hold button...
User Guide
Page 94
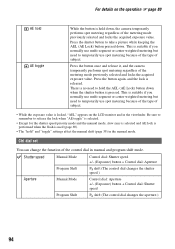
... control dial changes the shutter speed.) Aperture Manual Mode Control dial: Aperture +/- (Exposure) button + Control dial: Shutter speed Program Shift PA shift (The control dial changes the aperture.) 94 Ctrl dial set You can change the function of the metering mode previously selected and locks the acquired exposure value. For details on the LCD monitor and in the viewfinder. Press the button once and release it, and the camera temporarily performs spot metering regardless of the control dial in the manual mode. There is no need to temporarily use...
... control dial changes the shutter speed.) Aperture Manual Mode Control dial: Aperture +/- (Exposure) button + Control dial: Shutter speed Program Shift PA shift (The control dial changes the aperture.) 94 Ctrl dial set You can change the function of the metering mode previously selected and locks the acquired exposure value. For details on the LCD monitor and in the viewfinder. Press the button once and release it, and the camera temporarily performs spot metering regardless of the control dial in the manual mode. There is no need to temporarily use...
User Guide
Page 114
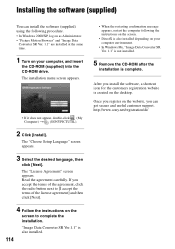
... restarting confirmation message appears, restart the computer following procedure. • In Windows 2000/XP, log on as Administrator. • "Picture Motion Browser" and "Image Data Converter SR Ver. 1.1" are installed at the same time. 1 Turn on your computer environment. • In Windows Me, "Image Data Converter SR Ver. 1.1" is not installed. 5 Remove the CD-ROM after the installation is complete. The "Choose Setup Language" screen appears. 3 Select the desired language, then click...
... restarting confirmation message appears, restart the computer following procedure. • In Windows 2000/XP, log on as Administrator. • "Picture Motion Browser" and "Image Data Converter SR Ver. 1.1" are installed at the same time. 1 Turn on your computer environment. • In Windows Me, "Image Data Converter SR Ver. 1.1" is not installed. 5 Remove the CD-ROM after the installation is complete. The "Choose Setup Language" screen appears. 3 Select the desired language, then click...
User Guide
Page 121
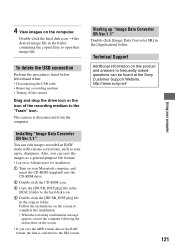
... answers to folder. Also, you save the images as a general-purpose file format. • Log on as Administrator for installation. 1 Turn on the computer. Follow the instructions on the screen to complete the installation. • When the restarting confirmation message appears, restart the computer following the instructions on the screen. • If you can be found at the Sony Customer Support Website. To delete the USB connection Perform the...
... answers to folder. Also, you save the images as a general-purpose file format. • Log on as Administrator for installation. 1 Turn on the computer. Follow the instructions on the screen to complete the installation. • When the restarting confirmation message appears, restart the computer following the instructions on the screen. • If you can be found at the Sony Customer Support Website. To delete the USB connection Perform the...

User Guide
Page 130
... function may not be used , take it off the Super SteadyShot function and consider using the flash (t step 5 in "Read This First"). • Light the room and shoot the subject. In such a case, turn off and try shooting again. The eyes of the subject come out red. • Activate the red eye reduction function (page 86). • Get close to appear too dark (insufficient light). The image...
... function may not be used , take it off the Super SteadyShot function and consider using the flash (t step 5 in "Read This First"). • Light the room and shoot the subject. In such a case, turn off and try shooting again. The eyes of the subject come out red. • Activate the red eye reduction function (page 86). • Get close to appear too dark (insufficient light). The image...
User Guide
Page 132
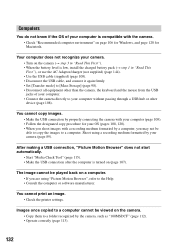
... does not recognize your camera. • Turn on the camera (t step 3 in "Read This First"). • When the battery level is low, install the charged battery pack (t step 1 in "Read This First"), or use the AC Adaptor/charger (not supplied) (page 144). • Use the USB cable (supplied) (page 108). • Disconnect the USB cable, and connect it again firmly. • Set [Transfer mode] to [Mass Storage] (page...
... does not recognize your camera. • Turn on the camera (t step 3 in "Read This First"). • When the battery level is low, install the charged battery pack (t step 1 in "Read This First"), or use the AC Adaptor/charger (not supplied) (page 144). • Use the USB cable (supplied) (page 108). • Disconnect the USB cable, and connect it again firmly. • Set [Transfer mode] to [Mass Storage] (page...


