
Instruction Manual
Page 1
Digital Single Lens Reflex Camera Instruction Manual DSLR-A500/A550 Preparing the camera Before your operation Shooting images Using the shooting function Using the viewing function Changing your setup Viewing images on this product and answers to frequently asked questions can be found at our Customer Support Website. Additional information on a computer Printing images Printed on 70% or more recycled paper using VOC (Volatile Organic Compound)-free vegetable oil based ink.
Digital Single Lens Reflex Camera Instruction Manual DSLR-A500/A550 Preparing the camera Before your operation Shooting images Using the shooting function Using the viewing function Changing your setup Viewing images on this product and answers to frequently asked questions can be found at our Customer Support Website. Additional information on a computer Printing images Printed on 70% or more recycled paper using VOC (Volatile Organic Compound)-free vegetable oil based ink.
Instruction Manual
Page 7
... this Instruction Manual: at an ordinary ambient temperature of 25ºC (77°F), and using the "Pixel mapping" function (page 163). Black, white, red, blue and green points • Do not hold of your camera Shooting procedure • This camera has two modes for shooting: the Live View mode using the LCD monitor, and the viewfinder mode using the viewfinder (OVF). • There may be differences between an image recorded in Live View mode and an image recorded in viewfinder mode, such as exposure, white balance...
... this Instruction Manual: at an ordinary ambient temperature of 25ºC (77°F), and using the "Pixel mapping" function (page 163). Black, white, red, blue and green points • Do not hold of your camera Shooting procedure • This camera has two modes for shooting: the Live View mode using the LCD monitor, and the viewfinder mode using the viewfinder (OVF). • There may be differences between an image recorded in Live View mode and an image recorded in viewfinder mode, such as exposure, white balance...

Instruction Manual
Page 9
... mode 61 Shooting with program auto 62 Shooting by controlling the blur of the background (Aperture priority 63 Shooting a moving subject with various expressions (Shutter speed priority 65 Shooting with the exposure adjusted manually (Manual exposure 67 Shooting trails with long exposure (BULB 69 Shooting with the viewfinder (OVF 71 Switching to the viewfinder 71 Adjusting the focus of the finder (diopter adjustment) 72 Switching the recording information display (DISP) 73 LCD monitor (Graphic Display 74 LCD monitor (Standard Display 76 Viewfinder 78 Using...
... mode 61 Shooting with program auto 62 Shooting by controlling the blur of the background (Aperture priority 63 Shooting a moving subject with various expressions (Shutter speed priority 65 Shooting with the exposure adjusted manually (Manual exposure 67 Shooting trails with long exposure (BULB 69 Shooting with the viewfinder (OVF 71 Switching to the viewfinder 71 Adjusting the focus of the finder (diopter adjustment) 72 Switching the recording information display (DISP) 73 LCD monitor (Graphic Display 74 LCD monitor (Standard Display 76 Viewfinder 78 Using...

Instruction Manual
Page 11
...Protecting images (Protect 122 Deleting images (Delete 123 Viewing images on a TV screen 125 Changing your setup Setting image size and image quality 128 Setting the method for recording on a memory card ..... 130 Changing the noise reduction setting 132 Changing the function of the AEL button 133 Changing other settings 134 Setting the LCD monitor 135 Confirming the version of the camera 137 Resetting to the default 138 Viewing images Using your computer 140 on a computer Using the software 147 Printing images Specifying DPOF 152 Printing images by connecting the camera to...
...Protecting images (Protect 122 Deleting images (Delete 123 Viewing images on a TV screen 125 Changing your setup Setting image size and image quality 128 Setting the method for recording on a memory card ..... 130 Changing the noise reduction setting 132 Changing the function of the AEL button 133 Changing other settings 134 Setting the LCD monitor 135 Confirming the version of the camera 137 Resetting to the default 138 Viewing images Using your computer 140 on a computer Using the software 147 Printing images Specifying DPOF 152 Printing images by connecting the camera to...

Instruction Manual
Page 45
...) Long exp.NR (132) High ISO NR (132) 2 Custom menu Eye-Start AF (71) AEL button (92) 1 Red eye reduc. (90) Auto review (135) Auto off w/ VF (136) Grid Line (136) 45 Before your operation The functions selected by the Fn (Function) button Drive mode (108) Flash mode (88) Autofocus mode (82) AF area (83) Face Detection (52) Smile Shutter (113) ISO sensitivity (103) Metering mode (97) Flash compens. (95) White balance (104) DRO/Auto HDR (98) Creative Style (101...
...) Long exp.NR (132) High ISO NR (132) 2 Custom menu Eye-Start AF (71) AEL button (92) 1 Red eye reduc. (90) Auto review (135) Auto off w/ VF (136) Grid Line (136) 45 Before your operation The functions selected by the Fn (Function) button Drive mode (108) Flash mode (88) Autofocus mode (82) AF area (83) Face Detection (52) Smile Shutter (113) ISO sensitivity (103) Metering mode (97) Flash compens. (95) White balance (104) DRO/Auto HDR (98) Creative Style (101...

Instruction Manual
Page 62
Shooting with program auto This mode is suitable for z Using the automatic exposure, while keeping the custom settings for ISO sensitivity, Creative Style, D-Range optimizer, etc. 1 Set the mode dial to P. 2 Set the shooting functions to your desired settings (pages 79 to 112). • To fire the flash, press the button. 3 Adjust the focus and shoot the subject. 62
Shooting with program auto This mode is suitable for z Using the automatic exposure, while keeping the custom settings for ISO sensitivity, Creative Style, D-Range optimizer, etc. 1 Set the mode dial to P. 2 Set the shooting functions to your desired settings (pages 79 to 112). • To fire the flash, press the button. 3 Adjust the focus and shoot the subject. 62

Instruction Manual
Page 68
...). Manual shift You can change the shutter speed and aperture value combination without changing the exposure you shoot with the flash. Toward -: Images become brighter. Standard value Notes • The (Camera shake warning) indicator is not indicated in manual exposure mode. • When the mode dial is set . Toward +: Images become darker. Rotate the control dial while pressing the AEL button to the aperture value. When you set to [200]. In M mode, the ISO setting [AUTO] is set . • Check the exposure...
...). Manual shift You can change the shutter speed and aperture value combination without changing the exposure you shoot with the flash. Toward -: Images become brighter. Standard value Notes • The (Camera shake warning) indicator is not indicated in manual exposure mode. • When the mode dial is set . Toward +: Images become darker. Rotate the control dial while pressing the AEL button to the aperture value. When you set to [200]. In M mode, the ISO setting [AUTO] is set . • Check the exposure...

Instruction Manual
Page 70
... shutter remains open using a tripod, turn off the SteadyShot function (page 48). • The longer the exposure time, the more conspicuous the noise on the image. • After shooting, noise reduction (Long exp.NR) will be done for the duration of time that is equipped with a shutter button lock function (sold separately) (page 112). Shooting techniques • Use a tripod. • Set the focus to infinity in manual focus mode when shooting fireworks, etc. • Use the Wireless Remote...
... shutter remains open using a tripod, turn off the SteadyShot function (page 48). • The longer the exposure time, the more conspicuous the noise on the image. • After shooting, noise reduction (Long exp.NR) will be done for the duration of time that is equipped with a shutter button lock function (sold separately) (page 112). Shooting techniques • Use a tripod. • Set the focus to infinity in manual focus mode when shooting fireworks, etc. • Use the Wireless Remote...
Instruction Manual
Page 91
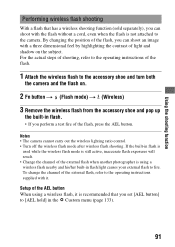
... wireless flash mode after wireless flash shooting. Using the shooting function Performing wireless flash shooting With a flash that you set [AEL button] to [AEL hold] in flash light causes your external flash to fire. By changing the position of the external flash, refer to the operating instructions supplied with the flash without a cord, even when the flash is not attached to the camera. To change the channel of the flash, you can shoot with it is using a wireless flash nearby and his/her built-in the Custom menu...
... wireless flash mode after wireless flash shooting. Using the shooting function Performing wireless flash shooting With a flash that you set [AEL button] to [AEL hold] in flash light causes your external flash to fire. By changing the position of the external flash, refer to the operating instructions supplied with the flash without a cord, even when the flash is not attached to the camera. To change the channel of the flash, you can shoot with it is using a wireless flash nearby and his/her built-in the Custom menu...

Instruction Manual
Page 92
... subject is achieved. 92 The spot where you lock the exposure. 1 Fn button t (Metering mode) t (Spot) 2 Adjust the focus on the portion you want to lock the exposure of the entire image. The exposure is set when the focus is bright enough and lock the exposure before shooting. To make the subject brighter, point the camera forwards a spot that is brighter than the subject and use the light meter to lock the exposure.
... subject is achieved. 92 The spot where you lock the exposure. 1 Fn button t (Metering mode) t (Spot) 2 Adjust the focus on the portion you want to lock the exposure of the entire image. The exposure is set when the focus is bright enough and lock the exposure before shooting. To make the subject brighter, point the camera forwards a spot that is brighter than the subject and use the light meter to lock the exposure.

Instruction Manual
Page 95
... shift to AUTO or Scene Selection. 95 Fn button t (Flash compens.) t Select the desired setting Toward +: Makes the flash level higher. Notes • The histogram displayed in the following situations: - Using the shooting function The exposure compensation will differ based on aperture setting, etc. • The histogram differs between shooting and playback in Live View mode does not indicate the final recorded image. When firing the flash. - When the subject has low intensity, such as night scenery. Both...
... shift to AUTO or Scene Selection. 95 Fn button t (Flash compens.) t Select the desired setting Toward +: Makes the flash level higher. Notes • The histogram displayed in the following situations: - Using the shooting function The exposure compensation will differ based on aperture setting, etc. • The histogram differs between shooting and playback in Live View mode does not indicate the final recorded image. When firing the flash. - When the subject has low intensity, such as night scenery. Both...
Instruction Manual
Page 129
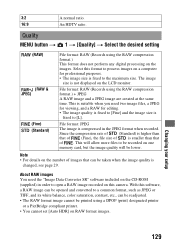
... not displayed on one memory card, but the image quality will be printed using a DPOF (print) designated printer or a PictBridge compliant printer. • You cannot set [Auto HDR] on the images. Note • For details on this camera. Changing your setup 129 File format: JPEG The image is smaller than that can be readjusted. • The RAW format image cannot be lower. 3:2 A normal ratio. 16:9 An HDTV ratio. Quality MENU button...
... not displayed on one memory card, but the image quality will be printed using a DPOF (print) designated printer or a PictBridge compliant printer. • You cannot set [Auto HDR] on the images. Note • For details on this camera. Changing your setup 129 File format: JPEG The image is smaller than that can be readjusted. • The RAW format image cannot be lower. 3:2 A normal ratio. 16:9 An HDTV ratio. Quality MENU button...

Instruction Manual
Page 134
... is set different time intervals for the camera to switch to power save mode (Power save mode You can set to the power save ) for the Live View (LV) and viewfinder modes (OVF). MENU button t 2 t [Audio signals] t Select the desired setting Removing the Help Guide from the screen You can turn the camera to (Remote Commander). Pressing the shutter button halfway down returns the camera to perform the next operation quickly. This is convenient when you operate the camera. Selecting the language MENU button t 1 t [ Language] t Select the language 134 Changing other settings Setting...
... is set different time intervals for the camera to switch to power save mode (Power save mode You can set to the power save ) for the Live View (LV) and viewfinder modes (OVF). MENU button t 2 t [Audio signals] t Select the desired setting Removing the Help Guide from the screen You can turn the camera to (Remote Commander). Pressing the shutter button halfway down returns the camera to perform the next operation quickly. This is convenient when you operate the camera. Selecting the language MENU button t 1 t [ Language] t Select the language 134 Changing other settings Setting...

Instruction Manual
Page 135
... [Auto]. MENU button t 1 t [LCD brightness] t [Manual] t Select the desired setting Notes • When it is set to [Auto], do not cover the light sensor with your hand and so on the LCD monitor right after shooting (Auto review) You can change the displayed time. You can check the recorded image on . • When using the light sensor (page 36). You can set the brightness of the LCD monitor manually. Setting the LCD monitor Setting the brightness of the LCD monitor manually...
... [Auto]. MENU button t 1 t [LCD brightness] t [Manual] t Select the desired setting Notes • When it is set to [Auto], do not cover the light sensor with your hand and so on the LCD monitor right after shooting (Auto review) You can change the displayed time. You can check the recorded image on . • When using the light sensor (page 36). You can set the brightness of the LCD monitor manually. Setting the LCD monitor Setting the brightness of the LCD monitor manually...

Instruction Manual
Page 138
... reset the main functions of the camera. Resetting to L:14M (DSLR-A550)/ L:12M (DSLR-A500) 3:2 Fine ADI flash Auto 138 Items Exposure compensation (93) Recording information display (73) Playback display (115) Drive mode (108) Flash mode (88) Autofocus mode (82) AF area (83) Face Detection (52) Smile Shutter (113) ISO (103) Metering mode (97) Flash compens. (95) White balance (104) ColorTemperature/Color filter (105) Custom white balance (106) DRO/Auto HDR (98) Creative Style (101) Recording menu Reset to be reset are as follows. MENU button t 3 t [Reset default...
... reset the main functions of the camera. Resetting to L:14M (DSLR-A550)/ L:12M (DSLR-A500) 3:2 Fine ADI flash Auto 138 Items Exposure compensation (93) Recording information display (73) Playback display (115) Drive mode (108) Flash mode (88) Autofocus mode (82) AF area (83) Face Detection (52) Smile Shutter (113) ISO (103) Metering mode (97) Flash compens. (95) White balance (104) ColorTemperature/Color filter (105) Custom white balance (106) DRO/Auto HDR (98) Creative Style (101) Recording menu Reset to be reset are as follows. MENU button t 3 t [Reset default...

Instruction Manual
Page 140
... at the same time. 140 Viewing images on an upgrade of USB devices you are using. • Operations are not supported. *2 Starter (Edition) is not supported. USB jack: Provided as standard x Macintosh OS (pre-installed): Mac OS X v10.3/Mac OS X v10.4/Mac OS X v10.5 USB jack: Provided as this camera is compatible with Hi-Speed USB (USB 2.0 compliant). • When your computer resumes from a suspend or sleep mode, communication between your...
... at the same time. 140 Viewing images on an upgrade of USB devices you are using. • Operations are not supported. *2 Starter (Edition) is not supported. USB jack: Provided as standard x Macintosh OS (pre-installed): Mac OS X v10.3/Mac OS X v10.4/Mac OS X v10.5 USB jack: Provided as this camera is compatible with Hi-Speed USB (USB 2.0 compliant). • When your computer resumes from a suspend or sleep mode, communication between your...

Instruction Manual
Page 149
...-ROM after the installation is installed and shortcut icons appear on the desktop. • Sony Image Data Suite "Image Data Converter SR" "Image Data Lightbox SR" • Sony Picture Utility "PMB" "PMB Guide" x Macintosh • Log on as Administrator. 1 Turn on your Macintosh computer, and insert the CD-ROM (supplied) into the CD-ROM drive. 2 Double-click the CD-ROM icon. 3 Copy the [IDS_INST.pkg] file in the [MAC] folder to the hard disk icon...
...-ROM after the installation is installed and shortcut icons appear on the desktop. • Sony Image Data Suite "Image Data Converter SR" "Image Data Lightbox SR" • Sony Picture Utility "PMB" "PMB Guide" x Macintosh • Log on as Administrator. 1 Turn on your Macintosh computer, and insert the CD-ROM (supplied) into the CD-ROM drive. 2 Double-click the CD-ROM icon. 3 Copy the [IDS_INST.pkg] file in the [MAC] folder to the hard disk icon...

Instruction Manual
Page 164
... when the image file was recorded using a model other than that you cannot restore it. The EV scale b B is flashing on the LCD monitor or in the viewfinder. • The subject is strange. • In Live View mode, carefully check the image displayed on the LCD monitor before shooting. Computers You do not want to recognize the color of your camera, playback on your computer is in Live View mode is...
... when the image file was recorded using a model other than that you cannot restore it. The EV scale b B is flashing on the LCD monitor or in the viewfinder. • The subject is strange. • In Live View mode, carefully check the image displayed on the LCD monitor before shooting. Computers You do not want to recognize the color of your camera, playback on your computer is in Live View mode is...

Instruction Manual
Page 169
... separately). If you use this camera (page 23). Power insufficient • You tried to the recording position. Unable to complete the format. Charge the battery pack or use SD memory card. Format? • The memory card was formatted on this card. Set date and time? • Set the date and time. SD memory card locked. • You are using a memory card with the manufacturer of recording and playing normally. • Since the card is not "Memory Stick" standard-compatible, it is inserted...
... separately). If you use this camera (page 23). Power insufficient • You tried to the recording position. Unable to complete the format. Charge the battery pack or use SD memory card. Format? • The memory card was formatted on this card. Set date and time? • Set the date and time. SD memory card locked. • You are using a memory card with the manufacturer of recording and playing normally. • Since the card is not "Memory Stick" standard-compatible, it is inserted...

Instruction Manual
Page 170
...... • When Long exposure noise reduction will be done for the same amount of the camera in the memory card. Shutter is locked. • The lens is not attached properly, or the lens is locked. Turn the power off , remove the battery pack, then re-insert it again. Camera error System error • Turn the power off . If the message appears frequently, consult your Sony dealer or local authorized Sony service facility. Insert a memory card. Image protected •...
...... • When Long exposure noise reduction will be done for the same amount of the camera in the memory card. Shutter is locked. • The lens is not attached properly, or the lens is locked. Turn the power off , remove the battery pack, then re-insert it again. Camera error System error • Turn the power off . If the message appears frequently, consult your Sony dealer or local authorized Sony service facility. Insert a memory card. Image protected •...


