Instruction Manual
Page 7
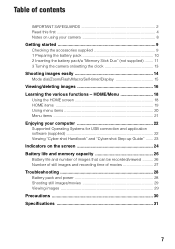
...movies 27 Troubleshooting 28 Battery pack and power 28 Shooting still images/movies 29 Viewing images 29 Precautions 30 Specifications 31 7 HOME/Menu 18 Using the HOME screen 18 HOME items 19 Using menu items 20 Menu items 21 Enjoying your camera 8 Getting started 9 Checking the accessories ...supplied 9 1 Preparing the battery pack 10 2 Inserting the battery pack/a "Memory Stick Duo" (not supplied) ........ 11 3 Turning the camera on the screen 24 Battery life and memory capacity 26 Battery life and number of images that can be recorded/viewed .......... 26 Number...
...movies 27 Troubleshooting 28 Battery pack and power 28 Shooting still images/movies 29 Viewing images 29 Precautions 30 Specifications 31 7 HOME/Menu 18 Using the HOME screen 18 HOME items 19 Using menu items 20 Menu items 21 Enjoying your camera 8 Getting started 9 Checking the accessories ...supplied 9 1 Preparing the battery pack 10 2 Inserting the battery pack/a "Memory Stick Duo" (not supplied) ........ 11 3 Turning the camera on the screen 24 Battery life and memory capacity 26 Battery life and number of images that can be recorded/viewed .......... 26 Number...

Instruction Manual
Page 10
...charging is finished (Practical charge). When the CHARGE lamp turns off the power by . • Even if the CHARGE lamp is not lit, the battery charger is not disconnected from the battery charger. • Designed for use with compatible Sony batteries. 10 1 Preparing the battery pack For customers in... the USA and Canada Plug For customers other than those in the USA and Canada ɟ ɟ CHARGE lamp CHARGE lamp Power cord (mains lead) 1Insert the battery pack ...
...charging is finished (Practical charge). When the CHARGE lamp turns off the power by . • Even if the CHARGE lamp is not lit, the battery charger is not disconnected from the battery charger. • Designed for use with compatible Sony batteries. 10 1 Preparing the battery pack For customers in... the USA and Canada Plug For customers other than those in the USA and Canada ɟ ɟ CHARGE lamp CHARGE lamp Power cord (mains lead) 1Insert the battery pack ...
Instruction Manual
Page 11
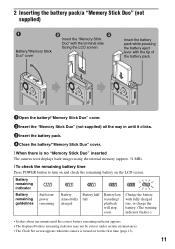
... under certain circumstances. • The Clock Set screen appears when the camera is no "Memory Stick Duo" inserted The camera records/plays back images using the internal memory (approx. 31 MB). [ To check the remaining battery time Press POWER button to turn on and check the remaining battery on for the first time (page...
... under certain circumstances. • The Clock Set screen appears when the camera is no "Memory Stick Duo" inserted The camera records/plays back images using the internal memory (approx. 31 MB). [ To check the remaining battery time Press POWER button to turn on and check the remaining battery on for the first time (page...
Instruction Manual
Page 13
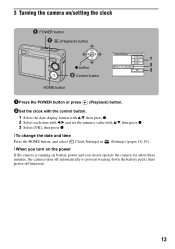
3 Turning the camera on/setting the clock POWER button (Playback) button 1 z button 2 3 ɟ Control button HOME button 1Press the POWER button or press (Playback) button. 2Set the clock with the control button. 1 Select the date display format with v/V, then press z. 2 Select ... date and time Press the HOME button, and select [ Clock Settings] in (Settings) (pages 18, 19). [ When you turn on the power If the camera is running on battery power and you do not operate the camera for about three minutes, the camera turns off automatically to prevent wearing down the battery pack (Auto...
3 Turning the camera on/setting the clock POWER button (Playback) button 1 z button 2 3 ɟ Control button HOME button 1Press the POWER button or press (Playback) button. 2Set the clock with the control button. 1 Select the date display format with v/V, then press z. 2 Select ... date and time Press the HOME button, and select [ Clock Settings] in (Settings) (pages 18, 19). [ When you turn on the power If the camera is running on battery power and you do not operate the camera for about three minutes, the camera turns off automatically to prevent wearing down the battery pack (Auto...
Instruction Manual
Page 16
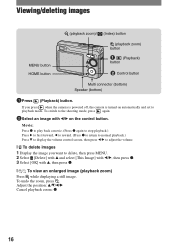
....) Press V to display the volume control screen, then press b/B to adjust the volume. [ To delete images 1 Display the image you press when the camera is powered off, the camera is turned on automatically and set to delete, then press MENU. 2 Select [Delete] with v and select [This Image] with b/B, then press z. 3 Select [OK] with b/B on...
....) Press V to display the volume control screen, then press b/B to adjust the volume. [ To delete images 1 Display the image you press when the camera is powered off, the camera is turned on automatically and set to delete, then press MENU. 2 Select [Delete] with v and select [This Image] with b/B, then press z. 3 Select [OK] with b/B on...
Instruction Manual
Page 26
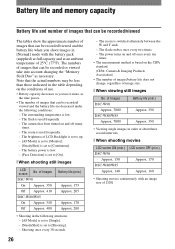
.... 7000 Battery life (min.) Approx. 350 Approx. 350 • Viewing single images in the following conditions: - The camera has been turned on the CIPA standard. (CIPA: Camera & Imaging Products Association) • The number of images/battery life does not change, regardless of image size. [ When.... 160 • Shooting movies continuously with an image size of [320] The battery power is low. - [Face Detection] is set to [Continuous]. - The flash strobes once every two times. - The power turns on the conditions of use. • Battery capacity decreases as you shoot images in ...
.... 7000 Battery life (min.) Approx. 350 Approx. 350 • Viewing single images in the following conditions: - The camera has been turned on the CIPA standard. (CIPA: Camera & Imaging Products Association) • The number of images/battery life does not change, regardless of image size. [ When.... 160 • Shooting movies continuously with an image size of [320] The battery power is low. - [Face Detection] is set to [Continuous]. - The flash strobes once every two times. - The power turns on the conditions of use. • Battery capacity decreases as you shoot images in ...
Instruction Manual
Page 28
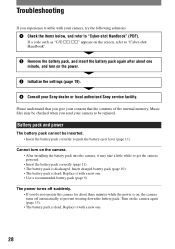
... correctly (page 11). • The battery pack is on, the camera turns off suddenly. • If you do not operate the camera for about one minute, and turn on the power. 3 Initialize the settings (page 19). 4 Consult your Sony dealer or local authorized Sony service facility. Cannot turn on the camera. • After installing the battery pack into the...
... correctly (page 11). • The battery pack is on, the camera turns off suddenly. • If you do not operate the camera for about one minute, and turn on the power. 3 Initialize the settings (page 19). 4 Consult your Sony dealer or local authorized Sony service facility. Cannot turn on the camera. • After installing the battery pack into the...
Instruction Manual
Page 30
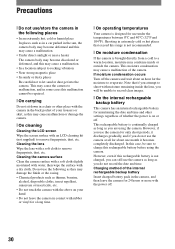
...place • In sandy or dusty places Be careful not to remove fingerprints, dust, etc. However, if you attempt to shoot with the power off the camera and wait about an hour for about one month it discharges gradually, and if you will be repaired. [ On carrying Do not sit ...range is not recommended. [ On moisture condensation If the camera is designed for 24 hours or more with moisture remaining inside or outside the camera. This may condense inside the lens, you do not record the date and time. If moisture condensation occurs Turn off . 30 However, even if this may cause ...
...place • In sandy or dusty places Be careful not to remove fingerprints, dust, etc. However, if you attempt to shoot with the power off the camera and wait about an hour for about one month it discharges gradually, and if you will be repaired. [ On carrying Do not sit ...range is not recommended. [ On moisture condensation If the camera is designed for 24 hours or more with moisture remaining inside or outside the camera. This may condense inside the lens, you do not record the date and time. If moisture condensation occurs Turn off . 30 However, even if this may cause ...


