

User Guide
Page 1
Printed in the space provided below. DSC-T30 Serial No © 2006 Sony Corporation Enjoying the camera Using the menu Using the Setup screen Using your computer Printing still images Connecting your camera to frequently asked questions can be found at our Customer Support Website. ...recycled paper using VOC (Volatile Organic Compound)-free vegetable oil based ink. Printed on this product. Record the serial number in Japan Digital Still Camera User's Guide/ Troubleshooting DSC-T30 "Read This First" (separate volume) Explains the set-up and basic operations for future reference...
Printed in the space provided below. DSC-T30 Serial No © 2006 Sony Corporation Enjoying the camera Using the menu Using the Setup screen Using your computer Printing still images Connecting your camera to frequently asked questions can be found at our Customer Support Website. ...recycled paper using VOC (Volatile Organic Compound)-free vegetable oil based ink. Printed on this product. Record the serial number in Japan Digital Still Camera User's Guide/ Troubleshooting DSC-T30 "Read This First" (separate volume) Explains the set-up and basic operations for future reference...

User Guide
Page 5
..., if not installed and used with the limits for a Class B digital device, pursuant to provide reasonable protection against harmful interference in the U.S.A. ...the picture and sound of rechargeable batteries, call : Sony Customer Information Services Center 1-800-222-SONY (7669) The number below is for the FCC ... about this first CAUTION Replace the battery with the limits for a digital device pursuant to Subpart B of Part 15 of the following two ... with Part 15 of Conformity Trade Name: SONY Model No.: DSC-T30 Responsible Party: Sony Electronics Inc. If this device must be ...
..., if not installed and used with the limits for a Class B digital device, pursuant to provide reasonable protection against harmful interference in the U.S.A. ...the picture and sound of rechargeable batteries, call : Sony Customer Information Services Center 1-800-222-SONY (7669) The number below is for the FCC ... about this first CAUTION Replace the battery with the limits for a digital device pursuant to Subpart B of Part 15 of the following two ... with Part 15 of Conformity Trade Name: SONY Model No.: DSC-T30 Responsible Party: Sony Electronics Inc. If this device must be ...

User Guide
Page 7
... first time. (t step 1 in Germany. When using a "Memory Stick Duo" with "Memory Stick" compatible equipment You can be used by this camera has been produced under a quality assurance system certified by Carl Zeiss in accordance with the quality standards of Carl Zeiss in "Read This First") •...; The battery pack can use a "Memory Stick" with your camera. Also, even if the battery pack is neither dust-proof, nor splashproof, nor water-proof. No compensation for contents of the recording The contents...
... first time. (t step 1 in Germany. When using a "Memory Stick Duo" with "Memory Stick" compatible equipment You can be used by this camera has been produced under a quality assurance system certified by Carl Zeiss in accordance with the quality standards of Carl Zeiss in "Read This First") •...; The battery pack can use a "Memory Stick" with your camera. Also, even if the battery pack is neither dust-proof, nor splashproof, nor water-proof. No compensation for contents of the recording The contents...
User Guide
Page 8
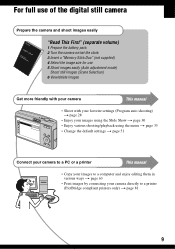
... playback of images recorded with other materials may be careful not to apply force to record or play back properly. • Using the camera in color) that generates strong radio waves or emits radiation. This is manufactured using this manual are reproduced images, and are not guaranteed.... green points • Exposing the LCD screen or the lens to the flash surface, resulting in any way. Be careful when placing the camera near a location that constantly appear on the flash surface to become discolored or to stick to direct sunlight for long periods may cause malfunctions....
... playback of images recorded with other materials may be careful not to apply force to record or play back properly. • Using the camera in color) that generates strong radio waves or emits radiation. This is manufactured using this manual are reproduced images, and are not guaranteed.... green points • Exposing the LCD screen or the lens to the flash surface, resulting in any way. Be careful when placing the camera near a location that constantly appear on the flash surface to become discolored or to stick to direct sunlight for long periods may cause malfunctions....
User Guide
Page 9
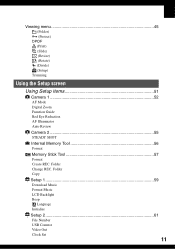
For full use of the digital still camera Prepare the camera and shoot images easily "Read This First" (separate volume) 1 Prepare the battery pack 2 Turn the camera on/set the clock 3 Insert a "Memory Stick Duo" (not supplied) 4 Select the image size for use 5 Shoot images easily (Auto ...adjustment mode) Shoot still images (Scene Selection) 6 View/delete images Get more friendly with your camera This manual • Shoot with your favorite settings (Program auto shooting) t page 28 • Enjoy your images using the Slide Show t page 30...
For full use of the digital still camera Prepare the camera and shoot images easily "Read This First" (separate volume) 1 Prepare the battery pack 2 Turn the camera on/set the clock 3 Insert a "Memory Stick Duo" (not supplied) 4 Select the image size for use 5 Shoot images easily (Auto ...adjustment mode) Shoot still images (Scene Selection) 6 View/delete images Get more friendly with your camera This manual • Shoot with your favorite settings (Program auto shooting) t page 28 • Enjoy your images using the Slide Show t page 30...

User Guide
Page 10
.../viewed 27 Using the mode switch 28 Using the Slide Show 30 Using the menu Using menu items 33 Menu items 34 Shooting menu 36 (Camera) COLOR (Color Mode) (EV) 9 (Focus) (Metering Mode) WB (White Bal) ISO (P.Quality) Mode (REC Mode) BRK (Bracket Step) M (Interval) (Flash Level...) (Contrast) (Sharpness) (Setup) 10 Focusing on using your camera 7 Enjoying the camera Basic techniques for better images 13 Focus - On "image quality" and "image size 15 Identifying parts 17 Indicators on the screen 19 Changing the...
.../viewed 27 Using the mode switch 28 Using the Slide Show 30 Using the menu Using menu items 33 Menu items 34 Shooting menu 36 (Camera) COLOR (Color Mode) (EV) 9 (Focus) (Metering Mode) WB (White Bal) ISO (P.Quality) Mode (REC Mode) BRK (Bracket Step) M (Interval) (Flash Level...) (Contrast) (Sharpness) (Setup) 10 Focusing on using your camera 7 Enjoying the camera Basic techniques for better images 13 Focus - On "image quality" and "image size 15 Identifying parts 17 Indicators on the screen 19 Changing the...
User Guide
Page 11
Viewing menu 45 (Folder) - (Protect) DPOF (Print) (Slide) (Resize) (Rotate) (Divide) (Setup) Trimming Using the Setup screen Using Setup items 51 Camera 1 52 1 AF Mode Digital Zoom Function Guide Red Eye Reduction AF Illuminator Auto Review Camera 2 55 2 STEADY SHOT Internal Memory Tool 56 Format Memory Stick Tool 57 Format Create REC. Folder Copy Setup 1 59 1 Download Music Format Music LCD Backlight Beep Language Initialize Setup 2 61 2 File Number USB Connect Video Out Clock Set 11 Folder Change REC.
Viewing menu 45 (Folder) - (Protect) DPOF (Print) (Slide) (Resize) (Rotate) (Divide) (Setup) Trimming Using the Setup screen Using Setup items 51 Camera 1 52 1 AF Mode Digital Zoom Function Guide Red Eye Reduction AF Illuminator Auto Review Camera 2 55 2 STEADY SHOT Internal Memory Tool 56 Format Memory Stick Tool 57 Format Create REC. Folder Copy Setup 1 59 1 Download Music Format Music LCD Backlight Beep Language Initialize Setup 2 61 2 File Number USB Connect Video Out Clock Set 11 Folder Change REC.
User Guide
Page 12
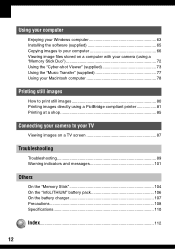
...Enjoying your Windows computer 63 Installing the software (supplied 65 Copying images to your computer 66 Viewing image files stored on a computer with your camera (using a "Memory Stick Duo 72 Using the "Cyber-shot Viewer" (supplied 73 Using the "Music Transfer" (supplied 77 Using your ...still images How to print still images 80 Printing images directly using a PictBridge compliant printer 81 Printing at a shop 85 Connecting your camera to your TV Viewing images on a TV screen 87 Troubleshooting Troubleshooting 89 Warning indicators and messages 101 Others On the "Memory Stick ...
...Enjoying your Windows computer 63 Installing the software (supplied 65 Copying images to your computer 66 Viewing image files stored on a computer with your camera (using a "Memory Stick Duo 72 Using the "Cyber-shot Viewer" (supplied 73 Using the "Music Transfer" (supplied 77 Using your ...still images How to print still images 80 Printing images directly using a PictBridge compliant printer 81 Printing at a shop 85 Connecting your camera to your TV Viewing images on a TV screen 87 Troubleshooting Troubleshooting 89 Warning indicators and messages 101 Others On the "Memory Stick ...

User Guide
Page 13
...and so on. Focus Focusing on t [Focus] (page 38) If the image looks blurred even after focusing, it may be because of camera shake. Remember to focus on a subject successfully When you press the shutter button halfway down . Shooting with a 2-second delay self-timer, ...a tripod is recommended to lean against a tree or a building nearby to use various camera functions such as follows). Hints for preventing blur Hold the camera steady, keeping your arms at your camera. It is also effective. To shoot a still image difficult to press the shutter button...
...and so on. Focus Focusing on t [Focus] (page 38) If the image looks blurred even after focusing, it may be because of camera shake. Remember to focus on a subject successfully When you press the shutter button halfway down . Shooting with a 2-second delay self-timer, ...a tripod is recommended to lean against a tree or a building nearby to use various camera functions such as follows). Hints for preventing blur Hold the camera steady, keeping your arms at your camera. It is also effective. To shoot a still image difficult to press the shutter button...

User Guide
Page 14
... the ISO sensitivity t page 41 High ISO sensitivity Records a bright image even when shooting in the auto adjustment mode. Shutter speed = Length of time the camera receives Exposure: light Aperture = Size of measurement (sensitivity), estimating how much light Whitish image Correct exposure Underexposure = too little light Darker image The exposure is... set to photo films) receives. Low ISO sensitivity Records a smoother image. t page 37 Metering Mode: Allows you to change the part of light that the camera will receive when you can create various images by the...
... the ISO sensitivity t page 41 High ISO sensitivity Records a bright image even when shooting in the auto adjustment mode. Shutter speed = Length of time the camera receives Exposure: light Aperture = Size of measurement (sensitivity), estimating how much light Whitish image Correct exposure Underexposure = too little light Darker image The exposure is... set to photo films) receives. Low ISO sensitivity Records a smoother image. t page 37 Metering Mode: Allows you to change the part of light that the camera will receive when you can create various images by the...
User Guide
Page 15
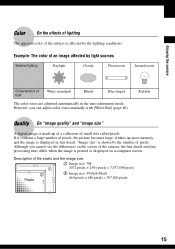
...affected by the number of light White (standard) Bluish Blue-tinged The color tones are adjusted automatically in fine detail. Description of the camera, the fine detail and data processing time differ when the image is displayed in the auto adjustment mode. Although you can adjust color ...with [White Bal] (page 40). However, you cannot see the differences on a computer screen. Reddish Quality On "image quality" and "image size" A digital image is made up more memory, and the image is printed or displayed on the screen of the pixels and the image size 1 Image size...
...affected by the number of light White (standard) Bluish Blue-tinged The color tones are adjusted automatically in fine detail. Description of the camera, the fine detail and data processing time differ when the image is displayed in the auto adjustment mode. Although you can adjust color ...with [White Bal] (page 40). However, you cannot see the differences on a computer screen. Reddish Quality On "image quality" and "image size" A digital image is made up more memory, and the image is printed or displayed on the screen of the pixels and the image size 1 Image size...

User Guide
Page 17
Identifying parts See the pages in parentheses for details of operation. 1 3 5 1 2 6 2 4 3 5 7 6 4 8 7 8 9 Enjoying the camera A (STEADY SHOT) button (t step 5 in "Read This First") B Shutter button (t step 5 in "Read This First") C POWER button/POWER lamp (t step 2 in "Read This First") D Hook ...
Identifying parts See the pages in parentheses for details of operation. 1 3 5 1 2 6 2 4 3 5 7 6 4 8 7 8 9 Enjoying the camera A (STEADY SHOT) button (t step 5 in "Read This First") B Shutter button (t step 5 in "Read This First") C POWER button/POWER lamp (t step 2 in "Read This First") D Hook ...
User Guide
Page 18
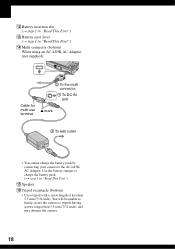
You will be unable to firmly secure the camera to charge the battery pack. (t step 1 in "Read This First") N Multi connector (bottom) When using an AC-LS5K AC ... 2 To the multi connector 1 To DC IN jack v mark 3 To wall outlet • You cannot charge the battery pack by connecting your camera to the AC-LS5K AC Adaptor. Use the battery charger to tripods having screws longer than 5.5 mm (7/32 inch). L Battery insertion slot (t step...First") O Speaker P Tripod receptacle (bottom) • Use a tripod with a screw length of less than 5.5 mm (7/32 inch), and may damage the camera. 18
You will be unable to firmly secure the camera to charge the battery pack. (t step 1 in "Read This First") N Multi connector (bottom) When using an AC-LS5K AC ... 2 To the multi connector 1 To DC IN jack v mark 3 To wall outlet • You cannot charge the battery pack by connecting your camera to the AC-LS5K AC Adaptor. Use the battery charger to tripods having screws longer than 5.5 mm (7/32 inch). L Battery insertion slot (t step...First") O Speaker P Tripod receptacle (bottom) • Use a tripod with a screw length of less than 5.5 mm (7/32 inch), and may damage the camera. 18

User Guide
Page 19
... on the screen See the pages in "Read This First") 19 When shooting still images 60min 1 3 4 Display SL 5 1.3 2 Indication Camera mode (Scene Selection) (t step 5 in "Read This First") Camera mode (Program) (28) Flash mode (t step 5 in "Read This First") Flash charging Zoom scaling (t 52, step 5 in "Read This First") When shooting movies...
... on the screen See the pages in "Read This First") 19 When shooting still images 60min 1 3 4 Display SL 5 1.3 2 Indication Camera mode (Scene Selection) (t step 5 in "Read This First") Camera mode (Program) (28) Flash mode (t step 5 in "Read This First") Flash charging Zoom scaling (t 52, step 5 in "Read This First") When shooting movies...

User Guide
Page 20
... • When using a tripod or other means to insufficient lighting. Even if the vibration warning appears, you from shooting clear images due to stabilize the camera. Image quality (41) Recording folder (57) • This does not appear when using internal memory. C Display 7M 3:2 5M 3M 2M 1M VGA 16:9 FINE 640...
... • When using a tripod or other means to insufficient lighting. Even if the vibration warning appears, you from shooting clear images due to stabilize the camera. Image quality (41) Recording folder (57) • This does not appear when using internal memory. C Display 7M 3:2 5M 3M 2M 1M VGA 16:9 FINE 640...

User Guide
Page 21
... 6 in "Read This First") Protect (46) Print order (DPOF) mark (85) Change folder (45) • This does not appear when using internal memory. Enjoying the camera When playing back still images 60min M VGA 101 1 101 12/12 3 C:32:00 1.3 +2.0EV 4 500 F3.5 5 2 2006 1 1 9: 30 AM BACK/NEXT VOLUME When playing back...
... 6 in "Read This First") Protect (46) Print order (DPOF) mark (85) Change folder (45) • This does not appear when using internal memory. Enjoying the camera When playing back still images 60min M VGA 101 1 101 12/12 3 C:32:00 1.3 +2.0EV 4 500 F3.5 5 2 2006 1 1 9: 30 AM BACK/NEXT VOLUME When playing back...

User Guide
Page 23
... large difference in the histogram displayed when shooting and during playback. • The histogram does not appear in the following situations: While shooting - Enjoying the camera Changing the screen display Each time you are rotating still images. - The shutter speed is displayed during playback may not appear for images recorded using... to on 60min • By pressing (Screen display switch) button longer, you can increase the LCD backlight. • When you are using other cameras. 23 When you press the (Screen display switch) button, the display changes as follows.
... large difference in the histogram displayed when shooting and during playback. • The histogram does not appear in the following situations: While shooting - Enjoying the camera Changing the screen display Each time you are rotating still images. - The shutter speed is displayed during playback may not appear for images recorded using... to on 60min • By pressing (Screen display switch) button longer, you can increase the LCD backlight. • When you are using other cameras. 23 When you press the (Screen display switch) button, the display changes as follows.
User Guide
Page 24
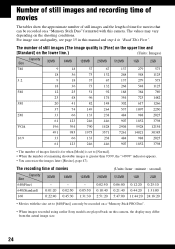
... be recorded on a "Memory Stick PRO Duo". • When images recorded using earlier Sony models are played back on this manual and step 4 in this camera, the display may vary depending on a "Memory Stick Duo" formatted with this camera. For image size and quality, see page 15 in "Read This First". The recording...
... be recorded on a "Memory Stick PRO Duo". • When images recorded using earlier Sony models are played back on this manual and step 4 in this camera, the display may vary depending on a "Memory Stick Duo" formatted with this camera. For image size and quality, see page 15 in "Read This First". The recording...

User Guide
Page 25
... : second) Capacity Size 640 (Standard) 160 58MB 0:02:30 0:42:40 25 When a "Memory Stick Duo" is no "Memory Stick Duo" inserted in the camera, you do not have a "Memory Stick Duo" (Recording with the image size set to [640(Fine)] cannot be performed on the lower line.) (Units: Images... Memory are played back. [Menu, Setup, etc.]: Various functions can be recorded using this internal memory. • Movies with the internal memory) The camera has 58 MB of internal memory. Even when there is not removable. The number of still images (The image quality is [Fine] on the upper...
... : second) Capacity Size 640 (Standard) 160 58MB 0:02:30 0:42:40 25 When a "Memory Stick Duo" is no "Memory Stick Duo" inserted in the camera, you do not have a "Memory Stick Duo" (Recording with the image size set to [640(Fine)] cannot be performed on the lower line.) (Units: Images... Memory are played back. [Menu, Setup, etc.]: Various functions can be recorded using this internal memory. • Movies with the internal memory) The camera has 58 MB of internal memory. Even when there is not removable. The number of still images (The image quality is [Fine] on the upper...

User Guide
Page 26
However you copy (back up) data without a "Memory Stick Duo" inserted in the camera. • You cannot copy image data on a hard disk of 64 MB or more, then perform the procedure explained in [Copy] (page 58). To copy (... you cannot copy data on a computer to a computer. To copy (back up ) data on a "Memory Stick Duo" to the internal memory. • By connecting the camera and a computer with a capacity of your computer Perform the procedure on pages 66 to 70 without error using one of the following methods. On image...
However you copy (back up) data without a "Memory Stick Duo" inserted in the camera. • You cannot copy image data on a hard disk of 64 MB or more, then perform the procedure explained in [Copy] (page 58). To copy (... you cannot copy data on a computer to a computer. To copy (back up ) data on a "Memory Stick Duo" to the internal memory. • By connecting the camera and a computer with a capacity of your computer Perform the procedure on pages 66 to 70 without error using one of the following methods. On image...


