
Operating Instructions
Page 1
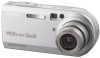
Model No. Refer to these numbers whenever you call upon your computer_________ Troubleshooting Additional information Index Digital Still Camera Operating Instructions Before operating the unit, please read this product. DSC-P100/P120 © 2004 Sony Corporation 3-091-477-11(1) Getting started Shooting still images Viewing still images Deleting still images Before ...serial number in the space provided below. DSC-P100/P120 Serial No. Owner's Record The model and serial numbers are located on your Sony dealer regarding this manual thoroughly, and retain it for future reference.
Model No. Refer to these numbers whenever you call upon your computer_________ Troubleshooting Additional information Index Digital Still Camera Operating Instructions Before operating the unit, please read this product. DSC-P100/P120 © 2004 Sony Corporation 3-091-477-11(1) Getting started Shooting still images Viewing still images Deleting still images Before ...serial number in the space provided below. DSC-P100/P120 Serial No. Owner's Record The model and serial numbers are located on your Sony dealer regarding this manual thoroughly, and retain it for future reference.

Operating Instructions
Page 3
...compliant with BS 1363 is fitted to BS 1362, (i.e., marked with your nearest Sony service station. Attention The electromagnetic field at the specific frequencies may regulate disposal of... causes data transfer to the collection and recycling location nearest you. THIS CLASS B DIGITAL APPARATUS COMPLIES WITH CANADIAN ICES-003. and Canada RECYCLING LITHIUM-ION BATTERIES Lithium-Ion ...batteries are recyclable. You can help preserve our environment by ASTA or BSI to this camera. OPERATION IS SUBJECT TO THE FOLLOWING TWO CONDITIONS: (1) THIS DEVICE MAY NOT CAUSE HARMFUL...
...compliant with BS 1363 is fitted to BS 1362, (i.e., marked with your nearest Sony service station. Attention The electromagnetic field at the specific frequencies may regulate disposal of... causes data transfer to the collection and recycling location nearest you. THIS CLASS B DIGITAL APPARATUS COMPLIES WITH CANADIAN ICES-003. and Canada RECYCLING LITHIUM-ION BATTERIES Lithium-Ion ...batteries are recyclable. You can help preserve our environment by ASTA or BSI to this camera. OPERATION IS SUBJECT TO THE FOLLOWING TWO CONDITIONS: (1) THIS DEVICE MAY NOT CAUSE HARMFUL...

Operating Instructions
Page 4
... LCD finder (only models with an LCD finder) and lens • The LCD screen and the LCD finder are manufactured using the camera. Notes on the camera locations Do not use . Unauthorized recording of such materials may be contrary to the provision of data loss, always copy (back up ...recommendation To avoid the potential risk of the copyright laws. 4 Do not shake or strike the camera In addition to malfunctions and inability to record images, this first Trial recording Before you record one-time events, you may cause malfunctions. •...
... LCD finder (only models with an LCD finder) and lens • The LCD screen and the LCD finder are manufactured using the camera. Notes on the camera locations Do not use . Unauthorized recording of such materials may be contrary to the provision of data loss, always copy (back up ...recommendation To avoid the potential risk of the copyright laws. 4 Do not shake or strike the camera In addition to malfunctions and inability to record images, this first Trial recording Before you record one-time events, you may cause malfunctions. •...

Operating Instructions
Page 5
...Duo", , "MagicGate" and are trademarks of Sony Corporation. • "InfoLITHIUM" is a trademark of Sony Corporation. • Picture Package is capable of reproducing sharp images with the quality standards of Carl Zeiss in Germany. Carl Zeiss lens This camera is equipped with a Carl Zeiss lens which... is a trademark of Sony Corporation. • Microsoft, Windows, WindowsMedia, and DirectX are either registered trademarks or trademarks...
...Duo", , "MagicGate" and are trademarks of Sony Corporation. • "InfoLITHIUM" is a trademark of Sony Corporation. • Picture Package is capable of reproducing sharp images with the quality standards of Carl Zeiss in Germany. Carl Zeiss lens This camera is equipped with a Carl Zeiss lens which... is a trademark of Sony Corporation. • Microsoft, Windows, WindowsMedia, and DirectX are either registered trademarks or trademarks...
Operating Instructions
Page 6
... a TV screen 38 Deleting still images Deleting images 40 Formatting a "Memory Stick 42 Before advanced operations How to setup and operate your camera 15 How to use the control button 15 Setting the date and time 16 Shooting still images Inserting and removing a "Memory Stick 18 ... level - AF range finder 47 Choosing a focus operation - Scene Selection 32 6 Viewing still images Viewing images on the LCD screen of your camera 36 Viewing images on a still image 31 Shooting according to the subject - Focus preset 49 Shooting with manual shutter speed and aperture settings - ...
... a TV screen 38 Deleting still images Deleting images 40 Formatting a "Memory Stick 42 Before advanced operations How to setup and operate your camera 15 How to use the control button 15 Setting the date and time 16 Shooting still images Inserting and removing a "Memory Stick 18 ... level - AF range finder 47 Choosing a focus operation - Scene Selection 32 6 Viewing still images Viewing images on the LCD screen of your camera 36 Viewing images on a still image 31 Shooting according to the subject - Focus preset 49 Shooting with manual shutter speed and aperture settings - ...
Operating Instructions
Page 7
For Windows users 81 Installing the USB driver 82 Connecting the camera to your computer 83 Copying images 84 Viewing the images on your computer Copying images to your computer - Print (DPOF) mark 68 Still image printing (... movies 79 Enjoying images on your computer 86 Image file storage destinations and file names 86 Viewing image files once copied to a computer with your camera 88 Installing "Picture Package 88 Copying images using "Picture Package 90 Using "Picture Package 91 Copying images to print - Rotate 64 Playing back images shot...
For Windows users 81 Installing the USB driver 82 Connecting the camera to your computer 83 Copying images 84 Viewing the images on your computer Copying images to your computer - Print (DPOF) mark 68 Still image printing (... movies 79 Enjoying images on your computer 86 Image file storage destinations and file names 86 Viewing image files once copied to a computer with your camera 88 Installing "Picture Package 88 Copying images using "Picture Package 90 Using "Picture Package 91 Copying images to print - Rotate 64 Playing back images shot...

Operating Instructions
Page 8
You will be unable to firmly secure the camera to tripods having longer screws, and may damage the camera. qa qs K Lens L Speaker (bottom surface) • Use a tripod with a screw length of operation. 1 7 2 8 3 9 Attaching the strap 4 5 6 A POWER button (15) B Shutter button (23) C Hook for ...
You will be unable to firmly secure the camera to tripods having longer screws, and may damage the camera. qa qs K Lens L Speaker (bottom surface) • Use a tripod with a screw length of operation. 1 7 2 8 3 9 Attaching the strap 4 5 6 A POWER button (15) B Shutter button (23) C Hook for ...
Operating Instructions
Page 10
... focus, exposure and white balance are made automatically just as in the auto adjustment mode, but you can also change the settings of the camera (pages 44 and 113). (Movie shooting) You can shoot movies (page 76). (Playback/Edit) You can manually adjust the aperture value ... (Program auto shooting) The shooting adjustments are automatically adjusted to the scene (page 32). In addition, you can set various shooting functions using your camera, set various shooting functions using menus (pages 44 and 109). Mode dial Before using menus (pages 44 and 109). M (Manual exposure shooting) ...
... focus, exposure and white balance are made automatically just as in the auto adjustment mode, but you can also change the settings of the camera (pages 44 and 113). (Movie shooting) You can shoot movies (page 76). (Playback/Edit) You can manually adjust the aperture value ... (Program auto shooting) The shooting adjustments are automatically adjusted to the scene (page 32). In addition, you can set various shooting functions using your camera, set various shooting functions using menus (pages 44 and 109). Mode dial Before using menus (pages 44 and 109). M (Manual exposure shooting) ...
Operating Instructions
Page 11
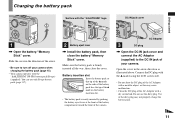
... DC IN jack cover and connect the AC Adaptor (supplied) to the DC IN jack of the arrow. • Be sure to turn off your camera. Do not use only R type battery pack (page 117). 2 Battery eject lever , Install the battery pack, then close the cover. Open the cover in the... on the battery insertion slot. • The battery pack is firmly inserted all the way, then close the battery/"Memory Stick" cover. Use of the camera. You can use the dirty plug. Make sure the battery pack is easily inserted by pushing the battery eject lever at the front of the...
... DC IN jack cover and connect the AC Adaptor (supplied) to the DC IN jack of the arrow. • Be sure to turn off your camera. Do not use only R type battery pack (page 117). 2 Battery eject lever , Install the battery pack, then close the cover. Open the cover in the... on the battery insertion slot. • The battery pack is firmly inserted all the way, then close the battery/"Memory Stick" cover. Use of the camera. You can use the dirty plug. Make sure the battery pack is easily inserted by pushing the battery eject lever at the front of the...
Operating Instructions
Page 12
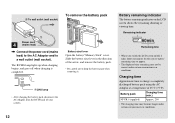
... on /off when charging is completed. /CHG lamp • After charging the battery pack, disconnect the AC Adaptor from the DC IN jack of your camera. Battery pack NP-FR1 (supplied) Charging time (min.) Approx. 200 • The charging time may not be correct under certain circumstances or conditions. 12 Slide...
... on /off when charging is completed. /CHG lamp • After charging the battery pack, disconnect the AC Adaptor from the DC IN jack of your camera. Battery pack NP-FR1 (supplied) Charging time (min.) Approx. 200 • The charging time may not be correct under certain circumstances or conditions. 12 Slide...

Operating Instructions
Page 13
... in normal mode with the image size [160] • The number of 25°C (77°F). The zoom is low - The camera has been turned on CIPA standard. (CIPA: Camera & Imaging Products Association) Viewing still images2) NP-FR1 (supplied) Image size No. The numbers of images that can be recorded/viewed when...
... in normal mode with the image size [160] • The number of 25°C (77°F). The zoom is low - The camera has been turned on CIPA standard. (CIPA: Camera & Imaging Products Association) Viewing still images2) NP-FR1 (supplied) Image size No. The numbers of images that can be recorded/viewed when...

Operating Instructions
Page 14
... (wall socket) AC Adaptor 1 DC plug , Open the DC IN jack cover and connect the AC Adaptor (supplied) to the DC IN jack of the camera and from a wall outlet (wall socket). • The set is connected to the wall outlet (wall socket) even if the set itself has been turned... AC Adaptor, disconnect it both from the AC power source (mains) as long as it is not disconnected from the DC IN jack of your camera in the arrow direction as this may cause a malfunction. 14 Connect the DC plug with the AC Adaptor (supplied) within 100 V to an easily accessible...
... (wall socket) AC Adaptor 1 DC plug , Open the DC IN jack cover and connect the AC Adaptor (supplied) to the DC IN jack of the camera and from a wall outlet (wall socket). • The set is connected to the wall outlet (wall socket) even if the set itself has been turned... AC Adaptor, disconnect it both from the AC power source (mains) as long as it is not disconnected from the DC IN jack of your camera in the arrow direction as this may cause a malfunction. 14 Connect the DC plug with the AC Adaptor (supplied) within 100 V to an easily accessible...

Operating Instructions
Page 15
..., the lens portion moves. The POWER lamp (green) lights up the menu or the SET UP screen (page 45), and use the control button Camera AF Mode: Digital Zoom: Date/Time: 1 Red Eye Reduction: 2 AF Illuminator: Auto Review: Single Smart Off Off Auto Off SELECT Setup 2 File Number: USB ...Connect: Video Out: 1 Clock Set: OK Cancel To change the current settings of time with the power off function If you turn on your camera POWER ...
..., the lens portion moves. The POWER lamp (green) lights up the menu or the SET UP screen (page 45), and use the control button Camera AF Mode: Digital Zoom: Date/Time: 1 Red Eye Reduction: 2 AF Illuminator: Auto Review: Single Smart Off Off Auto Off SELECT Setup 2 File Number: USB ...Connect: Video Out: 1 Clock Set: OK Cancel To change the current settings of time with the power off function If you turn on your camera POWER ...
Operating Instructions
Page 18
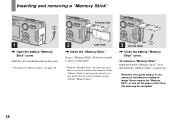
... clicks as illustrated. • Push the "Memory Stick" all of the way in so that it out. • Whenever the access lamp is lit, the camera is securely seated in the direction of the arrow. • For details on "Memory Stick," see page 116. 2 Label side , Insert the "Memory Stick." Shooting...
... clicks as illustrated. • Push the "Memory Stick" all of the way in so that it out. • Whenever the access lamp is lit, the camera is securely seated in the direction of the arrow. • For details on "Memory Stick," see page 116. 2 Label side , Insert the "Memory Stick." Shooting...

Operating Instructions
Page 20
... the number of pixels (dots) (horizontal × vertical), which compose an image. Each uses a different compression ratio. It is the highest image quality on this camera. 2) Images are 2592 pixels horizontally and 1944 pixels vertically.
... the number of pixels (dots) (horizontal × vertical), which compose an image. Each uses a different compression ratio. It is the highest image quality on this camera. 2) Images are 2592 pixels horizontally and 1944 pixels vertically.

Operating Instructions
Page 21
... values according to shooting conditions. • When the number of remaining shooting images is greater than 9,999, the ">9999" indicator appears on this camera, the display may differ from the actual image size. • When the images are shown below. (Units: number of images) Capacity 16MB Image...; For recording a larger number of images that can resize the images later (Resize function, see page 45. • When images recorded using earlier Sony models are played back on the LCD screen. • You can be saved in other modes, see page 108. 4) For more information about the...
... values according to shooting conditions. • When the number of remaining shooting images is greater than 9,999, the ">9999" indicator appears on this camera, the display may differ from the actual image size. • When the images are shown below. (Units: number of images) Capacity 16MB Image...; For recording a larger number of images that can resize the images later (Resize function, see page 45. • When images recorded using earlier Sony models are played back on the LCD screen. • You can be saved in other modes, see page 108. 4) For more information about the...

Operating Instructions
Page 22
Using auto adjustment mode Holding the camera correctly Mode dial When shooting pictures with the camera, be careful so that your fingers do not block the lens portion, finder window, flash emitter or speaker (page 8). 1 , Set the mode dial to , and ... frame indicated on the power or when the zoom function is working (page 24). • This camera can create new folders and select folders to be stored in the "Memory Stick" (page 46). 2 , Hold the camera steadily with both hands and position the subject in the center of the focus frame. •...
Using auto adjustment mode Holding the camera correctly Mode dial When shooting pictures with the camera, be careful so that your fingers do not block the lens portion, finder window, flash emitter or speaker (page 8). 1 , Set the mode dial to , and ... frame indicated on the power or when the zoom function is working (page 24). • This camera can create new folders and select folders to be stored in the "Memory Stick" (page 46). 2 , Hold the camera steadily with both hands and position the subject in the center of the focus frame. •...

Operating Instructions
Page 23
...such cases, release the shutter button, then recompose the shot and focus again. • The subject is distant from flashing to steadily lit, the camera is ready for shooting. (The LCD screen may have difficulty working under the following conditions. The shutter sounds. The image will be canceled. •...; You can continue and shoot even when the camera does not beep, but the image is not set properly. 60min VGA 101 95 S AF 4 , Press the shutter button fully down . See...
...such cases, release the shutter button, then recompose the shot and focus again. • The subject is distant from flashing to steadily lit, the camera is ready for shooting. (The LCD screen may have difficulty working under the following conditions. The shutter sounds. The image will be canceled. •...; You can continue and shoot even when the camera does not beep, but the image is not set properly. 60min VGA 101 95 S AF 4 , Press the shutter button fully down . See...

Operating Instructions
Page 24
... the image displayed on the LCD screen 1 Press (Delete). 2 Select [Delete] with zoom functions that enlarge the image using optical zoom and two types of digital processing. Using the zoom feature W (wide-angle) T (telephoto) 60min VGA 101 W T 96 1.1 60min VGA 101 W T 96 5.0 S AF S AF... , Press the zoom buttons to match the shooting purpose. Zoom Your camera is deleted. • The image may appear rough right after playback starts due to [Off] in the zoom scale display bar on the LCD screen...
... the image displayed on the LCD screen 1 Press (Delete). 2 Select [Delete] with zoom functions that enlarge the image using optical zoom and two types of digital processing. Using the zoom feature W (wide-angle) T (telephoto) 60min VGA 101 W T 96 1.1 60min VGA 101 W T 96 5.0 S AF S AF... , Press the zoom buttons to match the shooting purpose. Zoom Your camera is deleted. • The image may appear rough right after playback starts due to [Off] in the zoom scale display bar on the LCD screen...

Operating Instructions
Page 25
Optical zoom: - When you purchase your camera, it is set to smart zoom. This function cuts out and enlarges a certain portion of this phenomenon has no distortion. Optical zoom Smart zoom The image is digital zoom area Zoom scaling indicator • The zoom scaling indicator differs according to [... follows. m m Shooting still images The W side of the image, so the image quality deteriorates. This lets you purchase your camera, the image size is set [Digital Zoom] to a maximum 6×. Smart zoom When you use the smart zoom in the SET UP settings (page 113).
Optical zoom: - When you purchase your camera, it is set to smart zoom. This function cuts out and enlarges a certain portion of this phenomenon has no distortion. Optical zoom Smart zoom The image is digital zoom area Zoom scaling indicator • The zoom scaling indicator differs according to [... follows. m m Shooting still images The W side of the image, so the image quality deteriorates. This lets you purchase your camera, the image size is set [Digital Zoom] to a maximum 6×. Smart zoom When you use the smart zoom in the SET UP settings (page 113).


