Instruction Manual
Page 2
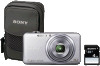
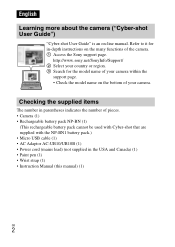
... rechargeable battery pack cannot be used with Cyber-shot that are supplied with the NP-BN1 battery pack.) • Micro USB cable (1) • AC Adaptor AC-UB10/UB10B (1) • Power cord (mains lead) (not supplied in -depth instructions on -line manual. English Learning more about the camera ("Cyber-shot User Guide") "Cyber-shot User Guide" is an on the many functions of the camera. 1 Access the Sony support page. http://www.sony.net/SonyInfo/Support/ 2 Select your camera.
... rechargeable battery pack cannot be used with Cyber-shot that are supplied with the NP-BN1 battery pack.) • Micro USB cable (1) • AC Adaptor AC-UB10/UB10B (1) • Power cord (mains lead) (not supplied in -depth instructions on -line manual. English Learning more about the camera ("Cyber-shot User Guide") "Cyber-shot User Guide" is an on the many functions of the camera. 1 Access the Sony support page. http://www.sony.net/SonyInfo/Support/ 2 Select your camera.
Instruction Manual
Page 3
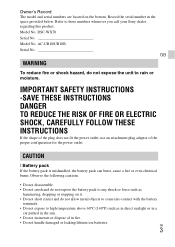
IMPORTANT SAFETY INSTRUCTIONS -SAVE THESE INSTRUCTIONS DANGER TO REDUCE THE RISK OF FIRE OR ELECTRIC SHOCK, CAREFULLY FOLLOW THESE INSTRUCTIONS If the shape of the plug does not fit the power outlet, use an attachment plug adaptor of in the space provided below. Observe ...power outlet. Owner's Record The model and serial numbers are located on it. • Do not short circuit and do not expose the unit to these numbers whenever you call your Sony dealer regarding this product. Refer to rain or moisture. Model No. DSC-WX70 Serial No Model No. CAUTION [ Battery pack If the battery...
IMPORTANT SAFETY INSTRUCTIONS -SAVE THESE INSTRUCTIONS DANGER TO REDUCE THE RISK OF FIRE OR ELECTRIC SHOCK, CAREFULLY FOLLOW THESE INSTRUCTIONS If the shape of the plug does not fit the power outlet, use an attachment plug adaptor of in the space provided below. Observe ...power outlet. Owner's Record The model and serial numbers are located on it. • Do not short circuit and do not expose the unit to these numbers whenever you call your Sony dealer regarding this product. Refer to rain or moisture. Model No. DSC-WX70 Serial No Model No. CAUTION [ Battery pack If the battery...
Instruction Manual
Page 5
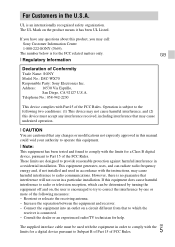
... the GB limits for help. 5 The supplied interface cable must accept any changes or modifications not expressly approved in a residential installation. Reorient or relocate the receiving antenna. - Consult the dealer or an experienced radio/TV technician for a digital device pursuant to correct the interference by turning the equipment off and on, the user is connected. - GB [ Regulatory Information...
... the GB limits for help. 5 The supplied interface cable must accept any changes or modifications not expressly approved in a residential installation. Reorient or relocate the receiving antenna. - Consult the dealer or an experienced radio/TV technician for a digital device pursuant to correct the interference by turning the equipment off and on, the user is connected. - GB [ Regulatory Information...

Instruction Manual
Page 6
... in the EMC Directive for using connection cables shorter than 3 meters (9.8 feet). [ Attention The electromagnetic fields at the specific frequencies may influence the picture and sound of this product is Sony Deutschland GmbH, Hedelfinger Strasse 61, 70327 Stuttgart, Germany. Instead it shall be handed over to discontinue midway (fail), restart the application or disconnect and connect the communication cable (USB, etc.) again...
... in the EMC Directive for using connection cables shorter than 3 meters (9.8 feet). [ Attention The electromagnetic fields at the specific frequencies may influence the picture and sound of this product is Sony Deutschland GmbH, Hedelfinger Strasse 61, 70327 Stuttgart, Germany. Instead it shall be handed over to discontinue midway (fail), restart the application or disconnect and connect the communication cable (USB, etc.) again...
Instruction Manual
Page 10
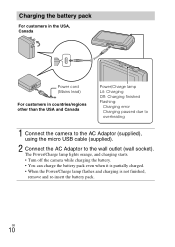
... the Power/Charge lamp flashes and charging is not finished, remove and re-insert the battery pack. Charging the battery pack For customers in the USA, Canada Power cord (Mains lead) For customers in countries/regions other than the USA and Canada Power/Charge lamp Lit: Charging Off: Charging finished Flashing: Charging error Charging paused due to overheating 1 Connect the camera to the AC Adaptor (supplied), using the micro USB cable (supplied). 2 Connect the...
... the Power/Charge lamp flashes and charging is not finished, remove and re-insert the battery pack. Charging the battery pack For customers in the USA, Canada Power cord (Mains lead) For customers in countries/regions other than the USA and Canada Power/Charge lamp Lit: Charging Off: Charging finished Flashing: Charging error Charging paused due to overheating 1 Connect the camera to the AC Adaptor (supplied), using the micro USB cable (supplied). 2 Connect the...

Instruction Manual
Page 13
... above number of images applies when the battery pack is switched alternately between the W and T ends. - Movie quality: AVC HD HQ - Shooting functions such as the zoom do not operate. Shooting once every 30 seconds. - The power turns on the CIPA standard, and is for shooting under the following conditions: (CIPA: Camera & Imaging Products Association) - [Panel Brightness] is set limits (page 24), touch (Movie button) again and continue shooting. When continuous shooting...
... above number of images applies when the battery pack is switched alternately between the W and T ends. - Movie quality: AVC HD HQ - Shooting functions such as the zoom do not operate. Shooting once every 30 seconds. - The power turns on the CIPA standard, and is for shooting under the following conditions: (CIPA: Camera & Imaging Products Association) - [Panel Brightness] is set limits (page 24), touch (Movie button) again and continue shooting. When continuous shooting...
Instruction Manual
Page 14
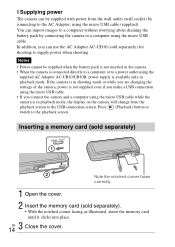
... the camera is in shooting mode or while you are changing the settings of the camera, power is not supplied even if you make a USB connection using the micro USB cable (supplied). Inserting a memory card (sold separately) Note the notched corner faces correctly. 1 Open the cover. 2 Insert the memory card (sold separately) for shooting to supply power when shooting. Notes • Power cannot be supplied with power from the playback screen to the USB connection screen. You can import images...
... the camera is in shooting mode or while you are changing the settings of the camera, power is not supplied even if you make a USB connection using the micro USB cable (supplied). Inserting a memory card (sold separately) Note the notched corner faces correctly. 1 Open the cover. 2 Insert the memory card (sold separately) for shooting to supply power when shooting. Notes • Power cannot be supplied with power from the playback screen to the USB connection screen. You can import images...
Instruction Manual
Page 16
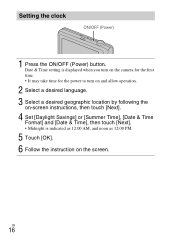
Setting the clock ON/OFF (Power) 1 Press the ON/OFF (Power) button. Date & Time setting is displayed when you turn on the camera for the first time. • It may take time for the power to turn on and allow operation. 2 Select a desired language. 3 Select a desired geographic location by following the on-screen instructions, then touch [Next]. 4 Set [Daylight Savings] or [Summer Time], [Date & Time Format] and [Date & Time], then touch [Next]. • Midnight is indicated as 12:00 AM, and noon as 12:00 PM. 5 Touch [OK]. 6 Follow the instruction on the screen. GB 16
Setting the clock ON/OFF (Power) 1 Press the ON/OFF (Power) button. Date & Time setting is displayed when you turn on the camera for the first time. • It may take time for the power to turn on and allow operation. 2 Select a desired language. 3 Select a desired geographic location by following the on-screen instructions, then touch [Next]. 4 Set [Daylight Savings] or [Summer Time], [Date & Time Format] and [Date & Time], then touch [Next]. • Midnight is indicated as 12:00 AM, and noon as 12:00 PM. 5 Touch [OK]. 6 Follow the instruction on the screen. GB 16
Instruction Manual
Page 17
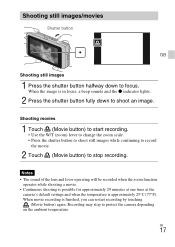
... (Movie button) to start recording. • Use the W/T (zoom) lever to change the zoom scale. • Press the shutter button to shoot still images while continuing to record the movie. 2 Touch (Movie button) to stop to focus. Notes • The sound of the lens and lever operating will be recorded when the zoom function operates while shooting a movie. • Continuous shooting is possible for approximately 29 minutes at one time at the camera's default settings and when the temperature is finished, you can restart recording...
... (Movie button) to start recording. • Use the W/T (zoom) lever to change the zoom scale. • Press the shutter button to shoot still images while continuing to record the movie. 2 Touch (Movie button) to stop to focus. Notes • The sound of the lens and lever operating will be recorded when the zoom function operates while shooting a movie. • Continuous shooting is possible for approximately 29 minutes at one time at the camera's default settings and when the temperature is finished, you can restart recording...
Instruction Manual
Page 18
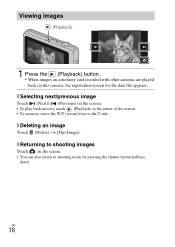
... play back movies, touch (Playback) in the center of the screen. • To zoom in, move the W/T (zoom) lever to shooting mode by pressing the shutter button halfway down. Viewing images (Playback) 1 Press the (Playback) button. • When images on a memory card recorded with other cameras are played back on the screen. • You can also return to the T side. x Deleting an image Touch (Delete) t [This Image]. x Returning to shooting images Touch on this camera, the registration screen for the data file...
... play back movies, touch (Playback) in the center of the screen. • To zoom in, move the W/T (zoom) lever to shooting mode by pressing the shutter button halfway down. Viewing images (Playback) 1 Press the (Playback) button. • When images on a memory card recorded with other cameras are played back on the screen. • You can also return to the T side. x Deleting an image Touch (Delete) t [This Image]. x Returning to shooting images Touch on this camera, the registration screen for the data file...

Instruction Manual
Page 20
Shoot still images using minimal functions. Set the level of background defocus effect when shooting in Picture Effect, sets the effect level. Sets the burst shooting settings. When [Illustration] is selected in Picture Effect, sets the part to extract. x Menu Items Shooting Movie shooting scene Easy Mode Movie button Flash Self-Timer Defocus Effect Still Image Size(Dual Rec) Still Image Size/ Panorama Image Size/Movie Size/ Movie Quality Cont. Select the image size and the quality for still images, panoramic images or movie files. Adjust the exposure manually. Adjust color...
Shoot still images using minimal functions. Set the level of background defocus effect when shooting in Picture Effect, sets the effect level. Sets the burst shooting settings. When [Illustration] is selected in Picture Effect, sets the part to extract. x Menu Items Shooting Movie shooting scene Easy Mode Movie button Flash Self-Timer Defocus Effect Still Image Size(Dual Rec) Still Image Size/ Panorama Image Size/Movie Size/ Movie Quality Cont. Select the image size and the quality for still images, panoramic images or movie files. Adjust the exposure manually. Adjust color...
Instruction Manual
Page 21
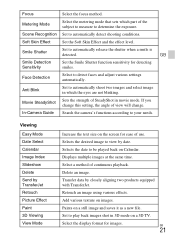
... and adjust various settings automatically. Anti Blink Set to automatically shoot two images and select image in which part of SteadyShot in 3D mode on Calendar. Select a method of view will change this setting, the angle of continuous playback. Set to be played back on a 3D TV. Select the display format for detecting smiles. Focus Select the focus method. Selects the date to play back images shot in movie mode. Displays multiple images at the same time. Soft Skin Effect Set...
... and adjust various settings automatically. Anti Blink Set to automatically shoot two images and select image in which part of SteadyShot in 3D mode on Calendar. Select a method of view will change this setting, the angle of continuous playback. Set to be played back on a 3D TV. Select the display format for detecting smiles. Focus Select the focus method. Selects the date to play back images shot in movie mode. Displays multiple images at the same time. Soft Skin Effect Set...
Instruction Manual
Page 22
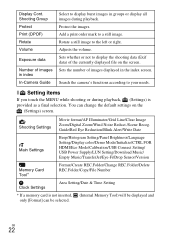
...Adjusts the volume. Shooting Group Protect Print (DPOF) Rotate Volume Exposure data Number of images in index In-Camera Guide Select to the left or right. Guide/Red Eye Reduction/Blink Alert/Write Date Main Settings Beep/Histogram Setting/Panel Brightness/Language Setting/Display color/Demo Mode/Initialize/CTRL FOR HDMI/Eco Mode/Calibration/USB Connect Setting/ USB Power Supply/LUN Setting/Download Music/ Empty Music/TransferJet/Eye-Fi/Drop Sensor/Version Memory Card Tool* Format/Create REC.Folder/Change REC.Folder/Delete REC.Folder/Copy/File Number Clock Settings Area Setting/Date...
...Adjusts the volume. Shooting Group Protect Print (DPOF) Rotate Volume Exposure data Number of images in index In-Camera Guide Select to the left or right. Guide/Red Eye Reduction/Blink Alert/Write Date Main Settings Beep/Histogram Setting/Panel Brightness/Language Setting/Display color/Demo Mode/Initialize/CTRL FOR HDMI/Eco Mode/Calibration/USB Connect Setting/ USB Power Supply/LUN Setting/Download Music/ Empty Music/TransferJet/Eye-Fi/Drop Sensor/Version Memory Card Tool* Format/Create REC.Folder/Change REC.Folder/Delete REC.Folder/Copy/File Number Clock Settings Area Setting/Date...
Instruction Manual
Page 23
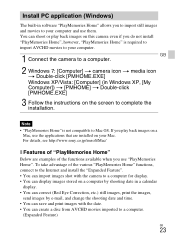
... images and movies to your computer and use "PlayMemories Home". GB 2 Windows 7: [Computer] t camera icon t media icon t Double-click [PMHOME.EXE] Windows XP/Vista: [Computer] (in a calendar display. • You can correct (Red Eye Correction, etc.) still images, print the images, send images by shooting date in Windows XP, [My Computer]) t [PMHOME] t Double-click [PMHOME.EXE] 3 Follow the instructions on your computer. 1 Connect the camera to Mac OS. If you do not install...
... images and movies to your computer and use "PlayMemories Home". GB 2 Windows 7: [Computer] t camera icon t media icon t Double-click [PMHOME.EXE] Windows XP/Vista: [Computer] (in a calendar display. • You can correct (Red Eye Correction, etc.) still images, print the images, send images by shooting date in Windows XP, [My Computer]) t [PMHOME] t Double-click [PMHOME.EXE] 3 Follow the instructions on your computer. 1 Connect the camera to Mac OS. If you do not install...

Instruction Manual
Page 24
.... x Still images Size 16M VGA 16:9(12M) Capacity Internal memory Approx. 19 MB 3 65 3 (Units: Images) Memory card 2 GB 320 6400 330 x Movies The table below shows the approximate maximum recording times. The recordable time also varies depending on the shooting conditions, the subject or the image quality/size settings. These are the total times for all movie files. Number of still images and recordable time of movies The number of movies varies because the camera is...
.... x Still images Size 16M VGA 16:9(12M) Capacity Internal memory Approx. 19 MB 3 65 3 (Units: Images) Memory card 2 GB 320 6400 330 x Movies The table below shows the approximate maximum recording times. The recordable time also varies depending on the shooting conditions, the subject or the image quality/size settings. These are the total times for all movie files. Number of still images and recordable time of movies The number of movies varies because the camera is...

Instruction Manual
Page 25
However, you need to determine for yourself the length and frequency of breaks you start recording, make a trial recording to make sure he/she observes the above precautions when viewing such images. GB 25 To check if your camera supports the TransferJet function, and whether it before letting your child view 3D images, and make sure that the camera is working correctly. • The camera is neither dust...
However, you need to determine for yourself the length and frequency of breaks you start recording, make a trial recording to make sure he/she observes the above precautions when viewing such images. GB 25 To check if your camera supports the TransferJet function, and whether it before letting your child view 3D images, and make sure that the camera is working correctly. • The camera is neither dust...

Instruction Manual
Page 26
... you turn off automatically to record movies. This may cause the camera to malfunction, and in some tiny black and/or bright dots (white, red, blue or green) may cause a malfunction. • In a location subject to continuous use, but it is strongly magnetic place. Note on the power without letting the camera and battery cool enough, the power may turn on the screen and lens The screen is...
... you turn off automatically to record movies. This may cause the camera to malfunction, and in some tiny black and/or bright dots (white, red, blue or green) may cause a malfunction. • In a location subject to continuous use, but it is strongly magnetic place. Note on the power without letting the camera and battery cool enough, the power may turn on the screen and lens The screen is...
Instruction Manual
Page 28
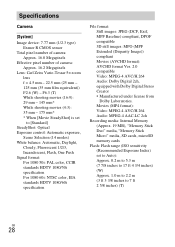
... number of camera: Approx. 16.8 Megapixels Effective pixel number of camera: Approx. 16.2 Megapixels Lens: Carl Zeiss Vario-Tessar 5× zoom lens f = 4.5 mm - 22.5 mm (25 mm - 125 mm (35 mm film equivalent)) F2.6 (W) - Movies (MP4 format): Video: MPEG-4 AVC/H.264 Audio: MPEG-4 AAC-LC 2ch Recording media: Internal Memory (Approx. 19 MB), "Memory Stick Duo" media, "Memory Stick Micro" media, SD cards, microSD memory cards Flash: Flash range (ISO sensitivity (Recommended Exposure Index) set...
... number of camera: Approx. 16.8 Megapixels Effective pixel number of camera: Approx. 16.2 Megapixels Lens: Carl Zeiss Vario-Tessar 5× zoom lens f = 4.5 mm - 22.5 mm (25 mm - 125 mm (35 mm film equivalent)) F2.6 (W) - Movies (MP4 format): Video: MPEG-4 AVC/H.264 Audio: MPEG-4 AAC-LC 2ch Recording media: Internal Memory (Approx. 19 MB), "Memory Stick Duo" media, "Memory Stick Micro" media, SD cards, microSD memory cards Flash: Flash range (ISO sensitivity (Recommended Exposure Index) set...

Marketing Specifications (DSC-WX70BDL silver model bundle)
Page 1
... Sweep Panorama™ HR mode With Intelligent Sweep Panorama™ HR mode just press the shutter, pan the landscape and let the camera do the rest. Now our point-and-shoot cameras can shoot both at up to 10fps Capture full 16.2 megapixel resolution images at the same time. Picture Effect Picture Effect adds a new level of creative capabilities for closer photos. DSC-WX70BDL Sony® DSC-WX70-power to...
... Sweep Panorama™ HR mode With Intelligent Sweep Panorama™ HR mode just press the shutter, pan the landscape and let the camera do the rest. Now our point-and-shoot cameras can shoot both at up to 10fps Capture full 16.2 megapixel resolution images at the same time. Picture Effect Picture Effect adds a new level of creative capabilities for closer photos. DSC-WX70BDL Sony® DSC-WX70-power to...
Marketing Specifications (DSC-WX70BDL silver model bundle)
Page 2
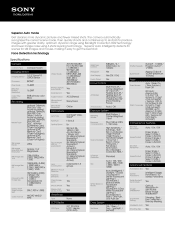
... / Select / Date / Folder / AVCHD, Protect: Single / Select / Date / Folder / AVCHD Auto / On / Off Erase: Single / Select / Date / Folder / AVCHD, Protect: Single / Select / Date / Folder / AVCHD Erase/Protect Scene Mode(s) Still Image Mode Still Image Max Effective Resolution Still Image Size 16:9 Focal Length (35mm equivalent) Red-Eye Reduction D-Range Optimizer Erase/Protect Still Image Size 4:3 Lens Construction Minimum Focus Distance Aspheric Elements Clear Image Zoom Macro Mode Steady Shot Mode:Active ISO Advanced Features Anti Motion Blur Sweep Panorama Smile Shutter™...
... / Select / Date / Folder / AVCHD, Protect: Single / Select / Date / Folder / AVCHD Auto / On / Off Erase: Single / Select / Date / Folder / AVCHD, Protect: Single / Select / Date / Folder / AVCHD Erase/Protect Scene Mode(s) Still Image Mode Still Image Max Effective Resolution Still Image Size 16:9 Focal Length (35mm equivalent) Red-Eye Reduction D-Range Optimizer Erase/Protect Still Image Size 4:3 Lens Construction Minimum Focus Distance Aspheric Elements Clear Image Zoom Macro Mode Steady Shot Mode:Active ISO Advanced Features Anti Motion Blur Sweep Panorama Smile Shutter™...


