Instruction Manual
Page 2
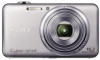
... the support page. • Check the model name on the bottom of the camera. 1 Access the Sony support page. Checking the supplied items The number in parentheses indicates the number of pieces. • Camera (1) • Rechargeable battery pack NP-BN (1) (This rechargeable battery pack cannot...UB10B (1) • Power cord (mains lead) (not supplied in -depth instructions on -line manual. http://www.sony.net/SonyInfo/Support/ 2 Select your camera. English Learning more about the camera ("Cyber-shot User Guide") "Cyber-shot User Guide" is an on the many functions of your country or ...
... the support page. • Check the model name on the bottom of the camera. 1 Access the Sony support page. Checking the supplied items The number in parentheses indicates the number of pieces. • Camera (1) • Rechargeable battery pack NP-BN (1) (This rechargeable battery pack cannot...UB10B (1) • Power cord (mains lead) (not supplied in -depth instructions on -line manual. http://www.sony.net/SonyInfo/Support/ 2 Select your camera. English Learning more about the camera ("Cyber-shot User Guide") "Cyber-shot User Guide" is an on the many functions of your country or ...

Instruction Manual
Page 4
... AC Adaptor, immediately shut off the power by disconnecting the plug from the wall outlet (wall socket). If some trouble occurs while using a genuine Sony battery charger or a device that may not cause harmful interference, and (2) this camera only, and should not be used with the same or equivalent type recommended by...
... AC Adaptor, immediately shut off the power by disconnecting the plug from the wall outlet (wall socket). If some trouble occurs while using a genuine Sony battery charger or a device that may not cause harmful interference, and (2) this camera only, and should not be used with the same or equivalent type recommended by...
Instruction Manual
Page 9
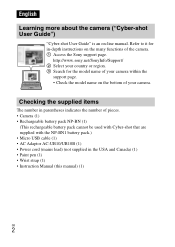
Make sure that the battery eject lever locks after insertion. • Closing the cover with the battery inserted incorrectly may damage the camera. GB 9 Inserting the battery pack GB Battery eject lever 1 Open the cover. 2 Insert the battery pack. • While pressing down the battery eject lever, insert the battery pack as illustrated.
Make sure that the battery eject lever locks after insertion. • Closing the cover with the battery inserted incorrectly may damage the camera. GB 9 Inserting the battery pack GB Battery eject lever 1 Open the cover. 2 Insert the battery pack. • While pressing down the battery eject lever, insert the battery pack as illustrated.
Instruction Manual
Page 10
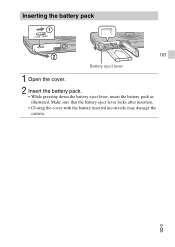
The Power/Charge lamp lights orange, and charging starts. • Turn off the camera while charging the battery. • You can charge the battery pack even when it is partially charged. • When the Power/Charge lamp flashes and .../regions other than the USA and Canada Power/Charge lamp Lit: Charging Off: Charging finished Flashing: Charging error Charging paused due to overheating 1 Connect the camera to the AC Adaptor (supplied), using the micro USB cable (supplied). 2 Connect the AC Adaptor to the wall outlet (wall socket).
The Power/Charge lamp lights orange, and charging starts. • Turn off the camera while charging the battery. • You can charge the battery pack even when it is partially charged. • When the Power/Charge lamp flashes and .../regions other than the USA and Canada Power/Charge lamp Lit: Charging Off: Charging finished Flashing: Charging error Charging paused due to overheating 1 Connect the camera to the AC Adaptor (supplied), using the micro USB cable (supplied). 2 Connect the AC Adaptor to the wall outlet (wall socket).
Instruction Manual
Page 11
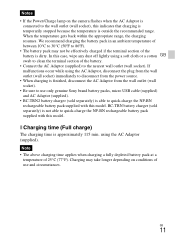
... of the battery. • Connect the AC Adaptor (supplied) to 86ºF). • The battery pack may take longer depending on the camera flashes when the AC Adaptor is connected to the wall outlet (wall socket), this indicates that charging is temporarily stopped because the temperature is outside... be effectively charged if the terminal section of the battery is dirty. Notes • If the Power/Charge lamp on conditions of use only genuine Sony brand battery packs, micro USB cable (supplied) and AC Adaptor (supplied). • BC-TRN2 battery charger (sold separately) is not able to...
... of the battery. • Connect the AC Adaptor (supplied) to 86ºF). • The battery pack may take longer depending on the camera flashes when the AC Adaptor is connected to the wall outlet (wall socket), this indicates that charging is temporarily stopped because the temperature is outside... be effectively charged if the terminal section of the battery is dirty. Notes • If the Power/Charge lamp on conditions of use only genuine Sony brand battery packs, micro USB cable (supplied) and AC Adaptor (supplied). • BC-TRN2 battery charger (sold separately) is not able to...
Instruction Manual
Page 12
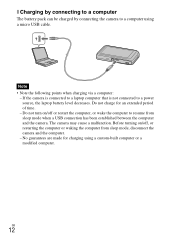
...from sleep mode when a USB connection has been established between the computer and the camera. Do not turn on /off or restart the computer, or wake the computer to resume from sleep mode, disconnect the camera and the computer. - x Charging by connecting to a computer The battery pack... can be charged by connecting the camera to a computer using a custom-built computer or a modified computer. Do not charge for ...
...from sleep mode when a USB connection has been established between the computer and the camera. Do not turn on /off or restart the computer, or wake the computer to resume from sleep mode, disconnect the camera and the computer. - x Charging by connecting to a computer The battery pack... can be charged by connecting the camera to a computer using a custom-built computer or a modified computer. Do not charge for ...

Instruction Manual
Page 13
...The power turns on and off once every ten times. • The battery life for movies applies shooting under the following conditions: (CIPA: Camera & Imaging Products Association) - [Panel Brightness] is for "Shooting (still images)" is based on the conditions of use. • The number... 60 min. - GB • The above number of 25°C (77°F). • The number for shooting under the following conditions: - Using Sony "Memory Stick PRO Duo" (Mark2) media (sold separately) - Movie quality: AVC HD HQ - When continuous shooting ends because of set to [3(Normal)]. ...
...The power turns on and off once every ten times. • The battery life for movies applies shooting under the following conditions: (CIPA: Camera & Imaging Products Association) - [Panel Brightness] is for "Shooting (still images)" is based on the conditions of use. • The number... 60 min. - GB • The above number of 25°C (77°F). • The number for shooting under the following conditions: - Using Sony "Memory Stick PRO Duo" (Mark2) media (sold separately) - Movie quality: AVC HD HQ - When continuous shooting ends because of set to [3(Normal)]. ...
Instruction Manual
Page 14
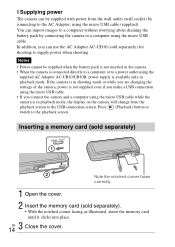
... 14 Close the cover. Press (Playback) button to switch to the playback screen. In addition, you connect the camera and a computer using the micro USB cable while the camera is in playback mode. Notes • Power cannot be supplied with power from the playback screen to the USB connection...the supplied AC Adaptor AC-UB10/UB10B, power supply is available only in playback mode, the display on the camera will change from the wall outlet (wall socket) by connecting the camera to a computer using the micro USB cable (supplied). Inserting a memory card (sold separately) Note the ...
... 14 Close the cover. Press (Playback) button to switch to the playback screen. In addition, you connect the camera and a computer using the micro USB cable while the camera is in playback mode. Notes • Power cannot be supplied with power from the playback screen to the USB connection...the supplied AC Adaptor AC-UB10/UB10B, power supply is available only in playback mode, the display on the camera will change from the wall outlet (wall socket) by connecting the camera to a computer using the micro USB cable (supplied). Inserting a memory card (sold separately) Note the ...
Instruction Manual
Page 15
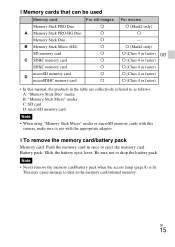
... Duo" media B: "Memory Stick Micro" media C: SD card D: microSD memory card Note • When using "Memory Stick Micro" media or microSD memory cards with this camera, make sure to eject the memory card. Be sure not to data in the memory card/internal memory. GB 15 Note • Never remove the...
... Duo" media B: "Memory Stick Micro" media C: SD card D: microSD memory card Note • When using "Memory Stick Micro" media or microSD memory cards with this camera, make sure to eject the memory card. Be sure not to data in the memory card/internal memory. GB 15 Note • Never remove the...
Instruction Manual
Page 16
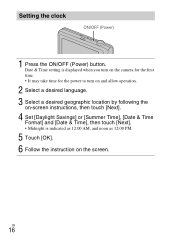
GB 16 Setting the clock ON/OFF (Power) 1 Press the ON/OFF (Power) button. Date & Time setting is displayed when you turn on the camera for the first time. • It may take time for the power to turn on and allow operation. 2 Select a desired language. 3 Select a desired geographic location by following the on-screen instructions, then touch [Next]. 4 Set [Daylight Savings] or [Summer Time], [Date & Time Format] and [Date & Time], then touch [Next]. • Midnight is indicated as 12:00 AM, and noon as 12:00 PM. 5 Touch [OK]. 6 Follow the instruction on the screen.
GB 16 Setting the clock ON/OFF (Power) 1 Press the ON/OFF (Power) button. Date & Time setting is displayed when you turn on the camera for the first time. • It may take time for the power to turn on and allow operation. 2 Select a desired language. 3 Select a desired geographic location by following the on-screen instructions, then touch [Next]. 4 Set [Daylight Savings] or [Summer Time], [Date & Time Format] and [Date & Time], then touch [Next]. • Midnight is indicated as 12:00 AM, and noon as 12:00 PM. 5 Touch [OK]. 6 Follow the instruction on the screen.
Instruction Manual
Page 17
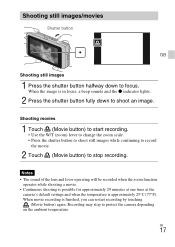
...when the zoom function operates while shooting a movie. • Continuous shooting is possible for approximately 29 minutes at one time at the camera's default settings and when the temperature is finished, you can restart recording by touching (Movie button) again. When the image is in ...Press the shutter button to shoot still images while continuing to record the movie. 2 Touch (Movie button) to stop to protect the camera depending on the ambient temperature. Recording may stop recording. Shooting still images/movies Shutter button GB Shooting still images 1 Press the shutter ...
...when the zoom function operates while shooting a movie. • Continuous shooting is possible for approximately 29 minutes at one time at the camera's default settings and when the temperature is finished, you can restart recording by touching (Movie button) again. When the image is in ...Press the shutter button to shoot still images while continuing to record the movie. 2 Touch (Movie button) to stop to protect the camera depending on the ambient temperature. Recording may stop recording. Shooting still images/movies Shutter button GB Shooting still images 1 Press the shutter ...
Instruction Manual
Page 18
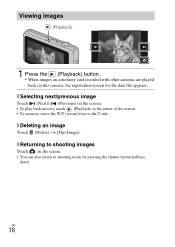
... images Touch on the screen. • You can also return to the T side. x Selecting next/previous image Touch (Next)/ (Previous) on this camera, the registration screen for the data file appears. Viewing images (Playback) 1 Press the (Playback) button. • When images on a memory card recorded with other... cameras are played back on the screen. • To play back movies, touch (Playback) in the center of the screen. • To zoom in, ...
... images Touch on the screen. • You can also return to the T side. x Selecting next/previous image Touch (Next)/ (Previous) on this camera, the registration screen for the data file appears. Viewing images (Playback) 1 Press the (Playback) button. • When images on a memory card recorded with other... cameras are played back on the screen. • To play back movies, touch (Playback) in the center of the screen. • To zoom in, ...

Instruction Manual
Page 19
... playing back can use various functions. GB 1 Touch MENU. 2 Touch (In-Camera Guide), then select the desired MENU item. While displaying the guide, you can search the guide using keywords or icons. This camera is equipped with built-in instruction guide. The operation guide for the selected item... is displayed. • If you touch (In-Camera Guide) when the MENU screen is not displayed, you can be operated touching...
... playing back can use various functions. GB 1 Touch MENU. 2 Touch (In-Camera Guide), then select the desired MENU item. While displaying the guide, you can search the guide using keywords or icons. This camera is equipped with built-in instruction guide. The operation guide for the selected item... is displayed. • If you touch (In-Camera Guide) when the MENU screen is not displayed, you can be operated touching...

Instruction Manual
Page 20
... HDR Painting effect Area of an image. Set the level of background defocus effect when shooting in Picture Effect, sets the color hue. When [Toy camera] is selected in Picture Effect, sets the part to extract. Adjust the exposure manually. Shoot movies quickly from a shooting mode other than [Movie Mode]. Sets...
... HDR Painting effect Area of an image. Set the level of background defocus effect when shooting in Picture Effect, sets the color hue. When [Toy camera] is selected in Picture Effect, sets the part to extract. Adjust the exposure manually. Shoot movies quickly from a shooting mode other than [Movie Mode]. Sets...
Instruction Manual
Page 21
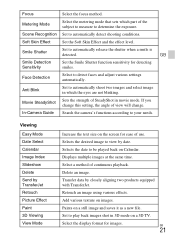
... images. Add various texture on a still image and saves it as a new file. Select a method of view will change. Paints on images. In-Camera Guide Search the camera's functions according to automatically detect shooting conditions. Scene Recognition Set to your needs. Smile Shutter Set to detect faces and adjust various settings automatically...
... images. Add various texture on a still image and saves it as a new file. Select a method of view will change. Paints on images. In-Camera Guide Search the camera's functions according to automatically detect shooting conditions. Scene Recognition Set to your needs. Smile Shutter Set to detect faces and adjust various settings automatically...
Instruction Manual
Page 22
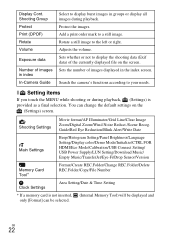
... during playback, (Settings) is not inserted, (Internal Memory Tool) will be displayed and only [Format] can change the default settings on the screen. Search the camera's functions according to the left or right. Guide/Red Eye Reduction/Blink Alert/Write Date Main Settings Beep/Histogram Setting/Panel Brightness/Language Setting/Display... Image Zoom/Digital Zoom/Wind Noise Reduct./Scene Recog. Sets whether or not to display the shooting data (Exif data) of images in index In-Camera Guide Select to a still image. Display Cont.
... during playback, (Settings) is not inserted, (Internal Memory Tool) will be displayed and only [Format] can change the default settings on the screen. Search the camera's functions according to the left or right. Guide/Red Eye Reduction/Blink Alert/Write Date Main Settings Beep/Histogram Setting/Panel Brightness/Language Setting/Display... Image Zoom/Digital Zoom/Wind Noise Reduct./Scene Recog. Sets whether or not to display the shooting data (Exif data) of images in index In-Camera Guide Select to a still image. Display Cont.
Instruction Manual
Page 23
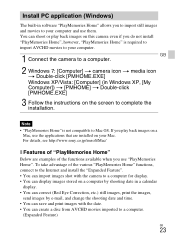
... the installation. Note • "PlayMemories Home" is required to import AVCHD movies to your computer. 1 Connect the camera to a computer. For details, see http://www.sony.co.jp/imsoft/Mac/ x Features of the various "PlayMemories Home" functions, connect to the Internet and install the ... that are examples of the functions available when you to import still images and movies to your computer and use them. GB 2 Windows 7: [Computer] t camera icon t media icon t Double-click [PMHOME.EXE] Windows XP/Vista: [Computer] (in Windows XP, [My Computer]) t [PMHOME] t Double-click...
... the installation. Note • "PlayMemories Home" is required to import AVCHD movies to your computer. 1 Connect the camera to a computer. For details, see http://www.sony.co.jp/imsoft/Mac/ x Features of the various "PlayMemories Home" functions, connect to the Internet and install the ... that are examples of the functions available when you to import still images and movies to your computer and use them. GB 2 Windows 7: [Computer] t camera icon t media icon t Double-click [PMHOME.EXE] Windows XP/Vista: [Computer] (in Windows XP, [My Computer]) t [PMHOME] t Double-click...

Instruction Manual
Page 24
... the total times for approximately 29 minutes. GB 24 Number of still images and recordable time of movies The number of movies varies because the camera is required for recording.
... the total times for approximately 29 minutes. GB 24 Number of still images and recordable time of movies The number of movies varies because the camera is required for recording.

Instruction Manual
Page 25
...you start recording, make a trial recording to make sure he/she observes the above precautions when viewing such images. To check if your camera supports the TransferJet function, and whether it before letting your child view 3D images, and make sure that you may occur. To prevent... these symptoms, we recommend that the camera is working correctly. • The camera is a 1080 60i-compatible device or 1080 50i-compatible device, check for the following marks on recording/playback • ...
...you start recording, make a trial recording to make sure he/she observes the above precautions when viewing such images. To check if your camera supports the TransferJet function, and whether it before letting your child view 3D images, and make sure that you may occur. To prevent... these symptoms, we recommend that the camera is working correctly. • The camera is a 1080 60i-compatible device or 1080 50i-compatible device, check for the following marks on recording/playback • ...

Instruction Manual
Page 26
... of the pixels are a normal result of the manufacturing process, and do not affect the recording. Note on the power without letting the camera and battery cool enough, the power may turn off again or you turn on the screen and lens The screen is capable of reproducing sharp... dust get hot due to continuous use, but it is strongly magnetic place. On carrying Do not sit down . These dots are operational for the camera has been produced under a quality assurance system certified by Carl Zeiss in accordance with excellent contrast. In this may cause a malfunction. • In a...
... of the pixels are a normal result of the manufacturing process, and do not affect the recording. Note on the power without letting the camera and battery cool enough, the power may turn off again or you turn on the screen and lens The screen is capable of reproducing sharp... dust get hot due to continuous use, but it is strongly magnetic place. On carrying Do not sit down . These dots are operational for the camera has been produced under a quality assurance system certified by Carl Zeiss in accordance with excellent contrast. In this may cause a malfunction. • In a...


