Instruction Manual
Page 7
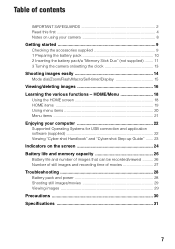
...supplied 9 1 Preparing the battery pack 10 2 Inserting the battery pack/a "Memory Stick Duo" (not supplied) ........ 11 3 Turning the camera on the screen 24 Battery life and memory capacity 26 Battery life and number of images that can be recorded/viewed .......... 26 Number of still images... this first 4 Notes on using your computer 22 Supported Operating Systems for USB connection and application software (supplied 22 Viewing "Cyber-shot Handbook" and "Cyber-shot Step-up Guide" ....... 23 Indicators on /setting the clock 13 Shooting images easily 14 Mode dial/Zoom/Flash/Macro/Self-...
...supplied 9 1 Preparing the battery pack 10 2 Inserting the battery pack/a "Memory Stick Duo" (not supplied) ........ 11 3 Turning the camera on the screen 24 Battery life and memory capacity 26 Battery life and number of images that can be recorded/viewed .......... 26 Number of still images... this first 4 Notes on using your computer 22 Supported Operating Systems for USB connection and application software (supplied 22 Viewing "Cyber-shot Handbook" and "Cyber-shot Step-up Guide" ....... 23 Indicators on /setting the clock 13 Shooting images easily 14 Mode dial/Zoom/Flash/Macro/Self-...
Instruction Manual
Page 8
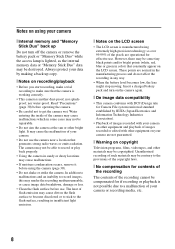
... are normal in the manufacturing process and do not affect the recording in insufficient light emission. [ Notes on the LCD screen • The LCD screen is manufactured using extremely high-precision technology so over 99.99% of flash emission may cause malfunctions. • If moisture... be some cases may be destroyed. Notes on using your camera [ Internal memory and "Memory Stick Duo" back up Do not turn on the camera again. [ On image data compatibility • This camera conforms with DCF (Design rule for Camera File system) universal standard established by making a back up ...
... are normal in the manufacturing process and do not affect the recording in insufficient light emission. [ Notes on the LCD screen • The LCD screen is manufactured using extremely high-precision technology so over 99.99% of flash emission may cause malfunctions. • If moisture... be some cases may be destroyed. Notes on using your camera [ Internal memory and "Memory Stick Duo" back up Do not turn on the camera again. [ On image data compatibility • This camera conforms with DCF (Design rule for Camera File system) universal standard established by making a back up ...
Instruction Manual
Page 11
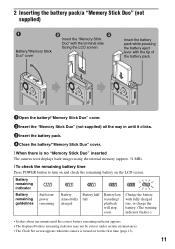
...The displayed battery remaining indicator may not be correct under certain circumstances. • The Clock Set screen appears when the camera is no "Memory Stick Duo" inserted The camera records/plays back images using the internal memory (approx. 31 MB). [ To check the remaining ...one minute until it clicks. 3Insert the battery pack. 4Close the battery/"Memory Stick Duo" cover. [ When there is turned on the LCD screen. Battery remaining indicator Battery remaining guidelines Sufficient power remaining Battery almost fully charged Battery half full Battery low, recording/ playback ...
...The displayed battery remaining indicator may not be correct under certain circumstances. • The Clock Set screen appears when the camera is no "Memory Stick Duo" inserted The camera records/plays back images using the internal memory (approx. 31 MB). [ To check the remaining ...one minute until it clicks. 3Insert the battery pack. 4Close the battery/"Memory Stick Duo" cover. [ When there is turned on the LCD screen. Battery remaining indicator Battery remaining guidelines Sufficient power remaining Battery almost fully charged Battery half full Battery low, recording/ playback ...
Instruction Manual
Page 16
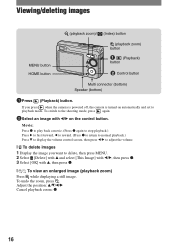
..., b to rewind. (Press z to return to normal playback.) Press V to display the volume control screen, then press b/B to adjust the volume. [ To delete images 1 Display the image you press when the camera is powered off, the camera is turned on the control button. Adjust the position: v/V/b/B Cancel playback zoom: z 16 If you want to...
..., b to rewind. (Press z to return to normal playback.) Press V to display the volume control screen, then press b/B to adjust the volume. [ To delete images 1 Display the image you press when the camera is powered off, the camera is turned on the control button. Adjust the position: v/V/b/B Cancel playback zoom: z 16 If you want to...
Instruction Manual
Page 20
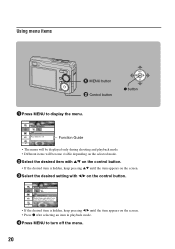
Using menu items MENU button ɟ Control button z button 1Press MENU to turn off the menu. 20 Function Guide • The menu will be displayed only during shooting and playback mode. • Different items will become visible depending ... mode. 2Select the desired item with v/V on the control button. • If the desired item is hidden, keep pressing v/V until the item appears on the screen. 3Select the desired setting with b/B on the control button. • If the desired item is hidden, keep pressing b/B until the item appears on the...
Using menu items MENU button ɟ Control button z button 1Press MENU to turn off the menu. 20 Function Guide • The menu will be displayed only during shooting and playback mode. • Different items will become visible depending ... mode. 2Select the desired item with v/V on the control button. • If the desired item is hidden, keep pressing v/V until the item appears on the screen. 3Select the desired setting with b/B on the control button. • If the desired item is hidden, keep pressing b/B until the item appears on the...
Instruction Manual
Page 23
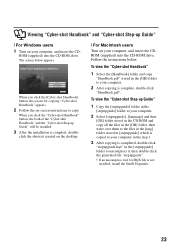
... the [img] folder stored in the [stepupguide] folder to copy. When you click the [Cyber-shot Handbook] button, the screen for copying "Cyber-shot Handbook" appears. 2 Follow the on-screen instructions to uncompress it, then double-click the generated file "stepupguide". • If an uncompress...[stepupguide] which is copied to your computer. 2 After copying is complete, double-click "Handbook.pdf". Viewing "Cyber-shot Handbook" and "Cyber-shot Step-up Guide" [ For Windows users 1 Turn on your computer, and insert the CDROM (supplied) into the CD-ROM drive. click the shortcut created on ...
... the [img] folder stored in the [stepupguide] folder to copy. When you click the [Cyber-shot Handbook] button, the screen for copying "Cyber-shot Handbook" appears. 2 Follow the on-screen instructions to uncompress it, then double-click the generated file "stepupguide". • If an uncompress...[stepupguide] which is copied to your computer. 2 After copying is complete, double-click "Handbook.pdf". Viewing "Cyber-shot Handbook" and "Cyber-shot Step-up Guide" [ For Windows users 1 Turn on your computer, and insert the CDROM (supplied) into the CD-ROM drive. click the shortcut created on ...
Instruction Manual
Page 26
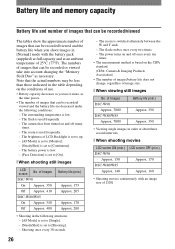
...is low. - The camera has been turned on and off many times. - Shooting once every 30 seconds. 26 - The flash is based on the conditions of use. • Battery capacity decreases as you shoot images in [Normal] mode with an image size of Images DSC-W90 On Approx. 350 ... 205 Approx. 170 Approx. 200 • Shooting in order at about three second intervals [ When shooting movies LCD screen ON (min.) DSC-W90 Approx. 150 DSC-W80/W85 Approx. 140 LCD screen OFF (min.) Approx. 170 Approx. 160 • Shooting movies continuously with the battery pack (supplied) at full capacity...
...is low. - The camera has been turned on and off many times. - Shooting once every 30 seconds. 26 - The flash is based on the conditions of use. • Battery capacity decreases as you shoot images in [Normal] mode with an image size of Images DSC-W90 On Approx. 350 ... 205 Approx. 170 Approx. 200 • Shooting in order at about three second intervals [ When shooting movies LCD screen ON (min.) DSC-W90 Approx. 150 DSC-W80/W85 Approx. 140 LCD screen OFF (min.) Approx. 170 Approx. 160 • Shooting movies continuously with the battery pack (supplied) at full capacity...
Instruction Manual
Page 28
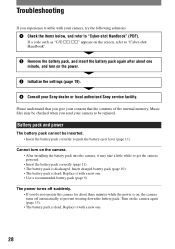
...on the screen, refer to "Cyber-shot Handbook". 2 Remove the battery pack, and insert the battery pack again after about three minutes while the power is on the power. 3 Initialize the settings (page 19). 4 Consult your camera to be repaired. Cannot turn on , the camera turns off ... recommended battery pack (page 9). The power turns off suddenly. • If you send your Sony dealer or local authorized Sony service facility. Please understand that you give your camera, try the following solutions. 1 Check the items below, and refer to "Cyber-shot Handbook" (PDF). Replace it may be ...
...on the screen, refer to "Cyber-shot Handbook". 2 Remove the battery pack, and insert the battery pack again after about three minutes while the power is on the power. 3 Initialize the settings (page 19). 4 Consult your camera to be repaired. Cannot turn on , the camera turns off ... recommended battery pack (page 9). The power turns off suddenly. • If you send your Sony dealer or local authorized Sony service facility. Please understand that you give your camera, try the following solutions. 1 Check the items below, and refer to "Cyber-shot Handbook" (PDF). Replace it may be ...
Instruction Manual
Page 30
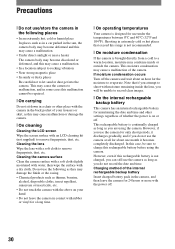
...and 40°C (32°F and 104°F). In this case, be sure to charge this may cause malfunction or damage the camera. [ On cleaning Cleaning the LCD screen Wipe the screen surface with the camera in extremely cold or hot places that if you attempt to let sand or dust get into the... with water, then wipe the surface with a soft cloth to evaporate. Do not use the camera at all for about an hour for only short periods, it becomes completely discharged. If moisture condensation occurs Turn off . 30 This may condense inside the lens, you do not use the following places &#...
...and 40°C (32°F and 104°F). In this case, be sure to charge this may cause malfunction or damage the camera. [ On cleaning Cleaning the LCD screen Wipe the screen surface with the camera in extremely cold or hot places that if you attempt to let sand or dust get into the... with water, then wipe the surface with a soft cloth to evaporate. Do not use the camera at all for about an hour for only short periods, it becomes completely discharged. If moisture condensation occurs Turn off . 30 This may condense inside the lens, you do not use the following places &#...


