Operating Instructions
Page 6
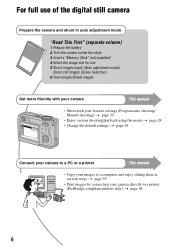
For full use of the digital still camera Prepare the camera and shoot in auto adjustment mode "Read This First" (separate volume) 1 Prepare the battery 2 Turn the camera on/set the clock 3 Insert a "Memory Stick" (not supplied) 4 Select the image size for use 5 Shoot images easily (Auto adjustment mode...) Shoot still images (Scene Selection) 6 View images/Delete images Get more friendly with your camera This manual • Shoot ...
For full use of the digital still camera Prepare the camera and shoot in auto adjustment mode "Read This First" (separate volume) 1 Prepare the battery 2 Turn the camera on/set the clock 3 Insert a "Memory Stick" (not supplied) 4 Select the image size for use 5 Shoot images easily (Auto adjustment mode...) Shoot still images (Scene Selection) 6 View images/Delete images Get more friendly with your camera This manual • Shoot ...
Operating Instructions
Page 8
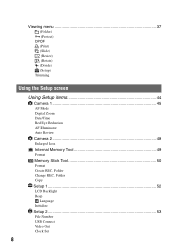
Viewing menu 37 (Folder) - (Protect) DPOF (Print) (Slide) (Resize) (Rotate) (Divide) (Setup) Trimming Using the Setup screen Using Setup items 44 Camera 1 45 1 AF Mode Digital Zoom Date/Time Red Eye Reduction AF Illuminator Auto Review Camera 2 48 2 Enlarged Icon Internal Memory Tool 49 Format Memory Stick Tool 50 Format Create REC. Folder Copy Setup 1 52 1 LCD Backlight Beep Language Initialize Setup 2 53 2 File Number USB Connect Video Out Clock Set 8 Folder Change REC.
Viewing menu 37 (Folder) - (Protect) DPOF (Print) (Slide) (Resize) (Rotate) (Divide) (Setup) Trimming Using the Setup screen Using Setup items 44 Camera 1 45 1 AF Mode Digital Zoom Date/Time Red Eye Reduction AF Illuminator Auto Review Camera 2 48 2 Enlarged Icon Internal Memory Tool 49 Format Memory Stick Tool 50 Format Create REC. Folder Copy Setup 1 52 1 LCD Backlight Beep Language Initialize Setup 2 53 2 File Number USB Connect Video Out Clock Set 8 Folder Change REC.
Operating Instructions
Page 46
... operation t page 44 • When you select. (t step 2 "Set the clock" in "Read This First") Off Does not superimpose the date and time. •... a second until the shutter clicks, hold the camera firmly to prevent the effects of the optical zoom. • The AF range finder frame does not appear when using the digital zoom. The W side of this before shooting.... scaling indicator appears as follows. Date Superimposes the year, month and day. • The date is the digital zoom area Zoom scaling indicator • The maximum zoom scale of smart zoom/precision zoom includes the scale of...
... operation t page 44 • When you select. (t step 2 "Set the clock" in "Read This First") Off Does not superimpose the date and time. •... a second until the shutter clicks, hold the camera firmly to prevent the effects of the optical zoom. • The AF range finder frame does not appear when using the digital zoom. The W side of this before shooting.... scaling indicator appears as follows. Date Superimposes the year, month and day. • The date is the digital zoom area Zoom scaling indicator • The maximum zoom scale of smart zoom/precision zoom includes the scale of...

Operating Instructions
Page 54
Then, perform the procedure explained in "Setting the clock" (t step 2 in "Read This First"). Cancels setting the clock. 54 OK Cancel For details on the operation t page 44 Select [OK] with v on the control button, and press z. Clock Set Sets the date and time.
Then, perform the procedure explained in "Setting the clock" (t step 2 in "Read This First"). Cancels setting the clock. 54 OK Cancel For details on the operation t page 44 Select [OK] with v on the control button, and press z. Clock Set Sets the date and time.
Operating Instructions
Page 85
... 1 in microcomputer is on, but the camera does not work . • Use the type of batteries you use it (page 93). Cannot identify an indicator on the printer. Replace them with this camera (page 91). • The battery level is not a malfunction. The Clock Set screen appears when you turn off the... camera and leave it for about an hour before using it for a while as the printer ...
... 1 in microcomputer is on, but the camera does not work . • Use the type of batteries you use it (page 93). Cannot identify an indicator on the printer. Replace them with this camera (page 91). • The battery level is not a malfunction. The Clock Set screen appears when you turn off the... camera and leave it for about an hour before using it for a while as the printer ...
Operating Instructions
Page 96
...D Date 46 Date&Time 46 Date/Time 46 Daylight 33 Delete t step 6 in "Read This First" Digital Zoom 45 DirectX 56 Divide 41 DPOF 72 E Effective pixels 94 Electronic transformer t step 1 in "Read ...Changing 51 Creating 50 Forced flash t step 5 in "Read This First" Cleaning 93 Clock Set 54 Cloudy 33 Color 12 Compression ratio 14 Computer Copying images 57 Macintosh 66 Recommended ...environment 56, 66 Software 64 Viewing image stored on a computer with your camera 63 Windows 55 Connecting Computer 58 Printer 70 TV 74 Contrast 36 Copy 51 Copying images...
...D Date 46 Date&Time 46 Date/Time 46 Daylight 33 Delete t step 6 in "Read This First" Digital Zoom 45 DirectX 56 Divide 41 DPOF 72 E Effective pixels 94 Electronic transformer t step 1 in "Read ...Changing 51 Creating 50 Forced flash t step 5 in "Read This First" Cleaning 93 Clock Set 54 Cloudy 33 Color 12 Compression ratio 14 Computer Copying images 57 Macintosh 66 Recommended ...environment 56, 66 Software 64 Viewing image stored on a computer with your camera 63 Windows 55 Connecting Computer 58 Printer 70 TV 74 Contrast 36 Copy 51 Copying images...
Operating Instructions
Page 98
...Indicator 17 LCD Backlight 52 Self-diagnosis display...........86 Self-timer t step 5 in "Read This First" Sepia 36 Setting the clock t step 2 in "Read This First" Setup 36, 43, 44 Camera 1 45 Camera 2 48 Internal Memory Tool ...49 Memory Stick Tool .......50 Setup 1 52 Setup 2 53 Setup 1 52 Setup 2 ... mode t step 5 in "Read This First" Twilight portrait mode t step 5 in "Read This First" U Underexposure 11 USB Connect 53 USB Driver 57 Using your camera abroad t step 1 in "Read This First" V VGA t step 4 in "Read This First" Video CD 64, 67 Video Out 53 Viewing Movie t step 6...
...Indicator 17 LCD Backlight 52 Self-diagnosis display...........86 Self-timer t step 5 in "Read This First" Sepia 36 Setting the clock t step 2 in "Read This First" Setup 36, 43, 44 Camera 1 45 Camera 2 48 Internal Memory Tool ...49 Memory Stick Tool .......50 Setup 1 52 Setup 2 53 Setup 1 52 Setup 2 ... mode t step 5 in "Read This First" Twilight portrait mode t step 5 in "Read This First" U Underexposure 11 USB Connect 53 USB Driver 57 Using your camera abroad t step 1 in "Read This First" V VGA t step 4 in "Read This First" Video CD 64, 67 Video Out 53 Viewing Movie t step 6...