Handycam® Handbook
Page 5
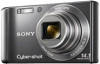
... Operation Search MENU/Settings Search Index Notes on using the camera How to use this handbook 2 Notes on using the camera 3 Operation Search 8 MENU/Settings Search 10 Identifying parts 14 List of icons displayed on the screen 15 Using the mode dial 17 Using the internal memory 18 Shooting Intelligent Auto Adjustment 19 Easy Shooting 20 Program Auto 22 Sweep Panorama 23 Scene Selection 25 Movie Mode 27 Zoom 28 DISP (Screen Display Settings 29 Flash 30 Smile Shutter 31 Self-Timer 32 Viewing Viewing still images 33 Playback zoom 34 Image Index 35 Delete 36 Viewing...
... Operation Search MENU/Settings Search Index Notes on using the camera How to use this handbook 2 Notes on using the camera 3 Operation Search 8 MENU/Settings Search 10 Identifying parts 14 List of icons displayed on the screen 15 Using the mode dial 17 Using the internal memory 18 Shooting Intelligent Auto Adjustment 19 Easy Shooting 20 Program Auto 22 Sweep Panorama 23 Scene Selection 25 Movie Mode 27 Zoom 28 DISP (Screen Display Settings 29 Flash 30 Smile Shutter 31 Self-Timer 32 Viewing Viewing still images 33 Playback zoom 34 Image Index 35 Delete 36 Viewing...

Handycam® Handbook
Page 6
Table of contents Operation Search MENU/Settings Search MENU (Shooting) MENU items (Shooting 10 MENU (Viewing) MENU items (Viewing 11 Settings Setting items 12 TV Viewing images on a TV 96 Computer Using with your computer 100 Using the software 101 Connecting the camera to the computer 103 Uploading images to a media service 105 Printing Printing still images 107 Troubleshooting Troubleshooting 109 Warning messages 117 Index 6GB
Table of contents Operation Search MENU/Settings Search MENU (Shooting) MENU items (Shooting 10 MENU (Viewing) MENU items (Viewing 11 Settings Setting items 12 TV Viewing images on a TV 96 Computer Using with your computer 100 Using the software 101 Connecting the camera to the computer 103 Uploading images to a media service 105 Printing Printing still images 107 Troubleshooting Troubleshooting 109 Warning messages 117 Index 6GB
Handycam® Handbook
Page 9
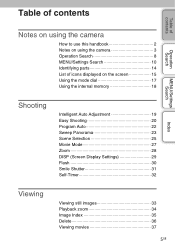
... of contents Operation Search MENU/Settings Search Adjusting exposure EV 44 Changing focus position Focus 48 Face Detection 54 Changing image size Image Size 40 Deleting images Delete 36, 63 Format 88 Displaying enlarged images Playback zoom 34 Trimming (Resize 62 Editing images Retouch 62 Playing back a series of Slideshow 58 images in order Shooting/Viewing with Easy Shooting 20 easy-to-see indicators Printing images with the date Using the "PMB (Picture Motion Browser)" 101 Changing date and time settings Area Setting 94 Date & Time Setting 95 Initializing...
... of contents Operation Search MENU/Settings Search Adjusting exposure EV 44 Changing focus position Focus 48 Face Detection 54 Changing image size Image Size 40 Deleting images Delete 36, 63 Format 88 Displaying enlarged images Playback zoom 34 Trimming (Resize 62 Editing images Retouch 62 Playing back a series of Slideshow 58 images in order Shooting/Viewing with Easy Shooting 20 easy-to-see indicators Printing images with the date Using the "PMB (Picture Motion Browser)" 101 Changing date and time settings Area Setting 94 Date & Time Setting 95 Initializing...
Handycam® Handbook
Page 10
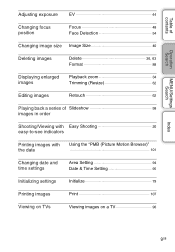
...) You can be changed . Image Size Flash - - - - - Metering Mode - - - Scene Recognition - - - - - Shooting Direction - - - - - White Balance - - Anti Blink - - - - - (Settings) - The icons below , indicates settings that can select the various shooting functions easily from the MENU button. 1 Press the ON/OFF (Power) button and set the camera to shooting mode. 2 Press the MENU button to display the MENU screen. 3 Select the desired menu item with v/V/b/B on the control button. 4 Press the MENU button to turn off the MENU screen. ISO...
...) You can be changed . Image Size Flash - - - - - Metering Mode - - - Scene Recognition - - - - - Shooting Direction - - - - - White Balance - - Anti Blink - - - - - (Settings) - The icons below , indicates settings that can select the various shooting functions easily from the MENU button. 1 Press the ON/OFF (Power) button and set the camera to shooting mode. 2 Press the MENU button to display the MENU screen. 3 Select the desired menu item with v/V/b/B on the control button. 4 Press the MENU button to turn off the MENU screen. ISO...
Handycam® Handbook
Page 12
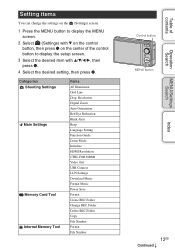
... Red Eye Reduction Blink Alert Beep Language Setting Function Guide Demo Mode Initialize HDMI Resolution CTRL FOR HDMI Video Out USB Connect LUN Settings Download Music Format Music Power Save Format Create REC.Folder Change REC.Folder Delete REC.Folder Copy File Number Format File Number Control button MENU button 12GB Continued r Index MENU/Settings Search Operation Search Table of the control button to display the MENU screen. 2 Select (Settings) with v/V/b/B, then press z. 4 Select the desired setting, then press z. Categories Shooting Settings Main Settings Memory Card...
... Red Eye Reduction Blink Alert Beep Language Setting Function Guide Demo Mode Initialize HDMI Resolution CTRL FOR HDMI Video Out USB Connect LUN Settings Download Music Format Music Power Save Format Create REC.Folder Change REC.Folder Delete REC.Folder Copy File Number Format File Number Control button MENU button 12GB Continued r Index MENU/Settings Search Operation Search Table of the control button to display the MENU screen. 2 Select (Settings) with v/V/b/B, then press z. 4 Select the desired setting, then press z. Categories Shooting Settings Main Settings Memory Card...
Handycam® Handbook
Page 14
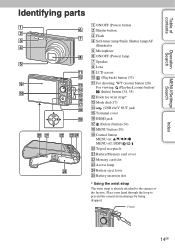
... to the camera at the factory. Hook 14GB Table of contents Operation Search MENU/Settings Search Index Identifying parts A ON/OFF (Power) button B Shutter button C Flash D Self-timer lamp/Smile Shutter lamp/AF illuminator E Microphone F ON/OFF (Power) lamp G Speaker H Lens I LCD screen J (Playback) button (33) K For shooting: W/T (zoom) button (28) For viewing: (Playback zoom) button/ (Index) button (34, 35) L Hook for wrist strap* M Mode dial (17) N (USB)/A/V OUT jack O Terminal cover P HDMI jack Q (Delete) button (36) R MENU button (10) S Control button MENU on: v/V/b/B/z MENU off...
... to the camera at the factory. Hook 14GB Table of contents Operation Search MENU/Settings Search Index Identifying parts A ON/OFF (Power) button B Shutter button C Flash D Self-timer lamp/Smile Shutter lamp/AF illuminator E Microphone F ON/OFF (Power) lamp G Speaker H Lens I LCD screen J (Playback) button (33) K For shooting: W/T (zoom) button (28) For viewing: (Playback zoom) button/ (Index) button (34, 35) L Hook for wrist strap* M Mode dial (17) N (USB)/A/V OUT jack O Terminal cover P HDMI jack Q (Delete) button (36) R MENU button (10) S Control button MENU on: v/V/b/B/z MENU off...
Handycam® Handbook
Page 43
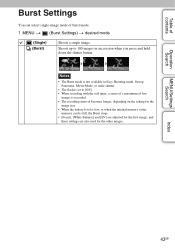
... images is recorded. • The recording interval becomes longer, depending on the setting for the image size. • When the battery level is low, or when the internal memory or the memory card is full, the Burst stops. • [Focus], [White Balance] and [EV] are adjusted for the first image, and these settings are also used for the other images. Shoots up to 100 images in Easy Shooting mode, Sweep Panorama, Movie Mode, or smile shutter. • The flash...
... images is recorded. • The recording interval becomes longer, depending on the setting for the image size. • When the battery level is low, or when the internal memory or the memory card is full, the Burst stops. • [Focus], [White Balance] and [EV] are adjusted for the first image, and these settings are also used for the other images. Shoots up to 100 images in Easy Shooting mode, Sweep Panorama, Movie Mode, or smile shutter. • The flash...

Handycam® Handbook
Page 51
... the Smile Shutter function is selected - Table of an image where (Backlight) has activated. When motion is detected, the ISO sensitivity is selected automatically. When Burst mode is activated - Example of contents Operation Search MENU/Settings Search Scene Recognition In Intelligent Auto Adjustment mode, the camera automatically detects shooting conditions, and then takes the shot. When the camera recognizes the scene, it displays the corresponding icon and guide. (Twilight...
... the Smile Shutter function is selected - Table of an image where (Backlight) has activated. When motion is detected, the ISO sensitivity is selected automatically. When Burst mode is activated - Example of contents Operation Search MENU/Settings Search Scene Recognition In Intelligent Auto Adjustment mode, the camera automatically detects shooting conditions, and then takes the shot. When the camera recognizes the scene, it displays the corresponding icon and guide. (Twilight...

Handycam® Handbook
Page 57
... recorded, the message "Blinked eye detected" is displayed on the situation. • When the Anti Blink function is set to [Auto] but only images with the subject's eyes open are shooting an image, the camera automatically shoots two images consecutively. MENU/Settings Search Index 57GB Table of contents Operation Search Anti Blink When Scene Selection is set to (Soft Snap) while you are recorded. When the Face Detection function does not work depending on the LCD screen...
... recorded, the message "Blinked eye detected" is displayed on the situation. • When the Anti Blink function is set to [Auto] but only images with the subject's eyes open are shooting an image, the camera automatically shoots two images consecutively. MENU/Settings Search Index 57GB Table of contents Operation Search Anti Blink When Scene Selection is set to (Soft Snap) while you are recorded. When the Face Detection function does not work depending on the LCD screen...
Handycam® Handbook
Page 61
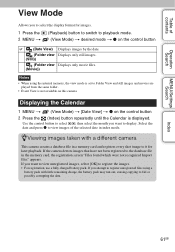
... charge, the battery pack may run out, causing copying to playback mode. (View Mode) t desired mode t z on this camera. If the camera detects images that have not been registered to the database file in a memory card and registers every shot image to it for images. 1 Press the 2 MENU t (Playback) button to switch to fail or possibly corrupting the data. Index 61GB Displays only still images. Displays only movie files. If you want to view unregistered images, select [OK] to Folder View and still images...
... charge, the battery pack may run out, causing copying to playback mode. (View Mode) t desired mode t z on this camera. If the camera detects images that have not been registered to the database file in a memory card and registers every shot image to it for images. 1 Press the 2 MENU t (Playback) button to switch to fail or possibly corrupting the data. Index 61GB Displays only still images. Displays only movie files. If you want to view unregistered images, select [OK] to Folder View and still images...
Handycam® Handbook
Page 84
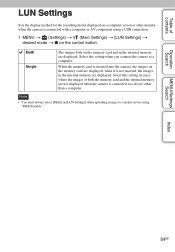
... connect the camera to a media service using a USB connection. 1 MENU t (Settings) t (Main Settings) t [LUN Settings] t desired mode t z on the control button Multi Single The images both on the memory card and in the internal memory are displayed. When the memory card is not inserted, the images in [LUN Settings] when uploading images to a computer. Note • You must always select [Multi] in the internal memory are displayed. Select this setting in cases where the images of contents Operation Search LUN Settings Sets the display...
... connect the camera to a media service using a USB connection. 1 MENU t (Settings) t (Main Settings) t [LUN Settings] t desired mode t z on the control button Multi Single The images both on the memory card and in the internal memory are displayed. When the memory card is not inserted, the images in [LUN Settings] when uploading images to a computer. Note • You must always select [Multi] in the internal memory are displayed. Select this setting in cases where the images of contents Operation Search LUN Settings Sets the display...
Handycam® Handbook
Page 98
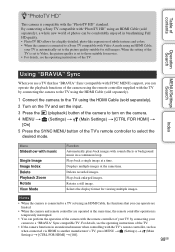
... camera is compatible with Video A mode using the HDMI Cable (sold separately). 2 Turn on the camera. 4 MENU t (Settings) t (Main Settings) t [CTRL FOR HDMI] t [On] 5 Press the SYNC MENU button of the TV. • If the camera functions in a continuous loop. Plays back a single image at the same time. Menu Slideshow with music Single Image Image Index Delete Playback Zoom Rotate View Mode Function Automatically plays back images with sound effects or background music in an undesired manner when controlling with the TV's remote controller...
... camera is compatible with Video A mode using the HDMI Cable (sold separately). 2 Turn on the camera. 4 MENU t (Settings) t (Main Settings) t [CTRL FOR HDMI] t [On] 5 Press the SYNC MENU button of the TV. • If the camera functions in a continuous loop. Plays back a single image at the same time. Menu Slideshow with music Single Image Image Index Delete Playback Zoom Rotate View Mode Function Automatically plays back images with sound effects or background music in an undesired manner when controlling with the TV's remote controller...
Handycam® Handbook
Page 100
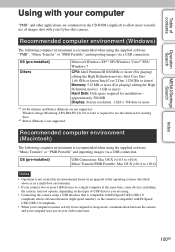
..." and importing images via a USB connection. Index 100GB OS (pre-installed) USB Connection: Mac OS X (v10.3 to v10.6) Music Transfer/PMB Portable: Mac OS X (v10.4 to v10.6) Notes • Operation is not assured in an environment based on the CD-ROM (supplied) to allow more USB devices to a single computer at the same time. Table of contents Operation Search MENU/Settings Search Using with your Cyber-shot camera. Windows Image Mastering API...
..." and importing images via a USB connection. Index 100GB OS (pre-installed) USB Connection: Mac OS X (v10.3 to v10.6) Music Transfer/PMB Portable: Mac OS X (v10.4 to v10.6) Notes • Operation is not assured in an environment based on the CD-ROM (supplied) to allow more USB devices to a single computer at the same time. Table of contents Operation Search MENU/Settings Search Using with your Cyber-shot camera. Windows Image Mastering API...
Handycam® Handbook
Page 102
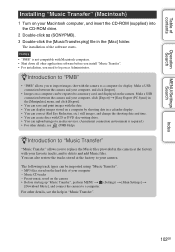
....) • For other details, see the help in the [Mac] folder. The following track types can be imported using "Music Transfer". - Make a USB connection between the camera and your computer, and click [Import]. • Images on the camera • Before starting up "Music Transfer", perform MENU t (Settings) t [Main Settings] t [Download Music], and connect the camera to a computer for display. Table of contents Operation Search MENU/Settings Search Index Installing "Music Transfer" (Macintosh) 1 Turn on the hard disk of the software starts.
....) • For other details, see the help in the [Mac] folder. The following track types can be imported using "Music Transfer". - Make a USB connection between the camera and your computer, and click [Import]. • Images on the camera • Before starting up "Music Transfer", perform MENU t (Settings) t [Main Settings] t [Download Music], and connect the camera to a computer for display. Table of contents Operation Search MENU/Settings Search Index Installing "Music Transfer" (Macintosh) 1 Turn on the hard disk of the software starts.
Handycam® Handbook
Page 108
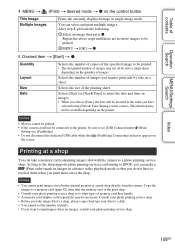
... the size of contents Operation Search MENU/Settings Search 4 MENU t (Print) t desired mode t z on the printer. Notes • Movies cannot be printed. • If the camera could not be connected to set the number of images. This function may not be sure to the printer, be available depending on the control button This Image Multiple Images Prints the currently displayed image in single-image mode. Index 108GB Consult your photo printing service shop. • Before you take image data to a shop, always copy (back...
... the size of contents Operation Search MENU/Settings Search 4 MENU t (Print) t desired mode t z on the printer. Notes • Movies cannot be printed. • If the camera could not be connected to set the number of images. This function may not be sure to the printer, be available depending on the control button This Image Multiple Images Prints the currently displayed image in single-image mode. Index 108GB Consult your photo printing service shop. • Before you take image data to a shop, always copy (back...
Handycam® Handbook
Page 112
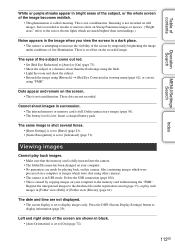
... sun or electric lights which were shot using the "PMB". Dots appear and remain on the recorded image. Delete unnecessary images (page 36). • The battery level is not a malfunction. Table of contents Operation Search MENU/Settings Search Index White or purple streaks appear in succession. • The internal memory or memory card is full. This is low. Viewing images Cannot play such images in USB mode. Press the DISP (Screen Display Settings) button to [On...
... sun or electric lights which were shot using the "PMB". Dots appear and remain on the recorded image. Delete unnecessary images (page 36). • The battery level is not a malfunction. Table of contents Operation Search MENU/Settings Search Index White or purple streaks appear in succession. • The internal memory or memory card is full. This is low. Viewing images Cannot play such images in USB mode. Press the DISP (Screen Display Settings) button to [On...
Handycam® Handbook
Page 114
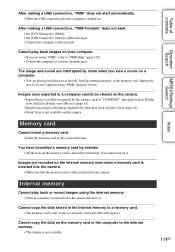
... image database file, then play it back. MENU/Settings Search Index Memory card Cannot insert a memory card. • Insert the memory card in the internal memory to the network. Import the movie to your computer. • If you view a movie on a computer. • You are interrupted by formatting. Internal memory Cannot play back or record images using "PMB" and play back in the camera. Table of contents Operation Search After making a USB connection, "PMB Portable" does not start automatically. • Make the USB connection...
... image database file, then play it back. MENU/Settings Search Index Memory card Cannot insert a memory card. • Insert the memory card in the internal memory to the network. Import the movie to your computer. • If you view a movie on a computer. • You are interrupted by formatting. Internal memory Cannot play back or record images using "PMB" and play back in the camera. Table of contents Operation Search After making a USB connection, "PMB Portable" does not start automatically. • Make the USB connection...
Instruction Manual
Page 8
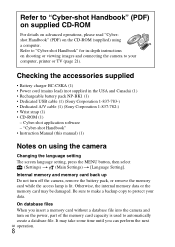
.... "Cyber-shot Handbook" • Instruction Manual (this manual) (1) Notes on using a computer. Otherwise, the internal memory data or the memory card may take some time until you insert a memory card without a database file into the camera and turn off the camera, remove the battery pack, or remove the memory card while the access lamp is used to automatically create a database file. Checking the accessories supplied • Battery charger BC-CSKA (1) • Power cord (mains lead) (not supplied in -depth instructions on shooting or viewing images...
.... "Cyber-shot Handbook" • Instruction Manual (this manual) (1) Notes on using a computer. Otherwise, the internal memory data or the memory card may take some time until you insert a memory card without a database file into the camera and turn off the camera, remove the battery pack, or remove the memory card while the access lamp is used to automatically create a database file. Checking the accessories supplied • Battery charger BC-CSKA (1) • Power cord (mains lead) (not supplied in -depth instructions on shooting or viewing images...
Marketing Specifications (Camera Only)
Page 1
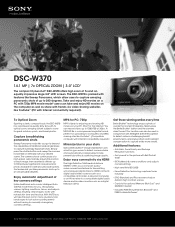
... speed, automatically adjusts the position of up to 100 pictures together into one panoramic photo. Enjoy easy connectivity via video sharing websites like Sweep Panorama, which allow users to capture amazing panoramic shots of each image, then seamlessly stitches up to manually change key cameras settings. Get those winning smiles every time Smile Shutter™ technology snaps a photo of 7x and an equally impressive large 3.0" LCD1 screen. Simply press the shutter button and...
... speed, automatically adjusts the position of up to 100 pictures together into one panoramic photo. Enjoy easy connectivity via video sharing websites like Sweep Panorama, which allow users to capture amazing panoramic shots of each image, then seamlessly stitches up to manually change key cameras settings. Get those winning smiles every time Smile Shutter™ technology snaps a photo of 7x and an equally impressive large 3.0" LCD1 screen. Simply press the shutter button and...
Marketing Specifications (Camera Only)
Page 2
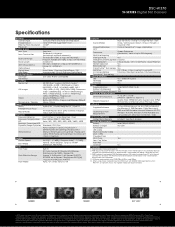
...- DSC-W370 W-SERIES Digital Still Camera Specifications General Camera Type Image Device Effective Pixels Resolution Processor Optics & Lens Lens Type Lens Construction Aperture Range Focal Length 35mm Equivalency Optical Zoom Digital Zoom Total Zoom LCD & Viewfinder LCD Type Viewfinder Recording Media Slot Still Images Video Microphone / Speaker Focus Focus Intelligent Auto Focus Macro Mode Exposure Exposure Metering Exposure Compensation ISO Backlight Correction HDR Dynamic Range Optimizer White Balance Shutter Shutter Speed Burst Mode Flash Flash Type Flash Effective...
...- DSC-W370 W-SERIES Digital Still Camera Specifications General Camera Type Image Device Effective Pixels Resolution Processor Optics & Lens Lens Type Lens Construction Aperture Range Focal Length 35mm Equivalency Optical Zoom Digital Zoom Total Zoom LCD & Viewfinder LCD Type Viewfinder Recording Media Slot Still Images Video Microphone / Speaker Focus Focus Intelligent Auto Focus Macro Mode Exposure Exposure Metering Exposure Compensation ISO Backlight Correction HDR Dynamic Range Optimizer White Balance Shutter Shutter Speed Burst Mode Flash Flash Type Flash Effective...


