
Cyber-shot® Handbook
Page 2
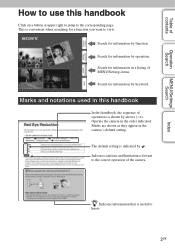
...used in the order indicated. Operate the camera in this handbook In this handbook Click on a button at upper right to jump to the corresponding page. Search for a function you want to view. Search for information in the camera's default setting. Indicates cautions and limitations ...relevant to the correct operation of the camera. Marks are shown as they appear in a listing of MENU/Settings items. Search for information ...
...used in the order indicated. Operate the camera in this handbook In this handbook Click on a button at upper right to jump to the corresponding page. Search for a function you want to view. Search for information in the camera's default setting. Indicates cautions and limitations ...relevant to the correct operation of the camera. Marks are shown as they appear in a listing of MENU/Settings items. Search for information ...
Cyber-shot® Handbook
Page 3
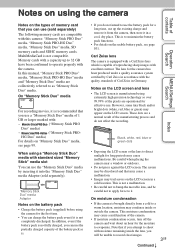
...battery pack is recommended that you use a "Memory Stick Duo" media of 1 GB or larger marked with excellent contrast. The lens for the camera has been produced under a quality assurance system certified by inserting it is not fully charged, you can use the partially charged capacity of the ... have been confirmed to direct sunlight for the first time. • You can charge the battery pack even if it . Be careful when placing the camera near a window or outdoors. • Do not press against the LCD screen. The screen may cause a malfunction of reproducing sharp images with : - ...
...battery pack is recommended that you use a "Memory Stick Duo" media of 1 GB or larger marked with excellent contrast. The lens for the camera has been produced under a quality assurance system certified by inserting it is not fully charged, you can use the partially charged capacity of the ... have been confirmed to direct sunlight for the first time. • You can charge the battery pack even if it . Be careful when placing the camera near a window or outdoors. • Do not press against the LCD screen. The screen may cause a malfunction of reproducing sharp images with : - ...
Cyber-shot® Handbook
Page 4
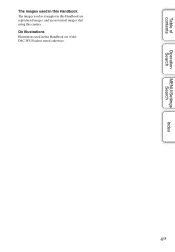
Table of the DSC-W320 unless noted otherwise. 4GB On Illustrations Illustrations used in this Handbook are of contents Operation Search MENU/Settings Search Index The images used in this Handbook The images used as examples in this Handbook are reproduced images, and are not actual images shot using this camera.
Table of the DSC-W320 unless noted otherwise. 4GB On Illustrations Illustrations used in this Handbook are of contents Operation Search MENU/Settings Search Index The images used in this Handbook The images used as examples in this Handbook are reproduced images, and are not actual images shot using this camera.
Cyber-shot® Handbook
Page 5
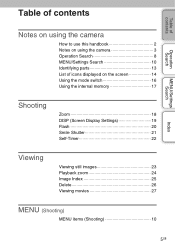
Table of contents Table of contents Operation Search MENU/Settings Search Index Notes on using the camera How to use this handbook 2 Notes on using the camera 3 Operation Search 8 MENU/Settings Search 10 Identifying parts 13 List of icons displayed on the screen 14 Using the mode switch 16 Using the internal memory 17 Shooting Zoom 18 DISP (Screen Display Settings 19 Flash 20 Smile Shutter 21 Self-Timer 22 Viewing Viewing still images 23 Playback zoom 24 Image Index 25 Delete 26 Viewing movies 27 MENU (Shooting) MENU items (Shooting 10 5GB
Table of contents Table of contents Operation Search MENU/Settings Search Index Notes on using the camera How to use this handbook 2 Notes on using the camera 3 Operation Search 8 MENU/Settings Search 10 Identifying parts 13 List of icons displayed on the screen 14 Using the mode switch 16 Using the internal memory 17 Shooting Zoom 18 DISP (Screen Display Settings 19 Flash 20 Smile Shutter 21 Self-Timer 22 Viewing Viewing still images 23 Playback zoom 24 Image Index 25 Delete 26 Viewing movies 27 MENU (Shooting) MENU items (Shooting 10 5GB

Cyber-shot® Handbook
Page 6
Table of contents MENU (Viewing) MENU items (Viewing 11 Settings Setting items 12 Operation Search TV Viewing images on a TV 77 MENU/Settings Search Computer Using with your computer 79 Using the software 80 Connecting the camera to the computer 82 Uploading images to a media service 84 Index Printing Printing still images 86 Troubleshooting Troubleshooting 88 Warning indicators and messages 96 Others "Memory Stick Duo" media 99 Battery pack 101 Battery charger 102 6GB
Table of contents MENU (Viewing) MENU items (Viewing 11 Settings Setting items 12 Operation Search TV Viewing images on a TV 77 MENU/Settings Search Computer Using with your computer 79 Using the software 80 Connecting the camera to the computer 82 Uploading images to a media service 84 Index Printing Printing still images 86 Troubleshooting Troubleshooting 88 Warning indicators and messages 96 Others "Memory Stick Duo" media 99 Battery pack 101 Battery charger 102 6GB
Cyber-shot® Handbook
Page 8
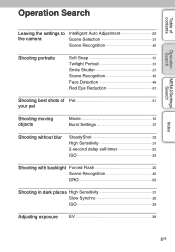
.../Settings Search Operation Search Leaving the settings to the camera Intelligent Auto Adjustment 29 Scene Selection 31 Scene Recognition 45 Shooting portraits Soft Snap 31 Twilight Portrait 31 Smile Shutter 21 Scene Recognition 45 Face Detection 48 Red Eye Reduction 61 Shooting best shots of Pet 31 your pet Shooting moving objects...
.../Settings Search Operation Search Leaving the settings to the camera Intelligent Auto Adjustment 29 Scene Selection 31 Scene Recognition 45 Shooting portraits Soft Snap 31 Twilight Portrait 31 Smile Shutter 21 Scene Recognition 45 Face Detection 48 Red Eye Reduction 61 Shooting best shots of Pet 31 your pet Shooting moving objects...
Cyber-shot® Handbook
Page 10
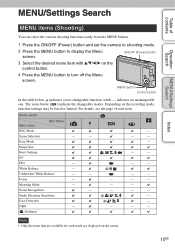
... Index MENU items (Shooting) You can select the various shooting functions easily from the MENU button. 1 Press the ON/OFF (Power) button and set the camera to shooting mode. 2 Press the MENU button to turn off the Menu screen. Image Size Burst Settings - - The icons below , indicates a user-changeable function, while...
... Index MENU items (Shooting) You can select the various shooting functions easily from the MENU button. 1 Press the ON/OFF (Power) button and set the camera to shooting mode. 2 Press the MENU button to turn off the Menu screen. Image Size Burst Settings - - The icons below , indicates a user-changeable function, while...
Cyber-shot® Handbook
Page 12
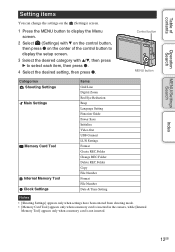
Control button MENU button Categories Shooting Settings Main Settings Memory Card Tool Internal Memory Tool Clock Settings Items Grid Line Digital Zoom Red Eye Reduction Beep Language Setting Function Guide Power Save Initialize Video Out USB Connect LUN Settings Format Create REC....] appears only when settings have been entered from shooting mode. • [Memory Card Tool] appears only when a memory card is inserted in the camera, while [Internal Memory Tool] appears only when a memory card is not inserted. Table of contents Operation Search MENU/Settings Search Setting items You can ...
Control button MENU button Categories Shooting Settings Main Settings Memory Card Tool Internal Memory Tool Clock Settings Items Grid Line Digital Zoom Red Eye Reduction Beep Language Setting Function Guide Power Save Initialize Video Out USB Connect LUN Settings Format Create REC....] appears only when settings have been entered from shooting mode. • [Memory Card Tool] appears only when a memory card is inserted in the camera, while [Internal Memory Tool] appears only when a memory card is not inserted. Table of contents Operation Search MENU/Settings Search Setting items You can ...
Cyber-shot® Handbook
Page 13
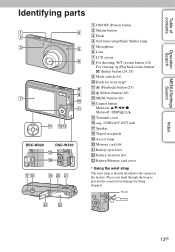
Hook Index 13GB Place your hand through the loop to the camera at the factory. Table of contents Operation Search MENU/Settings Search Identifying parts DSC-W320 DSC-W330 A ON/OFF (Power) button B Shutter button C Flash D Self-timer lamp/Smile Shutter lamp E Microphone F Lens G LCD screen H For shooting: W/T (zoom) button (18) For viewing: (Playback ... card slot U Battery eject lever V Battery insertion slot W Battery/Memory card cover * Using the wrist strap The wrist strap is already attached to prevent the camera from damage by being dropped.
Hook Index 13GB Place your hand through the loop to the camera at the factory. Table of contents Operation Search MENU/Settings Search Identifying parts DSC-W320 DSC-W330 A ON/OFF (Power) button B Shutter button C Flash D Self-timer lamp/Smile Shutter lamp E Microphone F Lens G LCD screen H For shooting: W/T (zoom) button (18) For viewing: (Playback ... card slot U Battery eject lever V Battery insertion slot W Battery/Memory card cover * Using the wrist strap The wrist strap is already attached to prevent the camera from damage by being dropped.

Cyber-shot® Handbook
Page 14
... the screen display using DISP (Screen Display Settings) on the control button. When shooting movies When playing back Scene Selection Camera mode (Intelligent Auto Adjustment, Program Auto, SteadyShot, Movie Mode) Scene Recognition icon White balance Metering Mode Vibration warning Scene ...Print order (DPOF) Playback zoom Index 14GB Continued r When shooting still images A Display Indication Battery remaining Low battery warning Image size • The icons are displayed on the screen to indicate the camera status. Table of contents Operation Search MENU/Settings Search List of...
... the screen display using DISP (Screen Display Settings) on the control button. When shooting movies When playing back Scene Selection Camera mode (Intelligent Auto Adjustment, Program Auto, SteadyShot, Movie Mode) Scene Recognition icon White balance Metering Mode Vibration warning Scene ...Print order (DPOF) Playback zoom Index 14GB Continued r When shooting still images A Display Indication Battery remaining Low battery warning Image size • The icons are displayed on the screen to indicate the camera status. Table of contents Operation Search MENU/Settings Search List of...
Cyber-shot® Handbook
Page 17
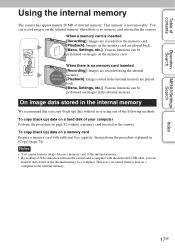
... to the internal memory. When there is not removable. Table of contents Operation Search MENU/Settings Search Using the internal memory The camera has approximately 28 MB of the following methods. This memory is no memory card inserted in the internal memory to a computer....on a hard disk of your computer Perform the procedure on a computer to the internal memory. • By making a USB connection between the camera and a computer with sufficient free capacity, then perform the procedure explained in the internal memory are played back. [Menu, Settings, etc.]: Various ...
... to the internal memory. When there is not removable. Table of contents Operation Search MENU/Settings Search Using the internal memory The camera has approximately 28 MB of the following methods. This memory is no memory card inserted in the internal memory to a computer....on a hard disk of your computer Perform the procedure on a computer to the internal memory. • By making a USB connection between the camera and a computer with sufficient free capacity, then perform the procedure explained in the internal memory are played back. [Menu, Settings, etc.]: Various ...
Cyber-shot® Handbook
Page 18
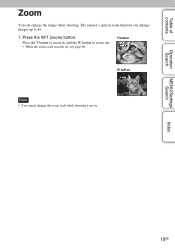
MENU/Settings Search Index 18GB Press the T button to zoom in, and the W button to 4×. 1 Press the W/T (zoom) button. The camera's optical zoom function can enlarge the image when shooting. T button W button Note • You cannot change the zoom scale while shooting a movie. Table of contents Operation Search Zoom You can enlarge images up to zoom out. • When the zoom scale exceeds 4×, see page 60.
MENU/Settings Search Index 18GB Press the T button to zoom in, and the W button to 4×. 1 Press the W/T (zoom) button. The camera's optical zoom function can enlarge the image when shooting. T button W button Note • You cannot change the zoom scale while shooting a movie. Table of contents Operation Search Zoom You can enlarge images up to zoom out. • When the zoom scale exceeds 4×, see page 60.
Cyber-shot® Handbook
Page 20
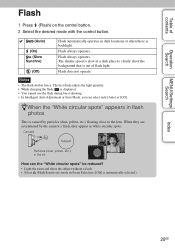
Flash always operates. The shutter speed is slow in the air How can select only [Auto] or [Off]. Camera Subject Particles (dust, pollen, etc.) in a dark place to the lens. Flash always operates. The first flash adjusts the light quantity. • While charging the ... Selection. ([Off] is backlight. When they are accentuated by particles (dust, pollen, etc.) floating close to clearly shoot the background that is caused by the camera's flash, they appear as white circular spots. Table of flash light.
Flash always operates. The shutter speed is slow in the air How can select only [Auto] or [Off]. Camera Subject Particles (dust, pollen, etc.) in a dark place to the lens. Flash always operates. The first flash adjusts the light quantity. • While charging the ... Selection. ([Off] is backlight. When they are accentuated by particles (dust, pollen, etc.) floating close to clearly shoot the background that is caused by the camera's flash, they appear as white circular spots. Table of flash light.
Cyber-shot® Handbook
Page 21
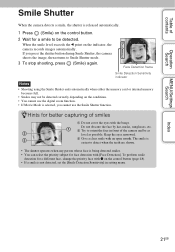
... easier to orient the face in setting menu. If you cannot use the digital zoom function. • If Movie Mode is selected, you press the shutter button during Smile Shutter, the camera shoots the image, then returns to be detected. Face Detection frame Smile Detection...correctly depending on the conditions. • You cannot use the Smile Shutter function. Table of contents Operation Search MENU/Settings Search Smile Shutter When the camera detects a smile, the shutter is released automatically. 1 Press (Smile) on the control button. 2 Wait for a smile to Smile Shutter mode....
... easier to orient the face in setting menu. If you cannot use the digital zoom function. • If Movie Mode is selected, you press the shutter button during Smile Shutter, the camera shoots the image, then returns to be detected. Face Detection frame Smile Detection...correctly depending on the conditions. • You cannot use the Smile Shutter function. Table of contents Operation Search MENU/Settings Search Smile Shutter When the camera detects a smile, the shutter is released automatically. 1 Press (Smile) on the control button. 2 Wait for a smile to Smile Shutter mode....
Cyber-shot® Handbook
Page 22
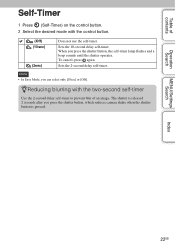
..., the self-timer lamp flashes and a beep sounds until the shutter operates. The shutter is released 2 seconds after you press the shutter button, which reduces camera shake when the shutter button is pressed. Table of contents Operation Search Self-Timer 1 Press (Self-Timer) on the control button. 2 Select the desired mode...
..., the self-timer lamp flashes and a beep sounds until the shutter operates. The shutter is released 2 seconds after you press the shutter button, which reduces camera shake when the shutter button is pressed. Table of contents Operation Search Self-Timer 1 Press (Self-Timer) on the control button. 2 Select the desired mode...
Cyber-shot® Handbook
Page 25
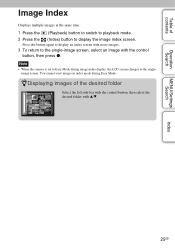
... with v/V. 25GB Press the button again to display an index screen with more images. 3 To return to the single- image screen. Note • When the camera is set to display the image index screen. zDisplaying images of contents Operation Search MENU/Settings Search Index Image Index Displays multiple images at the...
... with v/V. 25GB Press the button again to display an index screen with more images. 3 To return to the single- image screen. Note • When the camera is set to display the image index screen. zDisplaying images of contents Operation Search MENU/Settings Search Index Image Index Displays multiple images at the...
Cyber-shot® Handbook
Page 27
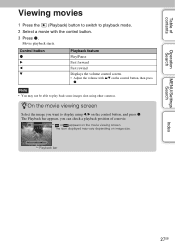
... playback starts. or appears on image size. The Playback bar appears, you want to play back some images shot using b/B on the control button, then press z. The icon displayed may not be able to display using other cameras. Table of a movie. Note • You may vary depending on the movie viewing screen.
... playback starts. or appears on image size. The Playback bar appears, you want to play back some images shot using b/B on the control button, then press z. The icon displayed may not be able to display using other cameras. Table of a movie. Note • You may vary depending on the movie viewing screen.
Cyber-shot® Handbook
Page 28
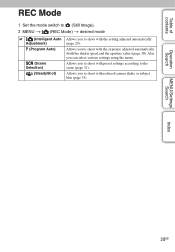
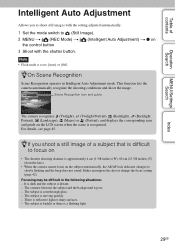
... shoot with the setting adjusted automatically (page 29). Operation Search MENU/Settings Search Index 28GB Table of contents REC Mode 1 Set the mode switch to (Still Image). 2 MENU t (REC Mode) t desired mode (Intelligent Auto Adjustment) (Program Auto) (Scene Selection) (SteadyShot) Allows you to shoot with reduced...
... shoot with the setting adjusted automatically (page 29). Operation Search MENU/Settings Search Index 28GB Table of contents REC Mode 1 Set the mode switch to (Still Image). 2 MENU t (REC Mode) t desired mode (Intelligent Auto Adjustment) (Program Auto) (Scene Selection) (SteadyShot) Allows you to shoot with reduced...
Cyber-shot® Handbook
Page 29
... shutter button. The subject is backlit or there is poor. - Either recompose the shot or change the focus setting (page 42). The contrast between the subject and the ...is distant. - Table of contents Operation Search MENU/Settings Search Intelligent Auto Adjustment Allows you shoot a still image of a subject that is difficult to focus on • The shortest shooting distance is approximately ... inches) (W), 60 cm (23 5/8 inches) (T) (from the lens). • When the camera cannot focus on the subject automatically, the AE/AF lock indicator changes to slowly flashing and the...
... shutter button. The subject is backlit or there is poor. - Either recompose the shot or change the focus setting (page 42). The contrast between the subject and the ...is distant. - Table of contents Operation Search MENU/Settings Search Intelligent Auto Adjustment Allows you shoot a still image of a subject that is difficult to focus on • The shortest shooting distance is approximately ... inches) (W), 60 cm (23 5/8 inches) (T) (from the lens). • When the camera cannot focus on the subject automatically, the AE/AF lock indicator changes to slowly flashing and the...
Cyber-shot® Handbook
Page 32
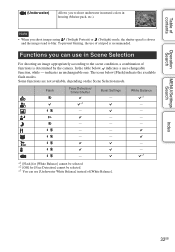
... *2 Burst Settings - Table of contents Operation Search MENU/Settings Search (Underwater) Allows you to blur. Functions you can use of a tripod is determined by the camera. Some functions are not available, depending on the Scene Selection mode. indicates an unchangeable one. Index 32GB
... *2 Burst Settings - Table of contents Operation Search MENU/Settings Search (Underwater) Allows you to blur. Functions you can use of a tripod is determined by the camera. Some functions are not available, depending on the Scene Selection mode. indicates an unchangeable one. Index 32GB


