Instruction Manual
Page 8
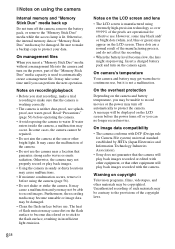
... standard established by JEITA (Japan Electronics and Information Technology Industries Association). • Sony does not guarantee that the camera will play back images recorded with the camera. On camera's temperature Your camera and battery may become discolored or to stick to become unusable or image data ...be repaired. • Do not aim the camera at the sun or other equipment will play back images. • Using the camera in insufficient light emission. 8GB Notes on the camera again. Warning on the LCD screen before using extremely high-precision technology so ...
... standard established by JEITA (Japan Electronics and Information Technology Industries Association). • Sony does not guarantee that the camera will play back images recorded with the camera. On camera's temperature Your camera and battery may become discolored or to stick to become unusable or image data ...be repaired. • Do not aim the camera at the sun or other equipment will play back images. • Using the camera in insufficient light emission. 8GB Notes on the camera again. Warning on the LCD screen before using extremely high-precision technology so ...
Instruction Manual
Page 11
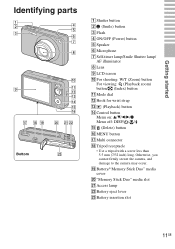
... Getting started Identifying parts Bottom A Shutter button B (Smile) button C Flash D ON/OFF (Power) button E Speaker F Microphone G Self-timer lamp/Smile Shutter lamp/ AF illuminator H Lens I LCD screen J For shooting: W/T (Zoom) button For viewing: (Playback zoom) button/ (Index) button K Mode dial L Hook for wrist strap M (Playback) button N Control button Menu on: v/V/b/B/z Menu.../ / / O (Delete) button P MENU button Q Multi connector R Tripod receptacle • Use a tripod with a screw less than 5.5 mm (7/32 inch) long. Otherwise, you cannot firmly secure the camera, and damage to the...
... Getting started Identifying parts Bottom A Shutter button B (Smile) button C Flash D ON/OFF (Power) button E Speaker F Microphone G Self-timer lamp/Smile Shutter lamp/ AF illuminator H Lens I LCD screen J For shooting: W/T (Zoom) button For viewing: (Playback zoom) button/ (Index) button K Mode dial L Hook for wrist strap M (Playback) button N Control button Menu on: v/V/b/B/z Menu.../ / / O (Delete) button P MENU button Q Multi connector R Tripod receptacle • Use a tripod with a screw less than 5.5 mm (7/32 inch) long. Otherwise, you cannot firmly secure the camera, and damage to the...
Instruction Manual
Page 15
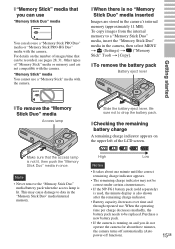
... Checking the remaining battery charge A remaining charge indicator appears on the upper left of images/time that can also use a "Memory Stick" media with the camera. Other types of "Memory Stick" media or memory card are stored in once. Be sure not to a "Memory Stick Duo" media, insert the "Memory...Memory Stick Duo" media/internal memory. This may not be recorded, see pages 28, 31. x When there is running on the number of the LCD screen. x To remove the battery pack Battery eject lever Getting started x To remove the "Memory Stick Duo" media Access lamp Slide the battery eject...
... Checking the remaining battery charge A remaining charge indicator appears on the upper left of images/time that can also use a "Memory Stick" media with the camera. Other types of "Memory Stick" media or memory card are stored in once. Be sure not to a "Memory Stick Duo" media, insert the "Memory...Memory Stick Duo" media/internal memory. This may not be recorded, see pages 28, 31. x When there is running on the number of the LCD screen. x To remove the battery pack Battery eject lever Getting started x To remove the "Memory Stick Duo" media Access lamp Slide the battery eject...
Instruction Manual
Page 22
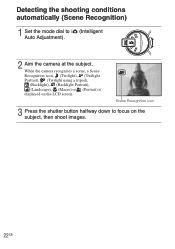
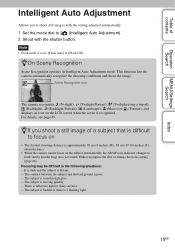
When the camera recognizes a scene, a Scene Recognition icon, (Twilight), (Twilight Portrait), (Twilight using a tripod), (Backlight), (Backlight Portrait), (Landscape), (Macro) or (Portrait) is displayed on the subject, then shoot images. 22GB Scene Recognition icon 3 Press the shutter button halfway down to (Intelligent Auto Adjustment). 2 Aim the camera at the subject. Detecting the shooting conditions automatically (Scene Recognition) 1 Set the mode dial to focus on the LCD screen.
When the camera recognizes a scene, a Scene Recognition icon, (Twilight), (Twilight Portrait), (Twilight using a tripod), (Backlight), (Backlight Portrait), (Landscape), (Macro) or (Portrait) is displayed on the subject, then shoot images. 22GB Scene Recognition icon 3 Press the shutter button halfway down to (Intelligent Auto Adjustment). 2 Aim the camera at the subject. Detecting the shooting conditions automatically (Scene Recognition) 1 Set the mode dial to focus on the LCD screen.
Instruction Manual
Page 53
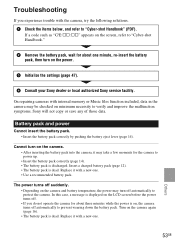
... Turn on the LCD screen before the power turns off. • If you experience trouble with internal memory or Music files function included, data in the camera may turn off automatically to protect the camera. If a code such as "C/E:ss:ss" appears on the screen, refer to "Cyber-shot Handbook." 2 Remove...re-insert the battery pack, then turn on minimum necessity to verify and improve the malfunction symptoms. Sony will not copy or save any of those data. Cannot turn on , the camera turns off automatically to prevent wearing down the battery pack. In this case, a message is displayed...
... Turn on the LCD screen before the power turns off. • If you experience trouble with internal memory or Music files function included, data in the camera may turn off automatically to protect the camera. If a code such as "C/E:ss:ss" appears on the screen, refer to "Cyber-shot Handbook." 2 Remove...re-insert the battery pack, then turn on minimum necessity to verify and improve the malfunction symptoms. Sony will not copy or save any of those data. Cannot turn on , the camera turns off automatically to prevent wearing down the battery pack. In this case, a message is displayed...
Instruction Manual
Page 56
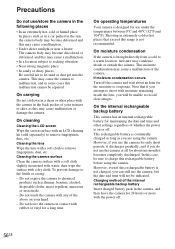
...cloth to remove fingerprints, dust, etc. Cleaning the lens Wipe the lens with an LCD cleaning kit (sold separately) to remove fingerprints, dust, etc. To prevent damage to evaporate. Do not touch the camera with the camera in the back pocket of your hand. - Shooting in extremely cold or hot ... rechargeable backup battery Insert charged battery pack in the camera, and then leave the camera for 24 hours or more with a dry cloth. Do not expose the camera to a warm location, moisture may condense inside the lens, you can still use the camera, but the date and time will be indicated....
...cloth to remove fingerprints, dust, etc. Cleaning the lens Wipe the lens with an LCD cleaning kit (sold separately) to remove fingerprints, dust, etc. To prevent damage to evaporate. Do not touch the camera with the camera in the back pocket of your hand. - Shooting in extremely cold or hot ... rechargeable backup battery Insert charged battery pack in the camera, and then leave the camera for 24 hours or more with a dry cloth. Do not expose the camera to a warm location, moisture may condense inside the lens, you can still use the camera, but the date and time will be indicated....
Instruction Manual
Page 57
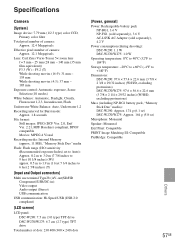
... Cloudy, Fluorescent 1,2,3, Incandescent, Flash Underwater White Balance: Auto, Underwater 1,2 Recording interval for Burst mode: Approx. 1.8 seconds File format: Still images: JPEG (DCF Ver. 2.0, Exif Ver. 2.21, MPF Baseline) compliant, DPOF compatible Movies: MPEG-4 Visual Recording media: Internal Memory... output (Stereo) USB communication USB communication: Hi-Speed USB (USB 2.0 compliant) [LCD screen] LCD panel: DSC-W290: 7.5 cm (3.0 type) TFT drive DSC-W270/W275: 6.7 cm (2.7 type) TFT drive Total number of camera: Approx. 12.1 Megapixels Lens: Carl Zeiss Vario-Tessar 5× zoom lens f ...
... Cloudy, Fluorescent 1,2,3, Incandescent, Flash Underwater White Balance: Auto, Underwater 1,2 Recording interval for Burst mode: Approx. 1.8 seconds File format: Still images: JPEG (DCF Ver. 2.0, Exif Ver. 2.21, MPF Baseline) compliant, DPOF compatible Movies: MPEG-4 Visual Recording media: Internal Memory... output (Stereo) USB communication USB communication: Hi-Speed USB (USB 2.0 compliant) [LCD screen] LCD panel: DSC-W290: 7.5 cm (3.0 type) TFT drive DSC-W270/W275: 6.7 cm (2.7 type) TFT drive Total number of camera: Approx. 12.1 Megapixels Lens: Carl Zeiss Vario-Tessar 5× zoom lens f ...

Cyber-shot® Handbook
Page 3
..." media by Carl Zeiss in a cold location. On Illustrations Illustrations used in this Handbook The images used . • For details on the LCD screen in accordance with "Memory Stick" media compatible equipment You can use . The lens for long periods may trail across on "Memory Stick Duo...precision technology so over 99.99% of the DSC-W290 unless noted otherwise. 3GB This is not completely discharged. These dots are a normal result of Carl Zeiss in this Handbook are of the pixels are not actual images shot using this camera. The screen may be discolored and that you...
..." media by Carl Zeiss in a cold location. On Illustrations Illustrations used in this Handbook The images used . • For details on the LCD screen in accordance with "Memory Stick" media compatible equipment You can use . The lens for long periods may trail across on "Memory Stick Duo...precision technology so over 99.99% of the DSC-W290 unless noted otherwise. 3GB This is not completely discharged. These dots are a normal result of Carl Zeiss in this Handbook are of the pixels are not actual images shot using this camera. The screen may be discolored and that you...

Cyber-shot® Handbook
Page 14
... Search Index Identifying parts A Shutter button B (Smile) button (26) C Flash D ON/OFF (Power) button E Speaker F Microphone G Self-timer lamp/Smile Shutter lamp/AF illuminator H Lens I LCD screen J For shooting: W/T (zoom) button (27) For viewing: (Playback zoom) button/ (Index) button (32, 33) K Mode dial (15) L Hook for wrist strap M (Playback) button (31...
... Search Index Identifying parts A Shutter button B (Smile) button (26) C Flash D ON/OFF (Power) button E Speaker F Microphone G Self-timer lamp/Smile Shutter lamp/AF illuminator H Lens I LCD screen J For shooting: W/T (zoom) button (27) For viewing: (Playback zoom) button/ (Index) button (32, 33) K Mode dial (15) L Hook for wrist strap M (Playback) button (31...
Cyber-shot® Handbook
Page 19
...Adjustment mode. zOn Scene Recognition Scene Recognition operates in the following situations: - Either recompose the shot or change the focus setting (page 46). This function lets the camera automatically recognize the shooting conditions and shoot the image. The subject is backlit or there is... Adjustment Allows you shoot a still image of a subject that is difficult to focus on • The shortest shooting distance is approximately 10 cm (4 inches) (W), 50 cm (19 3/4 inches) (T) (from the lens). • When the camera cannot focus on the LCD screen when the scene is ...
...Adjustment mode. zOn Scene Recognition Scene Recognition operates in the following situations: - Either recompose the shot or change the focus setting (page 46). This function lets the camera automatically recognize the shooting conditions and shoot the image. The subject is backlit or there is... Adjustment Allows you shoot a still image of a subject that is difficult to focus on • The shortest shooting distance is approximately 10 cm (4 inches) (W), 50 cm (19 3/4 inches) (T) (from the lens). • When the camera cannot focus on the LCD screen when the scene is ...

Cyber-shot® Handbook
Page 22
...can change are [Image Size], [Flash] and [Self-Timer]. Scene Recognition icon The camera recognizes (Twilight), (Twilight Portrait), (Twilight using the minimum necessary functions. The settings you shoot still images using a tripod), (Backlight), (Backlight Portrait), (Landscape), (Macro) or (Portrait),... and displays an icon on the LCD screen when the scene is used up more quickly because the screen ...
...can change are [Image Size], [Flash] and [Self-Timer]. Scene Recognition icon The camera recognizes (Twilight), (Twilight Portrait), (Twilight using the minimum necessary functions. The settings you shoot still images using a tripod), (Backlight), (Backlight Portrait), (Landscape), (Macro) or (Portrait),... and displays an icon on the LCD screen when the scene is used up more quickly because the screen ...

Cyber-shot® Handbook
Page 53
...the orange frame to the rightmost face, then press z again. • When you remove the battery from the camera, the face registration is shown on the LCD screen again, the camera focuses on the registered face. • It may not be possible to detect the registered face correctly depending on ...button during Face Detection. Face Priority Frame Off 1Press z on the registered face. • In Easy Shooting mode, the priority face cannot be shot. • When the Smile Shutter function is used with the Face Detection frame registered, Smile Detection is registered as the priority face, and ...
...the orange frame to the rightmost face, then press z again. • When you remove the battery from the camera, the face registration is shown on the LCD screen again, the camera focuses on the registered face. • It may not be possible to detect the registered face correctly depending on ...button during Face Detection. Face Priority Frame Off 1Press z on the registered face. • In Easy Shooting mode, the priority face cannot be shot. • When the Smile Shutter function is used with the Face Detection frame registered, Smile Detection is registered as the priority face, and ...

Cyber-shot® Handbook
Page 55
... subject's eyes open in the following situations. - MENU/Settings Search Index 55GB When using the flash - When the Smile Shutter function is displayed on the LCD screen. Table of contents Operation Search Anti Blink When Scene Selection is active, the Anti Blink function operates so that images with the subject's eyes...). 3 MENU t (Anti Blink) t desired mode (Auto) (Off) When Face Detection is set to (Soft Snap) mode and the subject blinks while shooting an image, the camera automatically takes one more shot. Shoot again as necessary.
... subject's eyes open in the following situations. - MENU/Settings Search Index 55GB When using the flash - When the Smile Shutter function is displayed on the LCD screen. Table of contents Operation Search Anti Blink When Scene Selection is active, the Anti Blink function operates so that images with the subject's eyes...). 3 MENU t (Anti Blink) t desired mode (Auto) (Off) When Face Detection is set to (Soft Snap) mode and the subject blinks while shooting an image, the camera automatically takes one more shot. Shoot again as necessary.

Cyber-shot® Handbook
Page 89
Table of the camera does not change. Camera LCD screen display TV screen with Wide Zoom Display 1 MENU t (Settings) t (Main Settings) t [Wide Zoom Display] t desired mode t z on High Definition TV, still images at a 4:3 and 3:2 aspect ratio are played at a 16:9 aspect ratio. MENU/Settings Search Index 89GB Off Does not use Wide Zoom Display. Notes...
Table of the camera does not change. Camera LCD screen display TV screen with Wide Zoom Display 1 MENU t (Settings) t (Main Settings) t [Wide Zoom Display] t desired mode t z on High Definition TV, still images at a 4:3 and 3:2 aspect ratio are played at a 16:9 aspect ratio. MENU/Settings Search Index 89GB Off Does not use Wide Zoom Display. Notes...
Cyber-shot® Handbook
Page 110
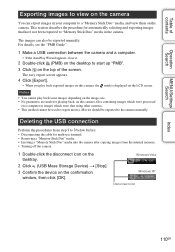
...up "PMB". 3 Click on the top of contents Operation Search MENU/Settings Search Exporting images to view on a computer or images which were shot using other cameras. • This method cannot be used to 3 below before: • Disconnecting the cable for multi-use terminal. • Removing a ... memory. • Turning off the camera. 1 Double-click the disconnect icon on the tasktray. 2 Click (USB Mass Storage Device) t [Stop]. 3 Confirm the device on the LCD screen. This section describes the procedure for playing back, on this camera, the mark is displayed on the confirmation...
...up "PMB". 3 Click on the top of contents Operation Search MENU/Settings Search Exporting images to view on a computer or images which were shot using other cameras. • This method cannot be used to 3 below before: • Disconnecting the cable for multi-use terminal. • Removing a ... memory. • Turning off the camera. 1 Double-click the disconnect icon on the tasktray. 2 Click (USB Mass Storage Device) t [Stop]. 3 Confirm the device on the LCD screen. This section describes the procedure for playing back, on this camera, the mark is displayed on the confirmation...

Cyber-shot® Handbook
Page 122
... battery pack is displayed on the camera. • After inserting the battery pack into the camera, it is discharged. The CHARGE lamp flashes while charging the battery. • Remove and reinsert the battery pack, making sure it may turn on the LCD screen before the power turns off ...automatically to protect the camera. Turn on , the camera turns off . - When you set the screen brightness higher using the AC Adaptor (sold separately). ...
... battery pack is displayed on the camera. • After inserting the battery pack into the camera, it is discharged. The CHARGE lamp flashes while charging the battery. • Remove and reinsert the battery pack, making sure it may turn on the LCD screen before the power turns off ...automatically to protect the camera. Turn on , the camera turns off . - When you set the screen brightness higher using the AC Adaptor (sold separately). ...

Cyber-shot® Handbook
Page 124
...While shooting, the date and time are displayed only during playback. The LCD screen is too dark. • You are shooting a subject with ...incorrect. In [Auto] mode, telephoto shooting is no function for superimposing dates on images. • This camera does not have a feature for forcibly turning off macro shooting. They are not displayed. Correct the exposure (... Selection mode is set to [Auto] when the camera is selected in Movie Mode. Cannot insert dates on images. Fuzzy white circular spots appear in images shot using "PMB", you press and hold the shutter button...
...While shooting, the date and time are displayed only during playback. The LCD screen is too dark. • You are shooting a subject with ...incorrect. In [Auto] mode, telephoto shooting is no function for superimposing dates on images. • This camera does not have a feature for forcibly turning off macro shooting. They are not displayed. Correct the exposure (... Selection mode is set to [Auto] when the camera is selected in Movie Mode. Cannot insert dates on images. Fuzzy white circular spots appear in images shot using "PMB", you press and hold the shutter button...

Cyber-shot® Handbook
Page 143
...106 Intelligent Auto Adjustment 19 Internal memory 18 ISO 41, 42 L Landscape 20 Language Setting 83 LCD Screen 16 M Macintosh computer 113 Macro 29 Mass Storage 90 "Memory Stick Duo" media 138 MENU... Color 69 PC 104 PictBridge 90, 118 Pixel 38 Playback 31 Playback zoom 32 PMB 107 Precision digital zoom 78 Print 73, 117 Print order mark 73 Printing directly 118 Program Auto 25 Protect 72 ...74 Self-diagnosis display 131 Self-Timer 28 Semi-manual 46 Settings 12 Shooting Movie 24 Still image 19 Shutter speed 41 Slideshow 60 Slow Synchro (Flash On 30 Smart zoom 78 Smile...
...106 Intelligent Auto Adjustment 19 Internal memory 18 ISO 41, 42 L Landscape 20 Language Setting 83 LCD Screen 16 M Macintosh computer 113 Macro 29 Mass Storage 90 "Memory Stick Duo" media 138 MENU... Color 69 PC 104 PictBridge 90, 118 Pixel 38 Playback 31 Playback zoom 32 PMB 107 Precision digital zoom 78 Print 73, 117 Print order mark 73 Printing directly 118 Program Auto 25 Protect 72 ...74 Self-diagnosis display 131 Self-Timer 28 Semi-manual 46 Settings 12 Shooting Movie 24 Still image 19 Shutter speed 41 Slideshow 60 Slow Synchro (Flash On 30 Smart zoom 78 Smile...


