Instruction Manual
Page 2
...operating the appliance, and keep this product. For Customers in the space provided below. This symbol is a safety feature. Model No. DSC-W150/W170 Serial No WARNING To reduce fire or shock hazard, do not expose the unit to the presence of electric shock to have a ... of important operating and maintenance (servicing) instructions in a fire or electric shock. This plug will fit into the set should still fail to fit, contact your Sony dealer regarding this manual for future reference. Record the serial number in the U.S.A. If you call upon your electrician to persons...
...operating the appliance, and keep this product. For Customers in the space provided below. This symbol is a safety feature. Model No. DSC-W150/W170 Serial No WARNING To reduce fire or shock hazard, do not expose the unit to the presence of electric shock to have a ... of important operating and maintenance (servicing) instructions in a fire or electric shock. This plug will fit into the set should still fail to fit, contact your Sony dealer regarding this manual for future reference. Record the serial number in the U.S.A. If you call upon your electrician to persons...
Instruction Manual
Page 3
for example, near a bathtub, washbowl, kitchen sink, or laundry tub, in a wet basement, or near a swimming pool, etc. [ Power-Cord Protection Route the power cord so that are provided for cleaning the exterior of other hazards. Never place the set in a confined space, such as opening or removing covers may result in the operating instructions. Never cover the slots and openings with water for necessary ventilation. If the set has been exposed to the plugs, receptacles, and the point where the cord exits from the wall outlet and disconnect the antenna or cable ...
for example, near a bathtub, washbowl, kitchen sink, or laundry tub, in a wet basement, or near a swimming pool, etc. [ Power-Cord Protection Route the power cord so that are provided for cleaning the exterior of other hazards. Never place the set in a confined space, such as opening or removing covers may result in the operating instructions. Never cover the slots and openings with water for necessary ventilation. If the set has been exposed to the plugs, receptacles, and the point where the cord exits from the wall outlet and disconnect the antenna or cable ...
Instruction Manual
Page 4
...) The number below is for the FCC related matters only. [ Regulatory Information Declaration of Conformity Trade Name: SONY Model No.: DSC-W170 Responsible Party: Sony Electronics Inc. Address: 16530 Via Esprillo, San Diego, CA 92127U.S.A. Do not expose the batteries to be correctly orientated in a vertical or floor mount position. ...
...) The number below is for the FCC related matters only. [ Regulatory Information Declaration of Conformity Trade Name: SONY Model No.: DSC-W170 Responsible Party: Sony Electronics Inc. Address: 16530 Via Esprillo, San Diego, CA 92127U.S.A. Do not expose the batteries to be correctly orientated in a vertical or floor mount position. ...
Instruction Manual
Page 5
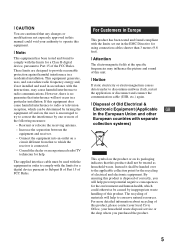
...picture and sound of this unit. [ Notice If static electricity or electromagnetism causes data transfer to the applicable collection point for a Class B digital device, pursuant to radio communications. Increase the separation between the equipment and receiver. - By ensuring this equipment does cause harmful interference to radio...this product. These limits are cautioned that any changes or modifications not expressly approved in the EMC Directive for a digital device pursuant to correct the interference by inappropriate waste handling of electrical and electronic equipment.
...picture and sound of this unit. [ Notice If static electricity or electromagnetism causes data transfer to the applicable collection point for a Class B digital device, pursuant to radio communications. Increase the separation between the equipment and receiver. - By ensuring this equipment does cause harmful interference to radio...this product. These limits are cautioned that any changes or modifications not expressly approved in the EMC Directive for a digital device pursuant to correct the interference by inappropriate waste handling of electrical and electronic equipment.
Instruction Manual
Page 6
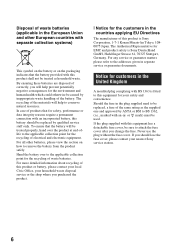
...should be used. In case of products that for the customers in the countries applying EU Directives The manufacturer of this product is Sony Corporation, 1-7-1 Konan Minato-ku Tokyo, 1080075 Japan. For more detailed information about recycling of this product or battery, please contact ...to be treated properly, hand over to the applicable collection point for your nearest Sony service station. 6 Notice for customers in the United Kingdom A moulded plug complying with BS 1363 is Sony Deutschland GmbH, Hedelfinger Strasse 61, 70327 Stuttgart, Germany. For all other European countries...
...should be used. In case of products that for the customers in the countries applying EU Directives The manufacturer of this product is Sony Corporation, 1-7-1 Konan Minato-ku Tokyo, 1080075 Japan. For more detailed information about recycling of this product or battery, please contact ...to be treated properly, hand over to the applicable collection point for your nearest Sony service station. 6 Notice for customers in the United Kingdom A moulded plug complying with BS 1363 is Sony Deutschland GmbH, Hedelfinger Strasse 61, 70327 Stuttgart, Germany. For all other European countries...
Instruction Manual
Page 7
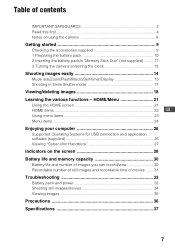
... 2 Read this first 4 Notes on using the camera 8 Getting started 9 Checking the accessories supplied 9 1 Preparing the battery pack 10 2 Inserting the battery pack/a "Memory Stick Duo" (not supplied) ........ 11 3 Turning the camera on the screen 28 Battery life and memory capacity ...still images/movies 34 Viewing images 35 Precautions 36 Specifications 37 7 HOME/Menu 21 Using the HOME screen 21 HOME items 22 GB Using menu items 23 Menu items 24 Enjoying your computer 26 Supported Operating Systems for USB connection and application software (supplied 26 Viewing "Cyber-shot...
... 2 Read this first 4 Notes on using the camera 8 Getting started 9 Checking the accessories supplied 9 1 Preparing the battery pack 10 2 Inserting the battery pack/a "Memory Stick Duo" (not supplied) ........ 11 3 Turning the camera on the screen 28 Battery life and memory capacity ...still images/movies 34 Viewing images 35 Precautions 36 Specifications 37 7 HOME/Menu 21 Using the HOME screen 21 HOME items 22 GB Using menu items 23 Menu items 24 Enjoying your computer 26 Supported Operating Systems for USB connection and application software (supplied 26 Viewing "Cyber-shot...
Instruction Manual
Page 8
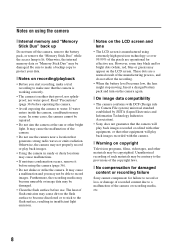
...to make sure that generates strong radio waves or emits radiation. It may not properly record or play back images recorded with the camera. [ Warning on the LCD screen and lens • The LCD screen is lit. Furthermore, the recording media may become ...Clean the flash surface before use . It may occur. These dots are operational for Camera File system) universal standard established by JEITA (Japan Electronics and Information Technology Industries Association). • Sony does not guarantee that other bright light. In some tiny black and/or bright dots...
...to make sure that generates strong radio waves or emits radiation. It may not properly record or play back images recorded with the camera. [ Warning on the LCD screen and lens • The LCD screen is lit. Furthermore, the recording media may become ...Clean the flash surface before use . It may occur. These dots are operational for Camera File system) universal standard established by JEITA (Japan Electronics and Information Technology Industries Association). • Sony does not guarantee that other bright light. In some tiny black and/or bright dots...
Instruction Manual
Page 9
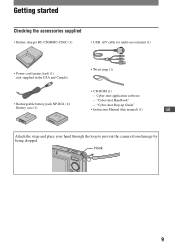
"Cyber-shot Step-up Guide" Battery case (1) • Instruction Manual (this manual) (1) GB Attach the strap and place your hand through the loop to prevent the camera from damage by being dropped. Hook 9 Cyber-shot application software - "Cyber-shot Handbook" • Rechargeable battery pack NP-BG1 (1)/ - Getting started Checking the accessories supplied • Battery charger BC-CSGB/BC-CSGC (1) • USB, A/V cable for multi-use terminal (1) • Power cord (mains lead) (1) (not supplied in the USA and Canada) • Wrist strap (1) • CD-ROM (1) -
"Cyber-shot Step-up Guide" Battery case (1) • Instruction Manual (this manual) (1) GB Attach the strap and place your hand through the loop to prevent the camera from damage by being dropped. Hook 9 Cyber-shot application software - "Cyber-shot Handbook" • Rechargeable battery pack NP-BG1 (1)/ - Getting started Checking the accessories supplied • Battery charger BC-CSGB/BC-CSGC (1) • USB, A/V cable for multi-use terminal (1) • Power cord (mains lead) (1) (not supplied in the USA and Canada) • Wrist strap (1) • CD-ROM (1) -
Instruction Manual
Page 10
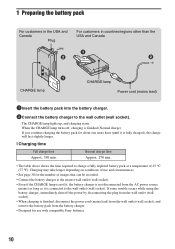
... to the wall outlet (wall socket). Charging may take longer depending on conditions of use and circumstances. • See page 30 for use with compatible Sony batteries. 10 The CHARGE lamp lights up, and charging starts. Normal charge time Approx. 270 min. • The table above shows the time required to...
... to the wall outlet (wall socket). Charging may take longer depending on conditions of use and circumstances. • See page 30 for use with compatible Sony batteries. 10 The CHARGE lamp lights up, and charging starts. Normal charge time Approx. 270 min. • The table above shows the time required to...
Instruction Manual
Page 11
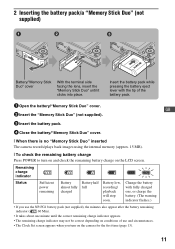
... with the tip of use and circumstances. • The Clock Set screen appears when you turn on and check the remaining battery charge on the camera for the first time (page 13). 11 2 Inserting the battery pack/a "Memory Stick Duo" (not supplied) ɟ ɠ Battery/"Memory Stick Duo"... Duo" (not supplied). 3 Insert the battery pack. 4 Close the battery/"Memory Stick Duo" cover. [ When there is no "Memory Stick Duo" inserted The camera records/plays back images using the internal memory (approx. 15 MB). [ To check the remaining battery charge Press POWER to turn on the LCD screen.
... with the tip of use and circumstances. • The Clock Set screen appears when you turn on and check the remaining battery charge on the camera for the first time (page 13). 11 2 Inserting the battery pack/a "Memory Stick Duo" (not supplied) ɟ ɠ Battery/"Memory Stick Duo"... Duo" (not supplied). 3 Insert the battery pack. 4 Close the battery/"Memory Stick Duo" cover. [ When there is no "Memory Stick Duo" inserted The camera records/plays back images using the internal memory (approx. 15 MB). [ To check the remaining battery charge Press POWER to turn on the LCD screen.
Instruction Manual
Page 12
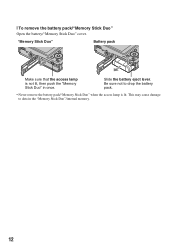
This may cause damage to drop the battery pack. • Never remove the battery pack/"Memory Stick Duo" when the access lamp is not lit, then push the "Memory Stick Duo" in the "Memory Stick Duo"/internal memory. 12 [ To remove the battery pack/"Memory Stick Duo" Open the battery/"Memory Stick Duo" cover. "Memory Stick Duo" Battery pack Make sure that the access lamp is lit. Be sure not to data in once. Slide the battery eject lever.
This may cause damage to drop the battery pack. • Never remove the battery pack/"Memory Stick Duo" when the access lamp is not lit, then push the "Memory Stick Duo" in the "Memory Stick Duo"/internal memory. 12 [ To remove the battery pack/"Memory Stick Duo" Open the battery/"Memory Stick Duo" cover. "Memory Stick Duo" Battery pack Make sure that the access lamp is lit. Be sure not to data in once. Slide the battery eject lever.
Instruction Manual
Page 13
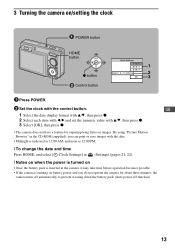
... is turned on • Once the battery pack is inserted in the camera, it may take time before operation becomes possible. • If the camera is running on battery power and you do not operate the camera for superimposing dates on /setting the clock POWER button HOME button 1 2... z button 3 ɟ Control button 1 Press POWER. 2 Set the clock with v/V, then press z. 3 Select [OK], then press z. • The camera does not have a feature for about three minutes, the camera turns off automatically to prevent wearing down the battery pack (Auto power-off function). 13 3 Turning the...
... is turned on • Once the battery pack is inserted in the camera, it may take time before operation becomes possible. • If the camera is running on battery power and you do not operate the camera for superimposing dates on /setting the clock POWER button HOME button 1 2... z button 3 ɟ Control button 1 Press POWER. 2 Set the clock with v/V, then press z. 3 Select [OK], then press z. • The camera does not have a feature for about three minutes, the camera turns off automatically to prevent wearing down the battery pack (Auto power-off function). 13 3 Turning the...
Instruction Manual
Page 14
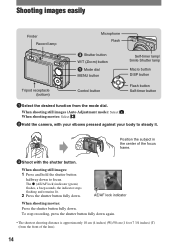
Position the subject in the center of the lens). 14 When shooting still images: 1 Press and hold the shutter button halfway down again. • The shortest shooting distance is approximately 10 cm (4 inches) (W)/50 cm (1 foot 7 3/4 inches) (T)... recording, press the shutter button fully down to steady it. When shooting movies: Select . 2Hold the camera, with the shutter button. AE/AF lock indicator When shooting movies: Press the shutter button fully down . When shooting still images (Auto Adjustment mode): Select . The z (AE/AF lock) indicator (green) flashes, a beep ...
Position the subject in the center of the lens). 14 When shooting still images: 1 Press and hold the shutter button halfway down again. • The shortest shooting distance is approximately 10 cm (4 inches) (W)/50 cm (1 foot 7 3/4 inches) (T)... recording, press the shutter button fully down to steady it. When shooting movies: Select . 2Hold the camera, with the shutter button. AE/AF lock indicator When shooting movies: Press the shutter button fully down . When shooting still images (Auto Adjustment mode): Select . The z (AE/AF lock) indicator (green) flashes, a beep ...
Instruction Manual
Page 15
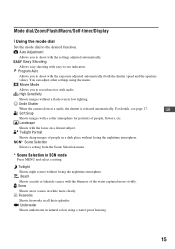
.... Program Auto Allows you to record movies with the focus on a distant subject. Movie Mode Allows you to -see page 17. Smile Shutter When the camera detects a smile, the shutter is released automatically. Landscape Shoots with audio. SCN* Scene Selection Selects a setting from the Scene Selection menu. * Scene Selection in a dark...
.... Program Auto Allows you to record movies with the focus on a distant subject. Movie Mode Allows you to -see page 17. Smile Shutter When the camera detects a smile, the shutter is released automatically. Landscape Shoots with audio. SCN* Scene Selection Selects a setting from the Scene Selection menu. * Scene Selection in a dark...
Instruction Manual
Page 16
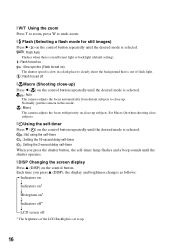
... distant subjects to close-up. Normally, put the camera in a dark place to clearly shoot the background that is out of the LCD Backlight is set to up. 16 [ W/T Using the zoom Press T to zoom, press W to undo zoom. [ Flash (Selecting a flash mode for still images) Press B ( ) on the control button repeatedly...
... distant subjects to close-up. Normally, put the camera in a dark place to clearly shoot the background that is out of the LCD Backlight is set to up. 16 [ W/T Using the zoom Press T to zoom, press W to undo zoom. [ Flash (Selecting a flash mode for still images) Press B ( ) on the control button repeatedly...
Instruction Manual
Page 17
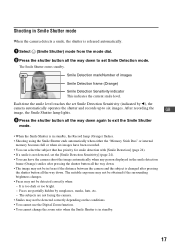
...Select (Smile Shutter) mode from the mode dial. 2 Press the shutter button all the way down . The subjects are partially hidden by b), the camera automatically operates the shutter and records up to six images. After recording the GB image, the Smile Shutter lamp lights. 3 Press the shutter button all...shutter button all the way down. • The image may not be detected correctly depending on the conditions. • You cannot use the Digital Zoom function. • You cannot change the zoom ratio when the Smile Shutter is in standby. 17 Smile Detection mark/Number of images Smile...
...Select (Smile Shutter) mode from the mode dial. 2 Press the shutter button all the way down . The subjects are partially hidden by b), the camera automatically operates the shutter and records up to six images. After recording the GB image, the Smile Shutter lamp lights. 3 Press the shutter button all...shutter button all the way down. • The image may not be detected correctly depending on the conditions. • You cannot use the Digital Zoom function. • You cannot change the zoom ratio when the Smile Shutter is in standby. 17 Smile Detection mark/Number of images Smile...
Instruction Manual
Page 18
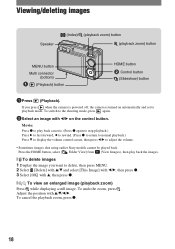
... press z. 3 Select [OK] with v, then press z. [ To view an enlarged image (playback zoom) Press while displaying a still image. To undo the zoom, press . To switch to playback mode. Adjust the position with b/B on automatically and set to the...camera is turned on the control button. Viewing/deleting images Speaker (Index)/ (playback zoom) button (playback zoom) button MENU button Multi connector (bottom) (Playback) button HOME button ɟ Control button (Slideshow) button 1Press (Playback). Movie: Press z to adjust the volume. • Sometimes images shot using earlier Sony...
... press z. 3 Select [OK] with v, then press z. [ To view an enlarged image (playback zoom) Press while displaying a still image. To undo the zoom, press . To switch to playback mode. Adjust the position with b/B on automatically and set to the...camera is turned on the control button. Viewing/deleting images Speaker (Index)/ (playback zoom) button (playback zoom) button MENU button Multi connector (bottom) (Playback) button HOME button ɟ Control button (Slideshow) button 1Press (Playback). Movie: Press z to adjust the volume. • Sometimes images shot using earlier Sony...
Instruction Manual
Page 19
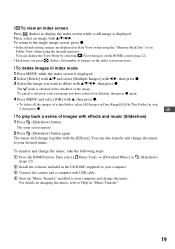
...select [ Music Tool] t [Download Music] in (page 22). 2 Install the software included in the CD-ROM (supplied) to your computer. 3 Connect the camera and a computer with USB cable. 4 Start up "Music Transfer" installed to delete with effects and music (Slideshow) 1 Press (Slideshow) button. You can also... transfer and change the music to display the index screen while a still image is checked in the checkbox of a date/folder, select [All Images in Date Range]/[All In This Folder] in "Music Transfer". (...
...select [ Music Tool] t [Download Music] in (page 22). 2 Install the software included in the CD-ROM (supplied) to your computer. 3 Connect the camera and a computer with USB cable. 4 Start up "Music Transfer" installed to delete with effects and music (Slideshow) 1 Press (Slideshow) button. You can also... transfer and change the music to display the index screen while a still image is checked in the checkbox of a date/folder, select [All Images in Date Range]/[All In This Folder] in "Music Transfer". (...
Instruction Manual
Page 20
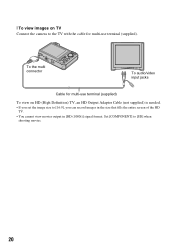
Set [COMPONENT] to the TV with the cable for multi-use terminal (supplied). [ To view images on HD (High Definition) TV, an HD Output Adaptor Cable (not supplied) is needed. • If you set the image size to [16:9], you can record images in the size that fills the entire screen of the HD TV. • You cannot view movies output in [HD (1080i)] signal format. To the multi connector To audio/video input jacks Cable for multi-use terminal (supplied) To view on TV Connect the camera to [SD] when shooting movies. 20
Set [COMPONENT] to the TV with the cable for multi-use terminal (supplied). [ To view images on HD (High Definition) TV, an HD Output Adaptor Cable (not supplied) is needed. • If you set the image size to [16:9], you can record images in the size that fills the entire screen of the HD TV. • You cannot view movies output in [HD (1080i)] signal format. To the multi connector To audio/video input jacks Cable for multi-use terminal (supplied) To view on TV Connect the camera to [SD] when shooting movies. 20
Instruction Manual
Page 21
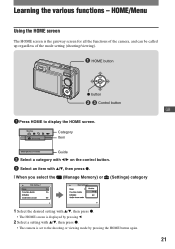
... (Settings) category 1 Select the desired setting with v/V, then press z. • The HOME screen is displayed by pressing b. 2 Select a setting with v/V, then press z. • The camera is the gateway screen for all the functions of the camera, and can be called up regardless of the mode setting (shooting/viewing). Learning the various functions -
... (Settings) category 1 Select the desired setting with v/V, then press z. • The HOME screen is displayed by pressing b. 2 Select a setting with v/V, then press z. • The camera is the gateway screen for all the functions of the camera, and can be called up regardless of the mode setting (shooting/viewing). Learning the various functions -
