Operating Instructions
Page 2
...) instructions in the literature accompanying the appliance. 2 IMPORTANT SAFEGUARDS For your protection, please read these numbers whenever you call upon your Sony dealer regarding this can result in the operating instructions and adhere to the presence of the polarized plug by the manufacturer, as they may... If you are unable to these safety instructions completely before operating the appliance, and keep this manual for future reference. DSC-W110/W115/W120/ W125/W130 Serial No WARNING To reduce fire or shock hazard, do not expose the unit to fit, contact your dealer or local...
...) instructions in the literature accompanying the appliance. 2 IMPORTANT SAFEGUARDS For your protection, please read these numbers whenever you call upon your Sony dealer regarding this can result in the operating instructions and adhere to the presence of the polarized plug by the manufacturer, as they may... If you are unable to these safety instructions completely before operating the appliance, and keep this manual for future reference. DSC-W110/W115/W120/ W125/W130 Serial No WARNING To reduce fire or shock hazard, do not expose the unit to fit, contact your dealer or local...
Operating Instructions
Page 3
[ Cleaning Unplug the set from the wall outlet before cleaning or polishing it is not likely to be walked on or pinched by items placed upon or against them, paying particular attention to the plugs, receptacles, and the point where the cord exits from the appliance. [ Accessories Do not place the set on a bed, sofa, rug, or other similar surface. - for example, near a bathtub, washbowl, kitchen sink, or laundry tub, in safe operating condition. 3 Never place the set in a confined space, such as specified by the manufacturer that the set from the wall outlet and refer servicing to ...
[ Cleaning Unplug the set from the wall outlet before cleaning or polishing it is not likely to be walked on or pinched by items placed upon or against them, paying particular attention to the plugs, receptacles, and the point where the cord exits from the appliance. [ Accessories Do not place the set on a bed, sofa, rug, or other similar surface. - for example, near a bathtub, washbowl, kitchen sink, or laundry tub, in safe operating condition. 3 Never place the set in a confined space, such as specified by the manufacturer that the set from the wall outlet and refer servicing to ...
Operating Instructions
Page 4
... not handle damaged or leaking Lithium-Ion batteries. Operation is for the FCC related matters only. [ Regulatory Information Declaration of Conformity Trade Name: SONY Model No.: DSC-W130 Responsible Party: Sony Electronics Inc. Telephone No.: 858-942-2230 This device complies with the specified type only. You can help preserve our environment by returning... Part 15 of the FCC Rules. For Customers in the U.S.A. Telephone No.: 858-942-2230 This device complies with Part 15 of Conformity Trade Name: SONY Model No.: DSC-W120, DSC-W125 Responsible Party: Sony Electronics Inc.
... not handle damaged or leaking Lithium-Ion batteries. Operation is for the FCC related matters only. [ Regulatory Information Declaration of Conformity Trade Name: SONY Model No.: DSC-W130 Responsible Party: Sony Electronics Inc. Telephone No.: 858-942-2230 This device complies with the specified type only. You can help preserve our environment by returning... Part 15 of the FCC Rules. For Customers in the U.S.A. Telephone No.: 858-942-2230 This device complies with Part 15 of Conformity Trade Name: SONY Model No.: DSC-W120, DSC-W125 Responsible Party: Sony Electronics Inc.
Operating Instructions
Page 5
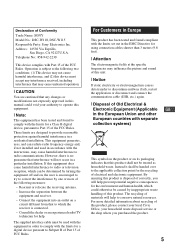
... any changes or modifications not expressly approved in the European Union and other European countries with the limits for a Class B digital device, pursuant to Part 15 of correctly, you will help prevent potential negative consequences for help to conserve natural resources. By...your household waste disposal service or the shop where you purchased the product. 5 For more of Conformity Trade Name: SONY Model No.: DSC-W110, DSC-W115 Responsible Party: Sony Electronics Inc. Declaration of the following two conditions: (1) This device may cause undesired operation. [ CAUTION You are...
... any changes or modifications not expressly approved in the European Union and other European countries with the limits for a Class B digital device, pursuant to Part 15 of correctly, you will help prevent potential negative consequences for help to conserve natural resources. By...your household waste disposal service or the shop where you purchased the product. 5 For more of Conformity Trade Name: SONY Model No.: DSC-W110, DSC-W115 Responsible Party: Sony Electronics Inc. Declaration of the following two conditions: (1) This device may cause undesired operation. [ CAUTION You are...
Operating Instructions
Page 6
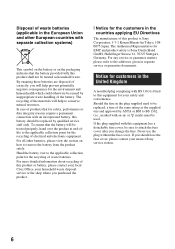
...and electronic equipment. For more detailed information about recycling of this product or battery, please contact your local Civic Office, your nearest Sony service station. 6 Hand the battery over the product at end-oflife to the applicable collection point for the customers in the ... inappropriate waste handling of the battery. Disposal of waste batteries (applicable in the countries applying EU Directives The manufacturer of this product is Sony Corporation, 1-7-1 Konan Minato-ku Tokyo, 1080075 Japan. Should the fuse in the plug supplied need to be treated properly, hand over ...
...and electronic equipment. For more detailed information about recycling of this product or battery, please contact your local Civic Office, your nearest Sony service station. 6 Hand the battery over the product at end-oflife to the applicable collection point for the customers in the ... inappropriate waste handling of the battery. Disposal of waste batteries (applicable in the countries applying EU Directives The manufacturer of this product is Sony Corporation, 1-7-1 Konan Minato-ku Tokyo, 1080075 Japan. Should the fuse in the plug supplied need to be treated properly, hand over ...
Operating Instructions
Page 7
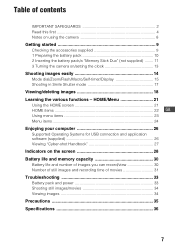
...menu items 23 Menu items 24 Enjoying your computer 26 Supported Operating Systems for USB connection and application software (supplied 26 Viewing "Cyber-shot Handbook 27 Indicators on the screen 28 Battery life and memory capacity 30 Battery life and number of images you can record/...view 30 Number of still images and recording time of contents IMPORTANT SAFEGUARDS 2 Read this first 4 Notes on using the camera 8 Getting started 9 Checking the accessories supplied 9 1 Preparing the battery pack 10 2 Inserting the battery pack/a "Memory Stick Duo" (not supplied) ...
...menu items 23 Menu items 24 Enjoying your computer 26 Supported Operating Systems for USB connection and application software (supplied 26 Viewing "Cyber-shot Handbook 27 Indicators on the screen 28 Battery life and memory capacity 30 Battery life and number of images you can record/...view 30 Number of still images and recording time of contents IMPORTANT SAFEGUARDS 2 Read this first 4 Notes on using the camera 8 Getting started 9 Checking the accessories supplied 9 1 Preparing the battery pack 10 2 Inserting the battery pack/a "Memory Stick Duo" (not supplied) ...
Operating Instructions
Page 8
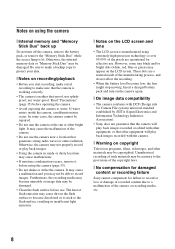
... (Japan Electronics and Information Technology Industries Association). • Sony does not guarantee that the camera will play back images recorded with other equipment, or that the camera is working correctly. • The camera is manufactured using the camera (page 35). • Do not shake or strike the camera. In some tiny black and/or bright dots...
... (Japan Electronics and Information Technology Industries Association). • Sony does not guarantee that the camera will play back images recorded with other equipment, or that the camera is working correctly. • The camera is manufactured using the camera (page 35). • Do not shake or strike the camera. In some tiny black and/or bright dots...
Operating Instructions
Page 9
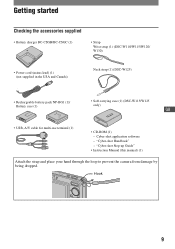
... strap and place your hand through the loop to prevent the camera from damage by being dropped. Hook 9 Cyber-shot application software - Getting started Checking the accessories supplied • Battery charger BC-CSGB/BC-CSGC (1) • Strap Wrist strap (1) (DSC-W110/W115/W120/ W130) • Power cord (mains lead) (1) (not supplied in the USA and...
... strap and place your hand through the loop to prevent the camera from damage by being dropped. Hook 9 Cyber-shot application software - Getting started Checking the accessories supplied • Battery charger BC-CSGB/BC-CSGC (1) • Strap Wrist strap (1) (DSC-W110/W115/W120/ W130) • Power cord (mains lead) (1) (not supplied in the USA and...
Operating Instructions
Page 10
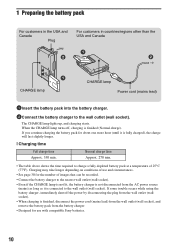
... to the wall outlet (wall socket). The CHARGE lamp lights up, and charging starts. If you continue charging the battery pack for use with compatible Sony batteries. 10 When the CHARGE lamp turns off the power by disconnecting the plug from the battery charger. • Designed for about one more hour...
... to the wall outlet (wall socket). The CHARGE lamp lights up, and charging starts. If you continue charging the battery pack for use with compatible Sony batteries. 10 When the CHARGE lamp turns off the power by disconnecting the plug from the battery charger. • Designed for about one more hour...

Operating Instructions
Page 11
...charged one minute until the correct remaining charge indicator appears. • The remaining charge indicator may not be correct depending on the camera for the first time (page 13). 11 Remaining charge indicator Status Sufficient power remaining Battery almost fully charged Battery half full Battery ...). 3 Insert the battery pack. 4 Close the battery/"Memory Stick Duo" cover. [ When there is no "Memory Stick Duo" inserted The camera records/plays back images using the internal memory (approx. 15 MB). [ To check the remaining battery charge Press POWER to turn on conditions of...
...charged one minute until the correct remaining charge indicator appears. • The remaining charge indicator may not be correct depending on the camera for the first time (page 13). 11 Remaining charge indicator Status Sufficient power remaining Battery almost fully charged Battery half full Battery ...). 3 Insert the battery pack. 4 Close the battery/"Memory Stick Duo" cover. [ When there is no "Memory Stick Duo" inserted The camera records/plays back images using the internal memory (approx. 15 MB). [ To check the remaining battery charge Press POWER to turn on conditions of...
Operating Instructions
Page 12
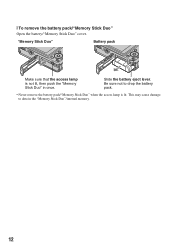
"Memory Stick Duo" Battery pack Make sure that the access lamp is lit. Be sure not to data in once. [ To remove the battery pack/"Memory Stick Duo" Open the battery/"Memory Stick Duo" cover. This may cause damage to drop the battery pack. • Never remove the battery pack/"Memory Stick Duo" when the access lamp is not lit, then push the "Memory Stick Duo" in the "Memory Stick Duo"/internal memory. 12 Slide the battery eject lever.
"Memory Stick Duo" Battery pack Make sure that the access lamp is lit. Be sure not to data in once. [ To remove the battery pack/"Memory Stick Duo" Open the battery/"Memory Stick Duo" cover. This may cause damage to drop the battery pack. • Never remove the battery pack/"Memory Stick Duo" when the access lamp is not lit, then push the "Memory Stick Duo" in the "Memory Stick Duo"/internal memory. 12 Slide the battery eject lever.

Operating Instructions
Page 13
... the date display format with v/V, then press z. 2 Select each item with b/B and set the numeric value with the control button. 3 Turning the camera on images. By using "Picture Motion Browser" in the CD-ROM (supplied), you can print or save images with the date. • Midnight is... the power is turned on • Once the battery pack is inserted in the camera, it may take time before operation becomes possible. • If the camera is running on battery power and you do not operate the camera for superimposing dates on /setting the clock POWER button HOME button 1 2 z button...
... the date display format with v/V, then press z. 2 Select each item with b/B and set the numeric value with the control button. 3 Turning the camera on images. By using "Picture Motion Browser" in the CD-ROM (supplied), you can print or save images with the date. • Midnight is... the power is turned on • Once the battery pack is inserted in the camera, it may take time before operation becomes possible. • If the camera is running on battery power and you do not operate the camera for superimposing dates on /setting the clock POWER button HOME button 1 2 z button...
Operating Instructions
Page 14
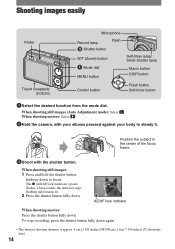
... Macro button DISP button Control button Flash button Self-timer button 1Select the desired function from the lens). 14 When shooting movies: Select . 2Hold the camera, with the shutter button.
... Macro button DISP button Control button Flash button Self-timer button 1Select the desired function from the lens). 14 When shooting movies: Select . 2Hold the camera, with the shutter button.
Operating Instructions
Page 15
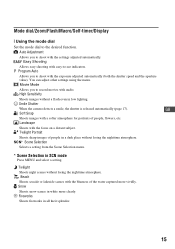
... function. Twilight Shoots night scenes without losing the nighttime atmosphere. Twilight Portrait Shoots sharp images of the water captured more clearly. Smile Shutter When the camera detects a smile, the shutter is released automatically (page 17). Mode dial/Zoom/Flash/Macro/Self-timer/Display [ Using the mode dial Set the mode dial...
... function. Twilight Shoots night scenes without losing the nighttime atmosphere. Twilight Portrait Shoots sharp images of the water captured more clearly. Smile Shutter When the camera detects a smile, the shutter is released automatically (page 17). Mode dial/Zoom/Flash/Macro/Self-timer/Display [ Using the mode dial Set the mode dial...
Operating Instructions
Page 16
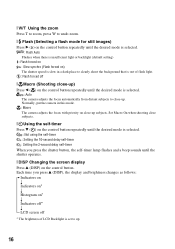
... on the control button repeatedly until the shutter operates. [ DISP Changing the screen display Press v (DISP) on the control button. Normally, put the camera in a dark place to clearly shoot the background that is out of flash light. : Flash forced off * The brightness of LCD Backlight is set ... or backlight (default setting) : Flash forced on : Slow synchro (Flash forced on) The shutter speed is slow in this mode. : Macro The camera adjusts the focus with priority on close -up. Each time you press v (DISP), the display and brightness changes as follows: Indicators on r Indicators on...
... on the control button repeatedly until the shutter operates. [ DISP Changing the screen display Press v (DISP) on the control button. Normally, put the camera in a dark place to clearly shoot the background that is out of flash light. : Flash forced off * The brightness of LCD Backlight is set ... or backlight (default setting) : Flash forced on : Slow synchro (Flash forced on) The shutter speed is slow in this mode. : Macro The camera adjusts the focus with priority on close -up. Each time you press v (DISP), the display and brightness changes as follows: Indicators on r Indicators on...
Operating Instructions
Page 17
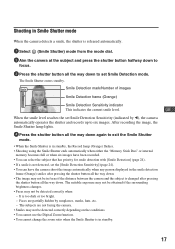
... Shutter lamp lights. 4 Press the shutter button all the way down. Faces are not facing the camera. • Smiles may not be detected correctly depending on the conditions. • You cannot use the Digital Zoom function. • You cannot change the zoom ratio when the Smile Shutter is in focus if... the distance between the camera and the subject is too dark or too bright. - GB When the smile level...
... Shutter lamp lights. 4 Press the shutter button all the way down. Faces are not facing the camera. • Smiles may not be detected correctly depending on the conditions. • You cannot use the Digital Zoom function. • You cannot change the zoom ratio when the Smile Shutter is in focus if... the distance between the camera and the subject is too dark or too bright. - GB When the smile level...
Operating Instructions
Page 18
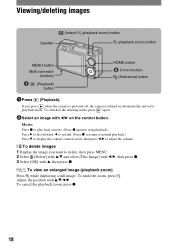
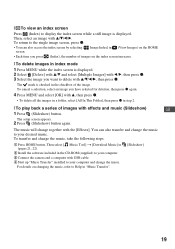
....) Press V to display the volume control screen, then press b/B to adjust the volume. [ To delete images 1 Display the image you press when the camera is powered off, the camera is turned on automatically and set to the shooting mode, press again. 2Select an image with b/B on the control button. To switch to...
....) Press V to display the volume control screen, then press b/B to adjust the volume. [ To delete images 1 Display the image you press when the camera is powered off, the camera is turned on automatically and set to the shooting mode, press again. 2Select an image with b/B on the control button. To switch to...
Operating Instructions
Page 19
... screen Press (Index) to Help in step 2. [ To play back a series of the image. The music will change the music to your computer. 3 Connect the camera and a computer with v/V/b/B, then press z. To cancel a selection, select an image you press (Index), the number of images on changing the music, refer to display...
... screen Press (Index) to Help in step 2. [ To play back a series of the image. The music will change the music to your computer. 3 Connect the camera and a computer with v/V/b/B, then press z. To cancel a selection, select an image you press (Index), the number of images on changing the music, refer to display...
Operating Instructions
Page 20
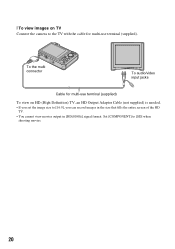
Set [COMPONENT] to [16:9], you set the image size to [SD] when shooting movies. 20 To the multi connector To audio/video input jacks Cable for multi-use terminal (supplied) To view on HD (High Definition) TV, an HD Output Adaptor Cable (not supplied) is needed. • If you can record images in the size that fills the entire screen of the HD TV. • You cannot view movies output in [HD(1080i)] signal format. [ To view images on TV Connect the camera to the TV with the cable for multi-use terminal (supplied).
Set [COMPONENT] to [16:9], you set the image size to [SD] when shooting movies. 20 To the multi connector To audio/video input jacks Cable for multi-use terminal (supplied) To view on HD (High Definition) TV, an HD Output Adaptor Cable (not supplied) is needed. • If you can record images in the size that fills the entire screen of the HD TV. • You cannot view movies output in [HD(1080i)] signal format. [ To view images on TV Connect the camera to the TV with the cable for multi-use terminal (supplied).
Operating Instructions
Page 21
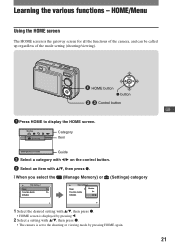
...) or (Settings) category 1 Select the desired setting with v/V, then press z. • HOME screen is displayed by pressing b. 2 Select a setting with v/V, then press z. • The camera is the gateway screen for all the functions of the camera, and can be called up regardless of the mode setting (shooting/viewing). Learning the various functions -
...) or (Settings) category 1 Select the desired setting with v/V, then press z. • HOME screen is displayed by pressing b. 2 Select a setting with v/V, then press z. • The camera is the gateway screen for all the functions of the camera, and can be called up regardless of the mode setting (shooting/viewing). Learning the various functions -
