User Guide
Page 3
... This symbol on the product or on a circuit different from that this camera. The recycling of this product shall not be used with the equipment in order to comply with the limits for a digital device pursuant to Subpart B of Part 15 of FCC Rules. By ensuring...discontinue midway (fail), restart the application or disconnect and connect the communication cable (USB, etc.) again. For more detailed information about recycling of this product, please contact your local city office, your nearest Sony service station. 3 Notice for customers in the EMC Directive for help ...
... This symbol on the product or on a circuit different from that this camera. The recycling of this product shall not be used with the equipment in order to comply with the limits for a digital device pursuant to Subpart B of Part 15 of FCC Rules. By ensuring...discontinue midway (fail), restart the application or disconnect and connect the communication cable (USB, etc.) again. For more detailed information about recycling of this product, please contact your local city office, your nearest Sony service station. 3 Notice for customers in the EMC Directive for help ...

User Guide
Page 15
...Enjoying the camera L "Memory Stick Duo" slot (t step 3 in "Read This First") M Battery insertion slot (t step 1 in "Read This First") N Battery eject lever (t step 1 in "Read This First") O Multi connector (bottom) When using an AC-LS5K AC Adaptor (not supplied) 2 To the multi connector Cable for multi-...use terminal (supplied) 1 To DC IN jack v mark 3 To wall outlet P Tripod receptacle (bottom) • Use a tripod with a screw length of less than 5.5 mm (7/32 inch), and may damage the camera. 15
...Enjoying the camera L "Memory Stick Duo" slot (t step 3 in "Read This First") M Battery insertion slot (t step 1 in "Read This First") N Battery eject lever (t step 1 in "Read This First") O Multi connector (bottom) When using an AC-LS5K AC Adaptor (not supplied) 2 To the multi connector Cable for multi-...use terminal (supplied) 1 To DC IN jack v mark 3 To wall outlet P Tripod receptacle (bottom) • Use a tripod with a screw length of less than 5.5 mm (7/32 inch), and may damage the camera. 15

User Guide
Page 19
... 2005 1 1 9:30 AM DPOF z PAUSE z PLAY BACK/ NEXT VOLUME Indication Histogram (20, 29) • appears when histogram display is disabled. Enjoying the camera C Display 101 101 8/8 12/12 C:32:00 00:00:12 D Display +2.0EV WB 500 F3.5 Indication PictBridge connecting (71) Recording folder (50) •...date/time of images recorded in selected folder Self-diagnosis display (90) Counter (t step 6 in "Read This First") Indication Do not disconnect the cable for multi-use terminal (72) Exposure Value (29) ISO number (33) Metering mode (32) Flash White balance (32) Shutter speed Aperture value ...
... 2005 1 1 9:30 AM DPOF z PAUSE z PLAY BACK/ NEXT VOLUME Indication Histogram (20, 29) • appears when histogram display is disabled. Enjoying the camera C Display 101 101 8/8 12/12 C:32:00 00:00:12 D Display +2.0EV WB 500 F3.5 Indication PictBridge connecting (71) Recording folder (50) •...date/time of images recorded in selected folder Self-diagnosis display (90) Counter (t step 6 in "Read This First") Indication Do not disconnect the cable for multi-use terminal (72) Exposure Value (29) ISO number (33) Metering mode (32) Flash White balance (32) Shutter speed Aperture value ...
User Guide
Page 22
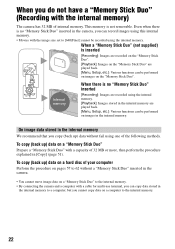
When a "Memory Stick Duo" (not supplied) is no "Memory Stick Duo" inserted in the camera, you can record images using this internal memory. • Movies with a cable for multi-use terminal, you can be recorded using the internal memory. To copy (back up) data on a "Memory Stick Duo" to the ...internal memory. • By connecting the camera and a computer with the image size set to the internal...
When a "Memory Stick Duo" (not supplied) is no "Memory Stick Duo" inserted in the camera, you can record images using this internal memory. • Movies with a cable for multi-use terminal, you can be recorded using the internal memory. To copy (back up) data on a "Memory Stick Duo" to the ...internal memory. • By connecting the camera and a computer with the image size set to the internal...

User Guide
Page 53
...assign file numbers to a PictBridge compliant printer (page 70). PictBridge Connects the camera to images. File Number Selects the method used when connecting the camera to a computer or a PictBridge compliant printer using the cable for multi-use terminal. Series Assigns numbers to files in sequence even if the...page 44 The default settings are copied to [Mass Storage]. 53 PTP When [PTP] (Picture Transfer Protocol) is set and the camera is assigned.) USB Connect Selects the USB mode to be connected when set to [Auto], change the setting to the computer. (Compatible with ....
...assign file numbers to a PictBridge compliant printer (page 70). PictBridge Connects the camera to images. File Number Selects the method used when connecting the camera to a computer or a PictBridge compliant printer using the cable for multi-use terminal. Series Assigns numbers to files in sequence even if the...page 44 The default settings are copied to [Mass Storage]. 53 PTP When [PTP] (Picture Transfer Protocol) is set and the camera is assigned.) USB Connect Selects the USB mode to be connected when set to [Auto], change the setting to the computer. (Compatible with ....

User Guide
Page 59
... the first time, your computer automatically runs a program to recognize the camera. USB Mode Mass Storage Memory Stick Switch on the supplied cable for multi-use terminal to [Mass Storage] (page 53). CAMERA TV DISP SEL • With Windows XP, the AutoPlay wizard appears on...the procedure explained in "Stage 4-B: Copying images to a "My Documents" folder. Using your computer 2 To the multi connector 1 To a USB connector Cable for multiuse terminal (supplied) • Set the switch on MENU Access indicators* When a USB connection is established for a while. * During communication, ...
... the first time, your computer automatically runs a program to recognize the camera. USB Mode Mass Storage Memory Stick Switch on the supplied cable for multi-use terminal to [Mass Storage] (page 53). CAMERA TV DISP SEL • With Windows XP, the AutoPlay wizard appears on...the procedure explained in "Stage 4-B: Copying images to a "My Documents" folder. Using your computer 2 To the multi connector 1 To a USB connector Cable for multiuse terminal (supplied) • Set the switch on MENU Access indicators* When a USB connection is established for a while. * During communication, ...

User Guide
Page 61
... "Stage 3: Connecting the camera and your computer 6 Click [Finish]. Then, right-click on page 59. 2 Double-click the folder where the image files you want to copy are copied to the "My Documents" folder. 61 The wizard screen closes. • To continue copying other images, disconnect the cable for multi-use terminal...
... "Stage 3: Connecting the camera and your computer 6 Click [Finish]. Then, right-click on page 59. 2 Double-click the folder where the image files you want to copy are copied to the "My Documents" folder. 61 The wizard screen closes. • To continue copying other images, disconnect the cable for multi-use terminal...
User Guide
Page 62
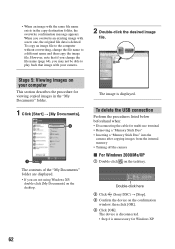
... back that image with a new one, the original file data is deleted. Stage 5: Viewing images on your camera. 2 Double-click the desired image file. Double-click here 2 Click (Sony DSC) t [Stop]. 3 Confirm the device on the tasktray. • When an image with the same file name... image is unnecessary for Windows XP. 62 To delete the USB connection Perform the procedures listed below beforehand when: • Disconnecting the cable for viewing copied images in the copy destination folder, the overwrite confirmation message appears. The device is disconnected. • Step 4 is...
... back that image with a new one, the original file data is deleted. Stage 5: Viewing images on your camera. 2 Double-click the desired image file. Double-click here 2 Click (Sony DSC) t [Stop]. 3 Confirm the device on the tasktray. • When an image with the same file name... image is unnecessary for Windows XP. 62 To delete the USB connection Perform the procedures listed below beforehand when: • Disconnecting the cable for viewing copied images in the copy destination folder, the overwrite confirmation message appears. The device is disconnected. • Step 4 is...

User Guide
Page 67
... computer resumes from the suspend or sleep mode, communication between your camera and your computer may not recover at the same time, some devices, including your camera, may not operate depending on page 58. 2 Connect the cable for multi-use terminal. Perform the same procedure as that described ...in "Stage 3: Connecting the camera and your computer" on [PTP], see page 63. 67 ...
... computer resumes from the suspend or sleep mode, communication between your camera and your computer may not recover at the same time, some devices, including your camera, may not operate depending on page 58. 2 Connect the cable for multi-use terminal. Perform the same procedure as that described ...in "Stage 3: Connecting the camera and your computer" on [PTP], see page 63. 67 ...
User Guide
Page 68
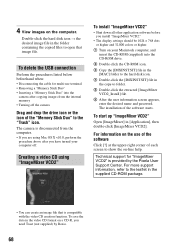
...Toast (not supplied) by the Pixela User Support Center. 4 View images on your Macintosh computer, and insert the CD-ROM (supplied) into the camera after copying images from the computer. • If you are using "ImageMixer VCD2" To install "ImageMixer VCD2" • Shut down all other ... or higher. 1 Turn on the computer. To delete the USB connection Perform the procedures listed below beforehand when: • Disconnecting the cable for "ImageMixer VCD2" is compatible with the video CD creation function. For more support information, refer to the leaflet in the folder containing...
...Toast (not supplied) by the Pixela User Support Center. 4 View images on your Macintosh computer, and insert the CD-ROM (supplied) into the camera after copying images from the computer. • If you are using "ImageMixer VCD2" To install "ImageMixer VCD2" • Shut down all other ... or higher. 1 Turn on the computer. To delete the USB connection Perform the procedures listed below beforehand when: • Disconnecting the cable for "ImageMixer VCD2" is compatible with the video CD creation function. For more support information, refer to the leaflet in the folder containing...

User Guide
Page 70
...error notification), check the connected printer. 3 Select [ ] (Setup2) with V, then 2 select [USB Connect] with v/V/B. 4 Select [PictBridge] with the cable for multi-use a fully charged battery pack or an AC Adaptor (not supplied) to prevent the power from turning off partway through printing. 1 Press MENU ...menu. 2 Press B on the control button to the printer with B/v, then press z. The USB mode is based on the CIPA standard. (CIPA: Camera & Imaging Products Association) In single-image mode You can be printed as an index image differ depending on the printer. • You cannot print ...
...error notification), check the connected printer. 3 Select [ ] (Setup2) with V, then 2 select [USB Connect] with v/V/B. 4 Select [PictBridge] with the cable for multi-use a fully charged battery pack or an AC Adaptor (not supplied) to prevent the power from turning off partway through printing. 1 Press MENU ...menu. 2 Press B on the control button to the printer with B/v, then press z. The USB mode is based on the CIPA standard. (CIPA: Camera & Imaging Products Association) In single-image mode You can be printed as an index image differ depending on the printer. • You cannot print ...

User Guide
Page 71
...8226; To select other images, repeat this procedure. 2Select [Print] with b/B, then press z. After the connection is made, the indicator appears. CAMERA TV DISP SEL Turn on the screen. Printing still images 71 Stage 3: Printing Regardless of the displayed image. [Select] Selects images and prints ... and the print menu appear on your camera and the USB jack on the printer with the supplied cable for multi-use terminal. 2 To the multi connector 1 To the USB jack Cable for multiuse terminal to "CAMERA". Stage 2: Connecting the camera to the printer Connect the multi connector on...
...8226; To select other images, repeat this procedure. 2Select [Print] with b/B, then press z. After the connection is made, the indicator appears. CAMERA TV DISP SEL Turn on the screen. Printing still images 71 Stage 3: Printing Regardless of the displayed image. [Select] Selects images and prints ... and the print menu appear on your camera and the USB jack on the printer with the supplied cable for multi-use terminal. 2 To the multi connector 1 To the USB jack Cable for multiuse terminal to "CAMERA". Stage 2: Connecting the camera to the printer Connect the multi connector on...

User Guide
Page 72
... a printer, the print menu appears. To print images on the index screen Perform "Stage 1: Preparing the camera" (page 70) and "Stage 2: Connecting the camera to the printer" (page 71), then proceed with v/ V, then press z. The image will be printed as an index image. Print All In This Folder... set [Index] to [On] in step 2, you want to print. The image is printed. • Do not disconnect the cable for multi-use terminal while the (Do not disconnect the cable for multi-use terminal) indicator appears on the printer. [Quantity] When [Index] is set to turn off the print menu...
... a printer, the print menu appears. To print images on the index screen Perform "Stage 1: Preparing the camera" (page 70) and "Stage 2: Connecting the camera to the printer" (page 71), then proceed with v/ V, then press z. The image will be printed as an index image. Print All In This Folder... set [Index] to [On] in step 2, you want to print. The image is printed. • Do not disconnect the cable for multi-use terminal while the (Do not disconnect the cable for multi-use terminal) indicator appears on the printer. [Quantity] When [Index] is set to turn off the print menu...
User Guide
Page 76
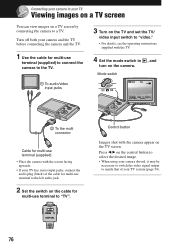
... may be necessary to switch the video signal output to match that of the cable for multi-use terminal to the left audio jack. 2 Set the switch on the cable for multi-use terminal to "TV". Connecting your camera to your TV Viewing images on a TV screen You can view images on the... TV screen. Press b/B on the camera. Mode switch , and 60min VGA 2/9 101-0002 2005 1 1 10:30PM BACK/NEXT VOLUME 2 To the multi connector Cable for multi-use terminal (supplied) • Place the camera with the screen facing upwards. • If your TV has stereo input ...
... may be necessary to switch the video signal output to match that of the cable for multi-use terminal to the left audio jack. 2 Set the switch on the cable for multi-use terminal to "TV". Connecting your camera to your TV Viewing images on a TV screen You can view images on the... TV screen. Press b/B on the camera. Mode switch , and 60min VGA 2/9 101-0002 2005 1 1 10:30PM BACK/NEXT VOLUME 2 To the multi connector Cable for multi-use terminal (supplied) • Place the camera with the screen facing upwards. • If your TV has stereo input ...

User Guide
Page 77
...with a video input jack and the cable for the TV color system of your TV Check the following lists for multi-use terminal (supplied). The color system of the TV must match that of the country or region where the camera is used. PAL-M system Brazil ...Argentina, Paraguay, Uruguay SECAM system Bulgaria, France, Guiana, Iran, Iraq, Monaco, Russia, Ukraine, etc. 77 Connecting your camera to view images on a TV screen, you want to your digital still camera. PAL system Australia, Austria, Belgium, China, Czech Republic, Denmark, Finland, Germany, Holland, Hong Kong, Hungary, Italy, ...
...with a video input jack and the cable for the TV color system of your TV Check the following lists for multi-use terminal (supplied). The color system of the TV must match that of the country or region where the camera is used. PAL-M system Brazil ...Argentina, Paraguay, Uruguay SECAM system Bulgaria, France, Guiana, Iran, Iraq, Monaco, Russia, Ukraine, etc. 77 Connecting your camera to view images on a TV screen, you want to your digital still camera. PAL system Australia, Austria, Belgium, China, Czech Republic, Denmark, Finland, Germany, Holland, Hong Kong, Hungary, Italy, ...

User Guide
Page 83
... the write-protect switch, and the switch is set the switch to the LOCK position (page 93) to prevent accidental erasure. Deleting/Editing images Your camera cannot delete an image. • Cancel the protection (page 39). • You are using the "Memory Stick Duo" with the write-protect switch and set... to the LOCK position. The image does not appear on the screen when a USB connection is made. • The switch on the cable for multiuse terminal or set to "CAMERA". Set the switch to "TV" (page 76). You cannot cut a movie. • The movie is not long enough to cut (shorter than...
... the write-protect switch, and the switch is set the switch to the LOCK position (page 93) to prevent accidental erasure. Deleting/Editing images Your camera cannot delete an image. • Cancel the protection (page 39). • You are using the "Memory Stick Duo" with the write-protect switch and set... to the LOCK position. The image does not appear on the screen when a USB connection is made. • The switch on the cable for multiuse terminal or set to "CAMERA". Set the switch to "TV" (page 76). You cannot cut a movie. • The movie is not long enough to cut (shorter than...
User Guide
Page 84
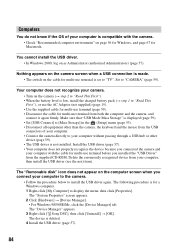
...in "Read This First"), or use the AC Adaptor (not supplied) (page 15). • Use the supplied cable for multi-use terminal (page 59). • Disconnect the cable for multi-use terminal from the USB connectors of your computer without passing through a USB hub or other device ... in the (Setup) menu (page 53). • Disconnect all equipment other than the camera, the keyboard and the mouse from both the computer and the camera, and connect it again firmly. The "Device Manager" appears. 3 Right-click [ Sony DSC], then click [Uninstall] t [OK]. The device is for a Windows computer. 1 ...
...in "Read This First"), or use the AC Adaptor (not supplied) (page 15). • Use the supplied cable for multi-use terminal (page 59). • Disconnect the cable for multi-use terminal from the USB connectors of your computer without passing through a USB hub or other device ... in the (Setup) menu (page 53). • Disconnect all equipment other than the camera, the keyboard and the mouse from both the computer and the camera, and connect it again firmly. The "Device Manager" appears. 3 Right-click [ Sony DSC], then click [Uninstall] t [OK]. The device is for a Windows computer. 1 ...

User Guide
Page 85
...; Copy them to a folder recognized by noise when you view a movie on help at the upper-right corner of your camera (page 50). Delete unnecessary images (t step 6 in "Read This First"). "Memory Stick Duo" Cannot insert a "Memory Stick Duo". • Insert it in the correct direction... and the switch is set to a computer. Copy the movie to the LOCK position. You cannot copy images. • Connect the camera and your computer correctly using the supplied cable for multi-use terminal (page 59). • Follow the designated copy procedure for your OS (pages 59, 67). • When you...
...; Copy them to a folder recognized by noise when you view a movie on help at the upper-right corner of your camera (page 50). Delete unnecessary images (t step 6 in "Read This First"). "Memory Stick Duo" Cannot insert a "Memory Stick Duo". • Insert it in the correct direction... and the switch is set to a computer. Copy the movie to the LOCK position. You cannot copy images. • Connect the camera and your computer correctly using the supplied cable for multi-use terminal (page 59). • Follow the designated copy procedure for your OS (pages 59, 67). • When you...

User Guide
Page 87
.... • When having images printed at a digital print shop, ask the shop whether they can be connected to the camera. • Set [USB Connect] to "CAMERA" (page 71). If you select [Exit] during printing, images may not be printed. • Images shot using your images, disconnect the cable for multi-use terminal, turn the...
.... • When having images printed at a digital print shop, ask the shop whether they can be connected to the camera. • Set [USB Connect] to "CAMERA" (page 71). If you select [Exit] during printing, images may not be printed. • Images shot using your images, disconnect the cable for multi-use terminal, turn the...

User Guide
Page 88
...the date-inserted part of the image. • Images that of either the camera (page 72) or the printer. Consult the printer manufacturer. Cannot print the image at the size selected. • Disconnect the cable for multi-use terminal and reconnect it whenever you change the paper size after... canceling printing. • Wait for a while as to the camera. • The print setting of the camera differs from that do not have the recording data ...
...the date-inserted part of the image. • Images that of either the camera (page 72) or the printer. Consult the printer manufacturer. Cannot print the image at the size selected. • Disconnect the cable for multi-use terminal and reconnect it whenever you change the paper size after... canceling printing. • Wait for a while as to the camera. • The print setting of the camera differs from that do not have the recording data ...


