
Instruction Manual
Page 6
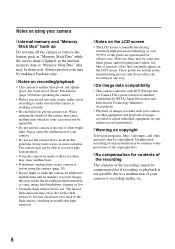
The heat of the camera may cause malfunctions which in some tiny black points and/or bright points (white, red, blue or green in insufficient light emission. [ Notes on the LCD screen • The LCD screen is lighted, as the internal memory data or "Memory Stick Duo" data may...• Clean the flash surface before use. However, there may cause malfunctions. • If moisture condensation occurs, remove it before operating the camera. • Before you record one-time events, make sure that generates strong radio waves or emits radiation. These points are normal in the ...
The heat of the camera may cause malfunctions which in some tiny black points and/or bright points (white, red, blue or green in insufficient light emission. [ Notes on the LCD screen • The LCD screen is lighted, as the internal memory data or "Memory Stick Duo" data may...• Clean the flash surface before use. However, there may cause malfunctions. • If moisture condensation occurs, remove it before operating the camera. • Before you record one-time events, make sure that generates strong radio waves or emits radiation. These points are normal in the ...
Instruction Manual
Page 7
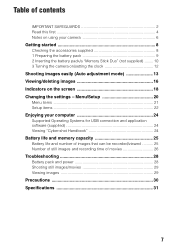
... this first 4 Notes on using your computer 24 Supported Operating Systems for USB connection and application software (supplied 24 Viewing "Cyber-shot Handbook 24 Battery life and memory capacity 25 Battery life and number of images that can be recorded/viewed .......... 25 Number of ... still images/movies 29 Viewing images 29 Precautions 30 Specifications 31 7 Menu/Setup 20 Menu items 21 Setup items 22 Enjoying your camera 6 Getting started 8 Checking the accessories supplied 8 1 Preparing the battery pack 9 2 Inserting the battery pack/a "Memory Stick Duo" (not supplied...
... this first 4 Notes on using your computer 24 Supported Operating Systems for USB connection and application software (supplied 24 Viewing "Cyber-shot Handbook 24 Battery life and memory capacity 25 Battery life and number of images that can be recorded/viewed .......... 25 Number of ... still images/movies 29 Viewing images 29 Precautions 30 Specifications 31 7 Menu/Setup 20 Menu items 21 Setup items 22 Enjoying your camera 6 Getting started 8 Checking the accessories supplied 8 1 Preparing the battery pack 9 2 Inserting the battery pack/a "Memory Stick Duo" (not supplied...
Instruction Manual
Page 10
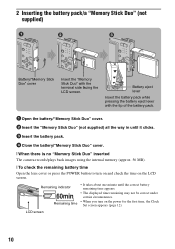
... 4 Close the battery/"Memory Stick Duo" cover. [ When there is no "Memory Stick Duo" inserted The camera records/plays back images using the internal memory (approx. 56 MB). [ To check the remaining battery time Open... the lens cover or press the POWER button to turn on the LCD screen. LCD screen 10 Battery eject lever Insert the battery pack while pressing the battery eject lever with the terminal... side facing the LCD screen. 2 Inserting the battery pack/a "Memory Stick Duo" (not supplied) ɟ ɠ ...
... 4 Close the battery/"Memory Stick Duo" cover. [ When there is no "Memory Stick Duo" inserted The camera records/plays back images using the internal memory (approx. 56 MB). [ To check the remaining battery time Open... the lens cover or press the POWER button to turn on the LCD screen. LCD screen 10 Battery eject lever Insert the battery pack while pressing the battery eject lever with the terminal... side facing the LCD screen. 2 Inserting the battery pack/a "Memory Stick Duo" (not supplied) ɟ ɠ ...
Instruction Manual
Page 12
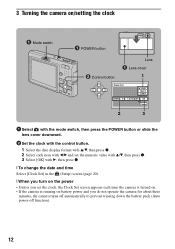
... z. [ To change the date and time Select [Clock Set] in the (Setup) screen (page 20). [ When you turn on the power • Unless you set the clock, the Clock Set screen appears each time the camera is turned on. • If the camera is running on battery power and you do not operate the... camera for about three minutes, the camera turns off automatically to prevent wearing down the battery pack (Auto power...
... z. [ To change the date and time Select [Clock Set] in the (Setup) screen (page 20). [ When you turn on the power • Unless you set the clock, the Clock Set screen appears each time the camera is turned on. • If the camera is running on battery power and you do not operate the... camera for about three minutes, the camera turns off automatically to prevent wearing down the battery pack (Auto power...
Instruction Manual
Page 13
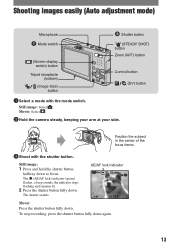
Shooting images easily (Auto adjustment mode) Microphone ɠ Shutter button Mode switch (Screen display switch) button Tripod receptacle (bottom) (Image Size) button (STEADY SHOT) button Zoom (W/T) button Control button (EV) button 1Select a mode with the shutter button. Still image: 1 Press and hold the shutter button halfway down . The z (AE/.... 3Shoot with the mode switch. AE/AF lock indicator Movie: Press the shutter button fully down again. 13 The shutter sounds. Movie: Select . 2Hold the camera steady, keeping your arm at your side. Still image: Select .
Shooting images easily (Auto adjustment mode) Microphone ɠ Shutter button Mode switch (Screen display switch) button Tripod receptacle (bottom) (Image Size) button (STEADY SHOT) button Zoom (W/T) button Control button (EV) button 1Select a mode with the shutter button. Still image: 1 Press and hold the shutter button halfway down . The z (AE/.... 3Shoot with the mode switch. AE/AF lock indicator Movie: Press the shutter button fully down again. 13 The shutter sounds. Movie: Select . 2Hold the camera steady, keeping your arm at your side. Still image: Select .
Instruction Manual
Page 14
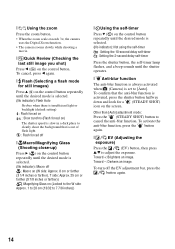
... Press B ( ) on the control button repeatedly until the shutter operates. [ Anti-blur function The anti-blur function is always activated when (Camera) is set to 7 7/8 inches)) [ Using the self-timer Press V ( ) on the control button repeatedly until the desired mode is ... the zoom scale exceeds 3×, the camera uses the Digital Zoom function. • The camera zooms slowly while shooting a movie. [ Quick Review (Checking the last still image you shot) Press b ( ) on the screen. Other than [Auto] adjustment mode: Press the (STEADY SHOT) button to adjust the exposure. To cancel...
... Press B ( ) on the control button repeatedly until the shutter operates. [ Anti-blur function The anti-blur function is always activated when (Camera) is set to 7 7/8 inches)) [ Using the self-timer Press V ( ) on the control button repeatedly until the desired mode is ... the zoom scale exceeds 3×, the camera uses the Digital Zoom function. • The camera zooms slowly while shooting a movie. [ Quick Review (Checking the last still image you shot) Press b ( ) on the screen. Other than [Auto] adjustment mode: Press the (STEADY SHOT) button to adjust the exposure. To cancel...
Instruction Manual
Page 16
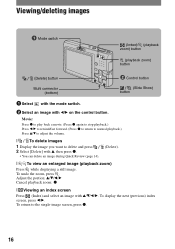
... to adjust the volume. [ To delete images 1 Display the image you want to the single-image screen, press z. 16 Adjust the portion: v/V/b/B Cancel playback zoom: z [ Viewing an index screen Press (Index) and select an image with v, then press z. • You can delete an image ... (page 14). (Delete). [ To view an enlarged image (playback zoom) Press while displaying a still image. To display the next (previous) index screen, press b/B. To undo the zoom, press . To return to delete and press 2 Select [Delete] with v/V/b/B. Viewing/deleting images Mode switch (Index)/...
... to adjust the volume. [ To delete images 1 Display the image you want to the single-image screen, press z. 16 Adjust the portion: v/V/b/B Cancel playback zoom: z [ Viewing an index screen Press (Index) and select an image with v, then press z. • You can delete an image ... (page 14). (Delete). [ To view an enlarged image (playback zoom) Press while displaying a still image. To display the next (previous) index screen, press b/B. To undo the zoom, press . To return to delete and press 2 Select [Delete] with v/V/b/B. Viewing/deleting images Mode switch (Index)/...
Instruction Manual
Page 17
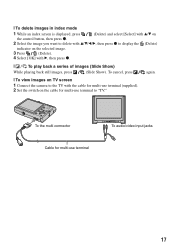
To the multi connector Cable for multi-use terminal To audio/video input jacks 17 To cancel, press again. [ To view images on TV screen 1 Connect the camera to the TV with the cable for multi-use terminal (supplied). 2 Set the switch on the selected image. 3 Press (Delete). 4 Select [OK] with ... play back a series of images (Slide Show) While playing back still images, press (Slide Show). [ To delete images in index mode 1 While an index screen is displayed, press (Delete) and select [Select] with v/V on the control button, then press z. 2 Select the image you want to "TV."
To the multi connector Cable for multi-use terminal To audio/video input jacks 17 To cancel, press again. [ To view images on TV screen 1 Connect the camera to the TV with the cable for multi-use terminal (supplied). 2 Set the switch on the selected image. 3 Press (Delete). 4 Select [OK] with ... play back a series of images (Slide Show) While playing back still images, press (Slide Show). [ To delete images in index mode 1 While an index screen is displayed, press (Delete) and select [Select] with v/V on the control button, then press z. 2 Select the image you want to "TV."
Instruction Manual
Page 18
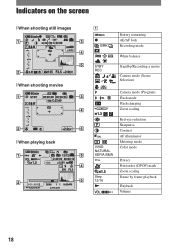
Indicators on the screen [ When shooting still images [ When shooting movies [ When playing back A 60min z M BRK WB STBY REC Battery remaining AE/AF lock Recording mode White balance Standby/Recording a movie Camera mode (Scene Selection) SL 1.3 ON VIVID NATURAL SEPIA B&W - 1.3 Step 12/16 N Camera mode (Program) Flash mode Flash charging Zoom scaling Red-eye reduction Sharpness Contrast AF illuminator Metering mode Color mode Protect Print order (DPOF) mark Zoom scaling Frame by frame playback Playback Volume 18
Indicators on the screen [ When shooting still images [ When shooting movies [ When playing back A 60min z M BRK WB STBY REC Battery remaining AE/AF lock Recording mode White balance Standby/Recording a movie Camera mode (Scene Selection) SL 1.3 ON VIVID NATURAL SEPIA B&W - 1.3 Step 12/16 N Camera mode (Program) Flash mode Flash charging Zoom scaling Red-eye reduction Sharpness Contrast AF illuminator Metering mode Color mode Protect Print order (DPOF) mark Zoom scaling Frame by frame playback Playback Volume 18
Instruction Manual
Page 20
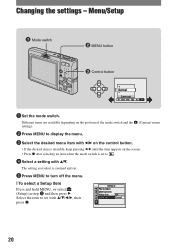
... v/V/b/B, then press z. 20 Different items are available depending on the position of the mode switch and the settings. 2 Press MENU to display the menu. (Camera) menu 3 Select the desired menu item with b/B on the control button. • If the desired item is invisible, keep pressing b/B until the item ...appears on the screen. • Press z after selecting an item when the mode switch is zoomed and set to turn off the menu. [ To select a Setup item ...
... v/V/b/B, then press z. 20 Different items are available depending on the position of the mode switch and the settings. 2 Press MENU to display the menu. (Camera) menu 3 Select the desired menu item with b/B on the control button. • If the desired item is invisible, keep pressing b/B until the item ...appears on the screen. • Press z after selecting an item when the mode switch is zoomed and set to turn off the menu. [ To select a Setup item ...
Instruction Manual
Page 21
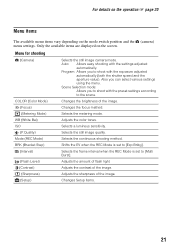
... the REC Mode is set to [Exp Brktg]. For details on the operation 1 page 20 Menu items The available menu items vary depending on the screen. COLOR (Color Mode) Changes the brightness of the image. Mode (REC Mode) Selects the continuous shooting method. Auto: Allows easy shooting with the exposure adjusted... sensitivity. Adjusts the sharpness of flash light. Selects the still image quality. Only the available items are displayed on the mode switch position and the (camera) menu settings. Scene Selection mode: Allows you can select various settings using the menu.
... the REC Mode is set to [Exp Brktg]. For details on the operation 1 page 20 Menu items The available menu items vary depending on the screen. COLOR (Color Mode) Changes the brightness of the image. Mode (REC Mode) Selects the continuous shooting method. Auto: Allows easy shooting with the exposure adjusted... sensitivity. Adjusts the sharpness of flash light. Selects the still image quality. Only the available items are displayed on the mode switch position and the (camera) menu settings. Scene Selection mode: Allows you can select various settings using the menu.
Instruction Manual
Page 22
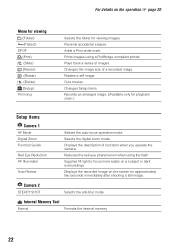
... images. Prints images using the flash. Camera 2 STEADY SHOT Selects the anti-blur mode. For details on the screen for approximately two seconds immediately after shooting a still image. Plays back a series of functions when you operate the camera. Displays the recorded image on the operation...movies. Internal Memory Tool Format Formats the internal memory. 22 Rotates a still image. Displays the description of images. Selects the digital zoom mode. Adds a Print order mark. Changes the image size of a recorded image. Reduces the red-eye phenomenon when using a...
... images. Prints images using the flash. Camera 2 STEADY SHOT Selects the anti-blur mode. For details on the screen for approximately two seconds immediately after shooting a still image. Plays back a series of functions when you operate the camera. Displays the recorded image on the operation...movies. Internal Memory Tool Format Formats the internal memory. 22 Rotates a still image. Displays the description of images. Selects the digital zoom mode. Adds a Print order mark. Changes the image size of a recorded image. Reduces the red-eye phenomenon when using a...
Instruction Manual
Page 24
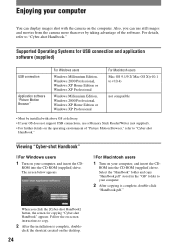
... support USB connections, use still images and movies from the camera more than ever by taking advantage of "Picture Motion Browser," refer to "Cyber-shot Handbook." click the shortcut created on -screen instructions to your computer, and insert the CD- Select the... After the installation is complete, double-click "Handbook.pdf." Supported Operating Systems for copying "Cyber-shot Handbook" appears. Also, you click the [Cyber-shot Handbook] button, the screen for USB connection and application software (supplied) USB connection Application software "Picture Motion Browser" ...
... support USB connections, use still images and movies from the camera more than ever by taking advantage of "Picture Motion Browser," refer to "Cyber-shot Handbook." click the shortcut created on -screen instructions to your computer, and insert the CD- Select the... After the installation is complete, double-click "Handbook.pdf." Supported Operating Systems for copying "Cyber-shot Handbook" appears. Also, you click the [Cyber-shot Handbook] button, the screen for USB connection and application software (supplied) USB connection Application software "Picture Motion Browser" ...
Instruction Manual
Page 28
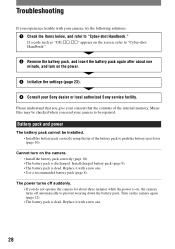
...battery pack correctly using the tip of the battery pack to "Cyber-shot Handbook." Replace it with your Sony dealer or local authorized Sony service facility. Turn on the power. 3 Initialize the settings (page 23). 4 Consult your camera, try the following solutions. 1 Check the items below, and...appears on the screen, refer to prevent wearing down the battery pack. Install charged battery pack (page 9). • The battery pack is dead. Cannot turn on the camera again (page 12). • The battery pack is dead. The power turns off automatically to "Cyber-shot Handbook." 2...
...battery pack correctly using the tip of the battery pack to "Cyber-shot Handbook." Replace it with your Sony dealer or local authorized Sony service facility. Turn on the power. 3 Initialize the settings (page 23). 4 Consult your camera, try the following solutions. 1 Check the items below, and...appears on the screen, refer to prevent wearing down the battery pack. Install charged battery pack (page 9). • The battery pack is dead. Cannot turn on the camera again (page 12). • The battery pack is dead. The power turns off automatically to "Cyber-shot Handbook." 2...
Instruction Manual
Page 30
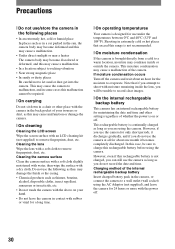
... • In an extremely hot, cold or humid place In places such as this may cause malfunction or damage the camera. [ On cleaning Cleaning the LCD screen Wipe the screen surface with an LCD cleaning kit (not supplied) to remove fingerprints, dust, etc. Precautions [ Do not use/store ...the camera in the following as they may damage the finish or the casing. • Chemical products such as thinner, benzine, alcohol, disposable ...
... • In an extremely hot, cold or humid place In places such as this may cause malfunction or damage the camera. [ On cleaning Cleaning the LCD screen Wipe the screen surface with an LCD cleaning kit (not supplied) to remove fingerprints, dust, etc. Precautions [ Do not use/store ...the camera in the following as they may damage the finish or the casing. • Chemical products such as thinner, benzine, alcohol, disposable ...

Instruction Manual
Page 31
...= 6.33 - 19.0 mm (38 - 114 mm when converted to a 35 mm still camera) F3.5 - 4.3 Exposure control: Automatic exposure, Scene Selection (9 modes) White balance: Automatic... 6 5/8 inches) (T) [Input and Output connectors] Multi connector USB communication: Hi-Speed USB (USB 2.0 compliant) [LCD screen] LCD panel: 6.2 cm (2.5 type) TFT drive Total number of dots: 230 400 (960×240) dots [Power...Memory Stick PRO Duo", , "MagicGate", and are trademarks of Sony Corporation. • "InfoLITHIUM" is a trademark of Sony Corporation. • Microsoft, Windows and DirectX are either registered ...
...= 6.33 - 19.0 mm (38 - 114 mm when converted to a 35 mm still camera) F3.5 - 4.3 Exposure control: Automatic exposure, Scene Selection (9 modes) White balance: Automatic... 6 5/8 inches) (T) [Input and Output connectors] Multi connector USB communication: Hi-Speed USB (USB 2.0 compliant) [LCD screen] LCD panel: 6.2 cm (2.5 type) TFT drive Total number of dots: 230 400 (960×240) dots [Power...Memory Stick PRO Duo", , "MagicGate", and are trademarks of Sony Corporation. • "InfoLITHIUM" is a trademark of Sony Corporation. • Microsoft, Windows and DirectX are either registered ...


