Instruction Manual
Page 7
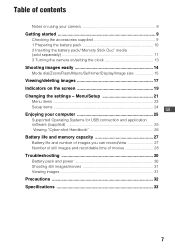
... and application software (supplied 25 Viewing "Cyber-shot Handbook 26 Battery life and memory capacity 27 Battery life and number of images you can record/view 27 Number of still images and recordable time of contents Notes on using your camera 8 Getting started 9 Checking the accessories ...Turning the camera on/setting the clock 13 Shooting images easily 14 Mode dial/Zoom/Flash/Macro/Self-timer/Display/Image size 15 Viewing/deleting images 17 Indicators on the screen 19 Changing the settings - Table of movies 28 Troubleshooting 30 Battery pack and power 30 Shooting still...
... and application software (supplied 25 Viewing "Cyber-shot Handbook 26 Battery life and memory capacity 27 Battery life and number of images you can record/view 27 Number of still images and recordable time of contents Notes on using your camera 8 Getting started 9 Checking the accessories ...Turning the camera on/setting the clock 13 Shooting images easily 14 Mode dial/Zoom/Flash/Macro/Self-timer/Display/Image size 15 Viewing/deleting images 17 Indicators on the screen 19 Changing the settings - Table of movies 28 Troubleshooting 30 Battery pack and power 30 Shooting still...
Instruction Manual
Page 8
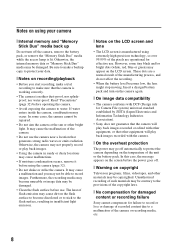
...turn on the camera again. [ On image data compatibility • The camera conforms with DCF (Design rule for Camera File system) universal standard established by JEITA (Japan Electronics and Information Technology Industries Association). • Sony does not guarantee that the camera will play back images recorded with the camera. [ On the overheat protection The power... may go off the camera, remove the battery pack, or...
...turn on the camera again. [ On image data compatibility • The camera conforms with DCF (Design rule for Camera File system) universal standard established by JEITA (Japan Electronics and Information Technology Industries Association). • Sony does not guarantee that the camera will play back images recorded with the camera. [ On the overheat protection The power... may go off the camera, remove the battery pack, or...
Instruction Manual
Page 10
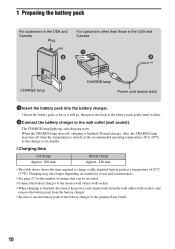
Charging may turn off , charging is finished (Normal...other than those in the USA and Canada ɟ ɟ CHARGE lamp CHARGE lamp Power cord (mains lead) 1Insert the battery pack into the battery charger. • Insert ...the battery pack as far as the charger is finished, disconnect the power cord (mains lead) from the wall outlet (wall socket), and remove the battery pack ...depending on standby. [ Charging time Full charge Approx. 300 min. When the CHARGE lamp turns off when the temperature is outside of the recommended operating temperature (10 to 30°C),...
Charging may turn off , charging is finished (Normal...other than those in the USA and Canada ɟ ɟ CHARGE lamp CHARGE lamp Power cord (mains lead) 1Insert the battery pack into the battery charger. • Insert ...the battery pack as far as the charger is finished, disconnect the power cord (mains lead) from the wall outlet (wall socket), and remove the battery pack ...depending on standby. [ Charging time Full charge Approx. 300 min. When the CHARGE lamp turns off when the temperature is outside of the recommended operating temperature (10 to 30°C),...

Instruction Manual
Page 12
"Memory Stick Duo" media Battery pack Make sure that the access lamp is lit. Remaining charge indicator Status Sufficient power remaining Battery almost fully charged Battery half full Battery low, recording/ playback will stop soon. Slide the battery eject lever. Change the battery ... This may not be correct depending on conditions of use and circumstances. • The Clock Set screen appears when you turn on and check the remaining battery charge on the camera for the first time (page 13). [ To remove the battery pack/"Memory Stick Duo" media Open the battery/"Memory ...
"Memory Stick Duo" media Battery pack Make sure that the access lamp is lit. Remaining charge indicator Status Sufficient power remaining Battery almost fully charged Battery half full Battery low, recording/ playback will stop soon. Slide the battery eject lever. Change the battery ... This may not be correct depending on conditions of use and circumstances. • The Clock Set screen appears when you turn on and check the remaining battery charge on the camera for the first time (page 13). [ To remove the battery pack/"Memory Stick Duo" media Open the battery/"Memory ...

Instruction Manual
Page 13
... inserted in the CD-ROM (supplied), you do not operate the camera for superimposing dates on images. 3 Turning the camera on/setting the clock ON/OFF (power) button 1 ɟ Control button z button 2 3 GB 1 Press the ON/OFF (power) button. 2 Set the clock with the control button. 1 Select the date display format with v/V, then press z. 2 Select...
... inserted in the CD-ROM (supplied), you do not operate the camera for superimposing dates on images. 3 Turning the camera on/setting the clock ON/OFF (power) button 1 ɟ Control button z button 2 3 GB 1 Press the ON/OFF (power) button. 2 Set the clock with the control button. 1 Select the date display format with v/V, then press z. 2 Select...
Instruction Manual
Page 17
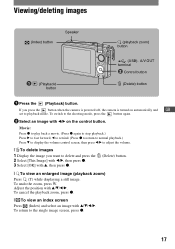
...display the volume control screen, then press b/B to adjust the volume. [ To delete images 1 Display the image you press the button when the camera is powered off, the camera is turned on automatically and GB set to delete and press the 2 Select [This Image] with b/B, then press z. 3 Select [OK] with b/B ... the button again. 2 Select an image with v, then press z. (Delete) button. [ To view an enlarged image (playback zoom) Press (T) while displaying a still image. To undo the zoom, press W. Adjust the position with v/V/b/B. To switch to the single image screen, press z. 17
...display the volume control screen, then press b/B to adjust the volume. [ To delete images 1 Display the image you press the button when the camera is powered off, the camera is turned on automatically and GB set to delete and press the 2 Select [This Image] with b/B, then press z. 3 Select [OK] with b/B ... the button again. 2 Select an image with v, then press z. (Delete) button. [ To view an enlarged image (playback zoom) Press (T) while displaying a still image. To undo the zoom, press W. Adjust the position with v/V/b/B. To switch to the single image screen, press z. 17
Instruction Manual
Page 30
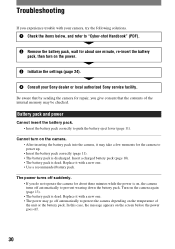
... may go off . 30 Cannot turn on the camera. • After inserting the battery pack into the camera, it with a new one minute, re-insert the battery pack, then turn on the power. 3 Initialize the settings (page 24). 4 Consult your camera, try the following solutions. 1 Check the items below, and refer to "Cyber-shot Handbook" (PDF). 2 Remove the...
... may go off . 30 Cannot turn on the camera. • After inserting the battery pack into the camera, it with a new one minute, re-insert the battery pack, then turn on the power. 3 Initialize the settings (page 24). 4 Consult your camera, try the following solutions. 1 Check the items below, and refer to "Cyber-shot Handbook" (PDF). 2 Remove the...
Instruction Manual
Page 32
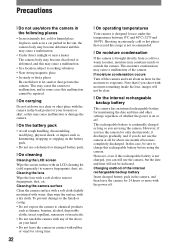
... with an LCD cleaning kit (sold separately) to charge this rechargeable battery before using the camera. Cleaning the lens Wipe the lens with a dry cloth. If moisture condensation occurs Turn off the camera and wait about one month it becomes completely discharged. In this case, be sure to ... periods, it discharges gradually, and if you can still use the camera, but the date and time will not be clear. [ On the internal rechargeable backup battery This camera has an internal rechargeable battery for 24 hours or more with the power off . Note that exceed this malfunction cannot be ...
... with an LCD cleaning kit (sold separately) to charge this rechargeable battery before using the camera. Cleaning the lens Wipe the lens with a dry cloth. If moisture condensation occurs Turn off the camera and wait about one month it becomes completely discharged. In this case, be sure to ... periods, it discharges gradually, and if you can still use the camera, but the date and time will not be clear. [ On the internal rechargeable backup battery This camera has an internal rechargeable battery for 24 hours or more with the power off . Note that exceed this malfunction cannot be ...

Cyber-shot® Handbook
Page 30
To view an enlarged image (playback zoom) Press (T) while displaying a still image. Shows the displayed area of the whole image. To switch to the ... mode. To cancel the playback zoom, press z. To undo the zoom, press W. In this case, the center is turned on the control button. Adjust the portion with b/B on automatically and set to adjust the volume. Viewing images v/V/b/B button ...1 Press the (Playback) button. • If you press the (Playback) button when the camera is powered off, the camera is enlarged. • To store enlarged images, see [Trimming] (page 50). 30
To view an enlarged image (playback zoom) Press (T) while displaying a still image. Shows the displayed area of the whole image. To switch to the ... mode. To cancel the playback zoom, press z. To undo the zoom, press W. In this case, the center is turned on the control button. Adjust the portion with b/B on automatically and set to adjust the volume. Viewing images v/V/b/B button ...1 Press the (Playback) button. • If you press the (Playback) button when the camera is powered off, the camera is enlarged. • To store enlarged images, see [Trimming] (page 50). 30

Cyber-shot® Handbook
Page 55
To cancel the (Setup) setting Select [Cancel] if it does not appear, select the previous setting again. • This setting is maintained even when the power is turned off the (Setup) screen, press the MENU button. Using the Setup screen 55 v/V/b/B button Mode dial z button Control button MENU button 1 Press the MENU ...close the (Setup) screen and return to enter the setting. To return to the menu from the (Setup) screen, press b on the control button. To turn off . Using the Setup screen Using Setup items You can change the default settings using the Setup screen.
To cancel the (Setup) setting Select [Cancel] if it does not appear, select the previous setting again. • This setting is maintained even when the power is turned off the (Setup) screen, press the MENU button. Using the Setup screen 55 v/V/b/B button Mode dial z button Control button MENU button 1 Press the MENU ...close the (Setup) screen and return to enter the setting. To return to the menu from the (Setup) screen, press b on the control button. To turn off . Using the Setup screen Using Setup items You can change the default settings using the Setup screen.

Cyber-shot® Handbook
Page 56
... the function guide. Even if you press the control/ shutter button. Main Settings 1 The default settings are reset to power off the beep/shutter sound. Off Turns off the camera while initializing. 56 On Displays the function guide. The message "Reset to the default setting. Initialize Initializes the setting to... you press the shutter button. The settings are marked with v/V on the control button, then press z. Function Guide When you operate the camera. Shutter Turns on the operation 1 page 55 Beep Selects the sound produced when you operate the...
... the function guide. Even if you press the control/ shutter button. Main Settings 1 The default settings are reset to power off the beep/shutter sound. Off Turns off the camera while initializing. 56 On Displays the function guide. The message "Reset to the default setting. Initialize Initializes the setting to... you press the shutter button. The settings are marked with v/V on the control button, then press z. Function Guide When you operate the camera. Shutter Turns on the operation 1 page 55 Beep Selects the sound produced when you operate the...
Cyber-shot® Handbook
Page 82
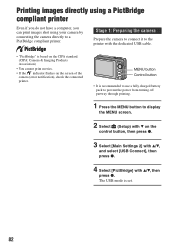
... the printer with v/V, then press z. Printing images directly using a PictBridge compliant printer Even if you do not have a computer, you can print images shot using your camera by connecting the camera directly to display the MENU screen. 2 Select (Setup) with V on the control button, then press z. 3 Select [Main Settings 2] with v/V, .... • "PictBridge" is set. 82 MENU button Control button • It is recommended to use a fully charged battery pack to prevent the power from turning off partway through printing. 1 Press the MENU button to a PictBridge compliant printer.
... the printer with v/V, then press z. Printing images directly using a PictBridge compliant printer Even if you do not have a computer, you can print images shot using your camera by connecting the camera directly to display the MENU screen. 2 Select (Setup) with V on the control button, then press z. 3 Select [Main Settings 2] with v/V, .... • "PictBridge" is set. 82 MENU button Control button • It is recommended to use a fully charged battery pack to prevent the power from turning off partway through printing. 1 Press the MENU button to a PictBridge compliant printer.

Cyber-shot® Handbook
Page 87
Battery pack and power 88 "Memory Stick Duo" media 93 Shooting still images/movies 89 Internal memory 94 Viewing images 91 Printing 94 Deleting/Editing images 92 PictBridge compliant printer 95 Computers 92 Others 96 87 Be aware that by sending the camera for about one of..., you experience trouble with your camera, try the following solutions. 1 Check the items on the power. 3 Initialize the settings (page 56). 4 Consult your Sony dealer or local authorized Sony service facility. Troubleshooting Click one minute, re-insert the battery pack, then turn on pages 88 to the page...
Battery pack and power 88 "Memory Stick Duo" media 93 Shooting still images/movies 89 Internal memory 94 Viewing images 91 Printing 94 Deleting/Editing images 92 PictBridge compliant printer 95 Computers 92 Others 96 87 Be aware that by sending the camera for about one of..., you experience trouble with your camera, try the following solutions. 1 Check the items on the power. 3 Initialize the settings (page 56). 4 Consult your Sony dealer or local authorized Sony service facility. Troubleshooting Click one minute, re-insert the battery pack, then turn on pages 88 to the page...
Cyber-shot® Handbook
Page 88
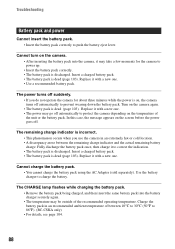
... with a new one. Fully discharge the battery pack once, then charge it with a new one . • The power may go off . The power turns off automatically to correct the indication. • The battery pack is on the camera again. • The battery pack is dead (page 103). Insert a charged battery pack. • The battery...
... with a new one. Fully discharge the battery pack once, then charge it with a new one . • The power may go off . The power turns off automatically to correct the indication. • The battery pack is on the camera again. • The battery pack is dead (page 103). Insert a charged battery pack. • The battery...
Cyber-shot® Handbook
Page 97
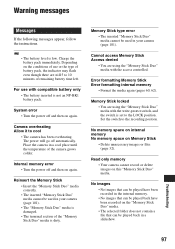
... "Memory Stick Duo" media is low. Read only memory • Your camera cannot record or delete images on Memory Stick • Delete unnecessary images or files (page 32). Internal memory error • Turn the power off and then on the conditions of remaining battery time left. Cannot access ...You are still 5 to 10 minutes of use with compatible battery only • The battery inserted is set to the LOCK position. No memory space on internal memory No memory space on this "Memory Stick Duo" media. Troubleshooting 97 Set the switch to cool • The camera has been ...
... "Memory Stick Duo" media is low. Read only memory • Your camera cannot record or delete images on Memory Stick • Delete unnecessary images or files (page 32). Internal memory error • Turn the power off and then on the conditions of remaining battery time left. Cannot access ...You are still 5 to 10 minutes of use with compatible battery only • The battery inserted is set to the LOCK position. No memory space on internal memory No memory space on this "Memory Stick Duo" media. Troubleshooting 97 Set the switch to cool • The camera has been ...

Cyber-shot® Handbook
Page 99
... not available for retouch • Retouching may take time, depending on image files that have selected a function that were recorded with another camera. Operation cannot be executed in unsupported files • Processing and other editing functions of a folder, this may not be executed when using a computer or images ... Troubleshooting Warning messages Processing... • The printer is finished. Unable to a PictBridge compliant printer. You cannot print until it is canceling the current print job. Turn the power off and on the image.
... not available for retouch • Retouching may take time, depending on image files that have selected a function that were recorded with another camera. Operation cannot be executed in unsupported files • Processing and other editing functions of a folder, this may not be executed when using a computer or images ... Troubleshooting Warning messages Processing... • The printer is finished. Unable to a PictBridge compliant printer. You cannot print until it is canceling the current print job. Turn the power off and on the image.


