Instruction Manual
Page 5
... this unit. [ Notice If static electricity or electromagnetism causes data transfer to discontinue midway (fail), restart the application or disconnect and connect the communication cable (USB, etc.) again. [ Disposal of Old Electrical & Electronic Equipment (Applicable in the European Union and other European countries with separate collection systems) This symbol on the...
... this unit. [ Notice If static electricity or electromagnetism causes data transfer to discontinue midway (fail), restart the application or disconnect and connect the communication cable (USB, etc.) again. [ Disposal of Old Electrical & Electronic Equipment (Applicable in the European Union and other European countries with separate collection systems) This symbol on the...
Instruction Manual
Page 7
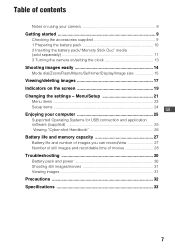
... computer 25 Supported Operating Systems for USB connection and application software (supplied 25 Viewing "Cyber-shot Handbook 26 Battery life and memory capacity 27 Battery life and number of images you can record/view 27 Number of still images and recordable time of contents Notes on using your camera 8 Getting started 9 Checking the accessories supplied...
... computer 25 Supported Operating Systems for USB connection and application software (supplied 25 Viewing "Cyber-shot Handbook 26 Battery life and memory capacity 27 Battery life and number of images you can record/view 27 Number of still images and recordable time of contents Notes on using your camera 8 Getting started 9 Checking the accessories supplied...
Instruction Manual
Page 9
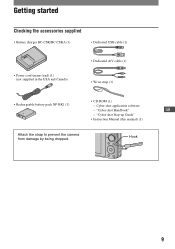
Cyber-shot application software - Hook 9 "Cyber-shot Step-up Guide" • Instruction Manual (this manual) (1) Attach the strap to prevent the camera from damage by being dropped. "Cyber-shot Handbook" GB - Getting started Checking the accessories supplied • Battery charger BC-CSK/BC-CSKA (1) • Dedicated USB cable (1) • Power cord (mains lead) (1) (not supplied in the USA and Canada) • Dedicated A/V cable (1) • Wrist strap (1) • CD-ROM (1) • Rechargeable battery pack NP-BK1 (1) -
Cyber-shot application software - Hook 9 "Cyber-shot Step-up Guide" • Instruction Manual (this manual) (1) Attach the strap to prevent the camera from damage by being dropped. "Cyber-shot Handbook" GB - Getting started Checking the accessories supplied • Battery charger BC-CSK/BC-CSKA (1) • Dedicated USB cable (1) • Power cord (mains lead) (1) (not supplied in the USA and Canada) • Dedicated A/V cable (1) • Wrist strap (1) • CD-ROM (1) • Rechargeable battery pack NP-BK1 (1) -
Instruction Manual
Page 17
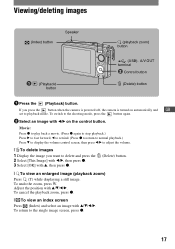
... powered off, the camera is turned on automatically and GB set to the shooting mode, press the button again. 2 Select an image with v, then press z. (Delete) button. [ To view an enlarged image (playback zoom) Press (T) while displaying a still image. To cancel the playback zoom, press z. [ To view ... 17 To undo the zoom, press W. Adjust the position with v/V/b/B. Viewing/deleting images (Index) button Speaker (playback zoom) button (Playback) button (USB) · A/V OUT terminal ɟ Control button (Delete) button 1 Press the (Playback) button. To switch to playback mode.
... powered off, the camera is turned on automatically and GB set to the shooting mode, press the button again. 2 Select an image with v, then press z. (Delete) button. [ To view an enlarged image (playback zoom) Press (T) while displaying a still image. To cancel the playback zoom, press z. [ To view ... 17 To undo the zoom, press W. Adjust the position with v/V/b/B. Viewing/deleting images (Index) button Speaker (playback zoom) button (Playback) button (USB) · A/V OUT terminal ɟ Control button (Delete) button 1 Press the (Playback) button. To switch to playback mode.

Instruction Manual
Page 18
... b/B on the dedicated A/V cable connector with the v mark beside the A/V OUT terminal and connect the cable to the camera. To cancel a selection, select an image you want to delete with v/V/b/B, then press z. To the (USB) · A/V OUT terminal To audio/video input jacks Dedicated A/V cable (supplied) Arrow mark (back) 18 [ To delete...
... b/B on the dedicated A/V cable connector with the v mark beside the A/V OUT terminal and connect the cable to the camera. To cancel a selection, select an image you want to delete with v/V/b/B, then press z. To the (USB) · A/V OUT terminal To audio/video input jacks Dedicated A/V cable (supplied) Arrow mark (back) 18 [ To delete...

Instruction Manual
Page 19
...we recommend that you from shooting clear images due to stabilize the camera. Even if the vibration warning appears, you press v (DISP) on the A control button, the display changes (page 16). [ When shooting still images [ When shooting movies [ When playing back VOL. Zoom scaling... Color mode PictBridge connecting Protect Print order (DPOF) mark Volume PictBridge connecting • Do not disconnect the dedicated USB cable while the mark is displayed only for the DSC-S980. • is ...
...we recommend that you from shooting clear images due to stabilize the camera. Even if the vibration warning appears, you press v (DISP) on the A control button, the display changes (page 16). [ When shooting still images [ When shooting movies [ When playing back VOL. Zoom scaling... Color mode PictBridge connecting Protect Print order (DPOF) mark Volume PictBridge connecting • Do not disconnect the dedicated USB cable while the mark is displayed only for the DSC-S980. • is ...

Instruction Manual
Page 24
...printer using the dedicated USB cable. Memory Stick Tool Format Formats the "Memory Stick Duo" media. Change REC.Folder Changes the folder currently used when connecting the camera to be used for ...recording images. Internal Memory Tool Format Formats the internal memory. Memory Tool - Main Settings 2 USB Connect Selects the USB mode to "Memory Stick Duo... when you operate the camera. Selects the digital zoom mode. For details on the screen for approximately two seconds immediately after ...
...printer using the dedicated USB cable. Memory Stick Tool Format Formats the "Memory Stick Duo" media. Change REC.Folder Changes the folder currently used when connecting the camera to be used for ...recording images. Internal Memory Tool Format Formats the internal memory. Memory Tool - Main Settings 2 USB Connect Selects the USB mode to "Memory Stick Duo... when you operate the camera. Selects the digital zoom mode. For details on the screen for approximately two seconds immediately after ...
Instruction Manual
Page 25
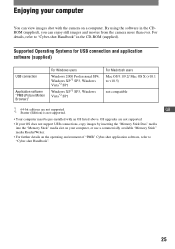
... supported. • If your OS does not support USB connections, copy images by inserting the "Memory Stick Duo" media into the "Memory Stick" media slot on your computer You can enjoy still images and movies from the camera more than ever. For details, refer to "Cyber-shot Handbook". 25 By using the software in the...
... supported. • If your OS does not support USB connections, copy images by inserting the "Memory Stick Duo" media into the "Memory Stick" media slot on your computer You can enjoy still images and movies from the camera more than ever. For details, refer to "Cyber-shot Handbook". 25 By using the software in the...
Instruction Manual
Page 31
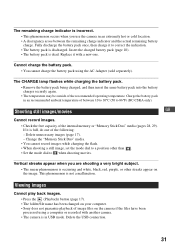
... one . Charge the battery pack in USB mode. Change the "Memory Stick Duo" media. • You cannot record images while charging the flash. • When shooting a still image, set the mode dial to a position other streaks appear on the camera if the files have been processed using the...images. • Press the (Playback) button (page 17). • The folder/file name has been changed on your computer. • Sony does not guarantee playback of between the remaining charge indicator and the actual remaining battery charge. If it is discharged. Fully discharge the battery pack...
... one . Charge the battery pack in USB mode. Change the "Memory Stick Duo" media. • You cannot record images while charging the flash. • When shooting a still image, set the mode dial to a position other streaks appear on the camera if the files have been processed using the...images. • Press the (Playback) button (page 17). • The folder/file name has been changed on your computer. • Sony does not guarantee playback of between the remaining charge indicator and the actual remaining battery charge. If it is discharged. Fully discharge the battery pack...
Instruction Manual
Page 33
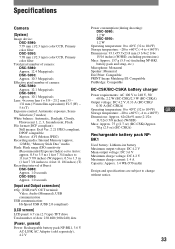
...camera: DSC-S980: Approx. 12.1 Megapixels DSC-S950: Approx. 10.1 Megapixels Lens: 4× zoom lens f = 5.8 - 23.2 mm (33 - 132 mm (35 mm film equivalent)) F2.5 (W) - 5.6 (T) Exposure control: Automatic exposure, Scene Selection (7 modes) White balance: Automatic, Daylight, Cloudy, Fluorescent 1, 2, 3, Incandescent, Flash File format (DCF compliant): Still... interval of Burst: DSC-S980: Approx. 1.0 seconds DSC-S950: Approx. 1.0 seconds [Input and Output connectors] (USB)•A/V OUT terminal: Video, Audio (Monaural), USB communication USB communication: Hi-Speed USB (USB 2.0 compliant) [LCD...
...camera: DSC-S980: Approx. 12.1 Megapixels DSC-S950: Approx. 10.1 Megapixels Lens: 4× zoom lens f = 5.8 - 23.2 mm (33 - 132 mm (35 mm film equivalent)) F2.5 (W) - 5.6 (T) Exposure control: Automatic exposure, Scene Selection (7 modes) White balance: Automatic, Daylight, Cloudy, Fluorescent 1, 2, 3, Incandescent, Flash File format (DCF compliant): Still... interval of Burst: DSC-S980: Approx. 1.0 seconds DSC-S950: Approx. 1.0 seconds [Input and Output connectors] (USB)•A/V OUT terminal: Video, Audio (Monaural), USB communication USB communication: Hi-Speed USB (USB 2.0 compliant) [LCD...
Cyber-shot® Handbook
Page 4
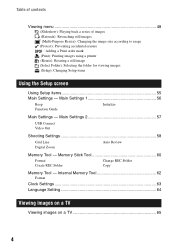
Main Settings 2 57 USB Connect Video Out Shooting Settings 58 Grid Line Digital Zoom Auto Review Memory Tool - Main Settings 1 56 Beep Function Guide Initialize Main Settings - Internal Memory Tool 62 Format Clock Settings 63 ...60 Format Change REC.Folder Create REC.Folder Copy Memory Tool - Table of contents Viewing menu 48 (Slideshow): Playing back a series of images (Retouch): Retouching still images (Multi-Purpose Resize): Changing the image size according to usage (Protect): Preventing accidental erasure : Adding a Print order mark (Print): Printing images using a...
Main Settings 2 57 USB Connect Video Out Shooting Settings 58 Grid Line Digital Zoom Auto Review Memory Tool - Main Settings 1 56 Beep Function Guide Initialize Main Settings - Internal Memory Tool 62 Format Clock Settings 63 ...60 Format Change REC.Folder Create REC.Folder Copy Memory Tool - Table of contents Viewing menu 48 (Slideshow): Playing back a series of images (Retouch): Retouching still images (Multi-Purpose Resize): Changing the image size according to usage (Protect): Preventing accidental erasure : Adding a Print order mark (Print): Printing images using a...

Cyber-shot® Handbook
Page 13
... damage to charge the battery pack. M Battery/"Memory Stick Duo" media cover 13 Use the battery charger (supplied) to the camera may occur. Identifying parts E DC IN jack When using an AC-LS5K AC Adaptor (sold separately) v mark (back) N "Memory Stick Duo" media slot O ... insertion slot P Access lamp 1 To DC IN jack 2 To wall outlet • You cannot charge the battery pack by connecting the camera to the AC-LS5K AC Adaptor. F Jack cover G (USB) · A/V OUT terminal (side) H Mode dial (20) I Hook for strap J Control button Menu on: v/V/b/B/z (34) Menu off: DISP/ / / (18, ...
... damage to charge the battery pack. M Battery/"Memory Stick Duo" media cover 13 Use the battery charger (supplied) to the camera may occur. Identifying parts E DC IN jack When using an AC-LS5K AC Adaptor (sold separately) v mark (back) N "Memory Stick Duo" media slot O ... insertion slot P Access lamp 1 To DC IN jack 2 To wall outlet • You cannot charge the battery pack by connecting the camera to the AC-LS5K AC Adaptor. F Jack cover G (USB) · A/V OUT terminal (side) H Mode dial (20) I Hook for strap J Control button Menu on: v/V/b/B/z (34) Menu off: DISP/ / / (18, ...
Cyber-shot® Handbook
Page 16
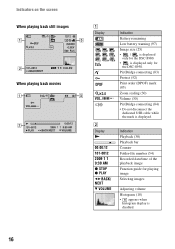
... still images When playing back movies A Display VOL. B Display N 00:00:12 101-0012 2009 1 1 9:30 AM z STOP z PLAY BACK/ NEXT V VOLUME Indication Battery remaining Low battery warning (97) Image size (25) • / is displayed only for the DSC-S980.... • is displayed only for playing image Selecting images Adjusting volume Histogram (18) • appears when histogram display is displayed. PictBridge connecting (83) Protect (52) Print order (DPOF) mark (85) Zoom scaling (30) Volume (30) PictBridge connecting (84) • Do not disconnect the dedicated USB...
... still images When playing back movies A Display VOL. B Display N 00:00:12 101-0012 2009 1 1 9:30 AM z STOP z PLAY BACK/ NEXT V VOLUME Indication Battery remaining Low battery warning (97) Image size (25) • / is displayed only for the DSC-S980.... • is displayed only for playing image Selecting images Adjusting volume Histogram (18) • appears when histogram display is displayed. PictBridge connecting (83) Protect (52) Print order (DPOF) mark (85) Zoom scaling (30) Volume (30) PictBridge connecting (84) • Do not disconnect the dedicated USB...
Cyber-shot® Handbook
Page 19
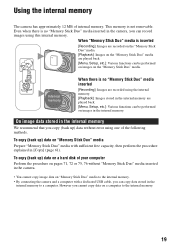
...; You cannot copy image data on "Memory Stick Duo" media to the internal memory. • By connecting the camera and a computer with sufficient free capacity, then perform the procedure explained in the internal memory We recommend that you copy (back up ) data on "Memory ...Stick Duo" media Prepare "Memory Stick Duo" media with a dedicated USB cable, you can copy data stored in the camera, you cannot copy data on the "Memory Stick Duo" media are recorded on the "Memory Stick Duo" media. [Playback]: Images on...
...; You cannot copy image data on "Memory Stick Duo" media to the internal memory. • By connecting the camera and a computer with sufficient free capacity, then perform the procedure explained in the internal memory We recommend that you copy (back up ) data on "Memory ...Stick Duo" media Prepare "Memory Stick Duo" media with a dedicated USB cable, you can copy data stored in the camera, you cannot copy data on the "Memory Stick Duo" media are recorded on the "Memory Stick Duo" media. [Playback]: Images on...
Cyber-shot® Handbook
Page 57
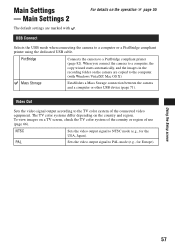
...page 71). PAL Sets the video output signal to a PictBridge compliant printer (page 82). When you connect the camera to a computer or a PictBridge compliant printer using the dedicated USB cable. NTSC Sets the video output signal to the TV color system of use (page 66). To view ... Out Sets the video signal output according to NTSC mode (e.g., for Europe). For details on the operation 1 page 55 USB Connect Selects the USB mode when connecting the camera to a computer, the copy wizard starts automatically, and the images in the recording folder on the country and region. ...
...page 71). PAL Sets the video output signal to a PictBridge compliant printer (page 82). When you connect the camera to a computer or a PictBridge compliant printer using the dedicated USB cable. NTSC Sets the video output signal to the TV color system of use (page 66). To view ... Out Sets the video signal output according to NTSC mode (e.g., for Europe). For details on the operation 1 page 55 USB Connect Selects the USB mode when connecting the camera to a computer, the copy wizard starts automatically, and the images in the recording folder on the country and region. ...
Cyber-shot® Handbook
Page 65
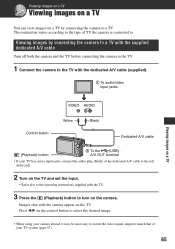
...operating instructions supplied with the TV. 3 Press the (Playback) button to . Viewing images by connecting the camera to match that of your TV system (page 57). 65 Images shot with the dedicated A/V cable (supplied). 1 To audio/video input jacks Viewing images on a TV VIDEO ...AUDIO Control button Yellow Black Dedicated A/V cable (Playback) button 2 To the (USB) · A/V OUT terminal • If your TV has stereo input jacks, connect the audio plug (black) of TV the camera...
...operating instructions supplied with the TV. 3 Press the (Playback) button to . Viewing images by connecting the camera to match that of your TV system (page 57). 65 Images shot with the dedicated A/V cable (supplied). 1 To audio/video input jacks Viewing images on a TV VIDEO ...AUDIO Control button Yellow Black Dedicated A/V cable (Playback) button 2 To the (USB) · A/V OUT terminal • If your TV has stereo input jacks, connect the audio plug (black) of TV the camera...
Cyber-shot® Handbook
Page 68
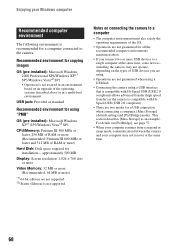
... 64 MB or more) *1) 64-bit editions are not guaranteed when using a USB hub. • Connecting the camera using a USB interface that is compatible with HiSpeed USB (USB 2.0 compliant). • There are two modes for a USB connection when connecting a computer, [Mass Storage] (default setting) and [PictBridge].... Enjoying your computer may not operate, depending on the types of USB devices you are using. • Operations are not supported. *2) Starter (Edition) is not supported. Notes on connecting the camera to a computer • The computer environment must also satisfy the ...
... 64 MB or more) *1) 64-bit editions are not guaranteed when using a USB hub. • Connecting the camera using a USB interface that is compatible with HiSpeed USB (USB 2.0 compliant). • There are two modes for a USB connection when connecting a computer, [Mass Storage] (default setting) and [PictBridge].... Enjoying your computer may not operate, depending on the types of USB devices you are using. • Operations are not supported. *2) Starter (Edition) is not supported. Notes on connecting the camera to a computer • The computer environment must also satisfy the ...
Cyber-shot® Handbook
Page 71
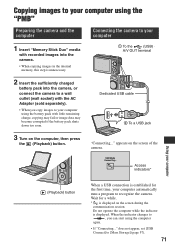
... Stick Duo" media with recorded images into the camera. • When copying images in the internal memory, this step is unnecessary. 1 To the (USB) · A/V OUT terminal 2 Insert the sufficiently charged battery pack into the camera, or connect the camera to a wall outlet (wall socket) with little...the indicator is established for a while. * is displayed on the screen of the camera. Dedicated USB cable 2 To a USB jack 3 Turn on the computer, then press the (Playback) button. does not appear, set [USB Connect] to , you can start using the battery pack with the AC Adaptor ...
... Stick Duo" media with recorded images into the camera. • When copying images in the internal memory, this step is unnecessary. 1 To the (USB) · A/V OUT terminal 2 Insert the sufficiently charged battery pack into the camera, or connect the camera to a wall outlet (wall socket) with little...the indicator is established for a while. * is displayed on the screen of the camera. Dedicated USB cable 2 To a USB jack 3 Turn on the computer, then press the (Playback) button. does not appear, set [USB Connect] to , you can start using the battery pack with the AC Adaptor ...

Cyber-shot® Handbook
Page 72
... on a calender by shooting date to view them. Copying images to your computer using the "PMB" Copying images to a computer 1 Connects the camera to a computer as the default folder in "Viewed folders". For details, see the "PMB Guide". Thumbnails of "PMB" appears automatically. After making... a USB connection, the [Import Media Files] screen of the imported images are imported into a folder created in "Pictures" (in Windows XP, "My Pictures...
... on a calender by shooting date to view them. Copying images to your computer using the "PMB" Copying images to a computer 1 Connects the camera to a computer as the default folder in "Viewed folders". For details, see the "PMB Guide". Thumbnails of "PMB" appears automatically. After making... a USB connection, the [Import Media Files] screen of the imported images are imported into a folder created in "Pictures" (in Windows XP, "My Pictures...
Cyber-shot® Handbook
Page 73
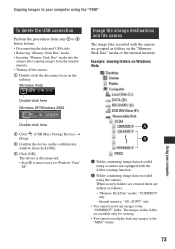
...to 4 below before: • Disconnecting the dedicated USB cable. • Removing "Memory Stick Duo" media. • Inserting "Memory Stick Duo" media into the camera after copying images from the internal memory. • Turning off the camera. 1 Double-click the disconnect icon on the confirmation... any images to the "MISC" folder. 73 Using your computer using the camera. "Memory Stick Duo" media: "101MSDCF" only - B Folder containing image data recorded using the "PMB" To delete the USB connection Perform the procedures from step 1 to the "100MSDCF" folder. Windows ...
...to 4 below before: • Disconnecting the dedicated USB cable. • Removing "Memory Stick Duo" media. • Inserting "Memory Stick Duo" media into the camera after copying images from the internal memory. • Turning off the camera. 1 Double-click the disconnect icon on the confirmation... any images to the "MISC" folder. 73 Using your computer using the camera. "Memory Stick Duo" media: "101MSDCF" only - B Folder containing image data recorded using the "PMB" To delete the USB connection Perform the procedures from step 1 to the "100MSDCF" folder. Windows ...


