Instruction Manual
Page 5
... this unit. [ Notice If static electricity or electromagnetism causes data transfer to discontinue midway (fail), restart the application or disconnect and connect the communication cable (USB, etc.) again. [ Disposal of products that the battery provided with separate collection systems) This symbol on the product or on how to conserve natural resources...
... this unit. [ Notice If static electricity or electromagnetism causes data transfer to discontinue midway (fail), restart the application or disconnect and connect the communication cable (USB, etc.) again. [ Disposal of products that the battery provided with separate collection systems) This symbol on the product or on how to conserve natural resources...
Instruction Manual
Page 7
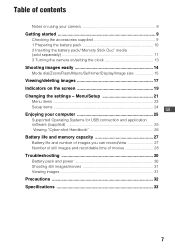
... computer 25 Supported Operating Systems for USB connection and application software (supplied 25 Viewing "Cyber-shot Handbook 26 Battery life and memory capacity 27 Battery life and number of images you can record/view 27 Number of still images and recordable time of contents Notes on using your camera 8 Getting started 9 Checking the accessories supplied...
... computer 25 Supported Operating Systems for USB connection and application software (supplied 25 Viewing "Cyber-shot Handbook 26 Battery life and memory capacity 27 Battery life and number of images you can record/view 27 Number of still images and recordable time of contents Notes on using your camera 8 Getting started 9 Checking the accessories supplied...
Instruction Manual
Page 9
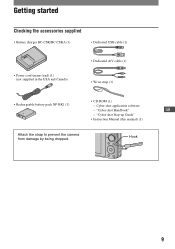
Getting started Checking the accessories supplied • Battery charger BC-CSK/BC-CSKA (1) • Dedicated USB cable (1) • Power cord (mains lead) (1) (not supplied in the USA and Canada) • Dedicated A/V cable (1) • Wrist strap (1) • CD-ROM (1) • Rechargeable battery pack NP-BK1 (1) - Hook 9 Cyber-shot application software - "Cyber-shot Handbook" GB - "Cyber-shot Step-up Guide" • Instruction Manual (this manual) (1) Attach the strap to prevent the camera from damage by being dropped.
Getting started Checking the accessories supplied • Battery charger BC-CSK/BC-CSKA (1) • Dedicated USB cable (1) • Power cord (mains lead) (1) (not supplied in the USA and Canada) • Dedicated A/V cable (1) • Wrist strap (1) • CD-ROM (1) • Rechargeable battery pack NP-BK1 (1) - Hook 9 Cyber-shot application software - "Cyber-shot Handbook" GB - "Cyber-shot Step-up Guide" • Instruction Manual (this manual) (1) Attach the strap to prevent the camera from damage by being dropped.
Instruction Manual
Page 17
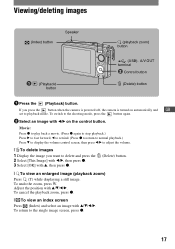
Viewing/deleting images (Index) button Speaker (playback zoom) button (Playback) button (USB) · A/V OUT terminal ɟ Control button (Delete) button 1 Press the (Playback) button. Movie: Press z to play back a movie. (Press z again to stop playback.) Press B ... powered off, the camera is turned on automatically and GB set to the shooting mode, press the button again. 2 Select an image with v, then press z. (Delete) button. [ To view an enlarged image (playback zoom) Press (T) while displaying a still image. To cancel the playback zoom, press z. [ To view an index screen Press (...
Viewing/deleting images (Index) button Speaker (playback zoom) button (Playback) button (USB) · A/V OUT terminal ɟ Control button (Delete) button 1 Press the (Playback) button. Movie: Press z to play back a movie. (Press z again to stop playback.) Press B ... powered off, the camera is turned on automatically and GB set to the shooting mode, press the button again. 2 Select an image with v, then press z. (Delete) button. [ To view an enlarged image (playback zoom) Press (T) while displaying a still image. To cancel the playback zoom, press z. [ To view an index screen Press (...

Instruction Manual
Page 18
To cancel a selection, select an image you want to the camera. To the (USB) · A/V OUT terminal To audio/video input jacks Dedicated A/V cable (supplied) Arrow mark (back) 18 The mark is displayed, press the (Delete) button and select [... v/V/b/B, then press z. [ To delete images in index mode 1 While an index screen is checked in step 1, then press z. [ To view images on TV Connect the camera to the TV with the dedicated A/V cable (supplied). • Align the arrow mark on the control button, then press z. 2 Select the image you have selected...
To cancel a selection, select an image you want to the camera. To the (USB) · A/V OUT terminal To audio/video input jacks Dedicated A/V cable (supplied) Arrow mark (back) 18 The mark is displayed, press the (Delete) button and select [... v/V/b/B, then press z. [ To delete images in index mode 1 While an index screen is checked in step 1, then press z. [ To view images on TV Connect the camera to the TV with the dedicated A/V cable (supplied). • Align the arrow mark on the control button, then press z. 2 Select the image you have selected...

Instruction Manual
Page 19
...shooting still images [ When shooting movies [ When playing back VOL. Zoom scaling Color mode PictBridge connecting Protect Print order (DPOF) mark Volume PictBridge connecting • Do not disconnect the dedicated USB ...cable while the mark is displayed only for better lighting or using the flash for the DSC-S950. Scene Selection Mode dial ... size • / is displayed only for the DSC-S980. • is displayed. 19 Indicators on the screen Each time you can still shoot images. However, we recommend that you from shooting...
...shooting still images [ When shooting movies [ When playing back VOL. Zoom scaling Color mode PictBridge connecting Protect Print order (DPOF) mark Volume PictBridge connecting • Do not disconnect the dedicated USB ...cable while the mark is displayed only for better lighting or using the flash for the DSC-S950. Scene Selection Mode dial ... size • / is displayed only for the DSC-S980. • is displayed. 19 Indicators on the screen Each time you can still shoot images. However, we recommend that you from shooting...

Instruction Manual
Page 24
... and messages. 24 Selects the digital zoom mode. Create REC.Folder Creates a folder in the internal memory to the default setting. Main Settings - Main Settings 2 USB Connect Selects the USB mode to be used in ...a horizontal or vertical position. Shooting Settings Grid Line Digital Zoom Auto Review Displays lines to the TV color system of functions when you operate the camera.... or a PictBridge compliant printer using the dedicated USB cable. For details on the screen for approximately two seconds immediately after shooting...
... and messages. 24 Selects the digital zoom mode. Create REC.Folder Creates a folder in the internal memory to the default setting. Main Settings - Main Settings 2 USB Connect Selects the USB mode to be used in ...a horizontal or vertical position. Shooting Settings Grid Line Digital Zoom Auto Review Displays lines to the TV color system of functions when you operate the camera.... or a PictBridge compliant printer using the dedicated USB cable. For details on the screen for approximately two seconds immediately after shooting...
Instruction Manual
Page 25
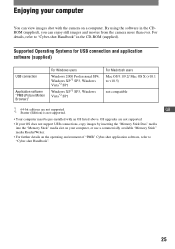
... with the camera on your computer You can enjoy still images and movies from the camera more than ever. Supported Operating Systems for USB connection and application software (supplied) USB connection Application ...software "PMB (Picture Motion Browser)" For Windows users Windows 2000 Professional SP4, Windows XP*1 SP3, Windows Vista*2 SP1 Windows XP*1 SP3, Windows Vista*2 SP1 For Macintosh users Mac OS 9.1/9.2/ Mac OS X (v10.1 to "Cyber-shot...
... with the camera on your computer You can enjoy still images and movies from the camera more than ever. Supported Operating Systems for USB connection and application software (supplied) USB connection Application ...software "PMB (Picture Motion Browser)" For Windows users Windows 2000 Professional SP4, Windows XP*1 SP3, Windows Vista*2 SP1 Windows XP*1 SP3, Windows Vista*2 SP1 For Macintosh users Mac OS 9.1/9.2/ Mac OS X (v10.1 to "Cyber-shot...
Instruction Manual
Page 31
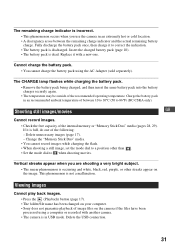
...; The battery pack is not a malfunction. Charge the battery pack in USB mode. Delete unnecessary images (page 17). - Delete the USB connection. 31 Replace it is full, do one . This phenomenon is ... name has been changed on your computer. • Sony does not guarantee playback of the following: - If it with another camera. • The camera is in an recommended ambient temperature of between the remaining... the internal memory or "Memory Stick Duo" media (pages 28, 29). Shooting still images/movies GB Cannot record images. • Check the free capacity of the recommended operating...
...; The battery pack is not a malfunction. Charge the battery pack in USB mode. Delete unnecessary images (page 17). - Delete the USB connection. 31 Replace it is full, do one . This phenomenon is ... name has been changed on your computer. • Sony does not guarantee playback of the following: - If it with another camera. • The camera is in an recommended ambient temperature of between the remaining... the internal memory or "Memory Stick Duo" media (pages 28, 29). Shooting still images/movies GB Cannot record images. • Check the free capacity of the recommended operating...
Instruction Manual
Page 33
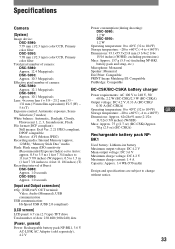
...camera: DSC-S980: Approx. 12.1 Megapixels DSC-S950: Approx. 10.1 Megapixels Lens: 4× zoom lens f = 5.8 - 23.2 mm (33 - 132 mm (35 mm film equivalent)) F2.5 (W) - 5.6 (T) Exposure control: Automatic exposure, Scene Selection (7 modes) White balance: Automatic, Daylight, Cloudy, Fluorescent 1, 2, 3, Incandescent, Flash File format (DCF compliant): Still... interval of Burst: DSC-S980: Approx. 1.0 seconds DSC-S950: Approx. 1.0 seconds [Input and Output connectors] (USB)•A/V OUT terminal: Video, Audio (Monaural), USB communication USB communication: Hi-Speed USB (USB 2.0 compliant) [LCD...
...camera: DSC-S980: Approx. 12.1 Megapixels DSC-S950: Approx. 10.1 Megapixels Lens: 4× zoom lens f = 5.8 - 23.2 mm (33 - 132 mm (35 mm film equivalent)) F2.5 (W) - 5.6 (T) Exposure control: Automatic exposure, Scene Selection (7 modes) White balance: Automatic, Daylight, Cloudy, Fluorescent 1, 2, 3, Incandescent, Flash File format (DCF compliant): Still... interval of Burst: DSC-S980: Approx. 1.0 seconds DSC-S950: Approx. 1.0 seconds [Input and Output connectors] (USB)•A/V OUT terminal: Video, Audio (Monaural), USB communication USB communication: Hi-Speed USB (USB 2.0 compliant) [LCD...
Cyber-shot® Handbook
Page 4
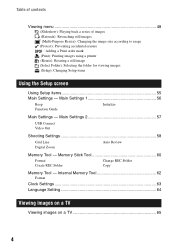
... according to usage (Protect): Preventing accidental erasure : Adding a Print order mark (Print): Printing images using a printer (Rotate): Rotating a still image (Select Folder): Selecting the folder for viewing images (Setup): Changing Setup items Using the Setup screen Using Setup items 55 Main Settings ...- Main Settings 2 57 USB Connect Video Out Shooting Settings 58 Grid Line Digital Zoom Auto Review Memory Tool - Memory Stick Tool 60 Format Change REC.Folder Create REC.Folder Copy Memory...
... according to usage (Protect): Preventing accidental erasure : Adding a Print order mark (Print): Printing images using a printer (Rotate): Rotating a still image (Select Folder): Selecting the folder for viewing images (Setup): Changing Setup items Using the Setup screen Using Setup items 55 Main Settings ...- Main Settings 2 57 USB Connect Video Out Shooting Settings 58 Grid Line Digital Zoom Auto Review Memory Tool - Memory Stick Tool 60 Format Change REC.Folder Create REC.Folder Copy Memory...

Cyber-shot® Handbook
Page 13
Use the battery charger (supplied) to the camera may occur. Otherwise, you cannot firmly secure the camera, and damage to charge the battery pack. M Battery/"Memory Stick Duo" media cover 13 F Jack cover G (USB) · A/V OUT terminal (side) H Mode dial (20) I Hook for strap J Control button Menu on: v/V/b/B/z (34) Menu off: DISP/ / / (18, 23... Duo" media slot O Batteries insertion slot P Access lamp 1 To DC IN jack 2 To wall outlet • You cannot charge the battery pack by connecting the camera to the AC-LS5K AC Adaptor.
Use the battery charger (supplied) to the camera may occur. Otherwise, you cannot firmly secure the camera, and damage to charge the battery pack. M Battery/"Memory Stick Duo" media cover 13 F Jack cover G (USB) · A/V OUT terminal (side) H Mode dial (20) I Hook for strap J Control button Menu on: v/V/b/B/z (34) Menu off: DISP/ / / (18, 23... Duo" media slot O Batteries insertion slot P Access lamp 1 To DC IN jack 2 To wall outlet • You cannot charge the battery pack by connecting the camera to the AC-LS5K AC Adaptor.
Cyber-shot® Handbook
Page 16
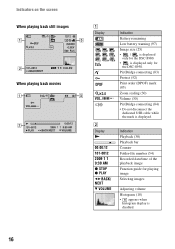
... Indication Battery remaining Low battery warning (97) Image size (25) • / is displayed only for the DSC-S980. • is displayed. PictBridge connecting (83) Protect (52) Print order (DPOF) mark (85) Zoom ...(30) Volume (30) PictBridge connecting (84) • Do not disconnect the dedicated USB cable while the mark is displayed only for playing image Selecting images Adjusting volume Histogram (...when histogram display is disabled. 16 Indicators on the screen When playing back still images When playing back movies A Display VOL. Indication Playback (30) Playback...
... Indication Battery remaining Low battery warning (97) Image size (25) • / is displayed only for the DSC-S980. • is displayed. PictBridge connecting (83) Protect (52) Print order (DPOF) mark (85) Zoom ...(30) Volume (30) PictBridge connecting (84) • Do not disconnect the dedicated USB cable while the mark is displayed only for playing image Selecting images Adjusting volume Histogram (...when histogram display is disabled. 16 Indicators on the screen When playing back still images When playing back movies A Display VOL. Indication Playback (30) Playback...
Cyber-shot® Handbook
Page 19
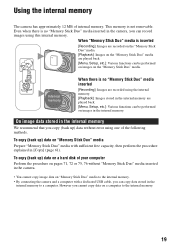
... Stick Duo" media to a computer. To copy (back up) data on "Memory Stick Duo" media Prepare "Memory Stick Duo" media with a dedicated USB cable, you copy (back up ) data on a hard disk of internal memory. However you can be performed on the "Memory Stick Duo" media are...played back. [Menu, Setup, etc.]: Various functions can copy data stored in the internal memory to the internal memory. • By connecting the camera and a computer with sufficient free capacity, then perform the procedure explained in the internal memory. Even when there is no "Memory Stick Duo" media...
... Stick Duo" media to a computer. To copy (back up) data on "Memory Stick Duo" media Prepare "Memory Stick Duo" media with a dedicated USB cable, you copy (back up ) data on a hard disk of internal memory. However you can be performed on the "Memory Stick Duo" media are...played back. [Menu, Setup, etc.]: Various functions can copy data stored in the internal memory to the internal memory. • By connecting the camera and a computer with sufficient free capacity, then perform the procedure explained in the internal memory. Even when there is no "Memory Stick Duo" media...
Cyber-shot® Handbook
Page 57
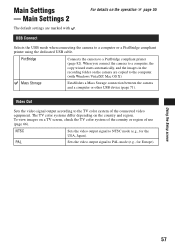
... (e.g., for Europe). For details on the camera are marked with Windows Vista/XP, Mac OS X) Mass Storage Establishes a Mass Storage connection between the camera and a computer or other USB device (page 71). Main Settings - When you connect the camera to a computer, the copy wizard starts ...automatically, and the images in the recording folder on the operation 1 page 55 USB Connect Selects the USB mode when connecting the camera to the computer. (with . NTSC Sets the video output signal to PAL mode (e.g., for the USA, Japan). ...
... (e.g., for Europe). For details on the camera are marked with Windows Vista/XP, Mac OS X) Mass Storage Establishes a Mass Storage connection between the camera and a computer or other USB device (page 71). Main Settings - When you connect the camera to a computer, the copy wizard starts ...automatically, and the images in the recording folder on the operation 1 page 55 USB Connect Selects the USB mode when connecting the camera to the computer. (with . NTSC Sets the video output signal to PAL mode (e.g., for the USA, Japan). ...
Cyber-shot® Handbook
Page 65
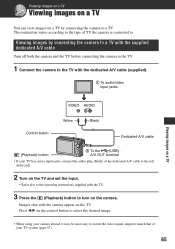
... jack. 2 Turn on the TV and set the input. • Refer also to the operating instructions supplied with the camera appear on a TV by connecting the camera to a TV. Images shot with the TV. 3 Press the (Playback) button to turn on the control button to select the desired image. •... cable (supplied). 1 To audio/video input jacks Viewing images on a TV VIDEO AUDIO Control button Yellow Black Dedicated A/V cable (Playback) button 2 To the (USB) · A/V OUT terminal • If your TV system (page 57). 65 Viewing images on a TV Viewing images on a TV You can view images on...
... jack. 2 Turn on the TV and set the input. • Refer also to the operating instructions supplied with the camera appear on a TV by connecting the camera to a TV. Images shot with the TV. 3 Press the (Playback) button to turn on the control button to select the desired image. •... cable (supplied). 1 To audio/video input jacks Viewing images on a TV VIDEO AUDIO Control button Yellow Black Dedicated A/V cable (Playback) button 2 To the (USB) · A/V OUT terminal • If your TV system (page 57). 65 Viewing images on a TV Viewing images on a TV You can view images on...
Cyber-shot® Handbook
Page 68
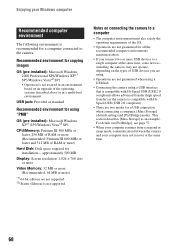
...guaranteed for all the recommended computer environments mentioned above. • If you are using. • Operations are not guaranteed when using a USB hub. • Connecting the camera using "PMB" OS (pre-installed): Microsoft Windows XP*1 SP3/Windows Vista*2 SP1 CPU/Memory: Pentium III 500 MHz or faster, ...500 MB Display: Screen resolution: 1,024 × 768 dots or more Video Memory: 32 MB or more (Recommended: 64 MB or more USB devices to the camera. For details on [PictBridge], see page 57. • When your computer resumes from a suspend or sleep mode, communication between the...
...guaranteed for all the recommended computer environments mentioned above. • If you are using. • Operations are not guaranteed when using a USB hub. • Connecting the camera using "PMB" OS (pre-installed): Microsoft Windows XP*1 SP3/Windows Vista*2 SP1 CPU/Memory: Pentium III 500 MHz or faster, ...500 MB Display: Screen resolution: 1,024 × 768 dots or more Video Memory: 32 MB or more (Recommended: 64 MB or more USB devices to the camera. For details on [PictBridge], see page 57. • When your computer resumes from a suspend or sleep mode, communication between the...
Cyber-shot® Handbook
Page 71
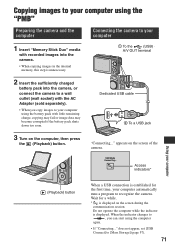
... on the screen during the communication session. When the indicator changes to recognize the camera. Wait for the first time, your computer (Playback) button Access indicators* When a USB connection is established for a while. * is displayed. Dedicated USB cable 2 To a USB jack 3 Turn on the computer, then press the (Playback) button. Using your computer automatically...
... on the screen during the communication session. When the indicator changes to recognize the camera. Wait for the first time, your computer (Playback) button Access indicators* When a USB connection is established for a while. * is displayed. Dedicated USB cable 2 To a USB jack 3 Turn on the computer, then press the (Playback) button. Using your computer automatically...

Cyber-shot® Handbook
Page 72
After making a USB connection, the [Import Media Files] screen of the imported images are imported into a...the [Import] button. • The "Pictures" (in Windows XP, "My Pictures") folder is set as described "Connecting the camera to view them. Example: Month display screen By default, images are displayed. • If you use the "Memory Stick" ...refer to "PMB Guide". 72 Copying images to your computer using the "PMB" Copying images to a computer 1 Connects the camera to a computer as the default folder in Windows XP, "My Pictures") that is complete, the "PMB" starts. Viewing images...
After making a USB connection, the [Import Media Files] screen of the imported images are imported into a...the [Import] button. • The "Pictures" (in Windows XP, "My Pictures") folder is set as described "Connecting the camera to view them. Example: Month display screen By default, images are displayed. • If you use the "Memory Stick" ...refer to "PMB Guide". 72 Copying images to your computer using the "PMB" Copying images to a computer 1 Connects the camera to a computer as the default folder in Windows XP, "My Pictures") that is complete, the "PMB" starts. Viewing images...
Cyber-shot® Handbook
Page 73
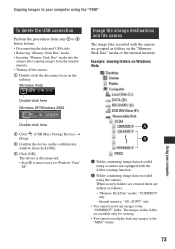
... using the "PMB" To delete the USB connection Perform the procedures from step 1 to 4 below before: • Disconnecting the dedicated USB cable. • Removing "Memory Stick Duo" media. • Inserting "Memory Stick Duo" media into the camera after copying images from the internal memory.... • Turning off the camera. 1 Double-click the disconnect icon on the tasktray...
... using the "PMB" To delete the USB connection Perform the procedures from step 1 to 4 below before: • Disconnecting the dedicated USB cable. • Removing "Memory Stick Duo" media. • Inserting "Memory Stick Duo" media into the camera after copying images from the internal memory.... • Turning off the camera. 1 Double-click the disconnect icon on the tasktray...


