Instruction Manual
Page 3
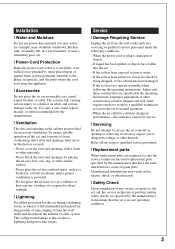
... Protection Route the power cord so that have fallen into the set , and to protect it from the wall outlet and disconnect the antenna or cable system. for service. [ Servicing Do not attempt to service the set during a lightning storm, or when it is left unattended and unused for necessary ventilation...
... Protection Route the power cord so that have fallen into the set , and to protect it from the wall outlet and disconnect the antenna or cable system. for service. [ Servicing Do not attempt to service the set during a lightning storm, or when it is left unattended and unused for necessary ventilation...
Instruction Manual
Page 4
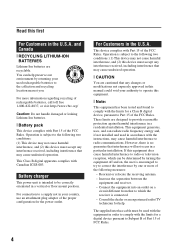
This Class B digital apparatus complies with the equipment in the U.S.A. This device complies with Part 15 of the FCC Rules. However, there is connected. - The supplied interface cable must be used rechargeable batteries to the collection and recycling location nearest you. For Customers in order to comply with the limits for help preserve...
This Class B digital apparatus complies with the equipment in the U.S.A. This device complies with Part 15 of the FCC Rules. However, there is connected. - The supplied interface cable must be used rechargeable batteries to the collection and recycling location nearest you. For Customers in order to comply with the limits for help preserve...
Instruction Manual
Page 5
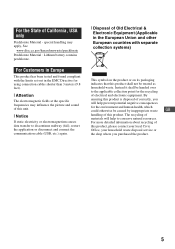
... Perchlorate Material - Instead it shall be handed over to discontinue midway (fail), restart the application or disconnect and connect the communication cable (USB, etc.) again. [ Disposal of this product, please contact your local Civic Office, your household waste disposal service or ...and sound of this unit. [ Notice If static electricity or electromagnetism causes data transfer to the applicable collection point for using connection cables shorter than 3 meters (9.8 feet). [ Attention The electromagnetic fields at the specific frequencies may apply, See www.dtsc.ca.gov/...
... Perchlorate Material - Instead it shall be handed over to discontinue midway (fail), restart the application or disconnect and connect the communication cable (USB, etc.) again. [ Disposal of this product, please contact your local Civic Office, your household waste disposal service or ...and sound of this unit. [ Notice If static electricity or electromagnetism causes data transfer to the applicable collection point for using connection cables shorter than 3 meters (9.8 feet). [ Attention The electromagnetic fields at the specific frequencies may apply, See www.dtsc.ca.gov/...
Instruction Manual
Page 9
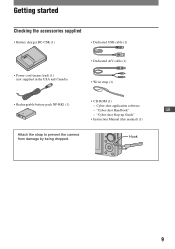
Hook 9 "Cyber-shot Step-up Guide" • Instruction Manual (this manual) (1) Attach the strap to prevent the camera from damage by being dropped. Getting started Checking the accessories supplied • Battery charger BC-CSK (1) • Dedicated USB cable (1) • Power cord (mains lead) (1) (not supplied in the USA and Canada) • Dedicated A/V cable (1) • Wrist strap (1) • CD-ROM (1) • Rechargeable battery pack NP-BK1 (1) - Cyber-shot application software - "Cyber-shot Handbook" GB -
Hook 9 "Cyber-shot Step-up Guide" • Instruction Manual (this manual) (1) Attach the strap to prevent the camera from damage by being dropped. Getting started Checking the accessories supplied • Battery charger BC-CSK (1) • Dedicated USB cable (1) • Power cord (mains lead) (1) (not supplied in the USA and Canada) • Dedicated A/V cable (1) • Wrist strap (1) • CD-ROM (1) • Rechargeable battery pack NP-BK1 (1) - Cyber-shot application software - "Cyber-shot Handbook" GB -
Instruction Manual
Page 18
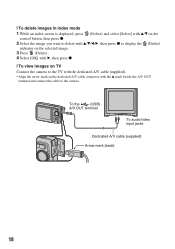
To the (USB) · A/V OUT terminal To audio/video input jacks Dedicated A/V cable (supplied) Arrow mark (back) 18 [ To delete images in index mode 1 While an index screen is displayed, press (Delete) and select [Select] with v/V on the ... press z to display the (Delete) indicator on the selected image. 3 Press (Delete). 4 Select [OK] with B, then press z. [ To view images on TV Connect the camera to the TV with the dedicated A/V cable (supplied). • Align the arrow mark on the dedicated A/V cable connector with the v mark beside the A/V OUT terminal and connect the...
To the (USB) · A/V OUT terminal To audio/video input jacks Dedicated A/V cable (supplied) Arrow mark (back) 18 [ To delete images in index mode 1 While an index screen is displayed, press (Delete) and select [Select] with v/V on the ... press z to display the (Delete) indicator on the selected image. 3 Press (Delete). 4 Select [OK] with B, then press z. [ To view images on TV Connect the camera to the TV with the dedicated A/V cable (supplied). • Align the arrow mark on the dedicated A/V cable connector with the v mark beside the A/V OUT terminal and connect the...
Instruction Manual
Page 23
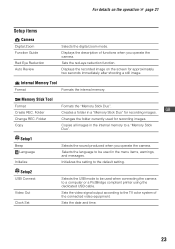
...Create REC. Folder Changes the folder currently used when connecting the camera to a computer or a PictBridge compliant printer using the dedicated USB cable. Setup1 Beep Language Initialize Selects the sound produced when you operate the camera. Sets the video signal output according to a "Memory Stick...Sets the red-eye reduction function. Displays the recorded image on the operation 1 page 21 Setup items Camera Digital Zoom Function Guide Red Eye Reduction Auto Review Selects the digital zoom mode. Copy Copies all images in the menu items, warnings, and messages. Setup2 USB Connect...
...Create REC. Folder Changes the folder currently used when connecting the camera to a computer or a PictBridge compliant printer using the dedicated USB cable. Setup1 Beep Language Initialize Selects the sound produced when you operate the camera. Sets the video signal output according to a "Memory Stick...Sets the red-eye reduction function. Displays the recorded image on the operation 1 page 21 Setup items Camera Digital Zoom Function Guide Red Eye Reduction Auto Review Selects the digital zoom mode. Copy Copies all images in the menu items, warnings, and messages. Setup2 USB Connect...


