
Handbook (Primary Manual)
Page 14
L Battery/"Memory Stick Duo" cover 2 3 5 4 Do not pinch the cord when you close the cover. 14 qa qs qd A Shutter button B Mode dial (24) C Microphone D Lens E POWER button / lamp F Flash G Self-timer lamp H Buzzer I USB jack J A/V OUT jack K Tripod receptacle • Use a tripod with a screw length of operation. 1 5 2 6 7 3 8 M ... supplied) 1 9 4 q; Identifying parts See the pages in parentheses for details of less than 5.5mm (7/32 inch), and may damage the camera. You will be unable to firmly secure the camera to tripods having screws longer than 5.5mm (7/32 inch).
L Battery/"Memory Stick Duo" cover 2 3 5 4 Do not pinch the cord when you close the cover. 14 qa qs qd A Shutter button B Mode dial (24) C Microphone D Lens E POWER button / lamp F Flash G Self-timer lamp H Buzzer I USB jack J A/V OUT jack K Tripod receptacle • Use a tripod with a screw length of operation. 1 5 2 6 7 3 8 M ... supplied) 1 9 4 q; Identifying parts See the pages in parentheses for details of less than 5.5mm (7/32 inch), and may damage the camera. You will be unable to firmly secure the camera to tripods having screws longer than 5.5mm (7/32 inch).

Handbook (Primary Manual)
Page 26
...WB ISO • If there is an item that is not displayed, an v/V mark appears on the power and set to display the menu. 3 Select the desired menu item with b/B on the control button. • If the desired item is invisible, keep pressing b/B until it appears on the screen. ...z after selecting an item when the mode dial is not displayed, select the mark with v/V. Using the menu Using menu items v/V/b/B button Mode dial z button Control button MENU button 1 Turn on the edges of the location where menu items usually appear. To display an item that are grayed out. 26 Items available...
...WB ISO • If there is an item that is not displayed, an v/V mark appears on the power and set to display the menu. 3 Select the desired menu item with b/B on the control button. • If the desired item is invisible, keep pressing b/B until it appears on the screen. ...z after selecting an item when the mode dial is not displayed, select the mark with v/V. Using the menu Using menu items v/V/b/B button Mode dial z button Control button MENU button 1 Turn on the edges of the location where menu items usually appear. To display an item that are grayed out. 26 Items available...

Handbook (Primary Manual)
Page 37
... You can change the default settings using the Setup screen. press B again. 4 Press v/V/b/B on the control button,! v/V/b/B button Mode dial z button Control button MENU button 1 Turn on the power. 2 Press MENU to display the menu. 3 After pressing B on the control button to select the item you want to the menu from the (Setup) screen, press b on the...
... You can change the default settings using the Setup screen. press B again. 4 Press v/V/b/B on the control button,! v/V/b/B button Mode dial z button Control button MENU button 1 Turn on the power. 2 Press MENU to display the menu. 3 After pressing B on the control button to select the item you want to the menu from the (Setup) screen, press b on the...

Handbook (Primary Manual)
Page 43
...The default settings are reset to the default setting. LCD Backlight Selects the brightness of the LCD backlight when using the camera with v on the control button, then press z. Off Turns off the beep/shutter sound. The message "Initialize all settings Ready?" Cancel Cancels the ...Turns on the beep/shutter sound when you press the control button/ press the shutter button. appears. 2 Select [OK] with . Initialize Initializes the setting to the default setting. • Make sure that the power is not disconnected during resetting. 43 OK See the following procedure...
...The default settings are reset to the default setting. LCD Backlight Selects the brightness of the LCD backlight when using the camera with v on the control button, then press z. Off Turns off the beep/shutter sound. The message "Initialize all settings Ready?" Cancel Cancels the ...Turns on the beep/shutter sound when you press the control button/ press the shutter button. appears. 2 Select [OK] with . Initialize Initializes the setting to the default setting. • Make sure that the power is not disconnected during resetting. 43 OK See the following procedure...
Handbook (Primary Manual)
Page 63
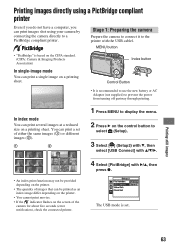
...] with the USB cablel. Printing still images 63 The USB mode is recommended to use the new battery or AC Adaptor (not supplied) to prevent the power from turning off partway through printing. Stage 1: Preparing the camera Prepare the camera to connect it to the printer ...then press z. You can print images shot using a PictBridge compliant printer Even if you do not have a computer, you can print a set . Printing images directly using your camera by connecting the camera directly to a PictBridge compliant printer. Index button Control Button • It is set of ...
...] with the USB cablel. Printing still images 63 The USB mode is recommended to use the new battery or AC Adaptor (not supplied) to prevent the power from turning off partway through printing. Stage 1: Preparing the camera Prepare the camera to connect it to the printer ...then press z. You can print images shot using a PictBridge compliant printer Even if you do not have a computer, you can print a set . Printing images directly using your camera by connecting the camera directly to a PictBridge compliant printer. Index button Control Button • It is set of ...
Instruction Manual (Set up and basic operation)
Page 1
...digital device, pursuant to prevent battery drain (Auto power-off and on, the user is intended to alert the user to e-mail or creating web pages More Printing Fine Rough * Images are cautioned that to your Sony dealer regarding this product. Battery life and number of still... flashes. • The displayed time remaining may not display the correct information. DSC-S45 Refer to "Cyber-shot Handbook" (PDF) on supplied CD-ROM Explains advanced techniques and what to a 35 mm still camera) F2.8 - 4.8 Exposure control Automatic exposure, Scene Selection (6 modes) White balance...
...digital device, pursuant to prevent battery drain (Auto power-off and on, the user is intended to alert the user to e-mail or creating web pages More Printing Fine Rough * Images are cautioned that to your Sony dealer regarding this product. Battery life and number of still... flashes. • The displayed time remaining may not display the correct information. DSC-S45 Refer to "Cyber-shot Handbook" (PDF) on supplied CD-ROM Explains advanced techniques and what to a 35 mm still camera) F2.8 - 4.8 Exposure control Automatic exposure, Scene Selection (6 modes) White balance...
Instruction Manual (Set up and basic operation)
Page 2
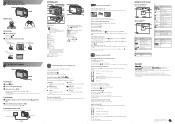
...; When the zoom scale exceeds 3×, the camera uses [Digital Zoom]. M Battery/"Memory Stick Duo" cover N AC Adaptor cord cover O For shooting: Zoom (W/T) button For viewing: / (Playback zoom) button/ (Index) button P LCD screen Q (Image Size/Delete) button R (Screen status) button S Hook for easy shooting. To delete images 1 Display the image you shot (Quick Review) ( ) Press b ( ) on the control...
...; When the zoom scale exceeds 3×, the camera uses [Digital Zoom]. M Battery/"Memory Stick Duo" cover N AC Adaptor cord cover O For shooting: Zoom (W/T) button For viewing: / (Playback zoom) button/ (Index) button P LCD screen Q (Image Size/Delete) button R (Screen status) button S Hook for easy shooting. To delete images 1 Display the image you shot (Quick Review) ( ) Press b ( ) on the control...


