Handbook (Primary Manual)
Page 7
Viewing menu 32 (Folder) - (Protect) DPOF (Print) (Slide) (Resize) (Rotate) (Setup) Using the Setup screen Using Setup items 37 Camera 38 Digital Zoom Date/Time Red Eye Reduction Auto Review Internal Memory Tool 40 Format Memory Stick Tool 41 Format Create REC. Folder Change REC. Folder Copy Setup 1 43 1 LCD Backlight Beep Initialize Setup 2 44 2 File Number USB Connect Video Out Clock Set Using your computer Enjoying your Windows computer 46 Installing the software (supplied 48 Copying images to your computer 49 7
Viewing menu 32 (Folder) - (Protect) DPOF (Print) (Slide) (Resize) (Rotate) (Setup) Using the Setup screen Using Setup items 37 Camera 38 Digital Zoom Date/Time Red Eye Reduction Auto Review Internal Memory Tool 40 Format Memory Stick Tool 41 Format Create REC. Folder Change REC. Folder Copy Setup 1 43 1 LCD Backlight Beep Initialize Setup 2 44 2 File Number USB Connect Video Out Clock Set Using your computer Enjoying your Windows computer 46 Installing the software (supplied 48 Copying images to your computer 49 7

Handbook (Primary Manual)
Page 36
... press z. • You may not be able to rotate images shot with other cameras. • When viewing images on a computer, the image rotation information may not be reflected depending on the operation t page 26 Rotates a still image. (Rotate) For details on the software. (Setup) See page 37. 36 OK Cancel Rotates an image. Determines...
... press z. • You may not be able to rotate images shot with other cameras. • When viewing images on a computer, the image rotation information may not be reflected depending on the operation t page 26 Rotates a still image. (Rotate) For details on the software. (Setup) See page 37. 36 OK Cancel Rotates an image. Determines...

Handbook (Primary Manual)
Page 46
Install the software (supplied) first (page 48) Copying images to "Using your computer • Viewing photos organized by date • Editing images Printing images 46 This section describes the English version! screen contents. Using your computer Enjoying your Windows computer For details on using the "Cyber-shot Viewer" (page 56) • Viewing images saved on your computer Enjoying images using a Macintosh computer,!refer to your computer (page 49) Viewing images saved on your Macintosh computer"!(page 60).
Install the software (supplied) first (page 48) Copying images to "Using your computer • Viewing photos organized by date • Editing images Printing images 46 This section describes the English version! screen contents. Using your computer Enjoying your Windows computer For details on using the "Cyber-shot Viewer" (page 56) • Viewing images saved on your computer Enjoying images using a Macintosh computer,!refer to your computer (page 49) Viewing images saved on your Macintosh computer"!(page 60).
Handbook (Primary Manual)
Page 47
...environments mentioned above or in an environment based on the types of RAM or more) Software:!DirectX 9.0c or later Hard Disk: Disk space required for installation-200 MB or more...computer at the same time, some devices, including your camera, may not recover at the same time. 47 Using your camera to the camera. Recommended environment for copying images OS (pre-installed): ... for a computer connected to a computer • Operations are not guaranteed when using the Cyber-shot Viewer OS (pre-installed): Microsoft Windows 2000 Professional, Windows Millennium Edition, Windows XP Home...
...environments mentioned above or in an environment based on the types of RAM or more) Software:!DirectX 9.0c or later Hard Disk: Disk space required for installation-200 MB or more...computer at the same time, some devices, including your camera, may not recover at the same time. 47 Using your camera to the camera. Recommended environment for copying images OS (pre-installed): ... for a computer connected to a computer • Operations are not guaranteed when using the Cyber-shot Viewer OS (pre-installed): Microsoft Windows 2000 Professional, Windows Millennium Edition, Windows XP Home...
Handbook (Primary Manual)
Page 48
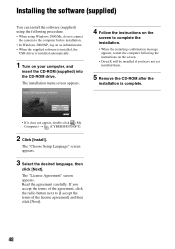
.... • When the restarting confirmation message appears, restart the computer following procedure. • When using Windows 2000/Me, do not connect the camera to the computer before installation. • In Windows 2000/XP, log on your computer, and insert the CD-ROM (supplied) into the CD...yet installed them. 5 Remove the CD-ROM after the installation is installed automatically. 1 Turn on as Administrator. • When the supplied software is installed, the USB driver is complete. • If it does not appear, double-click (My Computer) t (CYBERSHOTSOFT). 2 Click [Install].
.... • When the restarting confirmation message appears, restart the computer following procedure. • When using Windows 2000/Me, do not connect the camera to the computer before installation. • In Windows 2000/XP, log on your computer, and insert the CD-ROM (supplied) into the CD...yet installed them. 5 Remove the CD-ROM after the installation is installed automatically. 1 Turn on as Administrator. • When the supplied software is installed, the USB driver is complete. • If it does not appear, double-click (My Computer) t (CYBERSHOTSOFT). 2 Click [Install].
Handbook (Primary Manual)
Page 49
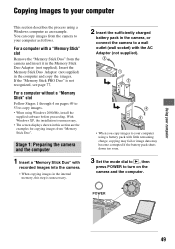
camera and insert it in the computer and copy the!images. Duo Adaptor!(not supplied). Insert the Memory Stick Duo!Adaptor!(not supplied)! supplied software before proceeding. Windows XP, the installation is not recognized, see page 77. Copying images to your computer This... section describes the process using Windows 2000/Me, install the! For a computer with recorded images into the camera. • When copying ...
camera and insert it in the computer and copy the!images. Duo Adaptor!(not supplied). Insert the Memory Stick Duo!Adaptor!(not supplied)! supplied software before proceeding. Windows XP, the installation is not recognized, see page 77. Copying images to your computer This... section describes the process using Windows 2000/Me, install the! For a computer with recorded images into the camera. • When copying ...
Handbook (Primary Manual)
Page 56
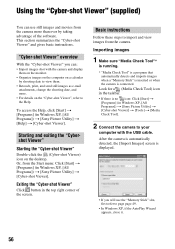
...it. 56 "Cyber-shot Viewer" overview With the "Cyber-shot Viewer" you will use still images and movies from the camera more . • For details on the desktop. To access the Help, click [Start] t [Programs] (in Windows XP, [All Programs]) t [Sony Picture Utility] t [Cyber-shot Viewer]. Look...top right corner of the software. This section summarizes the "Cyber-shot Viewer" and gives basic instructions. After the camera is automatically detected, the [Import Images] screen is connected. Using the "Cyber-shot Viewer" (supplied) You can : • Import images shot with the USB cable. ...
...it. 56 "Cyber-shot Viewer" overview With the "Cyber-shot Viewer" you will use still images and movies from the camera more . • For details on the desktop. To access the Help, click [Start] t [Programs] (in Windows XP, [All Programs]) t [Sony Picture Utility] t [Cyber-shot Viewer]. Look...top right corner of the software. This section summarizes the "Cyber-shot Viewer" and gives basic instructions. After the camera is automatically detected, the [Import Images] screen is connected. Using the "Cyber-shot Viewer" (supplied) You can : • Import images shot with the USB cable. ...
Handbook (Primary Manual)
Page 59
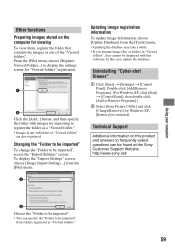
Uninstalling "Cyber-shot! To display the "Import Settings" screen, choose [Image Import Settings...] from the [File] menu. 1 Updating image registration information To update image information, choose [Update Database] from folders registered as "Viewed folders." 59 http://www.sony.net/ Using your computer 2 Choose the "... the "Viewed folders". Technical Support Additional information on the computer for Windows XP, [Remove]) to be displayed with this software. Changing the "Folder to be imported" To change the "Folder to uninstall. In this product and answers to register ...
Uninstalling "Cyber-shot! To display the "Import Settings" screen, choose [Image Import Settings...] from the [File] menu. 1 Updating image registration information To update image information, choose [Update Database] from folders registered as "Viewed folders." 59 http://www.sony.net/ Using your computer 2 Choose the "... the "Viewed folders". Technical Support Additional information on the computer for Windows XP, [Remove]) to be displayed with this software. Changing the "Folder to be imported" To change the "Folder to uninstall. In this product and answers to register ...

Handbook (Primary Manual)
Page 60
... hard disk icon t the desired image file in the folder containing the copied files to open that described in "Stage 2: Connecting the camera and your camera, may not recover at the same time, some devices, including your computer" on page 50. 3 Copy image files to the Macintosh ...8226; Operations are not guaranteed when using a USB hub. • The [Normal] (default setting) mode is recommended for a computer connected to the camera. Perform the same procedure as standard Notes on connecting your computer. • The supplied software is not compatible with Macintosh computers.
... hard disk icon t the desired image file in the folder containing the copied files to open that described in "Stage 2: Connecting the camera and your camera, may not recover at the same time, some devices, including your computer" on page 50. 3 Copy image files to the Macintosh ...8226; Operations are not guaranteed when using a USB hub. • The [Normal] (default setting) mode is recommended for a computer connected to the camera. Perform the same procedure as standard Notes on connecting your computer. • The supplied software is not compatible with Macintosh computers.
Handbook (Primary Manual)
Page 62
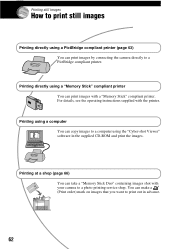
Printing at a shop (page 66) You can take a "Memory Stick Duo" containing images shot with a "Memory Stick" compliant printer. Printing still images How to print still images Printing directly using a PictBridge compliant printer (page 63) You can make a (Print order) mark... a computer You can print images with your camera to a PictBridge compliant printer. You can print images by connecting the camera directly to a photo printing service shop. For details, see the operating instructions supplied with the printer. Printing using the "Cyber-shot Viewer" software in advance. 62
Printing at a shop (page 66) You can take a "Memory Stick Duo" containing images shot with a "Memory Stick" compliant printer. Printing still images How to print still images Printing directly using a PictBridge compliant printer (page 63) You can make a (Print order) mark... a computer You can print images with your camera to a PictBridge compliant printer. You can print images by connecting the camera directly to a photo printing service shop. For details, see the operating instructions supplied with the printer. Printing using the "Cyber-shot Viewer" software in advance. 62
Handbook (Primary Manual)
Page 76
be viewed on the camera. • Copy them to the Help. • Consult the computer or software manufacturer. After making a USB connection, "Cyber-shot Viewer" does not start automatically. • Start "Media Check Tool" (page 56). • Make the USB connection after the computer is ...movie directly from the hard disk (page 49). You cannot print an image. • Check the printer settings. Shoot using "Cyber-shot Viewer", refer to a folder recognized by the camera, such as "101MSDCF" (page 54). • Operate correctly (page 55). 76 The image and sound are interrupted by ...
be viewed on the camera. • Copy them to the Help. • Consult the computer or software manufacturer. After making a USB connection, "Cyber-shot Viewer" does not start automatically. • Start "Media Check Tool" (page 56). • Make the USB connection after the computer is ...movie directly from the hard disk (page 49). You cannot print an image. • Check the printer settings. Shoot using "Cyber-shot Viewer", refer to a folder recognized by the camera, such as "101MSDCF" (page 54). • Operate correctly (page 55). 76 The image and sound are interrupted by ...
Handbook (Primary Manual)
Page 88
... environment 47 Software 48 Viewing image files stored on a computer with your camera 55 Windows 46 Connecting Computer 50 Printer 64 TV 68 Copy 42 Copying images to your computer 49 Create REC. Folder 41 Cyber-shot Viewer 56 88 D Date 39 Date/Time 39 Day&Time 39 Daylight 29 Delete 15 Digital Zoom 38... OS 47 Overexposure 10 IInndedx ex A A/V cable 68 Aperture 10 Auto Focus 9 Auto Review 39 AVI 54 B Back up 22 Beep 43 Blur 9 Burst 30 C Camera 38 CD-ROM 48 Change REC.
... environment 47 Software 48 Viewing image files stored on a computer with your camera 55 Windows 46 Connecting Computer 50 Printer 64 TV 68 Copy 42 Copying images to your computer 49 Create REC. Folder 41 Cyber-shot Viewer 56 88 D Date 39 Date/Time 39 Day&Time 39 Daylight 29 Delete 15 Digital Zoom 38... OS 47 Overexposure 10 IInndedx ex A A/V cable 68 Aperture 10 Auto Focus 9 Auto Review 39 AVI 54 B Back up 22 Beep 43 Blur 9 Burst 30 C Camera 38 CD-ROM 48 Change REC.
Handbook (Primary Manual)
Page 89
... 30 Pixel 12 Playback see "Viewing" Playback/Edit 24 Precautions 87 Precision digital zoom ..........38 Pressing halfway down ...........9 Print 62 Index mode 63 Single-image... 28 Shooting movies 24 Single-image mode 63 Slide 34 Smart zoom 38 Software 48 Spot metering 28 Spot metering cross hairs ..... 28 Standard 29 T... 19 USB Connect 44 V Video Out 44 Viewing Movie 56 Still image 56 S Viewing menu 32 Saturation 31 Screen Changing the display .....20 ...16 LCD Backlight 43 Sepia 30 Setup 31, 36, 37 Camera 38 W Warning indicators and messages 81 WB 29 White balance ...
... 30 Pixel 12 Playback see "Viewing" Playback/Edit 24 Precautions 87 Precision digital zoom ..........38 Pressing halfway down ...........9 Print 62 Index mode 63 Single-image... 28 Shooting movies 24 Single-image mode 63 Slide 34 Smart zoom 38 Software 48 Spot metering 28 Spot metering cross hairs ..... 28 Standard 29 T... 19 USB Connect 44 V Video Out 44 Viewing Movie 56 Still image 56 S Viewing menu 32 Saturation 31 Screen Changing the display .....20 ...16 LCD Backlight 43 Sepia 30 Setup 31, 36, 37 Camera 38 W Warning indicators and messages 81 WB 29 White balance ...
Instruction Manual (Set up and basic operation)
Page 1
... software, handbook "Cyber-shot Handbook") (1) • Operating instructions for digital still camera "Instruction Manual" (this manual) (1) Notes before purchasing. Hook WARNING To reduce fire or shock hazard, do if you experience trouble with v, then press z. (Setup) Now you call upon your Sony dealer regarding this product. This device ... extended for a Class B digital device, pursuant to e-mail or creating web pages More Printing Fine Rough * Images are designed to turn on and check the time on the LCD screen. DSC-S45 Refer to "Cyber-shot Handbook" (PDF) on supplied...
... software, handbook "Cyber-shot Handbook") (1) • Operating instructions for digital still camera "Instruction Manual" (this manual) (1) Notes before purchasing. Hook WARNING To reduce fire or shock hazard, do if you experience trouble with v, then press z. (Setup) Now you call upon your Sony dealer regarding this product. This device ... extended for a Class B digital device, pursuant to e-mail or creating web pages More Printing Fine Rough * Images are designed to turn on and check the time on the LCD screen. DSC-S45 Refer to "Cyber-shot Handbook" (PDF) on supplied...


