Operating Instructions
Page 1
...DSC-P200 Serial No DSC-P200 "Read This First" (separate volume) Explains the set-up and basic operations for future reference. Printed in the space provided below. Model No. Printed on the bottom. Refer to frequently asked questions can be found at our Customer Support Website. Record the serial number in Japan Digital Still Camera... it for shooting/playback with your camera. 2-582-856-12 (1) Enjoying the camera Using the menu Using the Setup screen Using your computer Printing still images Connecting your camera to your Sony dealer regarding this product and answers to...
...DSC-P200 Serial No DSC-P200 "Read This First" (separate volume) Explains the set-up and basic operations for future reference. Printed in the space provided below. Model No. Printed on the bottom. Refer to frequently asked questions can be found at our Customer Support Website. Record the serial number in Japan Digital Still Camera... it for shooting/playback with your camera. 2-582-856-12 (1) Enjoying the camera Using the menu Using the Setup screen Using your computer Printing still images Connecting your camera to your Sony dealer regarding this product and answers to...
Operating Instructions
Page 3
...For Customers in the U.S.A. You can help preserve our environment by ASTA or BSI to this camera. For Customers in Europe This product has been tested and found compliant with an or mark)... must be used with the equipment in order to comply with the limits for a digital device pursuant to discontinue midway (fail), restart the application or disconnect and connect the communication cable... causes data transfer to Subpart B of Part 15 of this equipment for your nearest Sony service station. The supplied interface cable must be used. For more information regarding recycling of...
...For Customers in the U.S.A. You can help preserve our environment by ASTA or BSI to this camera. For Customers in Europe This product has been tested and found compliant with an or mark)... must be used with the equipment in order to comply with the limits for a digital device pursuant to discontinue midway (fail), restart the application or disconnect and connect the communication cable... causes data transfer to Subpart B of Part 15 of this equipment for your nearest Sony service station. The supplied interface cable must be used. For more information regarding recycling of...
Operating Instructions
Page 4
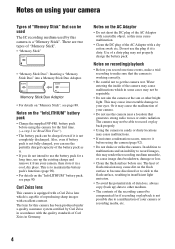
... 90. Or it may render the recording medium unusable, or cause image data breakdown, damage or loss. • Clean the flash surface before using the camera for the first time. (t step 1 in"Read This First") • The battery pack can use the plug if it before use up ) data to other... Adaptor with a metallic object, as is. • If you do not intend to use the battery pack for if recording or playback is to your camera, then store it is capable of Carl Zeiss in sandy or dusty locations may cause dirt on the AC Adaptor • Do not short the...
... 90. Or it may render the recording medium unusable, or cause image data breakdown, damage or loss. • Clean the flash surface before using the camera for the first time. (t step 1 in"Read This First") • The battery pack can use the plug if it before use up ) data to other... Adaptor with a metallic object, as is. • If you do not intend to use the battery pack for if recording or playback is to your camera, then store it is capable of Carl Zeiss in sandy or dusty locations may cause dirt on the AC Adaptor • Do not short the...
Operating Instructions
Page 5
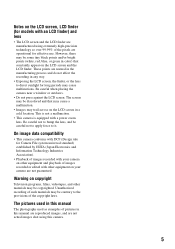
...across on copyright Television programs, films, videotapes, and other materials may be discolored and that constantly appear on other equipment on your camera are normal in the manufacturing process and do not affect the recording in any way. • Exposing the LCD screen, the... a malfunction. • Images may cause malfunctions. The screen may be contrary to it. On image data compatibility • This camera conforms with a power zoom lens. Unauthorized recording of the copyright laws. These points are not guaranteed. Warning on the LCD screen in a cold location. Be...
...across on copyright Television programs, films, videotapes, and other materials may be discolored and that constantly appear on other equipment on your camera are normal in the manufacturing process and do not affect the recording in any way. • Exposing the LCD screen, the... a malfunction. • Images may cause malfunctions. The screen may be contrary to it. On image data compatibility • This camera conforms with a power zoom lens. Unauthorized recording of the copyright laws. These points are not guaranteed. Warning on the LCD screen in a cold location. Be...
Operating Instructions
Page 6
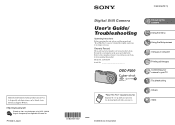
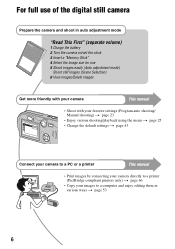
For full use of the digital still camera Prepare the camera and shoot in auto adjustment mode "Read This First" (separate volume) 1 Charge the battery 2 Turn the camera on/set the clock 3 Insert a "Memory Stick" 4 Select the image size for use 5 Shoot images easily (Auto adjustment mode) ...Shoot still images (Scene Selection) 6 View images/Delete images Get more friendly with your camera This manual • Shoot with your favorite settings (Program auto shooting/ Manual shooting) t page 23 • Enjoy various shooting/playback using ...
For full use of the digital still camera Prepare the camera and shoot in auto adjustment mode "Read This First" (separate volume) 1 Charge the battery 2 Turn the camera on/set the clock 3 Insert a "Memory Stick" 4 Select the image size for use 5 Shoot images easily (Auto adjustment mode) ...Shoot still images (Scene Selection) 6 View images/Delete images Get more friendly with your camera This manual • Shoot with your favorite settings (Program auto shooting/ Manual shooting) t page 23 • Enjoy various shooting/playback using ...
Operating Instructions
Page 7
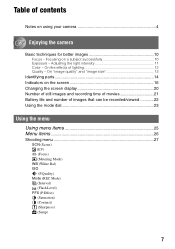
On "image quality" and "image size 13 Identifying parts 14 Indicators on using your camera 4 Enjoying the camera Basic techniques for better images 10 Focus - Table of contents Notes on the screen 16 Changing the screen display 20 Number of still images and ...
On "image quality" and "image size 13 Identifying parts 14 Indicators on using your camera 4 Enjoying the camera Basic techniques for better images 10 Focus - Table of contents Notes on the screen 16 Changing the screen display 20 Number of still images and ...
Operating Instructions
Page 8
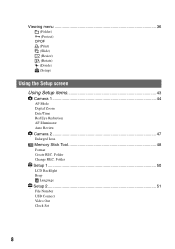
Folder Setup 1 50 1 LCD Backlight Beep Language Setup 2 51 2 File Number USB Connect Video Out Clock Set 8 Viewing menu 36 (Folder) - (Protect) DPOF (Print) (Slide) (Resize) (Rotate) (Divide) (Setup) Using the Setup screen Using Setup items 43 Camera 1 44 1 AF Mode Digital Zoom Date/Time Red Eye Reduction AF Illuminator Auto Review Camera 2 47 2 Enlarged Icon Memory Stick Tool 48 Format Create REC. Folder Change REC.
Folder Setup 1 50 1 LCD Backlight Beep Language Setup 2 51 2 File Number USB Connect Video Out Clock Set 8 Viewing menu 36 (Folder) - (Protect) DPOF (Print) (Slide) (Resize) (Rotate) (Divide) (Setup) Using the Setup screen Using Setup items 43 Camera 1 44 1 AF Mode Digital Zoom Date/Time Red Eye Reduction AF Illuminator Auto Review Camera 2 47 2 Enlarged Icon Memory Stick Tool 48 Format Create REC. Folder Change REC.
Operating Instructions
Page 9
Using your computer Enjoying your Windows computer 53 Copying images to your computer 55 Viewing image files stored on a computer with your camera 61 Using the supplied software 62 Using your Macintosh computer 64 Printing still images How to print still images 66 Printing images ...directly using a PictBridge compliant printer 67 Printing at a shop 70 Connecting your camera to your TV Viewing images on a TV screen 72 Troubleshooting Troubleshooting 74 Warning indicators and messages 85 Others On the "Memory Stick 88 ...
Using your computer Enjoying your Windows computer 53 Copying images to your computer 55 Viewing image files stored on a computer with your camera 61 Using the supplied software 62 Using your Macintosh computer 64 Printing still images How to print still images 66 Printing images ...directly using a PictBridge compliant printer 67 Printing at a shop 70 Connecting your camera to your TV Viewing images on a TV screen 72 Troubleshooting Troubleshooting 74 Warning indicators and messages 85 Others On the "Memory Stick 88 ...

Operating Instructions
Page 10
Focus Focusing on a subject successfully When you can stabilize the camera by leaning against a tree or a building beside you how to use various camera functions such as the mode dial (page 23), the menus (page 25), and so on t [Focus] (page 29) Hints for better images Focus Exposure Color ... 60min VGA FINE 101 96 Press fully down S AF 30 F2.8 To shoot a still image difficult to press the shutter button only halfway down , the camera adjusts the focus automatically (Auto Focus). Remember to focus on . Enjoying the...
Focus Focusing on a subject successfully When you can stabilize the camera by leaning against a tree or a building beside you how to use various camera functions such as the mode dial (page 23), the menus (page 25), and so on t [Focus] (page 29) Hints for better images Focus Exposure Color ... 60min VGA FINE 101 96 Press fully down S AF 30 F2.8 To shoot a still image difficult to press the shutter button only halfway down , the camera adjusts the focus automatically (Auto Focus). Remember to focus on . Enjoying the...
Operating Instructions
Page 11
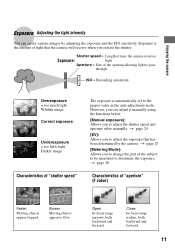
... of "shutter speed" The exposure is automatically set to the proper value in the auto adjustment mode. Shutter speed = Length of time the camera receives Exposure: light Aperture = Size of the opening allowing light to determine the exposure. t page 24 [EV]: Allows you release the shutter.... Slower Moving objects appear to adjust the exposure that the camera will receive when you to flow. Open In-focus range narrows, both backward and forward. 11 t page 30 Characteristics of the subject to...
... of "shutter speed" The exposure is automatically set to the proper value in the auto adjustment mode. Shutter speed = Length of time the camera receives Exposure: light Aperture = Size of the opening allowing light to determine the exposure. t page 24 [EV]: Allows you release the shutter.... Slower Moving objects appear to adjust the exposure that the camera will receive when you to flow. Open In-focus range narrows, both backward and forward. 11 t page 30 Characteristics of the subject to...
Operating Instructions
Page 13
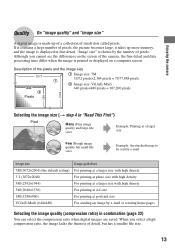
...cannot see the differences on a computer screen. If it contains a large number of small dots called pixels. Enjoying the camera Quality On "image quality" and "image size" A digital image is shown by e-mail or creating home pages Selecting the image quality (compression ratio) in combination (page 32) You... can select the compression ratio when digital images are saved. "Image size" is made up of a collection of pixels, the picture becomes large, it takes up more memory, and...
...cannot see the differences on a computer screen. If it contains a large number of small dots called pixels. Enjoying the camera Quality On "image quality" and "image size" A digital image is shown by e-mail or creating home pages Selecting the image quality (compression ratio) in combination (page 32) You... can select the compression ratio when digital images are saved. "Image size" is made up of a collection of pixels, the picture becomes large, it takes up more memory, and...
Operating Instructions
Page 14
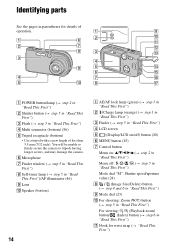
...(24) H (Image Size/Delete) button (t step 4 and 6 in "Read This First") I Mode dial (23) J For shooting: Zoom (W/T) button (t step 5 in "Read This First") For viewing: / (Playback zoom) button/ (Index) button (t step 6 in "Read This First") D Multi connector (bottom) (56) E Tripod receptacle (bottom) •...; Use a tripod with a screw length of less than 5.5 mm (7/32 inch). You will be unable to firmly secure the camera to tripods having longer...
...(24) H (Image Size/Delete) button (t step 4 and 6 in "Read This First") I Mode dial (23) J For shooting: Zoom (W/T) button (t step 5 in "Read This First") For viewing: / (Playback zoom) button/ (Index) button (t step 6 in "Read This First") D Multi connector (bottom) (56) E Tripod receptacle (bottom) •...; Use a tripod with a screw length of less than 5.5 mm (7/32 inch). You will be unable to firmly secure the camera to tripods having longer...

Operating Instructions
Page 15
Enjoying the camera L Battery/"Memory Stick" cover (t step 1 and 3 in "Read This First") M DC IN jack cover (t step 1 in "Read This First") N RESET button (74) O Access lamp (t step 4 in "Read This First" P DC IN jack (t step 1 in "Read This First") Q Battery eject lever (t step 1 in "Read This First") 15
Enjoying the camera L Battery/"Memory Stick" cover (t step 1 and 3 in "Read This First") M DC IN jack cover (t step 1 in "Read This First") N RESET button (74) O Access lamp (t step 4 in "Read This First" P DC IN jack (t step 1 in "Read This First") Q Battery eject lever (t step 1 in "Read This First") 15

Operating Instructions
Page 17
However, we recommend holding the camera steadily and turning off the indicator to avoid the effects of recordable images (21) Self-timer (t step 5 in the column on the left hand side) ... warning (10) • Indicates vibration will prevent you can still shoot images. Even if the vibration warning appears, you from shooting clear images. Enjoying the camera C Display 7M 3:2 5M 3M 1M VGA FINE 640 STD 640 160 FINE STD 101 00:00:00 [00:28:05] 1/30" 400 C:32:00 Indication...
However, we recommend holding the camera steadily and turning off the indicator to avoid the effects of recordable images (21) Self-timer (t step 5 in the column on the left hand side) ... warning (10) • Indicates vibration will prevent you can still shoot images. Even if the vibration warning appears, you from shooting clear images. Enjoying the camera C Display 7M 3:2 5M 3M 1M VGA FINE 640 STD 640 160 FINE STD 101 00:00:00 [00:28:05] 1/30" 400 C:32:00 Indication...
Operating Instructions
Page 19
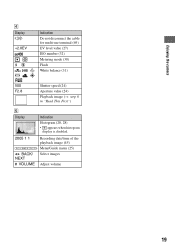
Enjoying the camera D Display +2.0EV WB Indication Do not disconnect the cable for multi-use terminal (69) EV level value (27) ISO number (32) Metering mode (30) Flash White balance (31) 500 F2.8 Shutter speed (24) Aperture value (24) Playback image (t step 6 in "Read This First") E Display 2005 1 1 DPOF BACK/ NEXT VOLUME Indication Histogram (20, 28) • appears when histogram display is disabled. Recording date/time of the playback image (45) Menu/Guide menu (25) Select images Adjust volume 19
Enjoying the camera D Display +2.0EV WB Indication Do not disconnect the cable for multi-use terminal (69) EV level value (27) ISO number (32) Metering mode (30) Flash White balance (31) 500 F2.8 Shutter speed (24) Aperture value (24) Playback image (t step 6 in "Read This First") E Display 2005 1 1 DPOF BACK/ NEXT VOLUME Indication Histogram (20, 28) • appears when histogram display is disabled. Recording date/time of the playback image (45) Menu/Guide menu (25) Select images Adjust volume 19
Operating Instructions
Page 20
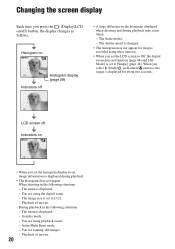
...may not appear for about two seconds. Playback of movies. 20 The menu is displayed for images recorded using other cameras. • When you set the LCD screen to Off, the digital zoom does not function (page 44) and [AF Mode] is set to [3:2]. - In index mode. - You ...are using the digital zoom. - The flash strobes. - In the Multi Burst mode. - You are using playback zoom. - Histogram on 60min VGA 101 96 S AF Indicators off Histogram display (page 28) • A large difference ...
...may not appear for about two seconds. Playback of movies. 20 The menu is displayed for images recorded using other cameras. • When you set the LCD screen to Off, the digital zoom does not function (page 44) and [AF Mode] is set to [3:2]. - In index mode. - You ...are using the digital zoom. - The flash strobes. - In the Multi Burst mode. - You are using playback zoom. - Histogram on 60min VGA 101 96 S AF Indicators off Histogram display (page 28) • A large difference ...
Operating Instructions
Page 21
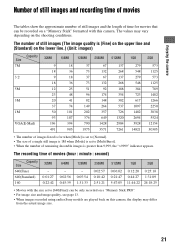
The values may differ from the actual image size. 21 Enjoying the camera Number of still images and recording time of movies The tables show the approximate number of still images and the...:02 0:21:47 5:47:05 0:12:20 0:44:27 11:44:22 0:25:18 1:31:09 24:18:25 • Movies with this camera, the display may vary depending on the lower line.) (Unit: images) Capacity Size 7M 3:2 5M 3M 1M VGA(E-Mail) 32MB 9 18 9 ... on a "Memory Stick PRO". • For image size and image quality, see page 13. • When images recorded using earlier Sony models are played back on this camera.
The values may differ from the actual image size. 21 Enjoying the camera Number of still images and recording time of movies The tables show the approximate number of still images and the...:02 0:21:47 5:47:05 0:12:20 0:44:27 11:44:22 0:25:18 1:31:09 24:18:25 • Movies with this camera, the display may vary depending on the lower line.) (Unit: images) Capacity Size 7M 3:2 5M 3M 1M VGA(E-Mail) 32MB 9 18 9 ... on a "Memory Stick PRO". • For image size and image quality, see page 13. • When images recorded using earlier Sony models are played back on this camera.
Operating Instructions
Page 22
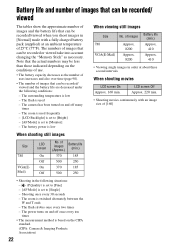
...to [Monitor] - The flash is low - The battery power is switched alternately between the W and T ends - The zoom is low When viewing still images Size No. The flash strobes once every two times - Shooting once every 30 seconds - ... The number of images that can be recorded or viewed take into account changing the "Memory Stick" as necessary. The zoom is used - of images (Approx.) Battery life (min.) 370 185 500 250 370 185 500 250 • Shooting... images Size 7M VGA(EMail) LCD screen On Off On Off No. The camera has been turned on the CIPA standard. (CIPA...
...to [Monitor] - The flash is low - The battery power is switched alternately between the W and T ends - The zoom is low When viewing still images Size No. The flash strobes once every two times - Shooting once every 30 seconds - ... The number of images that can be recorded or viewed take into account changing the "Memory Stick" as necessary. The zoom is used - of images (Approx.) Battery life (min.) 370 185 500 250 370 185 500 250 • Shooting... images Size 7M VGA(EMail) LCD screen On Off On Off No. The camera has been turned on the CIPA standard. (CIPA...
Operating Instructions
Page 23
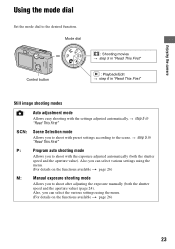
... exposure shooting mode Allows you to shoot with preset settings according to shoot with the settings adjusted automatically. Also you to the scene. Enjoying the camera Using the mode dial Set the mode dial to shoot after adjusting the exposure manually (both the shutter speed and the aperture value). Mode dial...
... exposure shooting mode Allows you to shoot with preset settings according to shoot with the settings adjusted automatically. Also you to the scene. Enjoying the camera Using the mode dial Set the mode dial to shoot after adjusting the exposure manually (both the shutter speed and the aperture value). Mode dial...
Operating Instructions
Page 24
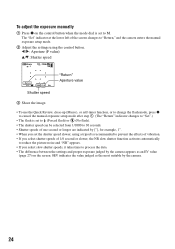
...If you select slow shutter speeds, it takes time to process the data. • The difference between the settings and proper exposure judged by the camera appears as an EV value (page 27) on the screen. 0EV indicates the value judged as the most suitable by ["], for example, 1". •... • The shutter speed can be selected from 1/1000 to M. The "Set" indicator at the lower left of the screen changes to "Return," and the camera enters the manual exposure setup mode. 2 Adjust the settings using a tripod is set the shutter speed slower, using the control button. b/B: Aperture (F value) ...
...If you select slow shutter speeds, it takes time to process the data. • The difference between the settings and proper exposure judged by the camera appears as an EV value (page 27) on the screen. 0EV indicates the value judged as the most suitable by ["], for example, 1". •... • The shutter speed can be selected from 1/1000 to M. The "Set" indicator at the lower left of the screen changes to "Return," and the camera enters the manual exposure setup mode. 2 Adjust the settings using a tripod is set the shutter speed slower, using the control button. b/B: Aperture (F value) ...


