Operating Instructions
Page 3
.... For Customers in the EMC Directive for using connection cables shorter than 3 meters (9.8 feet). Notice If static ..., please contact your safety and convenience. THIS CLASS B DIGITAL APPARATUS COMPLIES WITH CANADIAN ICES003. 3 For Customers in the... product has been tested and found compliant with this camera. Never use the plug without the fuse cover. ...in order to comply with the limits for a digital device pursuant to be used. Should the fuse in...the application or disconnect and connect the communication cable (USB, etc.) again. and Canada THIS DEVICE COMPLIES WITH PART...
.... For Customers in the EMC Directive for using connection cables shorter than 3 meters (9.8 feet). Notice If static ..., please contact your safety and convenience. THIS CLASS B DIGITAL APPARATUS COMPLIES WITH CANADIAN ICES003. 3 For Customers in the... product has been tested and found compliant with this camera. Never use the plug without the fuse cover. ...in order to comply with the limits for a digital device pursuant to be used. Should the fuse in...the application or disconnect and connect the communication cable (USB, etc.) again. and Canada THIS DEVICE COMPLIES WITH PART...
Operating Instructions
Page 51
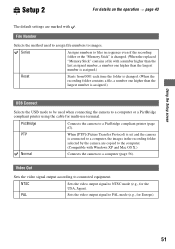
... computer, the images in the recording folder selected by the camera are marked with Windows XP and Mac OS X.) Normal Connects the camera to connected equipment. PAL Sets the video output signal to... images. PTP When [PTP] (Picture Transfer Protocol) is set and the camera is assigned.) USB Connect Selects the USB mode to be used to assign file numbers to PAL mode (e.g., for multi... Video Out Sets the video signal output according to a computer (page 56). PictBridge Connects the camera to NTSC mode (e.g., for the USA, Japan). NTSC Sets the video output signal to a ...
... computer, the images in the recording folder selected by the camera are marked with Windows XP and Mac OS X.) Normal Connects the camera to connected equipment. PAL Sets the video output signal to... images. PTP When [PTP] (Picture Transfer Protocol) is set and the camera is assigned.) USB Connect Selects the USB mode to be used to assign file numbers to PAL mode (e.g., for multi... Video Out Sets the video signal output according to a computer (page 56). PictBridge Connects the camera to NTSC mode (e.g., for the USA, Japan). NTSC Sets the video output signal to a ...
Operating Instructions
Page 56
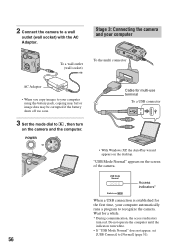
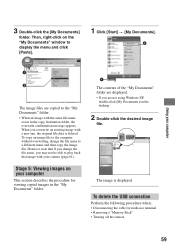
..., the access indicators turn white. • If "USB Mode Normal" does not appear, set [USB Connect] to recognize the camera. USB Mode Normal Access indicators* Switch on MENU When a USB connection is established for multi-use terminal To a USB connector • With Windows XP, the AutoPlay wizard ...camera to , then turn on the camera and the computer. Stage 3: Connecting the camera and your computer To a wall outlet (wall socket) To the multi connector AC Adaptor • When you copy images to your computer automatically runs a program to [Normal] (page 51). 56 POWER Cable...
..., the access indicators turn white. • If "USB Mode Normal" does not appear, set [USB Connect] to recognize the camera. USB Mode Normal Access indicators* Switch on MENU When a USB connection is established for multi-use terminal To a USB connector • With Windows XP, the AutoPlay wizard ...camera to , then turn on the camera and the computer. Stage 3: Connecting the camera and your computer To a wall outlet (wall socket) To the multi connector AC Adaptor • When you copy images to your computer automatically runs a program to [Normal] (page 51). 56 POWER Cable...
Operating Instructions
Page 59
... image is deleted. However, note that image with a new one, the original file data is displayed. Stage 5: Viewing images on your camera (page 61). To copy an image file to the computer without overwriting, change the file name, you change the file name to a ...different name and then copy the image file. To delete the USB connection Perform the following procedure when: • Disconnecting the cable for viewing copied images in the copy destination folder, the overwrite confirmation message appears. Then, right-click on the desktop...
... image is deleted. However, note that image with a new one, the original file data is displayed. Stage 5: Viewing images on your camera (page 61). To copy an image file to the computer without overwriting, change the file name, you change the file name to a ...different name and then copy the image file. To delete the USB connection Perform the following procedure when: • Disconnecting the cable for viewing copied images in the copy destination folder, the overwrite confirmation message appears. Then, right-click on the desktop...
Operating Instructions
Page 64
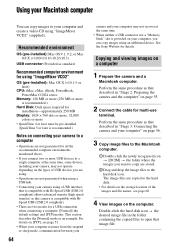
...procedure as that is compatible with Hi-Speed USB (USB 2.0 compliant) allows advanced transfer (high speed transfer) as that image file. See the Sony Website for multi-use terminal. Perform the same procedure as this camera is compatible with HiSpeed USB (USB 2.0 compliant). • There are two modes... dots or more, 32,000 colors or more USB devices to a single computer at the same time. • When neither a USB connector nor a "Memory Stick" slot is recommended.) Notes on connecting your computer" on page 55. 2 Connect the cable for details. For details on [PTP], see ...
...procedure as that is compatible with Hi-Speed USB (USB 2.0 compliant) allows advanced transfer (high speed transfer) as that image file. See the Sony Website for multi-use terminal. Perform the same procedure as this camera is compatible with HiSpeed USB (USB 2.0 compliant). • There are two modes... dots or more, 32,000 colors or more USB devices to a single computer at the same time. • When neither a USB connector nor a "Memory Stick" slot is recommended.) Notes on connecting your computer" on page 55. 2 Connect the cable for details. For details on [PTP], see ...
Operating Instructions
Page 67
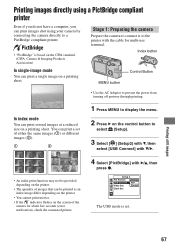
.... 2 Press B on the control button to select (Setup). 3 Select [ ] (Setup2) with V, then 2 select [USB Connect] with V/B. 4 Select [PictBridge] with the cable for about five seconds (error notification), check the connected printer. Printing still images 67 Printing images directly using a PictBridge compliant printer...print images shot using your camera by connecting the camera directly to a PictBridge compliant printer. • "PictBridge" is set of the camera for multi-use terminal. You can print a set . Stage 1: Preparing the camera Prepare the camera to connect it to prevent...
.... 2 Press B on the control button to select (Setup). 3 Select [ ] (Setup2) with V, then 2 select [USB Connect] with V/B. 4 Select [PictBridge] with the cable for about five seconds (error notification), check the connected printer. Printing still images 67 Printing images directly using a PictBridge compliant printer...print images shot using your camera by connecting the camera directly to a PictBridge compliant printer. • "PictBridge" is set of the camera for multi-use terminal. You can print a set . Stage 1: Preparing the camera Prepare the camera to connect it to prevent...
Operating Instructions
Page 68
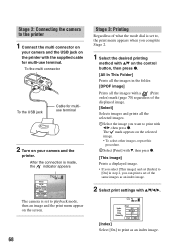
To the multi connector To the USB jack Cable for multiuse terminal 2 Turn on your camera and the USB jack on the printer with the supplied cable for multi-use terminal. Stage 2: Connecting the camera to the printer 1 Connect the multi connector on your camera and the printer. The mark appears on the control button, then...as an index image. After the connection is made, the indicator appears Print All In This Folder DPOF image Select This image Cancel The camera is set to playback mode, then an image and the print menu appear on the screen. 68 Stage 3: Printing Regardless of what the...
To the multi connector To the USB jack Cable for multiuse terminal 2 Turn on your camera and the USB jack on the printer with the supplied cable for multi-use terminal. Stage 2: Connecting the camera to the printer 1 Connect the multi connector on your camera and the printer. The mark appears on the control button, then...as an index image. After the connection is made, the indicator appears Print All In This Folder DPOF image Select This image Cancel The camera is set to playback mode, then an image and the print menu appear on the screen. 68 Stage 3: Printing Regardless of what the...

Operating Instructions
Page 79
..., use terminal is in "Read This First"). • The battery level is full. We recommend that of your camera is not guaranteed. • The camera is connected. Install a charged battery pack. Delete the USB communication (page 59). The image appears rough right after playback starts. • The image may appear rough right after... 23). • The folder/file name has been changed on your TV (page 51). • Check whether the connection is correct (page 72). • The cable for multi-use the screen.
..., use terminal is in "Read This First"). • The battery level is full. We recommend that of your camera is not guaranteed. • The camera is connected. Install a charged battery pack. Delete the USB communication (page 59). The image appears rough right after playback starts. • The image may appear rough right after... 23). • The folder/file name has been changed on your TV (page 51). • Check whether the connection is correct (page 72). • The cable for multi-use the screen.
Operating Instructions
Page 80
... the erroneously recognized device from the supplied CD-ROM. Install the USB driver (page 55). • Your computer does not properly recognize the device because you installed the "USB Driver" from your camera. • Turn on the camera (t step 2 in "Read This First"). • Use the...than the keyboard and the mouse from the USB connectors of your computer is not long enough to [Normal] in "Read This First"). • Use the supplied cable for multi-use terminal before you connected the camera and your computer with the camera. • Check "Recommended computer environment"...
... the erroneously recognized device from the supplied CD-ROM. Install the USB driver (page 55). • Your computer does not properly recognize the device because you installed the "USB Driver" from your camera. • Turn on the camera (t step 2 in "Read This First"). • Use the...than the keyboard and the mouse from the USB connectors of your computer is not long enough to [Normal] in "Read This First"). • Use the supplied cable for multi-use terminal before you connected the camera and your computer with the camera. • Check "Recommended computer environment"...
Operating Instructions
Page 81
... Manager" appears. 3 Right-click [ Sony DSC], then click [Uninstall] t [OK]. After making a USB connection, "PicturePackage" does not start automatically. • Start up the "PicturePackage Menu" and check [Settings]. • Make the USB connection after the computer is turned on the camera. • Copy them to a folder... recognized by noise when you view a movie on a computer. • You are using the supplied cable for multi-use terminal (page 56). &#...
... Manager" appears. 3 Right-click [ Sony DSC], then click [Uninstall] t [OK]. After making a USB connection, "PicturePackage" does not start automatically. • Start up the "PicturePackage Menu" and check [Settings]. • Make the USB connection after the computer is turned on the camera. • Copy them to a folder... recognized by noise when you view a movie on a computer. • You are using the supplied cable for multi-use terminal (page 56). &#...
Operating Instructions
Page 82
.... • All the data on and can be connected to the camera. • Set [USB Connect] to prevent accidental erasure (page 88). We recommend that is not compliant with the printer. Disconnect and connect the cable for multi-use terminal again. Cannot format a "Memory Stick". •... the printer are properly connected using cameras other than this camera or images modified with a computer may not print. You cannot restore it in the correct direction (t step 3 in the (Setup) menu (page 51). • Disconnect and connect the cable for multi-use terminal again. • Movies...
.... • All the data on and can be connected to the camera. • Set [USB Connect] to prevent accidental erasure (page 88). We recommend that is not compliant with the printer. Disconnect and connect the cable for multi-use terminal again. Cannot format a "Memory Stick". •... the printer are properly connected using cameras other than this camera or images modified with a computer may not print. You cannot restore it in the correct direction (t step 3 in the (Setup) menu (page 51). • Disconnect and connect the cable for multi-use terminal again. • Movies...
Operating Instructions
Page 87
...; The data transmission to the operating instructions supplied with the printer. Enable printer to connect • [USB Connect] is set to [PictBridge], however the camera is connected to print images before the printer connection was selected. Check the device. • The connection... established. Disconnect and connect the cable for multi-use terminal again. Connect to PictBridge device • You tried to a non-PictBridge compliant device. You cannot print movies. Connect to a PictBridge compliant printer. Do not disconnect the cable for multi-use terminal. 87
...; The data transmission to the operating instructions supplied with the printer. Enable printer to connect • [USB Connect] is set to [PictBridge], however the camera is connected to print images before the printer connection was selected. Check the device. • The connection... established. Disconnect and connect the cable for multi-use terminal again. Connect to PictBridge device • You tried to a non-PictBridge compliant device. You cannot print movies. Connect to a PictBridge compliant printer. Do not disconnect the cable for multi-use terminal. 87


