Operating Instructions
Page 14
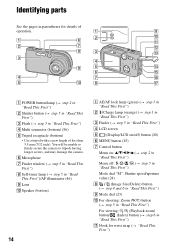
... "Read This First") K Hook for wrist strap (t "Read This First") You will be unable to firmly secure the camera to tripods having longer screws, and may damage the camera. F Microphone G Finder window (t step 5 in "Read This First") H Self-timer lamp (t step 5 in "Read...button (t step 4 and 6 in "Read This First") I Mode dial (23) J For shooting: Zoom (W/T) button (t step 5 in "Read This First") For viewing: / (Playback zoom) button/ (Index) button (t step 6 in "Read This First") D Multi connector (bottom) (56) E Tripod receptacle (bottom) • Use a tripod with a screw length of less...
... "Read This First") K Hook for wrist strap (t "Read This First") You will be unable to firmly secure the camera to tripods having longer screws, and may damage the camera. F Microphone G Finder window (t step 5 in "Read This First") H Self-timer lamp (t step 5 in "Read...button (t step 4 and 6 in "Read This First") I Mode dial (23) J For shooting: Zoom (W/T) button (t step 5 in "Read This First") For viewing: / (Playback zoom) button/ (Index) button (t step 6 in "Read This First") D Multi connector (bottom) (56) E Tripod receptacle (bottom) • Use a tripod with a screw length of less...
Operating Instructions
Page 54
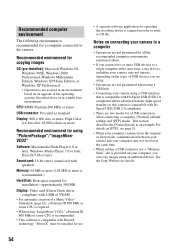
...in order to write to CD-Rs. This section describes the [Normal] mode as this camera is compatible with DirectX technology. CPU: MMX Pentium 200 MHz or faster USB connector: Provided as standard Display: 800 × 600 dots or more, High Color (16-...USB connector nor a "Memory Stick" slot is provided on your camera using an additional device. Recommended environment for a computer connected to the camera. "DirectX" must be installed for use. • A separate software application for details. 54 See the Sony Website for operating the recording device is required in a multi-boot...
...in order to write to CD-Rs. This section describes the [Normal] mode as this camera is compatible with DirectX technology. CPU: MMX Pentium 200 MHz or faster USB connector: Provided as standard Display: 800 × 600 dots or more, High Color (16-...USB connector nor a "Memory Stick" slot is provided on your camera using an additional device. Recommended environment for a computer connected to the camera. "DirectX" must be installed for use. • A separate software application for details. 54 See the Sony Website for operating the recording device is required in a multi-boot...
Operating Instructions
Page 56
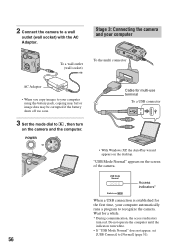
Stage 3: Connecting the camera and your computer To a wall outlet (wall socket) To the multi connector AC Adaptor • When you copy images to your computer automatically runs a program to a wall outlet (wall socket) with the AC Adaptor. Do not ... indicators turn on MENU When a USB connection is established for multi-use terminal To a USB connector • With Windows XP, the AutoPlay wizard appears on the screen of the camera. "USB Mode Normal" appears on the desktop. 2 Connect the camera to recognize the camera. POWER Cable for the first time, your computer using the...
Stage 3: Connecting the camera and your computer To a wall outlet (wall socket) To the multi connector AC Adaptor • When you copy images to your computer automatically runs a program to a wall outlet (wall socket) with the AC Adaptor. Do not ... indicators turn on MENU When a USB connection is established for multi-use terminal To a USB connector • With Windows XP, the AutoPlay wizard appears on the screen of the camera. "USB Mode Normal" appears on the desktop. 2 Connect the camera to recognize the camera. POWER Cable for the first time, your computer using the...
Operating Instructions
Page 64
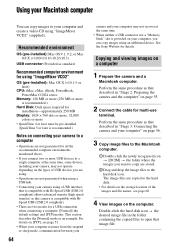
...). • There are stored. 2Drag and drop the image files to copy are two modes for multi-use terminal. Perform the same procedure as that described in "Stage 3: Connecting the camera and your computer" on page 56. 3 Copy image files to the Macintosh computer. 1Double-click the...more USB devices to a single computer at the same time. • When neither a USB connector nor a "Memory Stick" slot is provided on a computer 1 Prepare the camera and a Macintosh computer. See the Sony Website for all the recommended computer environments mentioned above. • If you want to the ...
...). • There are stored. 2Drag and drop the image files to copy are two modes for multi-use terminal. Perform the same procedure as that described in "Stage 3: Connecting the camera and your computer" on page 56. 3 Copy image files to the Macintosh computer. 1Double-click the...more USB devices to a single computer at the same time. • When neither a USB connector nor a "Memory Stick" slot is provided on a computer 1 Prepare the camera and a Macintosh computer. See the Sony Website for all the recommended computer environments mentioned above. • If you want to the ...
Operating Instructions
Page 68
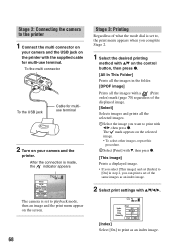
To the multi connector To the USB jack Cable for multi-use terminal. After the connection is made, the indicator appears Print All In This Folder DPOF image Select This image Cancel The camera is set to playback mode, then an image and the print menu appear on the screen. 68 Stage...Selects images and prints all the images in step 2, you want to print with the supplied cable for multiuse terminal 2 Turn on your camera and the USB jack on the printer with b/B, then press z. Stage 2: Connecting the camera to the printer 1 Connect the multi connector on your camera and the printer.
To the multi connector To the USB jack Cable for multi-use terminal. After the connection is made, the indicator appears Print All In This Folder DPOF image Select This image Cancel The camera is set to playback mode, then an image and the print menu appear on the screen. 68 Stage...Selects images and prints all the images in step 2, you want to print with the supplied cable for multiuse terminal 2 Turn on your camera and the USB jack on the printer with b/B, then press z. Stage 2: Connecting the camera to the printer 1 Connect the multi connector on your camera and the printer.
Operating Instructions
Page 72
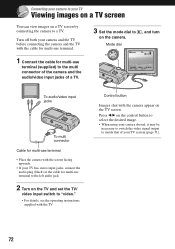
... To multi connector Cable for multi-use terminal • Place the camera with the screen facing upwards. • If your camera and the TV before connecting the camera and the TV with the cable for multi-use terminal. 1 Connect the cable for multi-use terminal (supplied) to the multi connector of the camera and ...the audio/video input jacks of the cable for multi-use terminal to the ...
... To multi connector Cable for multi-use terminal • Place the camera with the screen facing upwards. • If your camera and the TV before connecting the camera and the TV with the cable for multi-use terminal. 1 Connect the cable for multi-use terminal (supplied) to the multi connector of the camera and ...the audio/video input jacks of the cable for multi-use terminal to the ...

Operating Instructions
Page 77
...does not work . • You cannot change the zoom scale when shooting movies. The flash does not work. • The flash is set to (No flash) (t step 5 in "Read This First"). • You cannot use terminal is connected to the multi connector. Make sure to position the lens farther away from ...the subject than [640(Fine)]. (t step 4 in "Read This First") The image is out of focus" on page 30. Smart zoom does not function. • Set [Digital Zoom] to [Smart] (page 44). • ...
...does not work . • You cannot change the zoom scale when shooting movies. The flash does not work. • The flash is set to (No flash) (t step 5 in "Read This First"). • You cannot use terminal is connected to the multi connector. Make sure to position the lens farther away from ...the subject than [640(Fine)]. (t step 4 in "Read This First") The image is out of focus" on page 30. Smart zoom does not function. • Set [Digital Zoom] to [Smart] (page 44). • ...
Operating Instructions
Page 80
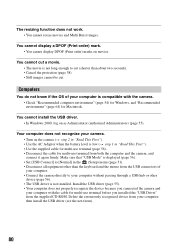
... Computers You do not know if the OS of your computer. • Connect the camera directly to cut (shorter than the keyboard and the mouse from the USB connectors of your computer with the camera. • Check "Recommended computer environment" (page 54) for Windows, and "Recommended ...environment" (page 64) for multi-use terminal from both the computer and the camera, and connect it again firmly. The resizing...
... Computers You do not know if the OS of your computer. • Connect the camera directly to cut (shorter than the keyboard and the mouse from the USB connectors of your computer with the camera. • Check "Recommended computer environment" (page 54) for Windows, and "Recommended ...environment" (page 64) for multi-use terminal from both the computer and the camera, and connect it again firmly. The resizing...
Operating Instructions
Page 93
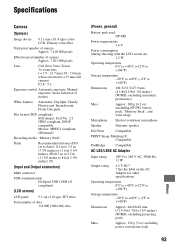
... color filter Total pixel number of camera Approx. 7 410 000 pixels Effective pixel number of camera Approx. 7 201 000 pixels Lens Carl Zeiss Vario-Tessar 3× zoom lens f = 7.9 - 23.7 mm (38 - 114 mm when converted to a 35 mm still camera) F2.8 - 5.2 Exposure control ... to 3.5 m (7 7/8 inches to 11 feet 5 3/4 inches) (W)/0.3 m to 2.5 m (11 7/8 inches to 8 feet 2 3/8 inches) (T) [Input and Output connectors] Multi connector USB communication Hi-Speed USB (USB 2.0 compliant) [LCD screen] LCD panel 5.1 cm (2.0 type) TFT drive Total number of dots 134 000 (560×240) dots...
... color filter Total pixel number of camera Approx. 7 410 000 pixels Effective pixel number of camera Approx. 7 201 000 pixels Lens Carl Zeiss Vario-Tessar 3× zoom lens f = 7.9 - 23.7 mm (38 - 114 mm when converted to a 35 mm still camera) F2.8 - 5.2 Exposure control ... to 3.5 m (7 7/8 inches to 11 feet 5 3/4 inches) (W)/0.3 m to 2.5 m (11 7/8 inches to 8 feet 2 3/8 inches) (T) [Input and Output connectors] Multi connector USB communication Hi-Speed USB (USB 2.0 compliant) [LCD screen] LCD panel 5.1 cm (2.0 type) TFT drive Total number of dots 134 000 (560×240) dots...


