
User Guide
Page 1
DSC-M2 Serial No DSC-M2 "Read This First" (separate volume) Explains the set-up and basic operations for future reference. Printed on the bottom. Model No. Additional information on this product and answers to your camera to frequently asked questions can be found at our ...shooting/playback with your camera. © 2005 Sony Corporation 2-638-430-12(1) Enjoying the camera Using the menu Using the Setup screen Using your computer Printing still images Connecting your TV Troubleshooting Others Index Record the serial number in Japan Digital Still Camera User's Guide/ Troubleshooting...
DSC-M2 Serial No DSC-M2 "Read This First" (separate volume) Explains the set-up and basic operations for future reference. Printed on the bottom. Model No. Additional information on this product and answers to your camera to frequently asked questions can be found at our ...shooting/playback with your camera. © 2005 Sony Corporation 2-638-430-12(1) Enjoying the camera Using the menu Using the Setup screen Using your computer Printing still images Connecting your TV Troubleshooting Others Index Record the serial number in Japan Digital Still Camera User's Guide/ Troubleshooting...
User Guide
Page 3
... in order to comply with BS 1363 is disposed of materials will help prevent potential negative consequences for your nearest Sony service station. 3 If the plug supplied with the instructions, may influence the picture and sound of electrical and...Applicable in the European Union and other European countries with the limits set out in the EMC Directive for a digital device pursuant to which can radiate radio frequency energy and, if not installed and used in Europe This product...has a detachable fuse cover, be used . Disposal of FCC Rules. By ensuring this camera.
... in order to comply with BS 1363 is disposed of materials will help prevent potential negative consequences for your nearest Sony service station. 3 If the plug supplied with the instructions, may influence the picture and sound of electrical and...Applicable in the European Union and other European countries with the limits set out in the EMC Directive for a digital device pursuant to which can radiate radio frequency energy and, if not installed and used in Europe This product...has a detachable fuse cover, be used . Disposal of FCC Rules. By ensuring this camera.
User Guide
Page 4
... Duo", see page 99. When using a "Memory Stick Duo" with "Memory Stick" compatible equipment You can be repairable. • Do not aim the camera at the sun or other medium. No compensation for contents of the recording • The contents of the recording cannot be compensated for a long time...recording media, etc. Also, even if the battery pack is not fully charged, you can use the partially charged capacity of "Memory Stick" that the camera is working correctly. • Be careful not to use up ) data to a malfunction of data loss, always copy (back up the existing charge...
... Duo", see page 99. When using a "Memory Stick Duo" with "Memory Stick" compatible equipment You can be repairable. • Do not aim the camera at the sun or other medium. No compensation for contents of the recording • The contents of the recording cannot be compensated for a long time...recording media, etc. Also, even if the battery pack is not fully charged, you can use the partially charged capacity of "Memory Stick" that the camera is working correctly. • Be careful not to use up ) data to a malfunction of data loss, always copy (back up the existing charge...
User Guide
Page 5
...normal in the manufacturing process and do not affect the recording in any way. In addition to malfunctions and an inability to pinch your camera are operational for long periods may not be discolored and that may cause a malfunction. • Images may cause dirt on and off... copyright Television programs, films, videotapes, and other equipment on the LCD screen. However, there may cause malfunction. Be careful when placing the camera near a location that constantly appear on your finger when the lens cover opens and closes. The screen may be able to direct sunlight for...
...normal in the manufacturing process and do not affect the recording in any way. In addition to malfunctions and an inability to pinch your camera are operational for long periods may not be discolored and that may cause a malfunction. • Images may cause dirt on and off... copyright Television programs, films, videotapes, and other equipment on the LCD screen. However, there may cause malfunction. Be careful when placing the camera near a location that constantly appear on your finger when the lens cover opens and closes. The screen may be able to direct sunlight for...

User Guide
Page 6
...; When opening the LCD panel, make sure not to touch the lens portion with your hand. 180° PHOTO MOVIE MODE • When carrying the camera, close the LCD panel as illustrated. PHOTO MOVIE MODE • The LCD panel rotates 90 degrees and 180 degrees to suit your fingers. You can...
...; When opening the LCD panel, make sure not to touch the lens portion with your hand. 180° PHOTO MOVIE MODE • When carrying the camera, close the LCD panel as illustrated. PHOTO MOVIE MODE • The LCD panel rotates 90 degrees and 180 degrees to suit your fingers. You can...
User Guide
Page 7
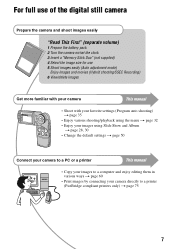
For full use of the digital still camera Prepare the camera and shoot images easily "Read This First" (separate volume) 1 Prepare the battery pack 2 Turn the camera on/set the clock 3 Insert a "Memory Stick Duo" (not supplied) 4 Select the image size for use 5 Shoot images easily (...Auto adjustment mode) Enjoy images and movies (Hybrid shooting/5SEC Recording) 6 View/delete images Get more familiar with your camera This manual PHOTO MOVIE MODE • Shoot with your favorite settings (Program auto shooting) t page 35 • Enjoy various shooting/playback using ...
For full use of the digital still camera Prepare the camera and shoot images easily "Read This First" (separate volume) 1 Prepare the battery pack 2 Turn the camera on/set the clock 3 Insert a "Memory Stick Duo" (not supplied) 4 Select the image size for use 5 Shoot images easily (...Auto adjustment mode) Enjoy images and movies (Hybrid shooting/5SEC Recording) 6 View/delete images Get more familiar with your camera This manual PHOTO MOVIE MODE • Shoot with your favorite settings (Program auto shooting) t page 35 • Enjoy various shooting/playback using ...
User Guide
Page 8
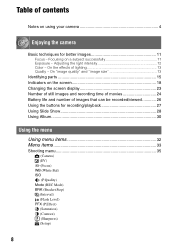
... for better images 11 Focus - Focusing on a subject successfully 11 Exposure - Adjusting the light intensity 12 Color - Table of contents Notes on using your camera 4 Enjoying the camera Basic techniques for recording/playback 27 Using Slide Show 28 Using Album 30 Using the menu Using menu items 32 Menu items 33 Shooting...
... for better images 11 Focus - Focusing on a subject successfully 11 Exposure - Adjusting the light intensity 12 Color - Table of contents Notes on using your camera 4 Enjoying the camera Basic techniques for recording/playback 27 Using Slide Show 28 Using Album 30 Using the menu Using menu items 32 Menu items 33 Shooting...
User Guide
Page 9
Viewing menu 45 (Folder) - (Protect) DPOF (Print) (Resize) (Rotate) (Setup) Trimming Using the Setup screen Using Setup items 50 Camera 51 Hybrid Rec Digital Zoom Date/Time Red Eye Reduction AF Illuminator Auto Review Memory Stick Tool 54 Format Create REC.Folder Change REC.Folder Copy Album tool 56 Write in Album Format Setup 1 57 1 Beep Format Music LCD Backlight Language Setup 2 58 2 File Number USB Connect Video Out Clock Set 9
Viewing menu 45 (Folder) - (Protect) DPOF (Print) (Resize) (Rotate) (Setup) Trimming Using the Setup screen Using Setup items 50 Camera 51 Hybrid Rec Digital Zoom Date/Time Red Eye Reduction AF Illuminator Auto Review Memory Stick Tool 54 Format Create REC.Folder Change REC.Folder Copy Album tool 56 Write in Album Format Setup 1 57 1 Beep Format Music LCD Backlight Language Setup 2 58 2 File Number USB Connect Video Out Clock Set 9

User Guide
Page 10
Using your computer Enjoying your Windows computer 60 Copying images to your computer 62 Viewing image files stored on a computer with your camera 69 Using the supplied software 70 Using your Macintosh computer 72 Printing still images How to print still images 74 Printing images ...directly using a PictBridge compliant printer 75 Printing at a shop 79 Connecting your camera to your TV Viewing images on a TV screen 81 Troubleshooting Troubleshooting 83 Warning indicators and messages 94 Others On the "Memory Stick 97 ...
Using your computer Enjoying your Windows computer 60 Copying images to your computer 62 Viewing image files stored on a computer with your camera 69 Using the supplied software 70 Using your Macintosh computer 72 Printing still images How to print still images 74 Printing images ...directly using a PictBridge compliant printer 75 Printing at a shop 79 Connecting your camera to your TV Viewing images on a TV screen 81 Troubleshooting Troubleshooting 83 Warning indicators and messages 94 Others On the "Memory Stick 97 ...
User Guide
Page 11
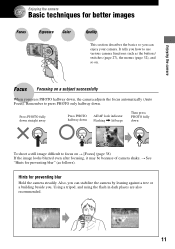
...page 27), the menus (page 32), and so on t [Focus] (page 38) If the image looks blurred even after focusing, it may be because of camera shake. Remember to press PHOTO only halfway down VGA FINE [ 96] 30 F2.8 To shoot a still image difficult to use various... in dark places are also recommended. 11 Focus Focusing on a subject successfully When you how to focus on . Also, you can enjoy your camera. Enjoying the camera Enjoying the camera Basic techniques for better images Focus Exposure Color PHOTO MOVIE MODE Quality This section describes the basics so you can stabilize the...
...page 27), the menus (page 32), and so on t [Focus] (page 38) If the image looks blurred even after focusing, it may be because of camera shake. Remember to press PHOTO only halfway down VGA FINE [ 96] 30 F2.8 To shoot a still image difficult to use various... in dark places are also recommended. 11 Focus Focusing on a subject successfully When you how to focus on . Also, you can enjoy your camera. Enjoying the camera Enjoying the camera Basic techniques for better images Focus Exposure Color PHOTO MOVIE MODE Quality This section describes the basics so you can stabilize the...

User Guide
Page 12
... the light intensity You can adjust it manually using the functions below. However, the image tends to adjust the exposure that the camera will receive when you release the shutter. t page 37 Metering Mode: Allows you can create various images by the... camera. Low ISO sensitivity Records a smoother image. Shutter speed = Length of time the camera receives Exposure: light Aperture = Size of the opening allowing light to photo films) receives. Exposure is the same...
... the light intensity You can adjust it manually using the functions below. However, the image tends to adjust the exposure that the camera will receive when you release the shutter. t page 37 Metering Mode: Allows you can create various images by the... camera. Low ISO sensitivity Records a smoother image. Shutter speed = Length of time the camera receives Exposure: light Aperture = Size of the opening allowing light to photo films) receives. Exposure is the same...
User Guide
Page 13
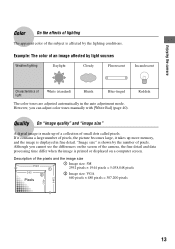
... Although you can adjust color tones manually with [White Bal] (page 40). Reddish Quality On "image quality" and "image size" A digital image is affected by the lighting conditions. Description of light White (standard) Bluish Blue-tinged The color tones are adjusted automatically in fine detail.... Enjoying the camera 1944 480 Color On the effects of lighting The apparent color of the subject is made up more memory, and the image ...
... Although you can adjust color tones manually with [White Bal] (page 40). Reddish Quality On "image quality" and "image size" A digital image is affected by the lighting conditions. Description of light White (standard) Bluish Blue-tinged The color tones are adjusted automatically in fine detail.... Enjoying the camera 1944 480 Color On the effects of lighting The apparent color of the subject is made up more memory, and the image ...

User Guide
Page 15
... the pages in "Read This First") 15 Camera 1 qf 2 qg 3 4 qh 5 6 qj 7 8 qk 9 0 PHOTO MOVIE MODE ql w; qa wa qs qd ws A (Index) button (75, t step 6 in "Read This First" ) B LCD screen (23) C ...
... the pages in "Read This First") 15 Camera 1 qf 2 qg 3 4 qh 5 6 qj 7 8 qk 9 0 PHOTO MOVIE MODE ql w; qa wa qs qd ws A (Index) button (75, t step 6 in "Read This First" ) B LCD screen (23) C ...

User Guide
Page 16
... K Battery eject lever (t step 1 in "Read This First") J Tripod receptacle Use a tripod with a screw length of less than 5.5 mm (7/32 inch), and may damage the camera. You will be unable to firmly secure the camera to a tripod having the screw longer than 5.5 mm (7/32 inch).
... K Battery eject lever (t step 1 in "Read This First") J Tripod receptacle Use a tripod with a screw length of less than 5.5 mm (7/32 inch), and may damage the camera. You will be unable to firmly secure the camera to a tripod having the screw longer than 5.5 mm (7/32 inch).
User Guide
Page 17
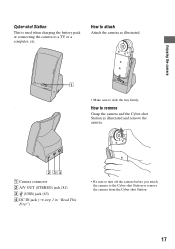
... Attach the camera as illustrated and remove the camera. 234 A Camera connector B A/V OUT (STEREO) jack (81) C (USB) jack (63) D DC IN jack (t step 1 in "Read This First") • Be sure to turn off the camera before you attach the camera to the Cyber-shot Station or remove the camera from the Cyber...-shot Station. 17 How to remove Grasp the camera and the Cyber-shot Station as illustrated. 1 • Make sure to a TV ...
... Attach the camera as illustrated and remove the camera. 234 A Camera connector B A/V OUT (STEREO) jack (81) C (USB) jack (63) D DC IN jack (t step 1 in "Read This First") • Be sure to turn off the camera before you attach the camera to the Cyber-shot Station or remove the camera from the Cyber...-shot Station. 17 How to remove Grasp the camera and the Cyber-shot Station as illustrated. 1 • Make sure to a TV ...
User Guide
Page 18
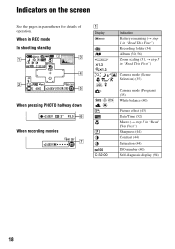
... 30f 7 C:32:00 Indication Battery remaining (t step 1 in "Read This First") Recording folder (54) Album (30, 56) Zoom scaling (51, t step 5 in "Read This First") Camera mode (Scene Selection) (35) Camera mode (Program) (35) White balance (40) Picture effect (43) Date/Time (52) Macro (t step 5 in parentheses for details of operation.
... 30f 7 C:32:00 Indication Battery remaining (t step 1 in "Read This First") Recording folder (54) Album (30, 56) Zoom scaling (51, t step 5 in "Read This First") Camera mode (Scene Selection) (35) Camera mode (Program) (35) White balance (40) Picture effect (43) Date/Time (52) Macro (t step 5 in parentheses for details of operation.

User Guide
Page 19
Even if the vibration warning appears, you from shooting clear images due to stabilize the camera. C Display 0.5m Indication AF range finder frame indicator (38) Focus preset distance (38) Metering mode (t step 5 in "Read This First") Histogram (23, 37) D Display E + ... you can still shoot images. However, we recommend using the flash for better lighting or using a tripod or other means to insufficient lighting. Enjoying the camera B Display Indication Red-eye reduction (52) SL Flash mode (t step 5 in "Read This First") 5M 3:2 3M 1M VGA FINE STD Image size (t step 4 in "...
Even if the vibration warning appears, you from shooting clear images due to stabilize the camera. C Display 0.5m Indication AF range finder frame indicator (38) Focus preset distance (38) Metering mode (t step 5 in "Read This First") Histogram (23, 37) D Display E + ... you can still shoot images. However, we recommend using the flash for better lighting or using a tripod or other means to insufficient lighting. Enjoying the camera B Display Indication Red-eye reduction (52) SL Flash mode (t step 5 in "Read This First") 5M 3:2 3M 1M VGA FINE STD Image size (t step 4 in "...

User Guide
Page 21
... (45) Playback bar (t step 6 in "Read This First") 21 C:32:00 2 DPOF 4 • To check the playback display on Album, see page 30. Enjoying the camera When playing back still images 60min 101 12/12 3 1 VGA 101 1.3 C:32:00 4 500 F4.5 PLAY ISO100 +2.0EV 2 101-0012 2005 1 1 9:30AM 5 When playing back...
... (45) Playback bar (t step 6 in "Read This First") 21 C:32:00 2 DPOF 4 • To check the playback display on Album, see page 30. Enjoying the camera When playing back still images 60min 101 12/12 3 1 VGA 101 1.3 C:32:00 4 500 F4.5 PLAY ISO100 +2.0EV 2 101-0012 2005 1 1 9:30AM 5 When playing back...

User Guide
Page 23
... playback zoom. - You are rotating still images. - Playback of Multi Burst images - The menu is 3:2. - You are using other cameras. • You can turn the indicators on by turning off the LCD backlight. • When you start Slide Show, the indicators will... difference in the histogram displayed when shooting and during playback. • The histogram does not appear in the digital zoom area During playback - The flash strobes. - Enjoying the camera Changing the screen display Each time you set the histogram display to on, image information is displayed. - Recording...
... playback zoom. - You are rotating still images. - Playback of Multi Burst images - The menu is 3:2. - You are using other cameras. • You can turn the indicators on by turning off the LCD backlight. • When you start Slide Show, the indicators will... difference in the histogram displayed when shooting and during playback. • The histogram does not appear in the digital zoom area During playback - The flash strobes. - Enjoying the camera Changing the screen display Each time you set the histogram display to on, image information is displayed. - Recording...

User Guide
Page 24
... is for when [Hybrid Rec] is greater than 9,999, the ">9999" indicator appears. • You can be recorded on a "Memory Stick Duo" formatted with this camera. The number of still images (The image quality is [Fine] on the upper line and [Standard] on the shooting conditions. The values may vary depending...
... is for when [Hybrid Rec] is greater than 9,999, the ">9999" indicator appears. • You can be recorded on a "Memory Stick Duo" formatted with this camera. The number of still images (The image quality is [Fine] on the upper line and [Standard] on the shooting conditions. The values may vary depending...


