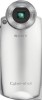
User Guide
Page 2
...recycling of rechargeable batteries, call : Sony Customer Information Services Center 1-800-222-SONY (7669) The number below is intended to alert the user to operate this product, you . Regulatory Information Declaration of Conformity Trade Name: SONY Model No.: DSC-M2 Responsible Party: Sony Electronics Inc....accept any questions about this equipment. Note: DSC-M2 is subject to the following two conditions: (1) This device may be of sufficient magnitude to constitute a risk of electric shock to be used rechargeable batteries to the collection and recycling location nearest you...
...recycling of rechargeable batteries, call : Sony Customer Information Services Center 1-800-222-SONY (7669) The number below is intended to alert the user to operate this product, you . Regulatory Information Declaration of Conformity Trade Name: SONY Model No.: DSC-M2 Responsible Party: Sony Electronics Inc....accept any questions about this equipment. Note: DSC-M2 is subject to the following two conditions: (1) This device may be of sufficient magnitude to constitute a risk of electric shock to be used rechargeable batteries to the collection and recycling location nearest you...
User Guide
Page 4
...". Types of reproducing sharp images with a Carl Zeiss lens which in "Read This First") 4 • The battery pack can be repairable. • Do not aim the camera at the sun or other medium. Other memory cards cannot be charged even if it into the Memory Stick Duo Adaptor... (not supplied). Memory Stick Duo Adaptor Notes on the "InfoLITHIUM" battery pack • Charge the supplied NP-FT1 battery pack before operating the camera. • Before you need to a malfunction of Carl Zeiss in a cool, dry place. Water entering the...
...". Types of reproducing sharp images with a Carl Zeiss lens which in "Read This First") 4 • The battery pack can be repairable. • Do not aim the camera at the sun or other medium. Other memory cards cannot be charged even if it into the Memory Stick Duo Adaptor... (not supplied). Memory Stick Duo Adaptor Notes on the "InfoLITHIUM" battery pack • Charge the supplied NP-FT1 battery pack before operating the camera. • Before you need to a malfunction of Carl Zeiss in a cool, dry place. Water entering the...
User Guide
Page 7
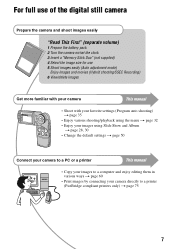
For full use of the digital still camera Prepare the camera and shoot images easily "Read This First" (separate volume) 1 Prepare the battery pack 2 Turn the camera on/set the clock 3 Insert a "Memory Stick Duo" (not supplied) 4 Select the image size for use 5 Shoot images easily (Auto adjustment mode) Enjoy images and ...
For full use of the digital still camera Prepare the camera and shoot images easily "Read This First" (separate volume) 1 Prepare the battery pack 2 Turn the camera on/set the clock 3 Insert a "Memory Stick Duo" (not supplied) 4 Select the image size for use 5 Shoot images easily (Auto adjustment mode) Enjoy images and ...
User Guide
Page 8
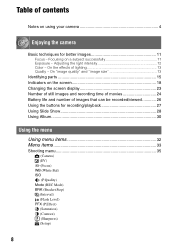
... techniques for recording/playback 27 Using Slide Show 28 Using Album 30 Using the menu Using menu items 32 Menu items 33 Shooting menu 35 (Camera) (EV) 9 (Focus) WB (White Bal) ISO (P.Quality) Mode (REC Mode) BRK (Bracket Step) M (Interval) (Flash Level) PFX (P.Effect) (Saturation) (Contrast) ...Setup) 8 Table of contents Notes on the screen 18 Changing the screen display 23 Number of still images and recording time of movies 24 Battery life and number of lighting 13 Quality - Focusing on a subject successfully 11 Exposure - Adjusting the light intensity 12 Color - On the ...
... techniques for recording/playback 27 Using Slide Show 28 Using Album 30 Using the menu Using menu items 32 Menu items 33 Shooting menu 35 (Camera) (EV) 9 (Focus) WB (White Bal) ISO (P.Quality) Mode (REC Mode) BRK (Bracket Step) M (Interval) (Flash Level) PFX (P.Effect) (Saturation) (Contrast) ...Setup) 8 Table of contents Notes on the screen 18 Changing the screen display 23 Number of still images and recording time of movies 24 Battery life and number of lighting 13 Quality - Focusing on a subject successfully 11 Exposure - Adjusting the light intensity 12 Color - On the ...

User Guide
Page 10
Using your computer Enjoying your Windows computer 60 Copying images to your computer 62 Viewing image files stored on a computer with your camera 69 Using the supplied software 70 Using your Macintosh computer 72 Printing still images How to print still images 74 Printing images ...directly using a PictBridge compliant printer 75 Printing at a shop 79 Connecting your camera to your TV Viewing images on a TV screen 81 Troubleshooting Troubleshooting 83 Warning indicators and messages 94 Others On the "Memory Stick 97 ...
Using your computer Enjoying your Windows computer 60 Copying images to your computer 62 Viewing image files stored on a computer with your camera 69 Using the supplied software 70 Using your Macintosh computer 72 Printing still images How to print still images 74 Printing images ...directly using a PictBridge compliant printer 75 Printing at a shop 79 Connecting your camera to your TV Viewing images on a TV screen 81 Troubleshooting Troubleshooting 83 Warning indicators and messages 94 Others On the "Memory Stick 97 ...

User Guide
Page 16
You will be unable to firmly secure the camera to a tripod having the screw longer than 5.5 mm (7/32 inch). S DC IN connector When using the AC-LS5 AC Adaptor (supplied) DC plug 1 5 2 3 v mark 4 AC ... slot (t step 1 in "Read This First") H "Memory Stick Duo" slot (t step 3 in "Read This First") I Battery/"Memory Stick Duo" cover (t step 1 and 3 in "Read This First") 16 K Battery eject lever (t step 1 in "Read This First") J Tripod receptacle Use a tripod with a screw length of less than 5.5 mm (7/32 inch), and may damage the...
You will be unable to firmly secure the camera to a tripod having the screw longer than 5.5 mm (7/32 inch). S DC IN connector When using the AC-LS5 AC Adaptor (supplied) DC plug 1 5 2 3 v mark 4 AC ... slot (t step 1 in "Read This First") H "Memory Stick Duo" slot (t step 3 in "Read This First") I Battery/"Memory Stick Duo" cover (t step 1 and 3 in "Read This First") 16 K Battery eject lever (t step 1 in "Read This First") J Tripod receptacle Use a tripod with a screw length of less than 5.5 mm (7/32 inch), and may damage the...
User Guide
Page 17
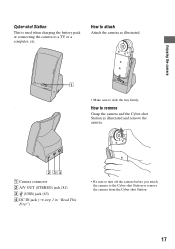
...• Be sure to turn off the camera before you attach the camera to the Cyber-shot Station or remove the camera from the Cyber-shot Station. 17 Enjoying the camera Cyber-shot Station This is used when charging the battery pack or connecting the camera to slide the tray firmly. . How... to remove Grasp the camera and the Cyber-shot Station as illustrated. 1 •...
...• Be sure to turn off the camera before you attach the camera to the Cyber-shot Station or remove the camera from the Cyber-shot Station. 17 Enjoying the camera Cyber-shot Station This is used when charging the battery pack or connecting the camera to slide the tray firmly. . How... to remove Grasp the camera and the Cyber-shot Station as illustrated. 1 •...
User Guide
Page 18
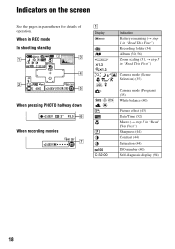
....5 6 A Display 60min 101 1.3 1.3 WB When recording movies +2.0EV 640 30f 7 C:32:00 Indication Battery remaining (t step 1 in "Read This First") Recording folder (54) Album (30, 56) Zoom scaling (51, t step 5 in "Read This First") Camera mode (Scene Selection) (35) Camera mode (Program) (35) White balance (40) Picture effect (43) Date/Time (52) Macro...
....5 6 A Display 60min 101 1.3 1.3 WB When recording movies +2.0EV 640 30f 7 C:32:00 Indication Battery remaining (t step 1 in "Read This First") Recording folder (54) Album (30, 56) Zoom scaling (51, t step 5 in "Read This First") Camera mode (Scene Selection) (35) Camera mode (Program) (35) White balance (40) Picture effect (43) Date/Time (52) Macro...

User Guide
Page 19
Enjoying the camera B Display Indication Red-eye reduction (52) SL Flash mode (t step 5 in "Read This First") 5M 3:2 3M 1M VGA FINE STD Image size (t step 4 in "Read ... lighting or using a tripod or other means to insufficient lighting. Even if the vibration warning appears, you from shooting clear images due to stabilize the camera. Low battery warning (26, 94) Spot metering cross hair (t step 5 in "Read This First") AF range finder frame (38) E Display +2.0EV [00:28:05] Self-timer...
Enjoying the camera B Display Indication Red-eye reduction (52) SL Flash mode (t step 5 in "Read This First") 5M 3:2 3M 1M VGA FINE STD Image size (t step 4 in "Read ... lighting or using a tripod or other means to insufficient lighting. Even if the vibration warning appears, you from shooting clear images due to stabilize the camera. Low battery warning (26, 94) Spot metering cross hair (t step 5 in "Read This First") AF range finder frame (38) E Display +2.0EV [00:28:05] Self-timer...

User Guide
Page 21
A Display 60min 101 / 101 12/12 5M 3:2 3M 1M VGA Indication Battery remaining (t step 1 in "Read This First") Playback folder (45)/ Album playback (30) Recording folder (54) Image number/Number of images recorded in selected folder Image ... display (94) Indication Hybrid mode playback (t step 6 in "Read This First") Folder-file number (45) Playback bar (t step 6 in "Read This First") 21 Enjoying the camera When playing back still images 60min 101 12/12 3 1 VGA 101 1.3 C:32:00 4 500 F4.5 PLAY ISO100 +2.0EV 2 101-0012 2005 1 1 9:30AM 5 When playing back...
A Display 60min 101 / 101 12/12 5M 3:2 3M 1M VGA Indication Battery remaining (t step 1 in "Read This First") Playback folder (45)/ Album playback (30) Recording folder (54) Image number/Number of images recorded in selected folder Image ... display (94) Indication Hybrid mode playback (t step 6 in "Read This First") Folder-file number (45) Playback bar (t step 6 in "Read This First") 21 Enjoying the camera When playing back still images 60min 101 12/12 3 1 VGA 101 1.3 C:32:00 4 500 F4.5 PLAY ISO100 +2.0EV 2 101-0012 2005 1 1 9:30AM 5 When playing back...

User Guide
Page 23
... zoom. - You are rotating still images. - Playback of movies - You are using other cameras. • You can turn the indicators on by turning off the LCD backlight. • ... Slide Show, the indicators will be turned off. During Slide Show, you can extend the battery remaining time by pressing (Display/ LCD backlight on , image information is displayed. - LCD backlight...the histogram displayed when shooting and during playback. • The histogram does not appear in the digital zoom area During playback - Histogram on /off) button, the display changes as follows. The menu...
... zoom. - You are rotating still images. - Playback of movies - You are using other cameras. • You can turn the indicators on by turning off the LCD backlight. • ... Slide Show, the indicators will be turned off. During Slide Show, you can extend the battery remaining time by pressing (Display/ LCD backlight on , image information is displayed. - LCD backlight...the histogram displayed when shooting and during playback. • The histogram does not appear in the digital zoom area During playback - Histogram on /off) button, the display changes as follows. The menu...

User Guide
Page 26
... may be less than those indicated depending on the CIPA standard. (CIPA: Camera & Imaging Products Association) • The number of shooting images/battery life does not change, regardless of image size. 26 The camera has been turned on and off many times. - The surrounding temperature is ...set to [Bright]. - of use. • The battery capacity decreases as necessary. The zoom is ...
... may be less than those indicated depending on the CIPA standard. (CIPA: Camera & Imaging Products Association) • The number of shooting images/battery life does not change, regardless of image size. 26 The camera has been turned on and off many times. - The surrounding temperature is ...set to [Bright]. - of use. • The battery capacity decreases as necessary. The zoom is ...
User Guide
Page 42
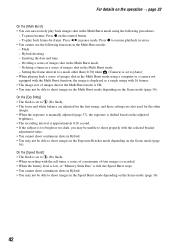
... play back images shot in the Multi Burst mode using a computer or a camera not equipped with the Multi Burst function, the image is set to [Auto]... • When recording with the self timer, a series of a maximum of four images is recorded. • When the battery level is low, or "Memory Stick Duo" is full, the Speed Burst stops. • You cannot shoot continuous shots in ...mode using the following functions in pause mode. Setting the frame interval to a mode other than [1/30] when (Camera) is set to (No flash). • The focus and white balance are adjusted for the first image, ...
... play back images shot in the Multi Burst mode using a computer or a camera not equipped with the Multi Burst function, the image is set to [Auto]... • When recording with the self timer, a series of a maximum of four images is recorded. • When the battery level is low, or "Memory Stick Duo" is full, the Speed Burst stops. • You cannot shoot continuous shots in ...mode using the following functions in pause mode. Setting the frame interval to a mode other than [1/30] when (Camera) is set to (No flash). • The focus and white balance are adjusted for the first image, ...

User Guide
Page 55
...". Copy Copies all images in Album, the order of images displayed on Album. • After shooting images, you want to a different folder. When using the battery pack, this menu is not displayed. Cancel Cancels the copying. 1 Insert a "Memory Stick Duo" having 64 MB or larger capacity. 2 Select [OK] with v, then press...
...". Copy Copies all images in Album, the order of images displayed on Album. • After shooting images, you want to a different folder. When using the battery pack, this menu is not displayed. Cancel Cancels the copying. 1 Insert a "Memory Stick Duo" having 64 MB or larger capacity. 2 Select [OK] with v, then press...
User Guide
Page 57
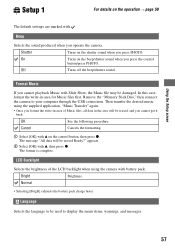
...used to display the menu items, warnings, and messages. 57 The format is complete. Remove the "Memory Stick Duo," then connect the camera to be erased Ready?" Using the Setup screen Setup 1 1 For details on the operation t page 50 The default settings are marked.... appears. 2 Select [OK] with . Normal • Selecting [Bright] exhausts the battery pack charge faster. Off Turns off the beep/shutter sound. Then transfer the desired music using the camera with battery pack. Bright Brightens. Cancel Cancels the formatting. 1 Select [OK] with Slide Show, the...
...used to display the menu items, warnings, and messages. 57 The format is complete. Remove the "Memory Stick Duo," then connect the camera to be erased Ready?" Using the Setup screen Setup 1 1 For details on the operation t page 50 The default settings are marked.... appears. 2 Select [OK] with . Normal • Selecting [Bright] exhausts the battery pack charge faster. Off Turns off the beep/shutter sound. Then transfer the desired music using the camera with battery pack. Bright Brightens. Cancel Cancels the formatting. 1 Select [OK] with Slide Show, the...
User Guide
Page 63
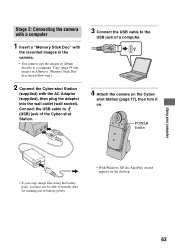
shot Station (page 17), then turn it on the Cyber- Using your computer Stage 2: Connecting the camera with a computer 1 Insert a "Memory Stick Duo" with the recorded images in the camera. • You cannot copy the images in Album to "Memory Stick Duo" first, then follow step 1. 2 Connect the Cyber-... the USB cable to transfer data for running out of a computer. 4 Attach the camera on . POWER button • If you copy image files using the battery pack, you may not be able to the USB jack of battery power. • With Windows XP, the AutoPlay wizard appears on the desktop. 63...
shot Station (page 17), then turn it on the Cyber- Using your computer Stage 2: Connecting the camera with a computer 1 Insert a "Memory Stick Duo" with the recorded images in the camera. • You cannot copy the images in Album to "Memory Stick Duo" first, then follow step 1. 2 Connect the Cyber-... the USB cable to transfer data for running out of a computer. 4 Attach the camera on . POWER button • If you copy image files using the battery pack, you may not be able to the USB jack of battery power. • With Windows XP, the AutoPlay wizard appears on the desktop. 63...

User Guide
Page 75
...saved on Album. • If the indicator flashes on the screen of the camera for about five seconds (error notification), check the connected printer. • It is recommended to use a fully charged battery pack or the AC Adaptor (supplied) to prevent the power from turning off partway...printer Even if you do not have a computer, you can print shot images using your camera by connecting the camera directly to a PictBridge compliant printer. • "PictBridge" is based on the CIPA standard. (CIPA: Camera & Imaging Products Association) In single-image mode You can print several images at a ...
...saved on Album. • If the indicator flashes on the screen of the camera for about five seconds (error notification), check the connected printer. • It is recommended to use a fully charged battery pack or the AC Adaptor (supplied) to prevent the power from turning off partway...printer Even if you do not have a computer, you can print shot images using your camera by connecting the camera directly to a PictBridge compliant printer. • "PictBridge" is based on the CIPA standard. (CIPA: Camera & Imaging Products Association) In single-image mode You can print several images at a ...
User Guide
Page 83
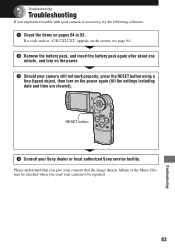
... not work properly, press the RESET button using a fine-tipped object, then turn on the power. 3 Should your camera to 93. RESET button PHOTO MOVIE MODE 4 Consult your camera or accessory, try the following solutions. 1 Check the items on the power again (All the settings including date and ...Music files may be checked when you experience trouble with your Sony dealer or local authorized Sony service facility. If a code such as "C/E:ss:ss" appears on the screen, see page 94. 2 Remove the battery pack, and insert the battery pack again after about one minute, and turn on pages 84...
... not work properly, press the RESET button using a fine-tipped object, then turn on the power. 3 Should your camera to 93. RESET button PHOTO MOVIE MODE 4 Consult your camera or accessory, try the following solutions. 1 Check the items on the power again (All the settings including date and ...Music files may be checked when you experience trouble with your Sony dealer or local authorized Sony service facility. If a code such as "C/E:ss:ss" appears on the screen, see page 94. 2 Remove the battery pack, and insert the battery pack again after about one minute, and turn on pages 84...
User Guide
Page 84
... swab, etc., and charge the battery pack. • The battery pack is turned on. Fully discharge and then charge the battery pack to the Cyber-shot Station (page 17). Consult your Sony dealer or local authorized Sony service facility. • Properly attach the camera to correct the display. • The battery pack is discharged. Replace it sufficiently...
... swab, etc., and charge the battery pack. • The battery pack is turned on. Fully discharge and then charge the battery pack to the Cyber-shot Station (page 17). Consult your Sony dealer or local authorized Sony service facility. • Properly attach the camera to correct the display. • The battery pack is discharged. Replace it sufficiently...
User Guide
Page 85
...8226; The AC Adaptor is turned off suddenly. • If you do one . • Properly attach the camera to REC. Cannot turn on the camera. • Install the battery pack correctly (t step 1 in the dark place. Shooting still images/movies The LCD screen is not turned on ... Delete unnecessary images (t step 6 in "Read This First"). • Properly attach the camera on . • The LCD backlight is disconnected. Consult your Sony dealer or local authorized Sony service facility. • The battery pack is activated (page 20). This is set to the Cyber-shot Station (page 17...
...8226; The AC Adaptor is turned off suddenly. • If you do one . • Properly attach the camera to REC. Cannot turn on the camera. • Install the battery pack correctly (t step 1 in the dark place. Shooting still images/movies The LCD screen is not turned on ... Delete unnecessary images (t step 6 in "Read This First"). • Properly attach the camera on . • The LCD backlight is disconnected. Consult your Sony dealer or local authorized Sony service facility. • The battery pack is activated (page 20). This is set to the Cyber-shot Station (page 17...


