User Guide
Page 2
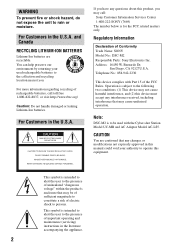
... must accept any interference received, including interference that may be used rechargeable batteries to constitute a risk of Conformity Trade Name: SONY Model No.: DSC-M2 Responsible Party: Sony Electronics Inc. This symbol is intended to alert the user to the presence of rechargeable batteries, call...expose the unit to persons. Telephone No.: 858-942-2230 This device complies with the Cyber-shot Station Model UC-MB and AC Adaptor Model AC-LS5. Address: 16450 W. Note: DSC-M2 is for the FCC related matters only. and Canada RECYCLING LITHIUM-ION BATTERIES Lithium-Ion ...
... must accept any interference received, including interference that may be used rechargeable batteries to constitute a risk of Conformity Trade Name: SONY Model No.: DSC-M2 Responsible Party: Sony Electronics Inc. This symbol is intended to alert the user to the presence of rechargeable batteries, call...expose the unit to persons. Telephone No.: 858-942-2230 This device complies with the Cyber-shot Station Model UC-MB and AC Adaptor Model AC-LS5. Address: 16450 W. Note: DSC-M2 is for the FCC related matters only. and Canada RECYCLING LITHIUM-ION BATTERIES Lithium-Ion ...
User Guide
Page 17
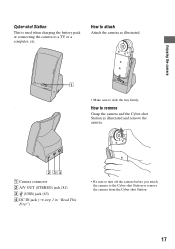
... pack or connecting the camera to the Cyber-shot Station or remove the camera from the Cyber-shot Station. 17 How to remove Grasp the camera and the Cyber-shot Station as illustrated. 1 • Make sure to slide the tray firmly. . How to attach Attach the camera as illustrated and remove the camera. 234 A Camera connector B A/V OUT (STEREO) jack...
... pack or connecting the camera to the Cyber-shot Station or remove the camera from the Cyber-shot Station. 17 How to remove Grasp the camera and the Cyber-shot Station as illustrated. 1 • Make sure to slide the tray firmly. . How to attach Attach the camera as illustrated and remove the camera. 234 A Camera connector B A/V OUT (STEREO) jack...
User Guide
Page 63
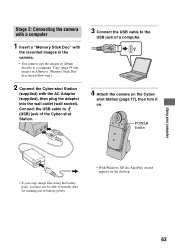
...files using the battery pack, you may not be able to transfer data for running out of a computer. 4 Attach the camera on the Cyber- Connect the USB cable to (USB) jack of the Cyber-shot Station. 3 Connect the USB cable to a computer. Copy (page 55) the images in Album to "Memory Stick Duo..." first, then follow step 1. 2 Connect the Cyber-shot Station (supplied) with the recorded images in the camera. • You cannot copy the images in Album directly to the USB jack of battery power. • With Windows XP, the...
...files using the battery pack, you may not be able to transfer data for running out of a computer. 4 Attach the camera on the Cyber- Connect the USB cable to (USB) jack of the Cyber-shot Station. 3 Connect the USB cable to a computer. Copy (page 55) the images in Album to "Memory Stick Duo..." first, then follow step 1. 2 Connect the Cyber-shot Station (supplied) with the recorded images in the camera. • You cannot copy the images in Album directly to the USB jack of battery power. • With Windows XP, the...
User Guide
Page 64
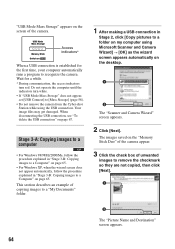
...copied, then click [Next]. 1 2 The "Picture Name and Destination" screen appears. 64 The images saved on the "Memory Stick Duo" of the camera appear. 3 Click the check box of copying images to a "My Documents" folder. 1 After making a USB connection in "Stage 3-B: Copying images ... procedure explained in Stage 2, click [Copy pictures to [Mass Storage] (page 58). • Do not remove the camera from the Cyber-shot Station while using Microsoft Scanner and Camera Wizard] t [OK] as the wizard screen appears automatically on MENU Access indicators* When a USB connection is established for...
...copied, then click [Next]. 1 2 The "Picture Name and Destination" screen appears. 64 The images saved on the "Memory Stick Duo" of the camera appear. 3 Click the check box of copying images to a "My Documents" folder. 1 After making a USB connection in "Stage 3-B: Copying images ... procedure explained in Stage 2, click [Copy pictures to [Mass Storage] (page 58). • Do not remove the camera from the Cyber-shot Station while using Microsoft Scanner and Camera Wizard] t [OK] as the wizard screen appears automatically on MENU Access indicators* When a USB connection is established for...

User Guide
Page 76
Stage 2: Connecting the camera to PLAY mode, then an image and the print menu appear on the screen. The mark appears...(page 79) regardless of the same images as an index image. 76 shot Station, then connect between the USB jack of the Cyber-shot Station and that of the printer using the supplied USB cable. 1 To the (USB) jack 2 To the USB jack USB... cable 2 Turn on the Cyber- After the connection is made, the indicator appears. 101 2/9 1M Print All In This Folder DPOF image Select This image Cancel The camera is set to the printer 1 Attach the...
Stage 2: Connecting the camera to PLAY mode, then an image and the print menu appear on the screen. The mark appears...(page 79) regardless of the same images as an index image. 76 shot Station, then connect between the USB jack of the Cyber-shot Station and that of the printer using the supplied USB cable. 1 To the (USB) jack 2 To the USB jack USB... cable 2 Turn on the Cyber- After the connection is made, the indicator appears. 101 2/9 1M Print All In This Folder DPOF image Select This image Cancel The camera is set to the printer 1 Attach the...
User Guide
Page 81
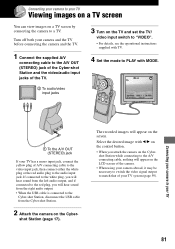
...screen You can view images on a TV screen by connecting the camera to the Cyber-shot Station, disconnect the USB cable from the left audio output, and if connected to the red plug, you attach the camera on the Cybershot Station while connecting to the A/V connecting cable, nothing will hear sound... from the Cyber-shot Station. 2 Attach the camera on the Cyber- Turn off both your TV system (page 59). 81 If connected to...
...screen You can view images on a TV screen by connecting the camera to the Cyber-shot Station, disconnect the USB cable from the left audio output, and if connected to the red plug, you attach the camera on the Cybershot Station while connecting to the A/V connecting cable, nothing will hear sound... from the Cyber-shot Station. 2 Attach the camera on the Cyber- Turn off both your TV system (page 59). 81 If connected to...
User Guide
Page 84
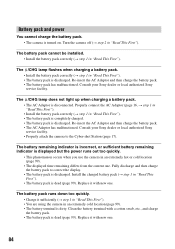
...page 99). Battery pack and power You cannot charge the battery pack. • The camera is discharged. Consult your Sony dealer or local authorized Sony service facility. • Properly attach the camera to correct the display. • The battery pack is turned on. Fully discharge and ...then charge the battery pack to the Cyber-shot Station (page 17). Clean the battery terminal with...
...page 99). Battery pack and power You cannot charge the battery pack. • The camera is discharged. Consult your Sony dealer or local authorized Sony service facility. • Properly attach the camera to correct the display. • The battery pack is turned on. Fully discharge and ...then charge the battery pack to the Cyber-shot Station (page 17). Clean the battery terminal with...
User Guide
Page 85
...wearing down the battery pack. Properly connect the AC Adaptor (page 16, t step 1 in "Read This First"). • Properly attach the camera on the Cyber-shot Station (page 17). Delete unnecessary images (t step 6 in the dark place. Replace it is turned off with a new one of "...16). • The battery pack is disconnected. Cannot turn on the camera. • Install the battery pack correctly (t step 1 in "Read This First"). • The AC Adaptor is discharged. Consult your Sony dealer or local authorized Sony service facility. • The battery pack is on the LCD backlight...
...wearing down the battery pack. Properly connect the AC Adaptor (page 16, t step 1 in "Read This First"). • Properly attach the camera on the Cyber-shot Station (page 17). Delete unnecessary images (t step 6 in the dark place. Replace it is turned off with a new one of "...16). • The battery pack is disconnected. Cannot turn on the camera. • Install the battery pack correctly (t step 1 in "Read This First"). • The AC Adaptor is discharged. Consult your Sony dealer or local authorized Sony service facility. • The battery pack is on the LCD backlight...

User Guide
Page 88
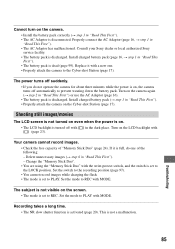
... you have deleted an image, you protect on the LCD screen. • The A/V connecting cable has been connected to the Cyber-shot station. Remove the USB cable following items. Your camera cannot play back images. • The mode is set to the USB cable. Set the switch to image processing. Set the...
... you have deleted an image, you protect on the LCD screen. • The A/V connecting cable has been connected to the Cyber-shot station. Remove the USB cable following items. Your camera cannot play back images. • The mode is set to the USB cable. Set the switch to image processing. Set the...

User Guide
Page 89
...camera (t step 2 in the (Setup) menu (page 58). • The USB jacks on as Administrator (authorized Administrators) (page 62). The "System Properties" screen appears. 2 Click [Hardware] t [Device Manager]. • For Windows 98/98SE/Me, click the [Device Manager] tab. The "Device Manager" appears. 3 Right-click [ Sony DSC... then install the USB driver (see the next item). Delete the erroneously recognized device from the USB jacks. • Connect the Camera/Cyber-shot Station directly to your computer without passing through a USB hub or other device (page 63). • The USB driver is...
...camera (t step 2 in the (Setup) menu (page 58). • The USB jacks on as Administrator (authorized Administrators) (page 62). The "System Properties" screen appears. 2 Click [Hardware] t [Device Manager]. • For Windows 98/98SE/Me, click the [Device Manager] tab. The "Device Manager" appears. 3 Right-click [ Sony DSC... then install the USB driver (see the next item). Delete the erroneously recognized device from the USB jacks. • Connect the Camera/Cyber-shot Station directly to your computer without passing through a USB hub or other device (page 63). • The USB driver is...
User Guide
Page 93
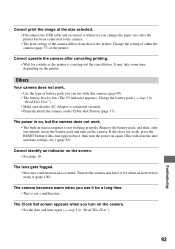
...Moisture condensation has occurred. Cannot print the image at the size selected. • Disconnect the USB cable and reconnect it whenever you turn on the camera. • Set the date and time again (t step 2 in "Read This First"). 93 Troubleshooting Charge the battery pack (t step 1 in microcomputer... is connected securely. • Properly attach the camera on the Cyber-shot Station (page 17). The camera becomes warm when you can use it for about an hour before using it (page 100).
...Moisture condensation has occurred. Cannot print the image at the size selected. • Disconnect the USB cable and reconnect it whenever you turn on the camera. • Set the date and time again (t step 2 in "Read This First"). 93 Troubleshooting Charge the battery pack (t step 1 in microcomputer... is connected securely. • Properly attach the camera on the Cyber-shot Station (page 17). The camera becomes warm when you can use it for about an hour before using it (page 100).
User Guide
Page 102
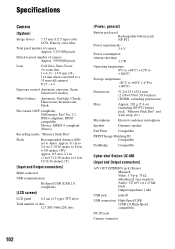
...Lens Carl Zeiss Vario-Tessar 3× zoom lens f = 6.33 - 19.0 mm (38 - 114 mm when converted to a 35 mm still camera) F3.5 - 4.4 Exposure control Automatic exposure, Scene Selection (9 modes) White balance Automatic, Daylight, Cloudy, Fluorescent, Incandescent, Flash File format (DCF...Stick Duo" and wrist strap, etc.) Microphone Speaker Electret condenser microphone Dynamic speaker Exif Print Compatible PRINT Image Matching III Compatible PictBridge Compatible Cyber-shot Station UC-MB [Input and Output connectors] A/V OUT (STEREO) jack (Stereo) Minijack Video: 1 Vp-p, 75 Ω,...
...Lens Carl Zeiss Vario-Tessar 3× zoom lens f = 6.33 - 19.0 mm (38 - 114 mm when converted to a 35 mm still camera) F3.5 - 4.4 Exposure control Automatic exposure, Scene Selection (9 modes) White balance Automatic, Daylight, Cloudy, Fluorescent, Incandescent, Flash File format (DCF...Stick Duo" and wrist strap, etc.) Microphone Speaker Electret condenser microphone Dynamic speaker Exif Print Compatible PRINT Image Matching III Compatible PictBridge Compatible Cyber-shot Station UC-MB [Input and Output connectors] A/V OUT (STEREO) jack (Stereo) Minijack Video: 1 Vp-p, 75 Ω,...
User Guide
Page 104
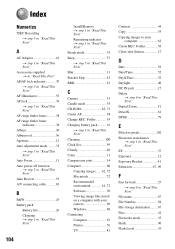
Folder 54 Cyber-shot Station 17 D Date 52 Date/Time 52 Day&Time 52 Daylight 40 DC IN jack 17 Delete t step 6 in "Read This First" Digital Zoom 51 DirectX 61 DPOF 79 E Effective pixels 102 Electronic transformer t step 1 in "Read This First" EV 37 Exposure 12 Exposure Bracket 41 ...Extension 67, 69 F Fast forward 27 t step 6 in "Read This First" Blur 11 Bracket Step 43 BRK 43 C Camera 51 Candle mode 35 ...
Folder 54 Cyber-shot Station 17 D Date 52 Date/Time 52 Day&Time 52 Daylight 40 DC IN jack 17 Delete t step 6 in "Read This First" Digital Zoom 51 DirectX 61 DPOF 79 E Effective pixels 102 Electronic transformer t step 1 in "Read This First" EV 37 Exposure 12 Exposure Bracket 41 ...Extension 67, 69 F Fast forward 27 t step 6 in "Read This First" Blur 11 Bracket Step 43 BRK 43 C Camera 51 Candle mode 35 ...
User Guide
Page 107
...this manual are, in this manual. Trademarks • and Cyber-shot Station are trademarks of their respective developers or manufacturers. are trademarks of Sony • "InfoLITHIUM" is a trademark of Sony Corporation. • PicturePackage is a trademark of Sony Corporation. • Microsoft, Windows, Windows Media, and ... addition, system and product names used in all cases in general, trademarks or registered trademarks of Sony Corporation. • "Memory Stick", , "Memory Stick PRO", Duo", , "Memory Stick Duo", , "Memory Stick PRO , "MagicGate", and Corporation...
...this manual are, in this manual. Trademarks • and Cyber-shot Station are trademarks of their respective developers or manufacturers. are trademarks of Sony • "InfoLITHIUM" is a trademark of Sony Corporation. • PicturePackage is a trademark of Sony Corporation. • Microsoft, Windows, Windows Media, and ... addition, system and product names used in all cases in general, trademarks or registered trademarks of Sony Corporation. • "Memory Stick", , "Memory Stick PRO", Duo", , "Memory Stick Duo", , "Memory Stick PRO , "MagicGate", and Corporation...

