Operating Instructions
Page 2
... and maintenance (servicing) instructions in the literature accompanying the appliance. You can help preserve our environment by returning your used rechargeable batteries to the collection and recycling location nearest you may call toll free 1-800-822-8837, or visit http://www.rbrc.org/ ... product, you . Address: 16450 W. Telephone No.: 858-942-2230 This device complies with Part 15 of Conformity Trade Name: SONY Model No.: DSC-H1 Responsible Party: Sony Electronics Inc. Bernardo Dr, San Diego, CA 92127U.S.A. For Customers in the U.S.A. If you have any questions about this device ...
... and maintenance (servicing) instructions in the literature accompanying the appliance. You can help preserve our environment by returning your used rechargeable batteries to the collection and recycling location nearest you may call toll free 1-800-822-8837, or visit http://www.rbrc.org/ ... product, you . Address: 16450 W. Telephone No.: 858-942-2230 This device complies with Part 15 of Conformity Trade Name: SONY Model No.: DSC-H1 Responsible Party: Sony Electronics Inc. Bernardo Dr, San Diego, CA 92127U.S.A. For Customers in the U.S.A. If you have any questions about this device ...

Operating Instructions
Page 4
... a "Memory Stick". Be sure to back up the data to record or play back properly. • Using the camera in sandy or dusty locations may cause irrecoverable damage to use the batteries for the first time. (t step 1 in a cool, dry place. This may cause malfunctions. • If moisture...condensation occurs, remove it before use up the data. Notes on the Nickel-Metal Hydride battery • Charge both of the supplied Ni-MH batteries before operating the camera. • Before you do not intend to your camera. • Do not use a "Memory Stick Duo" by inserting it may be...
... a "Memory Stick". Be sure to back up the data to record or play back properly. • Using the camera in sandy or dusty locations may cause irrecoverable damage to use the batteries for the first time. (t step 1 in a cool, dry place. This may cause malfunctions. • If moisture...condensation occurs, remove it before use up the data. Notes on the Nickel-Metal Hydride battery • Charge both of the supplied Ni-MH batteries before operating the camera. • Before you do not intend to your camera. • Do not use a "Memory Stick Duo" by inserting it may be...
Operating Instructions
Page 6
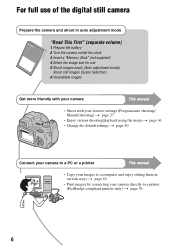
For full use of the digital still camera Prepare the camera and shoot in auto adjustment mode "Read This First" (separate volume) 1 Prepare the battery 2 Turn the camera on/set the clock 3 Insert a "Memory Stick" (not supplied) 4 Select the image size for use 5 Shoot images easily (Auto... adjustment mode) Shoot still images (Scene Selection) 6 View/delete images Get more friendly with your camera This manual • Shoot...
For full use of the digital still camera Prepare the camera and shoot in auto adjustment mode "Read This First" (separate volume) 1 Prepare the battery 2 Turn the camera on/set the clock 3 Insert a "Memory Stick" (not supplied) 4 Select the image size for use 5 Shoot images easily (Auto... adjustment mode) Shoot still images (Scene Selection) 6 View/delete images Get more friendly with your camera This manual • Shoot...

Operating Instructions
Page 7
...still images and recording time of movies 23 When you do not have a "Memory Stick" (Recording with the internal memory 24 Battery life and number of lighting 12 Quality - On the effects of images that can be recorded/viewed 25 Using the jog dial ... Bal) ISO (P.Quality) BRK (Bracket Step) M (Interval) (Flash Level) PFX (P.Effect) (Saturation) (Contrast) (Sharpness) (Setup) 7 Focusing on using your camera 4 Enjoying the camera Basic techniques for better images 10 Focus - Table of contents Notes on a subject successfully 10 Exposure - Adjusting the light intensity 11 Color -
...still images and recording time of movies 23 When you do not have a "Memory Stick" (Recording with the internal memory 24 Battery life and number of lighting 12 Quality - On the effects of images that can be recorded/viewed 25 Using the jog dial ... Bal) ISO (P.Quality) BRK (Bracket Step) M (Interval) (Flash Level) PFX (P.Effect) (Saturation) (Contrast) (Sharpness) (Setup) 7 Focusing on using your camera 4 Enjoying the camera Basic techniques for better images 10 Focus - Table of contents Notes on a subject successfully 10 Exposure - Adjusting the light intensity 11 Color -
Operating Instructions
Page 9
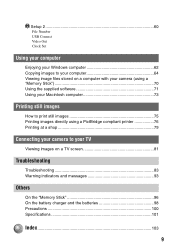
... Set Using your computer Enjoying your Windows computer 62 Copying images to your computer 64 Viewing image files stored on a computer with your camera (using a "Memory Stick 70 Using the supplied software 71 Using your Macintosh computer 73 Printing still images How to print still images... 75 Printing images directly using a PictBridge compliant printer 76 Printing at a shop 79 Connecting your camera to your TV Viewing images on a TV screen 81 Troubleshooting Troubleshooting 83 Warning indicators and messages 93 Others On the "Memory Stick 96...
... Set Using your computer Enjoying your Windows computer 62 Copying images to your computer 64 Viewing image files stored on a computer with your camera (using a "Memory Stick 70 Using the supplied software 71 Using your Macintosh computer 73 Printing still images How to print still images... 75 Printing images directly using a PictBridge compliant printer 76 Printing at a shop 79 Connecting your camera to your TV Viewing images on a TV screen 81 Troubleshooting Troubleshooting 83 Warning indicators and messages 93 Others On the "Memory Stick 96...
Operating Instructions
Page 15
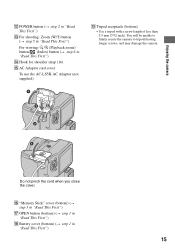
You will be unable to firmly secure the camera to tripods having longer screws, and may damage the camera. 3 2 4 Do not pinch the cord when you close the cover. P "Memory Stick" cover (bottom) (t step 3 in "Read This First") Q OPEN button (bottom) (t step 1 in "Read This First") R Battery cover (bottom) (t step 1 in "Read This First...
You will be unable to firmly secure the camera to tripods having longer screws, and may damage the camera. 3 2 4 Do not pinch the cord when you close the cover. P "Memory Stick" cover (bottom) (t step 3 in "Read This First") Q OPEN button (bottom) (t step 1 in "Read This First") R Battery cover (bottom) (t step 1 in "Read This First...

Operating Instructions
Page 18
... S AF 10 90cm 125 F3.5 +2.0EV When shooting movies STBY STD 640 101 00:00:00 [00:28:25] C:32:00 + +2.0EV A Display z BRK M Indication Battery remaining (t step 1 in "Read This First") AE/AF lock (t step 5 in "Read This First") Recording mode (27, 34) WB White balance (39) STBY REC P S A M SL...
... S AF 10 90cm 125 F3.5 +2.0EV When shooting movies STBY STD 640 101 00:00:00 [00:28:25] C:32:00 + +2.0EV A Display z BRK M Indication Battery remaining (t step 1 in "Read This First") AE/AF lock (t step 5 in "Read This First") Recording mode (27, 34) WB White balance (39) STBY REC P S A M SL...

Operating Instructions
Page 19
Low battery warning (25) Spot metering cross hair (38) AF range finder frame (32) E Display Indication Histogram (22, 31) NR slow shutter (29) 125 Shutter speed (29) ...) Multi Burst interval (40) Remaining number of light or a tripod. However, we recommend turning on the previous page) Menu/Guide menu (36) 19 Enjoying the camera B Display 2 5 10 90cm 0.9 2 5m Indication Manual focus bar (33) S AF M AF C AF z Set Macro (t step 5 in "Read This First") AF mode (51) AF range finder...
Low battery warning (25) Spot metering cross hair (38) AF range finder frame (32) E Display Indication Histogram (22, 31) NR slow shutter (29) 125 Shutter speed (29) ...) Multi Burst interval (40) Remaining number of light or a tripod. However, we recommend turning on the previous page) Menu/Guide menu (36) 19 Enjoying the camera B Display 2 5 10 90cm 0.9 2 5m Indication Manual focus bar (33) S AF M AF C AF z Set Macro (t step 5 in "Read This First") AF mode (51) AF range finder...

Operating Instructions
Page 20
... 1.3 +2.0EV 500 F3.5 BACK/NEXT VOLUME When playing back movies 20 A Display 5M 3:2 3M 1M VGA FINE 640 STD 640 160 M N - 1.3 Step 12/16 Indication Battery remaining (t step 1 in "Read This First") Image size (t step 4 in "Read This First") Recording mode (27, 34) Playback (t step 6 in "Read This First") Volume (t step...
... 1.3 +2.0EV 500 F3.5 BACK/NEXT VOLUME When playing back movies 20 A Display 5M 3:2 3M 1M VGA FINE 640 STD 640 160 M N - 1.3 Step 12/16 Indication Battery remaining (t step 1 in "Read This First") Image size (t step 4 in "Read This First") Recording mode (27, 34) Playback (t step 6 in "Read This First") Volume (t step...

Operating Instructions
Page 25
... once every ten times • The measurement method is switched alternately between the W and T ends - When viewing still images Battery No. Enjoying the camera Battery life and number of images that can be recorded/viewed The tables show the approximate number of images that can be recorded/viewed... and the battery life when you shoot images in normal mode with batteries at full capacity and at about three second ...
... once every ten times • The measurement method is switched alternately between the W and T ends - When viewing still images Battery No. Enjoying the camera Battery life and number of images that can be recorded/viewed The tables show the approximate number of images that can be recorded/viewed... and the battery life when you shoot images in normal mode with batteries at full capacity and at about three second ...

Operating Instructions
Page 34
... cannot select the certain shutter speeds*. * When [ISO] is [400]: 1/25 second or slower When [ISO] is not [400]: 1/6 second or slower • When the battery level is low, or when the internal memory or "Memory Stick" is set to or , continuous shooting modes are unable to shoot good pictures depending...
... cannot select the certain shutter speeds*. * When [ISO] is [400]: 1/25 second or slower When [ISO] is not [400]: 1/6 second or slower • When the battery level is low, or when the internal memory or "Memory Stick" is set to or , continuous shooting modes are unable to shoot good pictures depending...
Operating Instructions
Page 51
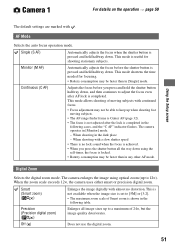
...Monitor (M AF) Automatically adjusts the focus before you press the shutter button all image sizes up to 12×). The camera operates in the following table. Precision (Precision digital zoom) ( ) Enlarges all the way down , and then continues to [5M] or [3:2]. • The maximum... is useful for focusing. • Battery consumption may be faster than in the dark place - Digital Zoom Selects the digital zoom mode. When shooting in any other AF mode. Off ( ) Does not use the digital zoom. 51 Using the Setup screen Camera 1 1 For details on the operation...
...Monitor (M AF) Automatically adjusts the focus before you press the shutter button all image sizes up to 12×). The camera operates in the following table. Precision (Precision digital zoom) ( ) Enlarges all the way down , and then continues to [5M] or [3:2]. • The maximum... is useful for focusing. • Battery consumption may be faster than in the dark place - Digital Zoom Selects the digital zoom mode. When shooting in any other AF mode. Off ( ) Does not use the digital zoom. 51 Using the Setup screen Camera 1 1 For details on the operation...

Operating Instructions
Page 54
... activated even if you press (Forced flash), or (Macro). You can stabilize images even when zooming up a far subject. • Battery consumption is faster than in manual focus mode. When camera shake is too strong - Off Does not enlarge the indicators. (Self-timer), STEADY SHOT Selects a steady shot mode. Off Does not...
... activated even if you press (Forced flash), or (Macro). You can stabilize images even when zooming up a far subject. • Battery consumption is faster than in manual focus mode. When camera shake is too strong - Off Does not enlarge the indicators. (Self-timer), STEADY SHOT Selects a steady shot mode. Off Does not...
Operating Instructions
Page 58
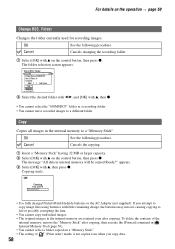
... the AC Adaptor (not supplied). To delete the contents of (Print order) marks is not copied even when you attempt to copy image files using batteries with v, then press z. Of Files: 0 Created: 2005 1 1 1:05:34AM OK Cancel BACK/NEXT 2 Select the desired folder with b/B, and [OK] with ...the recording folder. 1 Select [OK] with v on the control button, then press z. appears. 3 Select [OK] with little remaining charge, the batteries may run out, causing copying to fail or possibly corrupting the data. • You cannot copy individual images. • The original images in the ...
... the AC Adaptor (not supplied). To delete the contents of (Print order) marks is not copied even when you attempt to copy image files using batteries with v, then press z. Of Files: 0 Created: 2005 1 1 1:05:34AM OK Cancel BACK/NEXT 2 Select the desired folder with b/B, and [OK] with ...the recording folder. 1 Select [OK] with v on the control button, then press z. appears. 3 Select [OK] with little remaining charge, the batteries may run out, causing copying to fail or possibly corrupting the data. • You cannot copy individual images. • The original images in the ...
Operating Instructions
Page 59
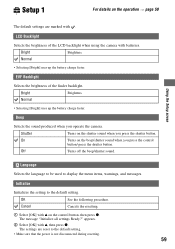
...Beep Selects the sound produced when you operate the camera. The message "Initialize all settings Ready?" appears. 2 Select [OK] with v on the shutter sound when you press the shutter button. The settings are marked with batteries. Using the Setup screen Language Selects the language ... brightness of the finder backlight. Shutter Turns on the control button, then press z. Normal • Selecting [Bright] uses up the battery charge faster. On Turns on the operation t page 50 The default settings are reset to display the menu items, warnings, and messages...
...Beep Selects the sound produced when you operate the camera. The message "Initialize all settings Ready?" appears. 2 Select [OK] with v on the shutter sound when you press the shutter button. The settings are marked with batteries. Using the Setup screen Language Selects the language ... brightness of the finder backlight. Shutter Turns on the control button, then press z. Normal • Selecting [Bright] uses up the battery charge faster. On Turns on the operation t page 50 The default settings are reset to display the menu items, warnings, and messages...
Operating Instructions
Page 65
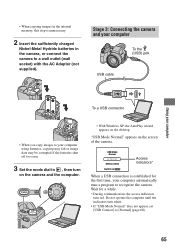
...* When a USB connection is unnecessary. 2 Insert the sufficiently charged Nickel-Metal Hydride batteries in the camera, or connect the camera to a wall outlet (wall socket) with the AC Adaptor (not supplied). 2 1 Stage 3: Connecting the camera and your computer To the (USB) jack USB cable To a USB connector 12 ...• When you copy images to your computer using batteries, copying may fail or image data may be corrupted if the batteries shut off too soon. 3 Set the mode...
...* When a USB connection is unnecessary. 2 Insert the sufficiently charged Nickel-Metal Hydride batteries in the camera, or connect the camera to a wall outlet (wall socket) with the AC Adaptor (not supplied). 2 1 Stage 3: Connecting the camera and your computer To the (USB) jack USB cable To a USB connector 12 ...• When you copy images to your computer using batteries, copying may fail or image data may be corrupted if the batteries shut off too soon. 3 Set the mode...

Operating Instructions
Page 76
... the printer with the USB cable. Index button Control Button • It is recommended to use the sufficiently charged Nickel-Metal Hydride batteries or an AC Adaptor (not supplied) to a PictBridge compliant printer. Printing images directly using a PictBridge compliant printer Even if you do... not have a computer, you can print images shot using your camera by connecting the camera directly to prevent the power from turning off partway through printing. You can print a set . 76 MENU button • "...
... the printer with the USB cable. Index button Control Button • It is recommended to use the sufficiently charged Nickel-Metal Hydride batteries or an AC Adaptor (not supplied) to a PictBridge compliant printer. Printing images directly using a PictBridge compliant printer Even if you do... not have a computer, you can print images shot using your camera by connecting the camera directly to prevent the power from turning off partway through printing. You can print a set . 76 MENU button • "...
Operating Instructions
Page 83
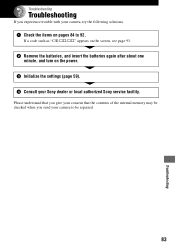
Troubleshooting Troubleshooting If you send your Sony dealer or local authorized Sony service facility. If a code such as "C/E:ss:ss" appears on the screen, see page 93. 2 Remove the batteries, and insert the batteries again after about one minute, and turn on pages 84 to be checked when you experience trouble with your camera, try the following solutions. 1 Check the items on the power. 3 Initialize the settings (page 59). 4 Consult your camera to 92. Please understand that you give your consent that the contents of the internal memory may be repaired. 83 Troubleshooting
Troubleshooting Troubleshooting If you send your Sony dealer or local authorized Sony service facility. If a code such as "C/E:ss:ss" appears on the screen, see page 93. 2 Remove the batteries, and insert the batteries again after about one minute, and turn on pages 84 to be checked when you experience trouble with your camera, try the following solutions. 1 Check the items on the power. 3 Initialize the settings (page 59). 4 Consult your camera to 92. Please understand that you give your consent that the contents of the internal memory may be repaired. 83 Troubleshooting

Operating Instructions
Page 84
... on . Shooting still images/movies The LCD screen does not turn on the camera again (t step 2 in "Read This First"). • The batteries are discharged. The batteries run down the batteries. Cannot turn on even when the power is turned on. • The finder... properly using the finder adjustment lever (t step 5 in "Read This First"). Turn on the camera. • Install the batteries correctly (t step 1 in "Read This First"). • The batteries are discharged. Your camera cannot record images. • Check the free capacity of the following: 84 Replace them sufficiently...
... on . Shooting still images/movies The LCD screen does not turn on the camera again (t step 2 in "Read This First"). • The batteries are discharged. The batteries run down the batteries. Cannot turn on even when the power is turned on. • The finder... properly using the finder adjustment lever (t step 5 in "Read This First"). Turn on the camera. • Install the batteries correctly (t step 1 in "Read This First"). • The batteries are discharged. Your camera cannot record images. • Check the free capacity of the following: 84 Replace them sufficiently...

Operating Instructions
Page 87
... Deleting/Editing images Your camera cannot delete an image. • Cancel the protection (page 45). • Set the write-protect switch on your TV (page 60). • Check whether the connection is correct (page 81). • The USB cable is full. Install charged batteries. This is connected,... playback starts due to the recording position (page 96). 87 Troubleshooting Delete unnecessary images (t step 6 in "Read This First"). • The battery level is in USB mode. The image does not appear on the screen. • If the AV cable is not a malfunction. Disconnect it...
... Deleting/Editing images Your camera cannot delete an image. • Cancel the protection (page 45). • Set the write-protect switch on your TV (page 60). • Check whether the connection is correct (page 81). • The USB cable is full. Install charged batteries. This is connected,... playback starts due to the recording position (page 96). 87 Troubleshooting Delete unnecessary images (t step 6 in "Read This First"). • The battery level is in USB mode. The image does not appear on the screen. • If the AV cable is not a malfunction. Disconnect it...


