
Instruction Manual
Page 4
...must accept any interference received, including interference that may not cause harmful interference, and (2) this product, you purchased this digital still camera, if not otherwise specified. For Customers in the U.S.A. Operation is subject to the following antenna installation and device operating ...Lithium-Ion batteries. For Customers in Canada This Class B digital apparatus complies with Part 15 of the FCC Rules and RSS-Gen of Conformity Trade Name: SONY Model No.: DSC-G1 Responsible Party: Sony Electronics Inc. This device complies with Canadian ICES-003. Telephone...
...must accept any interference received, including interference that may not cause harmful interference, and (2) this product, you purchased this digital still camera, if not otherwise specified. For Customers in the U.S.A. Operation is subject to the following antenna installation and device operating ...Lithium-Ion batteries. For Customers in Canada This Class B digital apparatus complies with Part 15 of the FCC Rules and RSS-Gen of Conformity Trade Name: SONY Model No.: DSC-G1 Responsible Party: Sony Electronics Inc. This device complies with Canadian ICES-003. Telephone...
Instruction Manual
Page 5
...RF) in the microwave range while being used in a residential installation. For details, please access the following URL:http:// www.compliance.sony.de/ The wireless LAN function is to be used with the instructions, may apply, See www.dtsc.ca.gov/hazardouswaste/perchlorate Perchlorate ... could void your authority to operate this DSC-G1 Digital Still Camera is no guarantee that to which the receiver is intended to be used with the equipment in order to provide reasonable protection against harmful interference in accordance with the Cyber-shot Station. However, there is no proof...
...RF) in the microwave range while being used in a residential installation. For details, please access the following URL:http:// www.compliance.sony.de/ The wireless LAN function is to be used with the instructions, may apply, See www.dtsc.ca.gov/hazardouswaste/perchlorate Perchlorate ... could void your authority to operate this DSC-G1 Digital Still Camera is no guarantee that to which the receiver is intended to be used with the equipment in order to provide reasonable protection against harmful interference in accordance with the Cyber-shot Station. However, there is no proof...

Instruction Manual
Page 6
... please contact your local Civic Office, your safety and convenience. If you should lose the fuse cover, please contact your nearest Sony service station. If the plug supplied with IDA Standards DB00353 6 [ Attention The electromagnetic fields at the specific frequencies may influence ...the picture and sound of this camera. [ Notice If static electricity or electromagnetism causes data transfer to this equipment for your household waste disposal service or the shop ...
... please contact your local Civic Office, your safety and convenience. If you should lose the fuse cover, please contact your nearest Sony service station. If the plug supplied with IDA Standards DB00353 6 [ Attention The electromagnetic fields at the specific frequencies may influence ...the picture and sound of this camera. [ Notice If static electricity or electromagnetism causes data transfer to this equipment for your household waste disposal service or the shop ...
Instruction Manual
Page 7
...your data by JEITA (Japan Electronics and Information Technology Industries Association). • Playback of images recorded with other equipment on your camera are operational for if recording or playback is not possible due to the flash surface, resulting in insufficient light emission. [ Notes...the flash surface before use. Read "Precautions" (page 37) before using extremely high-precision technology so over 99.99% of the camera may cause malfunctions which in color) that generates strong radio waves or emits radiation. In addition to malfunctions and an inability to ...
...your data by JEITA (Japan Electronics and Information Technology Industries Association). • Playback of images recorded with other equipment on your camera are operational for if recording or playback is not possible due to the flash surface, resulting in insufficient light emission. [ Notes...the flash surface before use. Read "Precautions" (page 37) before using extremely high-precision technology so over 99.99% of the camera may cause malfunctions which in color) that generates strong radio waves or emits radiation. In addition to malfunctions and an inability to ...
Instruction Manual
Page 8
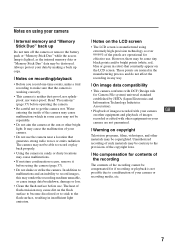
... started 10 Checking the accessories supplied 10 1 Inserting the battery pack 11 2 Charging the battery pack 13 3 Turning the camera on the screen 31 Battery life and memory capacity 33 Battery life and number of images that can be recorded/viewed .......... 33 ...on using your computer 28 "Album Editor 28 "Picture Motion Browser 28 Using the wireless LAN 29 Exchanging images among the DSC-G1s 29 Making your computer 16 Viewing "Cyber-shot Handbook 16 Installing the software 17 Shooting images easily (Auto adjustment mode 18 Zoom/Flash/Macro/Self-timer/Image size Viewing/...
... started 10 Checking the accessories supplied 10 1 Inserting the battery pack 11 2 Charging the battery pack 13 3 Turning the camera on the screen 31 Battery life and memory capacity 33 Battery life and number of images that can be recorded/viewed .......... 33 ...on using your computer 28 "Album Editor 28 "Picture Motion Browser 28 Using the wireless LAN 29 Exchanging images among the DSC-G1s 29 Making your computer 16 Viewing "Cyber-shot Handbook 16 Installing the software 17 Shooting images easily (Auto adjustment mode 18 Zoom/Flash/Macro/Self-timer/Image size Viewing/...
Instruction Manual
Page 10
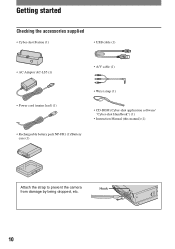
Hook 10 Getting started Checking the accessories supplied • Cyber-shot Station (1) • USB cable (1) • AC Adaptor AC-LS5 (1) • A/V cable (1) • Power cord (mains lead) (1) • Wrist strap (1) • CD-ROM (Cyber-shot application software/ "Cyber-shot Handbook") (1) • Instruction Manual (this manual) (1) • Rechargeable battery pack NP-FR1 (1)/Battery case (1) Attach the strap to prevent the camera from damage by being dropped, etc.
Hook 10 Getting started Checking the accessories supplied • Cyber-shot Station (1) • USB cable (1) • AC Adaptor AC-LS5 (1) • A/V cable (1) • Power cord (mains lead) (1) • Wrist strap (1) • CD-ROM (Cyber-shot application software/ "Cyber-shot Handbook") (1) • Instruction Manual (this manual) (1) • Rechargeable battery pack NP-FR1 (1)/Battery case (1) Attach the strap to prevent the camera from damage by being dropped, etc.
Instruction Manual
Page 13
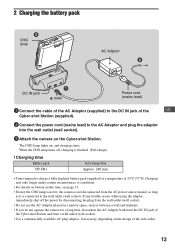
... cord (mains lead) to the AC Adaptor and plug the adaptor into the wall outlet (wall socket). 3Attach the camera on , and charging starts. The CHG lamp lights on the Cyber-shot Station. Charging may take longer under certain circumstances or conditions. • For details on battery usable time, see page... in a narrow space, such as between a wall and furniture. • If you do not operate the camera for a long time, disconnect the AC Adaptor both from the DC IN jack of the Cyber-shot Station and from the AC power source (mains) as long as it is finished (Full charge). [ Charging...
... cord (mains lead) to the AC Adaptor and plug the adaptor into the wall outlet (wall socket). 3Attach the camera on , and charging starts. The CHG lamp lights on the Cyber-shot Station. Charging may take longer under certain circumstances or conditions. • For details on battery usable time, see page... in a narrow space, such as between a wall and furniture. • If you do not operate the camera for a long time, disconnect the AC Adaptor both from the DC IN jack of the Cyber-shot Station and from the AC power source (mains) as long as it is finished (Full charge). [ Charging...

Instruction Manual
Page 15
... battery power and you do not operate the camera for about three minutes, the camera turns off automatically to prevent wearing down the battery pack (Auto power-off function). 15 Up Right: Move the button to the LCD screen side. ... change the date and time Press the HOME button, and select [ Settings] t [ Clock Set] (page 25). [ When you turn on the power • If the camera is running on /setting the clock Lens cover OPEN (CAMERA) lever POWER button Left: Move the button to the lens side.
... battery power and you do not operate the camera for about three minutes, the camera turns off automatically to prevent wearing down the battery pack (Auto power-off function). 15 Up Right: Move the button to the LCD screen side. ... change the date and time Press the HOME button, and select [ Settings] t [ Clock Set] (page 25). [ When you turn on the power • If the camera is running on /setting the clock Lens cover OPEN (CAMERA) lever POWER button Left: Move the button to the lens side.
Instruction Manual
Page 16
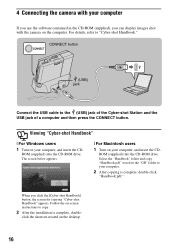
...copying is complete, double- CONNECT button (USB) jack Connect the USB cable to "Cyber-shot Handbook." ROM (supplied) into the CD-ROM drive. click the shortcut created on the desktop. 16 Viewing "Cyber-shot Handbook" [ For Windows users 1 Turn on your computer, and insert the CD-...and copy "Handbook.pdf" stored in the CD-ROM (supplied), you can display images shot with your computer If you click the [Cyber-shot Handbook] button, the screen for copying "Cyber-shot Handbook" appears. ROM (supplied) into the CD-ROM drive. 4 Connecting the camera with the camera on the computer.
...copying is complete, double- CONNECT button (USB) jack Connect the USB cable to "Cyber-shot Handbook." ROM (supplied) into the CD-ROM drive. click the shortcut created on the desktop. 16 Viewing "Cyber-shot Handbook" [ For Windows users 1 Turn on your computer, and insert the CD-...and copy "Handbook.pdf" stored in the CD-ROM (supplied), you can display images shot with your computer If you click the [Cyber-shot Handbook] button, the screen for copying "Cyber-shot Handbook" appears. ROM (supplied) into the CD-ROM drive. 4 Connecting the camera with the camera on the computer.

Instruction Manual
Page 18
...easily (Auto adjustment mode) Microphone Lens cover Zoom (W/T) button ɟ / (Movie/ Photo) button (Image Size) button Tripod receptacle (bottom) OPEN (CAMERA) lever Shutter button DISP (Screen display switch) button Control button (Flash) button / (Macro/Magnifying Glass) button (Self-timer) button 1Open the lens... cover by sliding the OPEN (CAMERA) lever. Each time you press the / (Movie/Photo) button, the mode changes between Movie and Photo. 3Hold the camera steady, keeping your arm at your side. The z (AE/AF lock) indicator (...
...easily (Auto adjustment mode) Microphone Lens cover Zoom (W/T) button ɟ / (Movie/ Photo) button (Image Size) button Tripod receptacle (bottom) OPEN (CAMERA) lever Shutter button DISP (Screen display switch) button Control button (Flash) button / (Macro/Magnifying Glass) button (Self-timer) button 1Open the lens... cover by sliding the OPEN (CAMERA) lever. Each time you press the / (Movie/Photo) button, the mode changes between Movie and Photo. 3Hold the camera steady, keeping your arm at your side. The z (AE/AF lock) indicator (...
Instruction Manual
Page 19
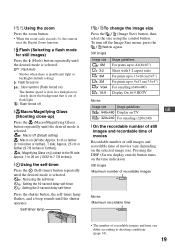
[ Using the zoom Press the zoom button. • When the zoom scale exceeds 3×, the camera uses the Digital Zoom function. [ Flash (Selecting a flash mode for still images) Press the (Flash) button repeatedly until the desired mode is selected. : Flash Auto Strobes when there ...
[ Using the zoom Press the zoom button. • When the zoom scale exceeds 3×, the camera uses the Digital Zoom function. [ Flash (Selecting a flash mode for still images) Press the (Flash) button repeatedly until the desired mode is selected. : Flash Auto Strobes when there ...

Instruction Manual
Page 20
... C/c. Adjust the portion: Moving the control button to c displays the next image. When the lens cover is closed, pressing the POWER button turns on the camera with the control button, then press z. [ To view an enlarged image (playback zoom) Press while displaying a still image. Viewing/deleting images POWER button (Playback) button...
... C/c. Adjust the portion: Moving the control button to c displays the next image. When the lens cover is closed, pressing the POWER button turns on the camera with the control button, then press z. [ To view an enlarged image (playback zoom) Press while displaying a still image. Viewing/deleting images POWER button (Playback) button...
Instruction Manual
Page 24
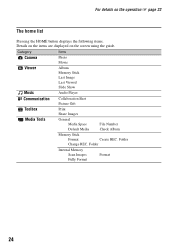
Folder Change REC. Folder Internal Memory Scan Images Fully Format Format 24 Category Camera Viewer Music Items Photo Movie Album Memory Stick Last Image Last Viewed Slide Show Audio Player Communication Toolbox Media Tools Collaboration Shot Picture Gift Print Share Images General Media Space Default Media File Number Check Album Memory Stick Format Create REC. For details on the operation 1 page 22 The home list Pressing the HOME button displays the following items. Details on the items are displayed on the screen using the guide.
Folder Change REC. Folder Internal Memory Scan Images Fully Format Format 24 Category Camera Viewer Music Items Photo Movie Album Memory Stick Last Image Last Viewed Slide Show Audio Player Communication Toolbox Media Tools Collaboration Shot Picture Gift Print Share Images General Media Space Default Media File Number Check Album Memory Stick Format Create REC. For details on the operation 1 page 22 The home list Pressing the HOME button displays the following items. Details on the items are displayed on the screen using the guide.
Instruction Manual
Page 25
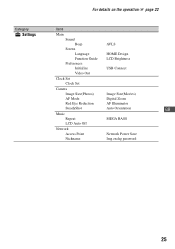
Category Settings For details on the operation 1 page 22 Items Main Sound Beep AVLS Screen Language Function Guide Preferences HOME Design LCD Brightness Initialize Video Out USB Connect Clock Set Clock Set Camera Image Size(Photos) Image Size(Movies) AF Mode Digital Zoom Red Eye Reduction AF Illuminator SteadyShot Auto Orientation GB Music Repeat MEGA BASS LCD Auto Off Network Access Point Nickname Network Power Save Img exchg password 25
Category Settings For details on the operation 1 page 22 Items Main Sound Beep AVLS Screen Language Function Guide Preferences HOME Design LCD Brightness Initialize Video Out USB Connect Clock Set Clock Set Camera Image Size(Photos) Image Size(Movies) AF Mode Digital Zoom Red Eye Reduction AF Illuminator SteadyShot Auto Orientation GB Music Repeat MEGA BASS LCD Auto Off Network Access Point Nickname Network Power Save Img exchg password 25
Instruction Manual
Page 27
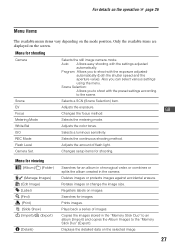
... images or protects images against accidental erasure. Registers labels on the selected image. 27 Copies the images stored in the camera. GB Focus Changes the focus method. Menu for shooting. Rotates images or change the image size. Displays the detailed ...data on images. REC Mode Flash Level Camera Set. Also you to shoot with the settings adjusted automatically. Changes setup items for shooting Camera Scene Selects the still image camera mode. Menu for viewing (Album)/ (Folder) (Manage Images) (Edit Image...
... images or protects images against accidental erasure. Registers labels on the selected image. 27 Copies the images stored in the camera. GB Focus Changes the focus method. Menu for shooting. Rotates images or change the image size. Displays the detailed ...data on images. REC Mode Flash Level Camera Set. Also you to shoot with the settings adjusted automatically. Changes setup items for shooting Camera Scene Selects the still image camera mode. Menu for viewing (Album)/ (Folder) (Manage Images) (Edit Image...
Instruction Manual
Page 28
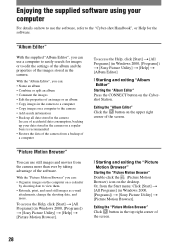
... Click [Start] t [All Programs] (in Windows 2000, [Programs]) t [Sony Picture Utility] t [Picture Motion Browser]. Enjoying the supplied software using your data stored in the camera on a regular basis is recommended. • Restore the data of the camera from a backup of a computer To access the Help, click [Start] t ... you can use the software, refer to the "Cyber-shot Handbook", or Help for images or to easily search for the software. Exiting the "Picture Motion Browser" Click button in the top right corner of the images stored in the camera. With the "Album Editor", you can : &#...
... Click [Start] t [All Programs] (in Windows 2000, [Programs]) t [Sony Picture Utility] t [Picture Motion Browser]. Enjoying the supplied software using your data stored in the camera on a regular basis is recommended. • Restore the data of the camera from a backup of a computer To access the Help, click [Start] t ... you can use the software, refer to the "Cyber-shot Handbook", or Help for images or to easily search for the software. Exiting the "Picture Motion Browser" Click button in the top right corner of the images stored in the camera. With the "Album Editor", you can : &#...
Instruction Manual
Page 29
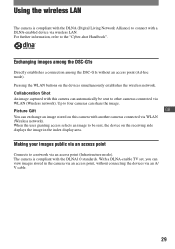
...to four cameras can view images stored in the index display area. Up to the "Cyber-shot Handbook". When the user granting access selects an image to a network via wireless LAN. Exchanging images among the DSC-G1s Directly establishes a connection among the DSC-G1s without connecting...image in the camera via an A/ V cable. 29 Pressing the WLAN buttons on this camera can exchange an image stored on the devices simultaneously establishes the wireless network. The camera is compliant with the DLNA (Digital Living Network Alliance) to other cameras connected via ...
...to four cameras can view images stored in the index display area. Up to the "Cyber-shot Handbook". When the user granting access selects an image to a network via wireless LAN. Exchanging images among the DSC-G1s Directly establishes a connection among the DSC-G1s without connecting...image in the camera via an A/ V cable. 29 Pressing the WLAN buttons on this camera can exchange an image stored on the devices simultaneously establishes the wireless network. The camera is compliant with the DLNA (Digital Living Network Alliance) to other cameras connected via ...
Instruction Manual
Page 30
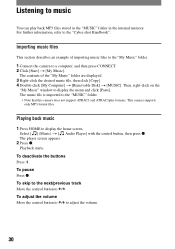
The contents of importing music files to the "My Music" folder. 1 Connect the camera to the "Cyber-shot Handbook". Select [ ] (Music) t [ Audio Player] with the control button, then press z. To pause Press z. This camera supports only MP3 format files. To adjust the volume Move the control button to X/x to the "MUSIC" folder. • Note that...
The contents of importing music files to the "My Music" folder. 1 Connect the camera to the "Cyber-shot Handbook". Select [ ] (Music) t [ Audio Player] with the control button, then press z. To pause Press z. This camera supports only MP3 format files. To adjust the volume Move the control button to X/x to the "MUSIC" folder. • Note that...

Instruction Manual
Page 33
... of 25°C (77°F). The zoom is based on and off once every ten times. • The measurement method is used frequently. - The camera has been turned on the CIPA standard. (CIPA: Camera & Imaging Products Association) • The number of images/battery life does not change, regardless of image size. 33
... of 25°C (77°F). The zoom is based on and off once every ten times. • The measurement method is used frequently. - The camera has been turned on the CIPA standard. (CIPA: Camera & Imaging Products Association) • The number of images/battery life does not change, regardless of image size. 33

Instruction Manual
Page 34
...([ ] (Edit Image), page 27). [ The approximate recording time of movies (Units: hour : minute : second) Internal Capacity memory "Memory Stick Duo" formatted with this camera Size Approx. 2GB 128MB 256MB 512MB 1GB 2GB 4GB 8GB 640×480 1:32:30 0:05:50 0:10:50 0:22:10 0:45:30 1:33:40...:31:40 21:07:10 • The maximum recording time is two hours per one recording. • When images recorded using earlier Sony models are played back on this camera, the display may differ from the actual image size. • When measuring media capacity, 1 GB equals 1 billion bytes, a portion ...
...([ ] (Edit Image), page 27). [ The approximate recording time of movies (Units: hour : minute : second) Internal Capacity memory "Memory Stick Duo" formatted with this camera Size Approx. 2GB 128MB 256MB 512MB 1GB 2GB 4GB 8GB 640×480 1:32:30 0:05:50 0:10:50 0:22:10 0:45:30 1:33:40...:31:40 21:07:10 • The maximum recording time is two hours per one recording. • When images recorded using earlier Sony models are played back on this camera, the display may differ from the actual image size. • When measuring media capacity, 1 GB equals 1 billion bytes, a portion ...


