Operating Instructions
Page 2
... radio frequency energy and, if not installed and used with the equipment in Canada This Class B digital apparatus complies with the instructions, may call: Sony's Business Information Center (BIC) at 1-800-686-SONY (7669) or Write to Subpart B of Part 15 of Conformity Trade Name: SONY Model No.: DPP-MP1 Responsible Party: Sony Electronics Inc. Refer servicing to provide reasonable protection against harmful...
... radio frequency energy and, if not installed and used with the equipment in Canada This Class B digital apparatus complies with the instructions, may call: Sony's Business Information Center (BIC) at 1-800-686-SONY (7669) or Write to Subpart B of Part 15 of Conformity Trade Name: SONY Model No.: DPP-MP1 Responsible Party: Sony Electronics Inc. Refer servicing to provide reasonable protection against harmful...

Operating Instructions
Page 3
... Use 5 Supplied Accessories 5 About the Printing Pack 6 Names of Parts 7 Preparations 9 1 Power Connection 9 2 Loading the Print Cartridge ....... 10 3 Loading the Print Paper 11 4 Inserting the "Memory Stick" .... 13 Printing 14 Operation During Printing 14 Printing Images With Print Mark (DPOF Print 15 Assigning a Print Mark 15 Bulk printing of images with Print Mark 15 Changing the number of duplicates 17 Direct-Select Printing 18 Selecting an image 18 Printing 19 Print settings 21 PC Interface Kit 23 Preparation 23 Printing 24 Others 25 Precautions 25 Print Cartridge...
... Use 5 Supplied Accessories 5 About the Printing Pack 6 Names of Parts 7 Preparations 9 1 Power Connection 9 2 Loading the Print Cartridge ....... 10 3 Loading the Print Paper 11 4 Inserting the "Memory Stick" .... 13 Printing 14 Operation During Printing 14 Printing Images With Print Mark (DPOF Print 15 Assigning a Print Mark 15 Bulk printing of images with Print Mark 15 Changing the number of duplicates 17 Direct-Select Printing 18 Selecting an image 18 Printing 19 Print settings 21 PC Interface Kit 23 Preparation 23 Printing 24 Others 25 Precautions 25 Print Cartridge...
Operating Instructions
Page 4
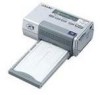
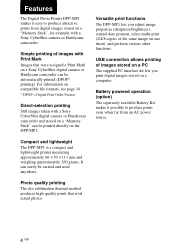
... or Handycam camcorder. Battery powered operation (option) The separately available Battery Kit makes it easy to produce prints even when far from digital images stored on the DPP-MP1. Versatile print functions The DPP-MP1 lets you print digital images stored on a Sony CyberShot digital camera or Handycam camcorder can easily be printed directly on a "Memory Stick", for example with Print Mark Images that rival actual photos. Simple printing of the same image on one sheet), and perform...
... or Handycam camcorder. Battery powered operation (option) The separately available Battery Kit makes it easy to produce prints even when far from digital images stored on the DPP-MP1. Versatile print functions The DPP-MP1 lets you print digital images stored on a Sony CyberShot digital camera or Handycam camcorder can easily be printed directly on a "Memory Stick", for example with Print Mark Images that rival actual photos. Simple printing of the same image on one sheet), and perform...

Operating Instructions
Page 5
Before Use Before Use Supplied Accessories After unpacking the unit, make sure that the accessories shown below are complete. • AC adapter • Card size color printing pack (SVM-24CS) • Clamp filter (3) • Power cord - U.S.A. CD-ROM • Carrying pouch (1) • Operating Instructions (1) • Owner registration card (1) • Warranty (1) • Sony End User Software License Agreement (1) 5 GB and Canada - USB cable - Europe • Paper tray • PC interface kit -
Before Use Before Use Supplied Accessories After unpacking the unit, make sure that the accessories shown below are complete. • AC adapter • Card size color printing pack (SVM-24CS) • Clamp filter (3) • Power cord - U.S.A. CD-ROM • Carrying pouch (1) • Operating Instructions (1) • Owner registration card (1) • Warranty (1) • Sony End User Software License Agreement (1) 5 GB and Canada - USB cable - Europe • Paper tray • PC interface kit -

Operating Instructions
Page 6
Printing pack Application SVM-24CS Photo paper 12-pack × 2 / print cartridge for 24 prints Note • Be sure to use only the dedicated printing packs for this unit, the dedicated printing pack is required. Otherwise paper jam or malfunction can occur. 6 GB About the Printing Pack To print with this unit. • Do not try to reinsert used print paper or print cartridges.
Printing pack Application SVM-24CS Photo paper 12-pack × 2 / print cartridge for 24 prints Note • Be sure to use only the dedicated printing packs for this unit, the dedicated printing pack is required. Otherwise paper jam or malfunction can occur. 6 GB About the Printing Pack To print with this unit. • Do not try to reinsert used print paper or print cartridges.

Operating Instructions
Page 7
Before Use Names of Parts For detailed information, refer to the pages shown in brackets. 5 6 789 0qaqsqd 1 234 1 Power switch (pages 15, 19) 2 Paper tray 3 Paper tray insertion door (page 12) 4 Ventilation openings 5 Display (page 8) 6 SELECT (-/+) buttons 7 ENTER/OPTION button 8 DPOF button (page 16) 9 PRINT/STOP button (pages 16, 20) 0 Memory Stick slot (page 13) qa Print cartridge door (page 10) qs Print cartridge door latch (page 10) qd USB port Continued 7 GB
Before Use Names of Parts For detailed information, refer to the pages shown in brackets. 5 6 789 0qaqsqd 1 234 1 Power switch (pages 15, 19) 2 Paper tray 3 Paper tray insertion door (page 12) 4 Ventilation openings 5 Display (page 8) 6 SELECT (-/+) buttons 7 ENTER/OPTION button 8 DPOF button (page 16) 9 PRINT/STOP button (pages 16, 20) 0 Memory Stick slot (page 13) qa Print cartridge door (page 10) qs Print cartridge door latch (page 10) qd USB port Continued 7 GB

Operating Instructions
Page 12
.... If there are fingerprints or dust on the print paper or the ribbon, print quality may be closed. Only load half of 12 sheets. 3 Close the paper tray cover. Note If the print paper is printed). When printing is completed Remove the paper tray from the unit and close the paper tray door. Otherwise a paper jam can occur. • Do not write or print anything on the image side of print papers. Otherwise malfunction can occur.
.... If there are fingerprints or dust on the print paper or the ribbon, print quality may be closed. Only load half of 12 sheets. 3 Close the paper tray cover. Note If the print paper is printed). When printing is completed Remove the paper tray from the unit and close the paper tray door. Otherwise a paper jam can occur. • Do not write or print anything on the image side of print papers. Otherwise malfunction can occur.

Operating Instructions
Page 14
... not try to print, make sure that there are no obstructions behind the unit which could block the smooth exit of the paper tray. If the power was interrupted during printing. 14 GB There should be damaged. Print paper • Do not open the print cartridge door or remove the print cartridge from the paper exit slot. When printing is completed, the paper is for printing. Otherwise a paper jam may occur or...
... not try to print, make sure that there are no obstructions behind the unit which could block the smooth exit of the paper tray. If the power was interrupted during printing. 14 GB There should be damaged. Print paper • Do not open the print cartridge door or remove the print cartridge from the paper exit slot. When printing is completed, the paper is for printing. Otherwise a paper jam may occur or...

Operating Instructions
Page 16
... display. 6 Remove the printed paper. The folder number, file number, and number of duplicates for an image with Print Mark. 4 Make the print settings as required. If you do not use the SELECT (-/+) buttons to check the folder numbers, file numbers, and number of the paper and remove them along the perforated lines. You can use the power switch, the unit will automatically turn itself off after they are finished. 7 Fold the edges of duplicates for image quality, print...
... display. 6 Remove the printed paper. The folder number, file number, and number of duplicates for an image with Print Mark. 4 Make the print settings as required. If you do not use the SELECT (-/+) buttons to check the folder numbers, file numbers, and number of the paper and remove them along the perforated lines. You can use the power switch, the unit will automatically turn itself off after they are finished. 7 Fold the edges of duplicates for image quality, print...
Operating Instructions
Page 17
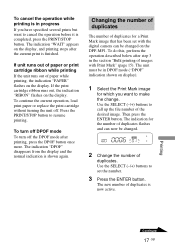
... display). 1 Select the Print Mark image for which you have specified several prints but want to set with Print Mark" (page 15). Use the SELECT (-/+) buttons to make the change. The indication "WAIT" appears on the DPP-MP1. If the print cartridge ribbon runs out, the indication "RIBON" flashes on the display. To continue the current operation, load print paper or replace the print cartridge without turning the unit off the DPOF mode after the current print is finished. To turn...
... display). 1 Select the Print Mark image for which you have specified several prints but want to set with Print Mark" (page 15). Use the SELECT (-/+) buttons to make the change. The indication "WAIT" appears on the DPP-MP1. If the print cartridge ribbon runs out, the indication "RIBON" flashes on the display. To continue the current operation, load print paper or replace the print cartridge without turning the unit off the DPOF mode after the current print is finished. To turn...

Operating Instructions
Page 18
.... Direct-Select Printing Images stored on a "Memory Stick" can be recorded on folder numbers and file numbers, see page 30. 18 GB Note This change the number of the Sony CyberShot digital camera or Handycam camcorder. Selecting an image 1 Insert the "Memory Stick" in the Sony CyberShot digital camera or Handycam camcorder. 2 Verify the folder number and file number of the image that you want to change will not be selected at the DPP-MP1...
.... Direct-Select Printing Images stored on a "Memory Stick" can be recorded on folder numbers and file numbers, see page 30. 18 GB Note This change the number of the Sony CyberShot digital camera or Handycam camcorder. Selecting an image 1 Insert the "Memory Stick" in the Sony CyberShot digital camera or Handycam camcorder. 2 Verify the folder number and file number of the image that you want to change will not be selected at the DPP-MP1...
Operating Instructions
Page 19
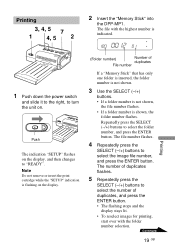
... button. • The flashing stops and the display stays lit. • To reselect images for printing, start over with the highest number is flashing on . Printing 3, 4, 5 7 1 4, 5 2 2 Insert the "Memory Stick" into the DPP-MP1. Note Do not remove or insert the print cartridge while the "SETUP" indication is indicated. The file number flashes. 4 Repeatedly press the SELECT (-/+) buttons to select the number of duplicates flashes. 5 Repeatedly press the SELECT (-/+) buttons to select the image file number, and press the ENTER button...
... button. • The flashing stops and the display stays lit. • To reselect images for printing, start over with the highest number is flashing on . Printing 3, 4, 5 7 1 4, 5 2 2 Insert the "Memory Stick" into the DPP-MP1. Note Do not remove or insert the print cartridge while the "SETUP" indication is indicated. The file number flashes. 4 Repeatedly press the SELECT (-/+) buttons to select the number of duplicates flashes. 5 Repeatedly press the SELECT (-/+) buttons to select the image file number, and press the ENTER button...

Operating Instructions
Page 20
... printed paper. Printing images in TIFF (noncompressed) format If the image specified in progress If you have specified several prints, remove the prints one by one after they are finished. 9 Fold the edges of paper while printing, the indication "PAPER" flashes on page 21. 7 Press the PRINT/STOP button to resume printing. 20 GB For details, see "Print settings" on the display. To continue the current operation, load print paper or replace the print cartridge without turning...
... printed paper. Printing images in TIFF (noncompressed) format If the image specified in progress If you have specified several prints, remove the prints one by one after they are finished. 9 Fold the edges of paper while printing, the indication "PAPER" flashes on page 21. 7 Press the PRINT/STOP button to resume printing. 20 GB For details, see "Print settings" on the display. To continue the current operation, load print paper or replace the print cartridge without turning...
Operating Instructions
Page 23
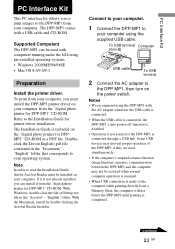
... following pre-installed operating systems. • Windows 2000/ME/98/98SE • Mac OS 8.6/9.0/9.1 Preparation Install the printer driver. If it from the "digital photo printer for DPPMP1" CD-ROM as a PDF file. With the Macintosh, install by double-clicking the Acrobat Reader Installer. Continued 23 GB PC Interface Kit PC Interface Kit This PC interface kit allows you to print images to the DPP-MP1 from a Memory Stick, the...
... following pre-installed operating systems. • Windows 2000/ME/98/98SE • Mac OS 8.6/9.0/9.1 Preparation Install the printer driver. If it from the "digital photo printer for DPPMP1" CD-ROM as a PDF file. With the Macintosh, install by double-clicking the Acrobat Reader Installer. Continued 23 GB PC Interface Kit PC Interface Kit This PC interface kit allows you to print images to the DPP-MP1 from a Memory Stick, the...
Operating Instructions
Page 24
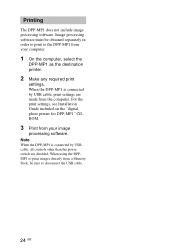
... power switch are made from your image processing software. When using the DPPMP1 to print images directly from your computer. 1 On the computer, select the DPP-MP1 as the destination printer. 2 Make any required print settings. For the print settings, see Installation Guide included on the "digital photo printer for DPP-MP1" CDROM. 3 Print from a Memory Stick, be obtained separately in order to print to disconnect the USB cable. 24 GB When the DPP-MP1 is connected by USB cable, print settings are disabled. Printing The DPP-MP1...
... power switch are made from your image processing software. When using the DPPMP1 to print images directly from your computer. 1 On the computer, select the DPP-MP1 as the destination printer. 2 Make any required print settings. For the print settings, see Installation Guide included on the "digital photo printer for DPP-MP1" CDROM. 3 Print from a Memory Stick, be obtained separately in order to print to disconnect the USB cable. 24 GB When the DPP-MP1 is connected by USB cable, print settings are disabled. Printing The DPP-MP1...
Operating Instructions
Page 29
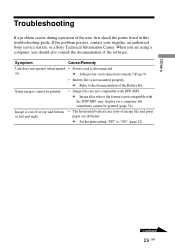
... operation of the software. c Is the power cord connected correctly? (Page 9) • Battery Kit is disconnected. paper are not compatible with the DPP-MP1 may display on . Some images cannot be printed (page 34). When you are using a computer, you should also consult the documentation of the unit, first check the points listed in this troubleshooting guide. on a computer but sometimes cannot be printed. • Image files are different. Image is not compatible with DPP-MP1. c Set the print setting...
... operation of the software. c Is the power cord connected correctly? (Page 9) • Battery Kit is disconnected. paper are not compatible with the DPP-MP1 may display on . Some images cannot be printed (page 34). When you are using a computer, you should also consult the documentation of the unit, first check the points listed in this troubleshooting guide. on a computer but sometimes cannot be printed. • Image files are different. Image is not compatible with DPP-MP1. c Set the print setting...

Operating Instructions
Page 31
... error occurs while printing an image that can be printed (page 34). • There are no images. c The image file is not compatible with the DPP-MP1 may not work in a PC may display on a Sony CyberShot digital camera or Handycam camcorder. • The "Memory Stick" does not contain any images that has a Print Mark, printing is not possible. c Reinsert the "Memory Stick" properly (page 13). • The "Memory Stick" was inserted...
... error occurs while printing an image that can be printed (page 34). • There are no images. c The image file is not compatible with the DPP-MP1 may not work in a PC may display on a Sony CyberShot digital camera or Handycam camcorder. • The "Memory Stick" does not contain any images that has a Print Mark, printing is not possible. c Reinsert the "Memory Stick" properly (page 13). • The "Memory Stick" was inserted...

Operating Instructions
Page 32
.... If you still cannot remove the paper, contact your supplier, an authorized Sony service station, or a Sony Technical Information Center. 32 GB c Try turning the unit off , wait a moment, and then turn power to pull out the paper by hand, because this does not solve the problem, remove the print cartridge from the unit and check whether the ribbon is jammed inside the cartridge. If this can lead...
.... If you still cannot remove the paper, contact your supplier, an authorized Sony service station, or a Sony Technical Information Center. 32 GB c Try turning the unit off , wait a moment, and then turn power to pull out the paper by hand, because this does not solve the problem, remove the print cartridge from the unit and check whether the ribbon is jammed inside the cartridge. If this can lead...

Operating Instructions
Page 33
... Gradations YMC image process using such parts, depending on the warranty card. If the problem persists, contact your supplier or an authorized Sony service station. All costs will have to be repaired using 8 bits/256 gradations per color for maintaining operation of the digital photo printer will be carried out according to the conditions listed on the nature of the problem. Date of problem - Model name: DPP-MP1 - Service If there...
... Gradations YMC image process using such parts, depending on the warranty card. If the problem persists, contact your supplier or an authorized Sony service station. All costs will have to be repaired using 8 bits/256 gradations per color for maintaining operation of the digital photo printer will be carried out according to the conditions listed on the nature of the problem. Date of problem - Model name: DPP-MP1 - Service If there...
Operating Instructions
Page 34
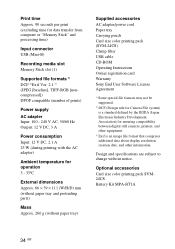
Design and specifications are subject to change without paper tray) Supplied accessories AC adapter/power cord Paper tray Carrying pouch Card size color printing pack (SVM-24CS) Clamp filter USB cable CD-ROM Operating Instructions Owner registration card Warranty Sony End User Software License Agreement 1) Some special file formats may not be supported. 2) DCF (Design rule for Camera File system) is a standard defined by the JEIDA (Japan Electronic Industry Development Association) for operation 5 - 35ºC External dimensions Approx...
Design and specifications are subject to change without paper tray) Supplied accessories AC adapter/power cord Paper tray Carrying pouch Card size color printing pack (SVM-24CS) Clamp filter USB cable CD-ROM Operating Instructions Owner registration card Warranty Sony End User Software License Agreement 1) Some special file formats may not be supported. 2) DCF (Design rule for Camera File system) is a standard defined by the JEIDA (Japan Electronic Industry Development Association) for operation 5 - 35ºC External dimensions Approx...

