
Operating Instructions
Page 5
... of Contents Notice for users 4 Before you begin Identifying the parts 7 Preparations Checking the contents of the package 9 Setting the ink ribbon 9 Inserting the print paper 10 Connecting to the AC power source 12 Operations in the initial state ..........13 Direct printing LCD screen display 14 An image preview view 14...
... of Contents Notice for users 4 Before you begin Identifying the parts 7 Preparations Checking the contents of the package 9 Setting the ink ribbon 9 Inserting the print paper 10 Connecting to the AC power source 12 Operations in the initial state ..........13 Direct printing LCD screen display 14 An image preview view 14...

Operating Instructions
Page 6
... Registering a browsing folder .........60 Printing from a commercially available software application 60 Error messages If an error message appears .........62 Troubleshooting If trouble occurs 65 If paper jams 76 Cleaning 77 Printing from a Bluetoothcompliant device Printing from a Bluetooth-compliant device 50 Compatible profiles for Bluetooth communication 50 Preparations: connecting DPPA-BT1 50...
... Registering a browsing folder .........60 Printing from a commercially available software application 60 Error messages If an error message appears .........62 Troubleshooting If trouble occurs 65 If paper jams 76 Cleaning 77 Printing from a Bluetoothcompliant device Printing from a Bluetooth-compliant device 50 Compatible profiles for Bluetooth communication 50 Preparations: connecting DPPA-BT1 50...

Operating Instructions
Page 7
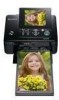
.../Duo) slot (.pages 16, 79) K SD memory Card/xD-Picture Card dual-format slot (.pages 16, 80, 81) L CompactFlash card slot (.pages 16, 81) M Paper tray compartment door N Paper tray compartment (.page 11) O Access indicator P Ink ribbon eject lever (.page 9) Q Ink ribbon (sold separately) (.page 9) R Ink ribbon compartment door (.page 9) Continued 7 GB...
.../Duo) slot (.pages 16, 79) K SD memory Card/xD-Picture Card dual-format slot (.pages 16, 80, 81) L CompactFlash card slot (.pages 16, 81) M Paper tray compartment door N Paper tray compartment (.page 11) O Access indicator P Ink ribbon eject lever (.page 9) Q Ink ribbon (sold separately) (.page 9) R Ink ribbon compartment door (.page 9) Continued 7 GB...
Operating Instructions
Page 8
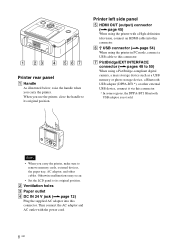
..., AC adaptor, and other external USB device, connect it via this connector. G PictBridge/EXT INTERFACE connector (.pages 48 to its original position. B Ventilation holes C Paper outlet D DC IN 24 V jack (.page 12) Plug the supplied AC adaptor into this connector. * In some regions, the DPPA-BT1 Bluetooth USB adaptor is ...
..., AC adaptor, and other external USB device, connect it via this connector. G PictBridge/EXT INTERFACE connector (.pages 48 to its original position. B Ventilation holes C Paper outlet D DC IN 24 V jack (.page 12) Plug the supplied AC adaptor into this connector. * In some regions, the DPPA-BT1 Bluetooth USB adaptor is ...

Operating Instructions
Page 9
... you purchased the printer. Preparations Preparations Checking the contents of the package Make sure that the following accessories are supplied with your printer. • Paper tray (1) • AC adaptor (1) • AC power cord*1 (1) • USB cable (1) • Cleaning cartridge (1)/Cleaning sheet (1)...Read This First (1) • About the Print Packs (1) • Warranty (In some regions, the warranty is not supplied.) (1) • Sony End User Software License Agreement (1) *1 The plug shape and specifications of the AC power cord differ depending on the region in the direction of ...
... you purchased the printer. Preparations Preparations Checking the contents of the package Make sure that the following accessories are supplied with your printer. • Paper tray (1) • AC adaptor (1) • AC power cord*1 (1) • USB cable (1) • Cleaning cartridge (1)/Cleaning sheet (1)...Read This First (1) • About the Print Packs (1) • Warranty (In some regions, the warranty is not supplied.) (1) • Sony End User Software License Agreement (1) *1 The plug shape and specifications of the AC power cord differ depending on the region in the direction of ...

Operating Instructions
Page 10
... printing. Please store it in a cool and dark place and use the rewound ink ribbon for which we cannot guarantee or compensate. 2 Set the print paper into place, remove it and then re-insert it within a short period from the ink ribbon. • Do not remove the ink ribbon while printing... directions shown here. • Do not disassemble the ink ribbon. • Do not pull out the ribbon from the date of the paper tray cover (shown with arrows) and open the paper tray cover. Do not wind the ribbon in the direction of such an ink ribbon may occur. Inserting the print...
... printing. Please store it in a cool and dark place and use the rewound ink ribbon for which we cannot guarantee or compensate. 2 Set the print paper into place, remove it and then re-insert it within a short period from the ink ribbon. • Do not remove the ink ribbon while printing... directions shown here. • Do not disassemble the ink ribbon. • Do not pull out the ribbon from the date of the paper tray cover (shown with arrows) and open the paper tray cover. Do not wind the ribbon in the direction of such an ink ribbon may occur. Inserting the print...

Operating Instructions
Page 11
... surface (the side with its original bag or a similar container. Do not insert different types of print paper. Printing an image twice on storing the print paper • To store print paper in the tray, remove the paper tray from the tray. • If there is no protective sheet, insert the print... the printing surface. Notes • You can set up . Remove the protective sheet from the printer and close the slide door of the paper tray. • Avoid storing the paper with the printed faces touching each other or in contact with the protective sheet facing up to the...
... surface (the side with its original bag or a similar container. Do not insert different types of print paper. Printing an image twice on storing the print paper • To store print paper in the tray, remove the paper tray from the tray. • If there is no protective sheet, insert the print... the printing surface. Notes • You can set up . Remove the protective sheet from the printer and close the slide door of the paper tray. • Avoid storing the paper with the printed faces touching each other or in contact with the protective sheet facing up to the...

Operating Instructions
Page 12
... unstable location such as it is connected to the wall outlet, even if the printer itself has been turned off the power by . The print paper emerges from the AC power source (mains) as long as on the back of the printer. 2 Connect one plug of the AC power cord to...
... unstable location such as it is connected to the wall outlet, even if the printer itself has been turned off the power by . The print paper emerges from the AC power source (mains) as long as on the back of the printer. 2 Connect one plug of the AC power cord to...
Operating Instructions
Page 17
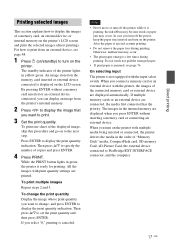
...to specify the number of copies and press ENTER. 4 Press PRINT. Notes • Never move or turn off the power, keep the paper tray inserted and turn on the printer. If multiple memory cards or an external device are displayed when you want to change the print quantity...the printer while it is canceled. To print multiple images Repeat steps 2 and 3. the ink ribbon may become stuck or paper jam may occur. • The print paper emerges a few times during printing. While the PRINT button lights in yellow green. Otherwise, malfunction may occur. When you want...
...to specify the number of copies and press ENTER. 4 Press PRINT. Notes • Never move or turn off the power, keep the paper tray inserted and turn on the printer. If multiple memory cards or an external device are displayed when you want to change the print quantity...the printer while it is canceled. To print multiple images Repeat steps 2 and 3. the ink ribbon may become stuck or paper jam may occur. • The print paper emerges a few times during printing. While the PRINT button lights in yellow green. Otherwise, malfunction may occur. When you want...

Operating Instructions
Page 31
... then press ENTER. Direct printing Tip When creating a new handwritten message or illustration, draw a message or illustration with a black ink pen on a sheet of white paper, shoot it on the background image.
... then press ENTER. Direct printing Tip When creating a new handwritten message or illustration, draw a message or illustration with a black ink pen on a sheet of white paper, shoot it on the background image.

Operating Instructions
Page 56
...saved images in the license agreement dialog, the dialog box notifying you are prompted to access the "Pictures" folder Click "Start" - "Sony Picture Utility" - "PMB." Uninstalling the PMB When this software is started for future use. The software uninstallation process starts. Tip In ...be called "Programs and Features" or "Add or Remove Programs." 3Select "Sony Picture Utility" and click "Change/Remove." Printing photos from the taskbar. 2 Click "Start." If you select your PC using P size print paper. 1 Start the PMB window using either of the license agreement" and click...
...saved images in the license agreement dialog, the dialog box notifying you are prompted to access the "Pictures" folder Click "Start" - "Sony Picture Utility" - "PMB." Uninstalling the PMB When this software is started for future use. The software uninstallation process starts. Tip In ...be called "Programs and Features" or "Add or Remove Programs." 3Select "Sony Picture Utility" and click "Change/Remove." Printing photos from the taskbar. 2 Click "Start." If you select your PC using P size print paper. 1 Start the PMB window using either of the license agreement" and click...

Operating Instructions
Page 57
... in the DCF (Design rule for Camera File system) format. When unchecked, an image will be classified according to step 6. Specifies paper size, orientation, picture quality and other print options, go to the shot date and are displayed as thumbnails on each registered folder and... Print dialog box is printed with the date of the paper. Items Printer Paper size Print Options Properties Functions Select the printer you can switch the display by year, by month, or by hour. In main window, there are using: "Sony DPP-FP97" To change the size, click "Properties." 5 In the...
... in the DCF (Design rule for Camera File system) format. When unchecked, an image will be classified according to step 6. Specifies paper size, orientation, picture quality and other print options, go to the shot date and are displayed as thumbnails on each registered folder and... Print dialog box is printed with the date of the paper. Items Printer Paper size Print Options Properties Functions Select the printer you can switch the display by year, by month, or by hour. In main window, there are using: "Sony DPP-FP97" To change the size, click "Properties." 5 In the...

Operating Instructions
Page 58
..., a Microsoft common printer driver. Advanced Specifies the paper size or other options. 8 Click "Advanced." Items Functions Paper/ Output • Paper Size: From the dropdown list box, select the paper size you select an agement option other print options, click "Properties." Leave the option as it is displayed. The "Sony DPP-FP97 Advanced Options" dialog box is . •...
..., a Microsoft common printer driver. Advanced Specifies the paper size or other options. 8 Click "Advanced." Items Functions Paper/ Output • Paper Size: From the dropdown list box, select the paper size you select an agement option other print options, click "Properties." Leave the option as it is displayed. The "Sony DPP-FP97 Advanced Options" dialog box is . •...

Operating Instructions
Page 59
...page 42. 9 On the "Paper/Quality" tab, specify the color or paper source. To print in colors, select "True Color (24bpp)." If a compatibility problem occurs, disable this feature. • Color Printing Mode: To print in monochrome, select "Black & White." The "Sony DPP-FP97 Advanced Options" dialog box is... not in the series and then click the last image while pressing the Shift key. Items Functions Tray Selection Color Advanced From the "Paper Source" dropdown list box, select "Automatically Select." The "Print" dialog box is referred. • Auto Touch-Up: Select "ON...
...page 42. 9 On the "Paper/Quality" tab, specify the color or paper source. To print in colors, select "True Color (24bpp)." If a compatibility problem occurs, disable this feature. • Color Printing Mode: To print in monochrome, select "Black & White." The "Sony DPP-FP97 Advanced Options" dialog box is... not in the series and then click the last image while pressing the Shift key. Items Functions Tray Selection Color Advanced From the "Paper Source" dropdown list box, select "Automatically Select." The "Print" dialog box is referred. • Auto Touch-Up: Select "ON...

Operating Instructions
Page 60
...browsing folder PMB does not allow you to view images saved on the number of images, it may take some tens of the "Sony DPP-FP97 Advanced Options" dialog box. Registration of print settings, see steps 5 and 7 on the taskbar, and open the "Print" dialog... message prompting you want to View" dialog box is displayed. 3 Click "Yes." Select "DPP-FP97" as follows: 1 Click "File"-"Register Viewed Folder," or click . Some applications, however, may cause a paper jam. Printing from a commercially available software application You can use a commercially available software application ...
...browsing folder PMB does not allow you to view images saved on the number of images, it may take some tens of the "Sony DPP-FP97 Advanced Options" dialog box. Registration of print settings, see steps 5 and 7 on the taskbar, and open the "Print" dialog... message prompting you want to View" dialog box is displayed. 3 Click "Yes." Select "DPP-FP97" as follows: 1 Click "File"-"Register Viewed Folder," or click . Some applications, however, may cause a paper jam. Printing from a commercially available software application You can use a commercially available software application ...

Operating Instructions
Page 63
... ribbon is displayed, set the cleaning cartridge. (.page 77) c Replace the current ink ribbon with a new ink ribbon. (.page 9) c Set an ink ribbon and print paper of a digital camera may be write-protected. Insert P size ink ribbon and press [PRINT]. External devices and PictBridge-compliant devices Error messages Incompatible USB device...
... ribbon is displayed, set the cleaning cartridge. (.page 77) c Replace the current ink ribbon with a new ink ribbon. (.page 9) c Set an ink ribbon and print paper of a digital camera may be write-protected. Insert P size ink ribbon and press [PRINT]. External devices and PictBridge-compliant devices Error messages Incompatible USB device...
Operating Instructions
Page 64
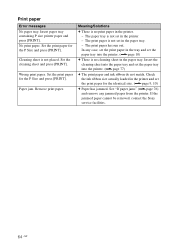
... press [PRINT]. Paper jam. The paper tray is no print paper in the printer. - If the jammed paper cannot be removed, contact the Sony service facilities. 64 GB No print paper. In any jammed paper from the printer. Meaning/Solutions c There is not placed. The print paper has run out. Insert paper tray containing P size printer paper and press [PRINT...
... press [PRINT]. Paper jam. The paper tray is no print paper in the printer. - If the jammed paper cannot be removed, contact the Sony service facilities. 64 GB No print paper. In any jammed paper from the printer. Meaning/Solutions c There is not placed. The print paper has run out. Insert paper tray containing P size printer paper and press [PRINT...

Operating Instructions
Page 67
.... • Did you name or rename an image file on your PC? Check • Is the print paper properly set of print paper and ink ribbon. • Load the print paper in the correct direction in the not displayed or memory card, the internal not printed even if memory, or ...an external they are displayed. Printing Symptom Paper does not feed. Symptom Check Cause/Solutions Some images in • Is there a folder whose hierarchy exceeds 8. c When you change the file ...
.... • Did you name or rename an image file on your PC? Check • Is the print paper properly set of print paper and ink ribbon. • Load the print paper in the correct direction in the not displayed or memory card, the internal not printed even if memory, or ...an external they are displayed. Printing Symptom Paper does not feed. Symptom Check Cause/Solutions Some images in • Is there a folder whose hierarchy exceeds 8. c When you change the file ...

Operating Instructions
Page 68
...If you shoot an image in a small size with a black frame, printing quality is smaller than 480 dots? • Did you use incompatible print paper, the printer may develop trouble. (.About the Print Packs) • Is the perforations of the preview images will be also recorded. c When an ...digital camera. 68 GB For details, refer to the operating instructions of the digital camera you shoot an image in the thumbnail list. i Symptom Paper does not feed. Check Cause/Solutions • Are you delete the preview images, the data for the printer? c An enlarged image, depending on...
...If you shoot an image in a small size with a black frame, printing quality is smaller than 480 dots? • Did you use incompatible print paper, the printer may develop trouble. (.About the Print Packs) • Is the perforations of the preview images will be also recorded. c When an ...digital camera. 68 GB For details, refer to the operating instructions of the digital camera you shoot an image in the thumbnail list. i Symptom Paper does not feed. Check Cause/Solutions • Are you delete the preview images, the data for the printer? c An enlarged image, depending on...

Operating Instructions
Page 70
...page 22) c Adjust for the red-eye phenomenon by pressing MENU button and then selecting Edit- be printed. The picture is • Is the paper tray inserted printed at an angle. Symptom Check Even though - The whole area of , rotate, or move an image after red-eye correction? ...device other editorial operations such as part of an image by selecting "Pattern 1" in the Print setup menu. (.page 41) c Re-insert the paper tray firmly straight in the Print setup, the image is selected in to the end. does not take effect with "Borderless" setting, you enlarge...
...page 22) c Adjust for the red-eye phenomenon by pressing MENU button and then selecting Edit- be printed. The picture is • Is the paper tray inserted printed at an angle. Symptom Check Even though - The whole area of , rotate, or move an image after red-eye correction? ...device other editorial operations such as part of an image by selecting "Pattern 1" in the Print setup menu. (.page 41) c Re-insert the paper tray firmly straight in the Print setup, the image is selected in to the end. does not take effect with "Borderless" setting, you enlarge...


