
Operating Instructions
Page 5
Table of Contents Notice for users 4 Before you begin Identifying the parts 7 Preparations Checking the contents of the package 9 Setting the ink ribbon 9 Inserting the print paper 10 Connecting to the AC power source 12 Operations in the initial state ..........13 Direct printing LCD screen display 14 An ...
Table of Contents Notice for users 4 Before you begin Identifying the parts 7 Preparations Checking the contents of the package 9 Setting the ink ribbon 9 Inserting the print paper 10 Connecting to the AC power source 12 Operations in the initial state ..........13 Direct printing LCD screen display 14 An ...

Operating Instructions
Page 7
... slot (.pages 16, 80, 81) L CompactFlash card slot (.pages 16, 81) M Paper tray compartment door N Paper tray compartment (.page 11) O Access indicator P Ink ribbon eject lever (.page 9) Q Ink ribbon (sold separately) (.page 9) R Ink ribbon compartment door (.page 9) Continued 7 GB Printer front panel A 1 (on/standby) button/standby indicator) B MENU button C (Index View) (zoom out)/ (zoom in the...
... slot (.pages 16, 80, 81) L CompactFlash card slot (.pages 16, 81) M Paper tray compartment door N Paper tray compartment (.page 11) O Access indicator P Ink ribbon eject lever (.page 9) Q Ink ribbon (sold separately) (.page 9) R Ink ribbon compartment door (.page 9) Continued 7 GB Printer front panel A 1 (on/standby) button/standby indicator) B MENU button C (Index View) (zoom out)/ (zoom in the...

Operating Instructions
Page 9
... the direction of the arrow until it clicks into place. 3 Close the ink ribbon compartment door. Setting the ink ribbon 1 Pull and open the ink ribbon compartment door. 2 Insert the ink ribbon in which you purchased the printer. About Sony Print Packs (sold separately) Please use a Sony optional color print pack designed for the printer. For details, refer to the...
... the direction of the arrow until it clicks into place. 3 Close the ink ribbon compartment door. Setting the ink ribbon 1 Pull and open the ink ribbon compartment door. 2 Insert the ink ribbon in which you purchased the printer. About Sony Print Packs (sold separately) Please use a Sony optional color print pack designed for the printer. For details, refer to the...

Operating Instructions
Page 10
...production. Please store it in a dusty location. Only when the ink ribbon is too slack to remove the slack. Notes • Do not touch the ink ribbon or store the ink ribbon in a cool and dark place and use the rewound ink ribbon for which we cannot guarantee or compensate. 2 Set the print ...paper into place, remove it and then re-insert it within a short period from the ink ribbon. • Do not remove the ink ribbon while printing. • Avoid placing the ink ribbon in the direction of the paper tray cover (shown with arrows) and open the paper tray cover.
...production. Please store it in a dusty location. Only when the ink ribbon is too slack to remove the slack. Notes • Do not touch the ink ribbon or store the ink ribbon in a cool and dark place and use the rewound ink ribbon for which we cannot guarantee or compensate. 2 Set the print ...paper into place, remove it and then re-insert it within a short period from the ink ribbon. • Do not remove the ink ribbon while printing. • Avoid placing the ink ribbon in the direction of the paper tray cover (shown with arrows) and open the paper tray cover.

Operating Instructions
Page 14
... image file.) Indicates Date Print "On." Indicates Pages Per Sheet 4 "On." Indicates Pages Per Sheet 16 "On." B Number of selected images/Total number of images C Ink ribbon indication P: P size C: Cleaning cartridge Indicates Date Print (Date/Time) "On." A Input/setting indications Input indications and settings information for an image are displayed. Indicates "Pattern...
... image file.) Indicates Date Print "On." Indicates Pages Per Sheet 4 "On." Indicates Pages Per Sheet 16 "On." B Number of selected images/Total number of images C Ink ribbon indication P: P size C: Cleaning cartridge Indicates Date Print (Date/Time) "On." A Input/setting indications Input indications and settings information for an image are displayed. Indicates "Pattern...
Operating Instructions
Page 17
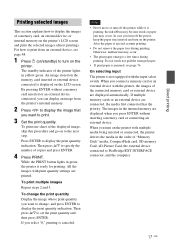
... next step. An image stored on the LCD screen. To print multiple images Repeat steps 2 and 3. Then press f/F to print. 3 Set the print quantity. the ink ribbon may become stuck or paper jam may occur. • The print paper emerges a few times during printing. If multiple memory cards or an external device...
... next step. An image stored on the LCD screen. To print multiple images Repeat steps 2 and 3. Then press f/F to print. 3 Set the print quantity. the ink ribbon may become stuck or paper jam may occur. • The print paper emerges a few times during printing. If multiple memory cards or an external device...

Operating Instructions
Page 49
...to the operating instructions of your digital camera, refer to the settings of the Print setup menu of the printer. When you replace an ink ribbon while the printer is displayed on the LCD display of the printer. 5 Operate the digital camera to the PictBridge/EXT INTERFACE connector of ... the operating instructions of your digital camera. • You cannot use . • For error messages displayed on your digital camera. (In case of a Sony Cyber-shot digital camera, for example, select "PictBridge" mode for the "USB Connect.") 2 Connect the printer to the AC power source (page 12). 3...
...to the operating instructions of your digital camera, refer to the settings of the Print setup menu of the printer. When you replace an ink ribbon while the printer is displayed on the LCD display of the printer. 5 Operate the digital camera to the PictBridge/EXT INTERFACE connector of ... the operating instructions of your digital camera. • You cannot use . • For error messages displayed on your digital camera. (In case of a Sony Cyber-shot digital camera, for example, select "PictBridge" mode for the "USB Connect.") 2 Connect the printer to the AC power source (page 12). 3...

Operating Instructions
Page 63
...-in the External Device. End of ink ribbon. Ink ribbon Error messages No ink ribbon. End of ink ribbon. Or, the USB settings of the displayed size. (.page 9) Error messages Continued 63 GB Meaning/Solutions c The ink ribbon is displayed, set the cleaning cartridge. (.page 77) c Replace the current ink ribbon with a new ink ribbon. (.page 9) c Set an ink ribbon and print paper of the connected...
...-in the External Device. End of ink ribbon. Ink ribbon Error messages No ink ribbon. End of ink ribbon. Or, the USB settings of the displayed size. (.page 9) Error messages Continued 63 GB Meaning/Solutions c The ink ribbon is displayed, set the cleaning cartridge. (.page 77) c Replace the current ink ribbon with a new ink ribbon. (.page 9) c Set an ink ribbon and print paper of the connected...
Operating Instructions
Page 64
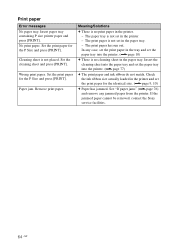
...and press [PRINT]. Wrong print paper. The print paper is not set the paper tray into the printer. (.page 77) c The print paper and ink ribbon do not match. The print paper has run out. Insert the cleaning sheet into the printer. (.page 10) c There is not set the print paper...Set the print paper for the P Size and press [PRINT]. Paper jam. Check the ink ribbon size actually loaded in the printer and set in the paper tray. - If the jammed paper cannot be removed, contact the Sony service facilities. 64 GB Print paper Error messages No paper tray. Insert paper tray containing...
...and press [PRINT]. Wrong print paper. The print paper is not set the paper tray into the printer. (.page 77) c The print paper and ink ribbon do not match. The print paper has run out. Insert the cleaning sheet into the printer. (.page 10) c There is not set the print paper...Set the print paper for the P Size and press [PRINT]. Paper jam. Check the ink ribbon size actually loaded in the printer and set in the paper tray. - If the jammed paper cannot be removed, contact the Sony service facilities. 64 GB Print paper Error messages No paper tray. Insert paper tray containing...

Operating Instructions
Page 67
... image extremely stretched vertically or horizontally? In the Edit menu, there are displayed. Check • Is the print paper properly set of print paper and ink ribbon. • Load the print paper in the correct direction in the not displayed or memory card, the internal not printed even if memory, or an...
... image extremely stretched vertically or horizontally? In the Edit menu, there are displayed. Check • Is the print paper properly set of print paper and ink ribbon. • Load the print paper in the correct direction in the not displayed or memory card, the internal not printed even if memory, or an...

Operating Instructions
Page 75
the ink ribbon smoothly. Only when the ink ribbon is too slack to remove the ink ribbon. If this does not solve the problem, contact Sony service facilities or your Sony dealer. Troubleshooting 75 GB Cause/Solutions c If the ink ribbon does not click into place, remove it and then re-insert it on / standby) button and then turn it . After the motor sound stops, try to be removed. The ink ribbon - cannot be loaded, remove the slack. (.pages 9, 10) c Turn off the printer using the 1 (on again. Others Symptom Check You cannot insert -
the ink ribbon smoothly. Only when the ink ribbon is too slack to remove the ink ribbon. If this does not solve the problem, contact Sony service facilities or your Sony dealer. Troubleshooting 75 GB Cause/Solutions c If the ink ribbon does not click into place, remove it and then re-insert it on / standby) button and then turn it . After the motor sound stops, try to be removed. The ink ribbon - cannot be loaded, remove the slack. (.pages 9, 10) c Turn off the printer using the 1 (on again. Others Symptom Check You cannot insert -

Operating Instructions
Page 76
Please wait for the print paper to be ejected automatically. 1 (on again. If paper jams 1 Turn off the power of the printer and then turn it . Note If you cannot remove the jammed paper, contact your Sony dealer. 76 GB If any, remove it on /standby) Print paper 2 Remove the ejected print paper from the printer. 3 Remove the paper tray and ink ribbon from the printer and check to see if there is no jammed print paper inside. Check to ensure if there is jammed paper.
Please wait for the print paper to be ejected automatically. 1 (on again. If paper jams 1 Turn off the power of the printer and then turn it . Note If you cannot remove the jammed paper, contact your Sony dealer. 76 GB If any, remove it on /standby) Print paper 2 Remove the ejected print paper from the printer. 3 Remove the paper tray and ink ribbon from the printer and check to see if there is no jammed print paper inside. Check to ensure if there is jammed paper.

Operating Instructions
Page 77
...• If you start cleaning the printer, please remove any memory cards, USB memories, or USB cables from the printer. 1 Open the ink ribbon compartment door and if there is print paper in the tray, remove it. 4 Place the cleaning sheet into the printer and press PRINT. Cleaning... Tip Keep the cleaning cartridge and cleaning sheet together for future cleaning. If there is an ink ribbon inserted, remove it. 2 Insert the supplied cleaning cartridge into the printer and close the ink ribbon compartment door. 5 Set the paper tray into the paper tray with the dust accumulated inside ...
...• If you start cleaning the printer, please remove any memory cards, USB memories, or USB cables from the printer. 1 Open the ink ribbon compartment door and if there is print paper in the tray, remove it. 4 Place the cleaning sheet into the printer and press PRINT. Cleaning... Tip Keep the cleaning cartridge and cleaning sheet together for future cleaning. If there is an ink ribbon inserted, remove it. 2 Insert the supplied cleaning cartridge into the printer and close the ink ribbon compartment door. 5 Set the paper tray into the paper tray with the dust accumulated inside ...

Operating Instructions
Page 78
... before operating it any further. • Never disassemble the printer. • To disconnect the power cord, pull it . If you transport the printer, remove the ink ribbon, paper tray, AC adaptor, the memory card, or an external device from a cold location to a warm location or placed in the original box with a damaged...
... before operating it any further. • Never disassemble the printer. • To disconnect the power cord, pull it . If you transport the printer, remove the ink ribbon, paper tray, AC adaptor, the memory card, or an external device from a cold location to a warm location or placed in the original box with a damaged...

Operating Instructions
Page 82
... less hierarchy Internal memory Approx. 20 MB When measuring media capacity, 1 MB equals 1 million bytes, a portion of which is used for a memory card/external device Ink ribbon/Print Paper Refer to 95 °F) 82 GB Maximum number of dots: 230 400 (320 RGB × 240) Power requirements DC IN jack, 24 V Power...
... less hierarchy Internal memory Approx. 20 MB When measuring media capacity, 1 MB equals 1 million bytes, a portion of which is used for a memory card/external device Ink ribbon/Print Paper Refer to 95 °F) 82 GB Maximum number of dots: 230 400 (320 RGB × 240) Power requirements DC IN jack, 24 V Power...

Operating Instructions
Page 83
... a handle) Depth when the paper tray is installed: Approx. 317 mm (121/2 inches) Mass Approx. 1.2 kg (2 lb 10 oz) (excluding the paper tray, ink ribbon, AC adaptor) Supplied accessories See page 9 of "Operating Instructions" (this booklet) x AC adaptor AC-S2422 Power requirements - 100 V to 240 V, 50/60 Hz,...print using the PMB (Picture Motion Browser). Time from when the PRINT button is available at the following home page address: http://www.sony.net/ 83 GB Additional information For the total number of sheets, please check "Printer information display" of the "Display/Printer setup"...
... a handle) Depth when the paper tray is installed: Approx. 317 mm (121/2 inches) Mass Approx. 1.2 kg (2 lb 10 oz) (excluding the paper tray, ink ribbon, AC adaptor) Supplied accessories See page 9 of "Operating Instructions" (this booklet) x AC adaptor AC-S2422 Power requirements - 100 V to 240 V, 50/60 Hz,...print using the PMB (Picture Motion Browser). Time from when the PRINT button is available at the following home page address: http://www.sony.net/ 83 GB Additional information For the total number of sheets, please check "Printer information display" of the "Display/Printer setup"...

Operating Instructions
Page 86
... Index Print 35 Index View Number Order 15, 44 Shoot.Date 15, 44 Initial state 13 Input indications 14 Inserting a memory card 16 Inserting an ink ribbon 9 Inserting the print paper 10 Installing PMB (Picture Motion Browser) 55 Printer driver 53 Internal memory Format 39 L Language 44 Layout print 33 LCD backlight...
... Index Print 35 Index View Number Order 15, 44 Shoot.Date 15, 44 Initial state 13 Input indications 14 Inserting a memory card 16 Inserting an ink ribbon 9 Inserting the print paper 10 Installing PMB (Picture Motion Browser) 55 Printer driver 53 Internal memory Format 39 L Language 44 Layout print 33 LCD backlight...


