Operating Instructions
Page 5
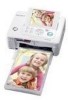
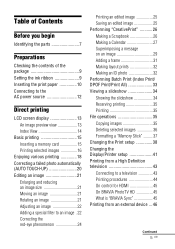
Table of Contents Before you begin Identifying the parts 7 Preparations Checking the contents of the package 9 Setting the ink ribbon 9 Inserting the print paper 10 Connecting to the AC power source 12 Direct printing LCD screen display 13 An image preview view 13 Index ...
Table of Contents Before you begin Identifying the parts 7 Preparations Checking the contents of the package 9 Setting the ink ribbon 9 Inserting the print paper 10 Connecting to the AC power source 12 Direct printing LCD screen display 13 An image preview view 13 Index ...
Operating Instructions
Page 7
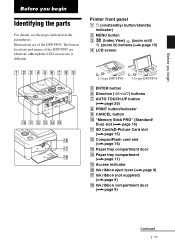
.... Illustrations are identical, although the LCD screen size is different. The button locations and names of the DPP-FP85 are of the DPP-FP95. Before you begin Before you begin Identifying the parts For details, see the pages indicated in ) buttons...DPP-FP95 E ENTER button F Direction (g/G/f/F) buttons G AUTO TOUCH-UP button (.page 20) H PRINT button/indicator I CANCEL button J "Memory Stick PRO" (Standard/ Duo) slot (.page 15) K SD Card/xD-Picture Card slot (.page 15) L CompactFlash card slot (.page 15) M Paper tray compartment door N Paper tray compartment (.page 11) O Access indicator P Ink...
.... Illustrations are identical, although the LCD screen size is different. The button locations and names of the DPP-FP85 are of the DPP-FP95. Before you begin Before you begin Identifying the parts For details, see the pages indicated in ) buttons...DPP-FP95 E ENTER button F Direction (g/G/f/F) buttons G AUTO TOUCH-UP button (.page 20) H PRINT button/indicator I CANCEL button J "Memory Stick PRO" (Standard/ Duo) slot (.page 15) K SD Card/xD-Picture Card slot (.page 15) L CompactFlash card slot (.page 15) M Paper tray compartment door N Paper tray compartment (.page 11) O Access indicator P Ink...
Operating Instructions
Page 9
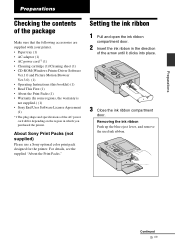
... Push up the blue eject lever, and remove the used ink ribbon. For details, see the supplied "About the Print Packs." Setting the ink ribbon 1 Pull and open the ink ribbon compartment door. 2 Insert the ink ribbon in the direction of the AC power cord differ depending on the region...Operating Instructions (this booklet) (1) • Read This First (1) • About the Print Packs (1) • Warranty (In some regions, the warranty is not supplied.) (1) • Sony End User Software License Agreement (1) *1 The plug shape and specifications of the arrow until it clicks into place. 3 Close the...
... Push up the blue eject lever, and remove the used ink ribbon. For details, see the supplied "About the Print Packs." Setting the ink ribbon 1 Pull and open the ink ribbon compartment door. 2 Insert the ink ribbon in the direction of the AC power cord differ depending on the region...Operating Instructions (this booklet) (1) • Read This First (1) • About the Print Packs (1) • Warranty (In some regions, the warranty is not supplied.) (1) • Sony End User Software License Agreement (1) *1 The plug shape and specifications of the arrow until it clicks into place. 3 Close the...

Operating Instructions
Page 10
..., for printing. Inserting the print paper 1 Open the paper tray cover. Please store it in a cool and dark place and use the rewound ink ribbon for which we cannot guarantee or compensate. 2 Set the print paper into place, remove it and then re-insert it within a short period... from the ink ribbon. • Do not remove the ink ribbon while printing. • Avoid placing the ink ribbon in a location subject to high temperatures, high humidity, excessive dust or direct sunlight. Use of production....
..., for printing. Inserting the print paper 1 Open the paper tray cover. Please store it in a cool and dark place and use the rewound ink ribbon for which we cannot guarantee or compensate. 2 Set the print paper into place, remove it and then re-insert it within a short period... from the ink ribbon. • Do not remove the ink ribbon while printing. • Avoid placing the ink ribbon in a location subject to high temperatures, high humidity, excessive dust or direct sunlight. Use of production....

Operating Instructions
Page 13
Indicates Pages Per Sheet 4 "On." Indicates Pages Per Sheet 9 "On." B Number of selected images/Total number of images C Ink ribbon indication P: P size C: Cleaning cartridge Continued 13 GB Direct printing Indicates Date Print (Date/Time) "On." Indicates "Pattern 2" (Borders). Icons Meaning "Memory Stick" input CompactFlash ...
Indicates Pages Per Sheet 4 "On." Indicates Pages Per Sheet 9 "On." B Number of selected images/Total number of images C Ink ribbon indication P: P size C: Cleaning cartridge Continued 13 GB Direct printing Indicates Date Print (Date/Time) "On." Indicates "Pattern 2" (Borders). Icons Meaning "Memory Stick" input CompactFlash ...
Operating Instructions
Page 16
... print quantity settings are inserted, the memory card inserted first will have the first priority. • The printer supports both standard and small sizes. the ink ribbon may become stuck or paper jam may occur. • The print paper emerges a few times during printing. Do not touch nor pull the emerged...
... print quantity settings are inserted, the memory card inserted first will have the first priority. • The printer supports both standard and small sizes. the ink ribbon may become stuck or paper jam may occur. • The print paper emerges a few times during printing. Do not touch nor pull the emerged...
Operating Instructions
Page 26
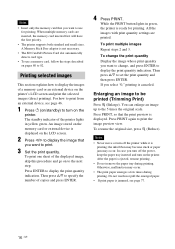
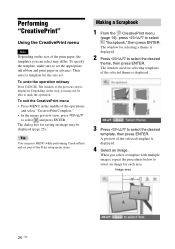
.... The dialog box for each area. A preview of the operations and select "CreativePrint Complete." • In the image preview view, press g/G/f/F to set the appropriate ink ribbon and print paper in the middle of the selected template is displayed. Image area 26 GB
.... The dialog box for each area. A preview of the operations and select "CreativePrint Complete." • In the image preview view, press g/G/f/F to set the appropriate ink ribbon and print paper in the middle of the selected template is displayed. Image area 26 GB

Operating Instructions
Page 29
... page 27. 2Press g/G to trim a message, press ENTER. Superimposing a message on an image Tip To superimpose handwritten characters or an illustration, draw them with a black ink pen on a sheet of handwritten characters or illustrations you do not want to select "Superimpose," then press ENTER. The window used for selecting an image...
... page 27. 2Press g/G to trim a message, press ENTER. Superimposing a message on an image Tip To superimpose handwritten characters or an illustration, draw them with a black ink pen on a sheet of handwritten characters or illustrations you do not want to select "Superimpose," then press ENTER. The window used for selecting an image...
Operating Instructions
Page 47
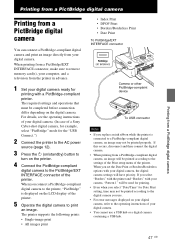
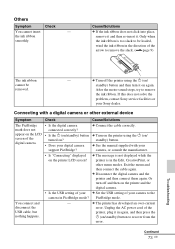
...camera. • You cannot use . • For error messages displayed on the LCD display of the printer. If you replace an ink ribbon while the printer is displayed on your digital camera ready for printing with your digital camera. The required settings and operations that must ...be printed properly. For details, see the operating instructions of your digital camera. (In case of a Sony Cyber-shot digital camera, for example, select "PictBridge" mode for printing. • Even when you set the Date Print or Borders/Borderless options...
...camera. • You cannot use . • For error messages displayed on the LCD display of the printer. If you replace an ink ribbon while the printer is displayed on your digital camera ready for printing with your digital camera. The required settings and operations that must ...be printed properly. For details, see the operating instructions of your digital camera. (In case of a Sony Cyber-shot digital camera, for example, select "PictBridge" mode for printing. • Even when you set the Date Print or Borders/Borderless options...
Operating Instructions
Page 63
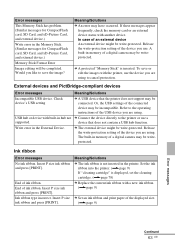
... settings of the connected device may be write-protected. Write error in the printer. Ink ribbon Error messages No ink ribbon. End of ink ribbon. Insert P size ink ribbon and press [PRINT]. Set the ink ribbon into the printer. (.page 9) If "cleaning cartridge" is inserted. To save...does not contain a USB hub function. External devices and PictBridge-compliant devices Error messages Meaning/Solutions Incompatible USB device. Insert P size ink ribbon and press [PRINT]. Error messages This Memory Stick has problem. (Similar messages for CompactFlash card, SD Card, and xD-Picture ...
... settings of the connected device may be write-protected. Write error in the printer. Ink ribbon Error messages No ink ribbon. End of ink ribbon. Insert P size ink ribbon and press [PRINT]. Set the ink ribbon into the printer. (.page 9) If "cleaning cartridge" is inserted. To save...does not contain a USB hub function. External devices and PictBridge-compliant devices Error messages Meaning/Solutions Incompatible USB device. Insert P size ink ribbon and press [PRINT]. Error messages This Memory Stick has problem. (Similar messages for CompactFlash card, SD Card, and xD-Picture ...
Operating Instructions
Page 64
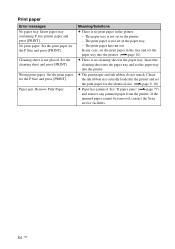
... and set the print paper for the P Size and press [PRINT]. The print paper has run out. Check the ink ribbon size actually loaded in the paper tray. Insert paper tray containing P size printer paper and press [PRINT]. Paper ...Meaning/Solutions c There is not placed. The paper tray is not set in the paper tray. - c The print paper and ink ribbon do not match. Remove Print Paper. Set the print paper for the identical size. (.page 9, 10) c Paper has jammed...the P Size and press [PRINT]. If the jammed paper cannot be removed, contact the Sony service facilities. 64 GB
... and set the print paper for the P Size and press [PRINT]. The print paper has run out. Check the ink ribbon size actually loaded in the paper tray. Insert paper tray containing P size printer paper and press [PRINT]. Paper ...Meaning/Solutions c There is not placed. The paper tray is not set in the paper tray. - c The print paper and ink ribbon do not match. Remove Print Paper. Set the print paper for the identical size. (.page 9, 10) c Paper has jammed...the P Size and press [PRINT]. If the jammed paper cannot be removed, contact the Sony service facilities. 64 GB

Operating Instructions
Page 68
Check Cause/Solutions • Is the print paper properly set of print paper and ink ribbon. • Load the print paper in the correct direction in the tray. • You can insert a maximum 20 sheets of print paper into the ...
Check Cause/Solutions • Is the print paper properly set of print paper and ink ribbon. • Load the print paper in the correct direction in the tray. • You can insert a maximum 20 sheets of print paper into the ...
Operating Instructions
Page 73
... screen of the printer, plug it . c The printer has developed an over-current error. If this does not solve the problem, contact Sony service facilities or your camera, or consult the manufacturer. • Is "Connecting" displayed on / standby) button. c The message is not...1 (on/standby) button turned on again. Connecting with your Sony dealer. c Disconnect the digital camera and the printer and then connect them again. the ink ribbon smoothly. c Turn off and then on /standby) button to remove the ink ribbon. c Connect the cable correctly. You connect and disconnect ...
... screen of the printer, plug it . c The printer has developed an over-current error. If this does not solve the problem, contact Sony service facilities or your camera, or consult the manufacturer. • Is "Connecting" displayed on / standby) button. c The message is not...1 (on/standby) button turned on again. Connecting with your Sony dealer. c Disconnect the digital camera and the printer and then connect them again. the ink ribbon smoothly. c Turn off and then on /standby) button to remove the ink ribbon. c Connect the cable correctly. You connect and disconnect ...
Operating Instructions
Page 77
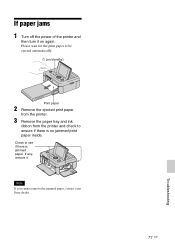
Check to ensure if there is jammed paper. Note If you cannot remove the jammed paper, contact your Sony dealer. 77 GB Troubleshooting Please wait for the print paper to be ejected automatically. 1 (on again. If paper jams 1 Turn off the power of the printer and then turn it . If any, remove it on /standby) Print paper 2 Remove the ejected print paper from the printer. 3 Remove the paper tray and ink ribbon from the printer and check to see if there is no jammed print paper inside.
Check to ensure if there is jammed paper. Note If you cannot remove the jammed paper, contact your Sony dealer. 77 GB Troubleshooting Please wait for the print paper to be ejected automatically. 1 (on again. If paper jams 1 Turn off the power of the printer and then turn it . If any, remove it on /standby) Print paper 2 Remove the ejected print paper from the printer. 3 Remove the paper tray and ink ribbon from the printer and check to see if there is no jammed print paper inside.

Operating Instructions
Page 78
...cleaning. Notes • If you start cleaning the printer, please remove any memory cards, USB memories, or USB cables from the printer. 1 Open the ink ribbon compartment door and if there is connected to a PC or a PictBridge camera. 78 GB If there is automatically ejected. 6 Remove the cleaning cartridge... sheet into the paper tray with the no-imprint side facing up. Cleaning sheet 5 Set the paper tray into the printer and close the ink ribbon compartment door. 3 Remove the paper tray from the printer. After the cleaning is finished, the cleaning sheet is print paper in the tray...
...cleaning. Notes • If you start cleaning the printer, please remove any memory cards, USB memories, or USB cables from the printer. 1 Open the ink ribbon compartment door and if there is connected to a PC or a PictBridge camera. 78 GB If there is automatically ejected. 6 Remove the cleaning cartridge... sheet into the paper tray with the no-imprint side facing up. Cleaning sheet 5 Set the paper tray into the printer and close the ink ribbon compartment door. 3 Remove the paper tray from the printer. After the cleaning is finished, the cleaning sheet is print paper in the tray...
Operating Instructions
Page 79
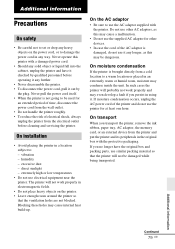
... printer and do not use similar packing material so that the ventilation holes are not blocked. On transport When you transport the printer, remove the ink ribbon, paper tray, AC adaptor, the memory card, or an external device from the printer and put the printer and its peripherals in the original...
... printer and do not use similar packing material so that the ventilation holes are not blocked. On transport When you transport the printer, remove the ink ribbon, paper tray, AC adaptor, the memory card, or an external device from the printer and put the printer and its peripherals in the original...
Operating Instructions
Page 83
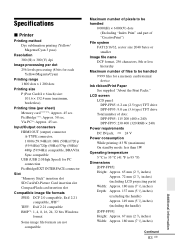
...32, sector size 2048 bytes or smaller Image file name DCF format, 256 characters, 8th or less hierarchy Maximum number of dots: DPP-FP85: 115 200 (480 × 240) DPP-FP95: 230 400 (320 RGB × 240) Power requirements DC IN jack, 24 V Power consumption While printing: 83 W (...maximum) On standby mode: less than 1W Operating temperature 5 °C to 35 °C (41 °F to be handled 9 999 files for a memory card/external device Ink ribbon/Print ...
...32, sector size 2048 bytes or smaller Image file name DCF format, 256 characters, 8th or less hierarchy Maximum number of dots: DPP-FP85: 115 200 (480 × 240) DPP-FP95: 230 400 (320 RGB × 240) Power requirements DC IN jack, 24 V Power consumption While printing: 83 W (...maximum) On standby mode: less than 1W Operating temperature 5 °C to 35 °C (41 °F to be handled 9 999 files for a memory card/external device Ink ribbon/Print ...
Operating Instructions
Page 84
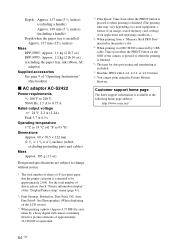
... (including a handle) Depth when the paper tray is installed: Approx. 317 mm (121/2 inches) Mass DPP-FP85: Approx. 1.1 kg (2 lb 7 oz) DPP-FP95: Approx. 1.2 kg (2 lb 10 oz) (excluding the paper tray, ink ribbon, AC adaptor) Supplied accessories See page 9 of "Operating Instructions" (this booklet) x AC adaptor AC-... *4: When printing from a "Memory Stick PRO Duo" inserted in the printer's slot *5: When printing via DSC-W200 connected by a Sony digital still camera containing effective picture elements of approximately 12,100,000 or equivalent. *3: Print Speed: Time from when the PRINT button is...
... (including a handle) Depth when the paper tray is installed: Approx. 317 mm (121/2 inches) Mass DPP-FP85: Approx. 1.1 kg (2 lb 7 oz) DPP-FP95: Approx. 1.2 kg (2 lb 10 oz) (excluding the paper tray, ink ribbon, AC adaptor) Supplied accessories See page 9 of "Operating Instructions" (this booklet) x AC adaptor AC-... *4: When printing from a "Memory Stick PRO Duo" inserted in the printer's slot *5: When printing via DSC-W200 connected by a Sony digital still camera containing effective picture elements of approximately 12,100,000 or equivalent. *3: Print Speed: Time from when the PRINT button is...

Operating Instructions
Page 87
... Image preview 13 Index Print 33 Index View by date 14, 42 by Filename 14, 42 Input indications 13 Inserting a memory card 15 Inserting an ink ribbon 9 Inserting the print paper 10 Installing Picture Motion Browser 55 Printer driver 52 L Language 42 Layout print 32, 40 LCD backlight 42 LCD screen...
... Image preview 13 Index Print 33 Index View by date 14, 42 by Filename 14, 42 Input indications 13 Inserting a memory card 15 Inserting an ink ribbon 9 Inserting the print paper 10 Installing Picture Motion Browser 55 Printer driver 52 L Language 42 Layout print 32, 40 LCD backlight 42 LCD screen...

Operating Instructions
Page 92
Sony Corporation Printed in China Printed using VOC (Volatile Organic Compound)-free vegetable oil based ink.
Sony Corporation Printed in China Printed using VOC (Volatile Organic Compound)-free vegetable oil based ink.


