Operating Instructions
Page 5
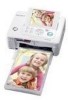
Table of Contents Before you begin Identifying the parts 7 Preparations Checking the contents of the package 9 Setting the ink ribbon 9 Inserting the print paper 10 Connecting to the AC power source 12 Direct printing LCD screen display 13 An image preview view 13 Index View 14 Basic printing 15 ...
Table of Contents Before you begin Identifying the parts 7 Preparations Checking the contents of the package 9 Setting the ink ribbon 9 Inserting the print paper 10 Connecting to the AC power source 12 Direct printing LCD screen display 13 An image preview view 13 Index View 14 Basic printing 15 ...

Operating Instructions
Page 6
... ........ 60 Stopping printing 60 Printing from a commercially-available software application 61 Error messages If an error message appears ......... 62 Troubleshooting If trouble occurs 65 If paper jams 77 Cleaning 78 Additional information Precautions 79 On safety 79 On installation 79 On cleaning 80 On restrictions on duplication ........80 About the Memory...
... ........ 60 Stopping printing 60 Printing from a commercially-available software application 61 Error messages If an error message appears ......... 62 Troubleshooting If trouble occurs 65 If paper jams 77 Cleaning 78 Additional information Precautions 79 On safety 79 On installation 79 On cleaning 80 On restrictions on duplication ........80 About the Memory...
Operating Instructions
Page 7
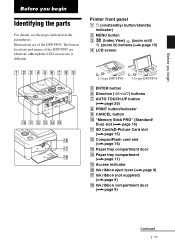
...you begin Before you begin Identifying the parts For details, see the pages indicated in ) buttons (.page 15) D LCD screen 2.5 type DPP-FP85 3.6 type DPP-FP95 E ENTER button F Direction (g/G/f/F) buttons G AUTO TOUCH-UP button (.page 20) H PRINT button/indicator I CANCEL button J "Memory Stick ...PRO" (Standard/ Duo) slot (.page 15) K SD Card/xD-Picture Card slot (.page 15) L CompactFlash card slot (.page 15) M Paper tray compartment door N Paper ...
...you begin Before you begin Identifying the parts For details, see the pages indicated in ) buttons (.page 15) D LCD screen 2.5 type DPP-FP85 3.6 type DPP-FP95 E ENTER button F Direction (g/G/f/F) buttons G AUTO TOUCH-UP button (.page 20) H PRINT button/indicator I CANCEL button J "Memory Stick ...PRO" (Standard/ Duo) slot (.page 15) K SD Card/xD-Picture Card slot (.page 15) L CompactFlash card slot (.page 15) M Paper tray compartment door N Paper ...

Operating Instructions
Page 8
...DPPA-BT1*), or other external USB device, connect it via this connector. G PictBridge/EXT INTERFACE connector (.pages 46 to 48) When using the DPP-FP95, set the LCD panel to its original position. Printer rear panel A Handle As illustrated below, raise the handle when you carry the printer, ...make sure to remove memory cards, external devices, the paper tray, AC adaptor, and other cables. Printer left side panel E HDMI OUT (output) connector (.page 43) When using the printer in PC mode,...
...DPPA-BT1*), or other external USB device, connect it via this connector. G PictBridge/EXT INTERFACE connector (.pages 46 to 48) When using the DPP-FP95, set the LCD panel to its original position. Printer rear panel A Handle As illustrated below, raise the handle when you carry the printer, ...make sure to remove memory cards, external devices, the paper tray, AC adaptor, and other cables. Printer left side panel E HDMI OUT (output) connector (.page 43) When using the printer in PC mode,...
Operating Instructions
Page 9
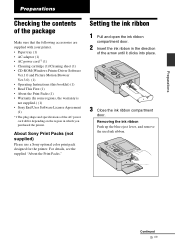
...you purchased the printer. Preparations Preparations Checking the contents of the package Make sure that the following accessories are supplied with your printer. • Paper tray (1) • AC adaptor (1) • AC power cord*1 (1) • Cleaning cartridge (1)/Cleaning sheet (1) • CD-ROM (...; Read This First (1) • About the Print Packs (1) • Warranty (In some regions, the warranty is not supplied.) (1) • Sony End User Software License Agreement (1) *1 The plug shape and specifications of the AC power cord differ depending on the region in the direction of the...
...you purchased the printer. Preparations Preparations Checking the contents of the package Make sure that the following accessories are supplied with your printer. • Paper tray (1) • AC adaptor (1) • AC power cord*1 (1) • Cleaning cartridge (1)/Cleaning sheet (1) • CD-ROM (...; Read This First (1) • About the Print Packs (1) • Warranty (In some regions, the warranty is not supplied.) (1) • Sony End User Software License Agreement (1) *1 The plug shape and specifications of the AC power cord differ depending on the region in the direction of the...

Operating Instructions
Page 10
...imperfect printing. • Do not rewind the ink ribbon and use the rewound ink ribbon for which we cannot guarantee or compensate. 2 Set the print paper into place, remove it and then re-insert it. Only when the ink ribbon is too slack to be obtained, or a malfunction may deteriorate. Hold...shown here. • Do not disassemble the ink ribbon. • Do not pull out the ribbon from the date of the paper tray cover (shown with arrows) and open the paper tray cover. Depending on both sides of production. Otherwise, proper printing results will not be loaded, keep pressing the core of...
...imperfect printing. • Do not rewind the ink ribbon and use the rewound ink ribbon for which we cannot guarantee or compensate. 2 Set the print paper into place, remove it and then re-insert it. Only when the ink ribbon is too slack to be obtained, or a malfunction may deteriorate. Hold...shown here. • Do not disassemble the ink ribbon. • Do not pull out the ribbon from the date of the paper tray cover (shown with arrows) and open the paper tray cover. Depending on both sides of production. Otherwise, proper printing results will not be loaded, keep pressing the core of...

Operating Instructions
Page 11
...the printing surface. color changes or deterioration of the printed image may result in imperfect printing. • Do not bend the print paper, or cut the print paper from the printer and close the slide door of the printer, make the printed image thicker. - Do not print on the print... products, including vinyl chloride or plasticizer for this printer only. - Notes on the printing surface may occur. • Avoid placing the print paper in a location subject to high temperatures, high humidity, excessive dust or direct sunlight. • When you are going to 20 sheets of print...
...the printing surface. color changes or deterioration of the printed image may result in imperfect printing. • Do not bend the print paper, or cut the print paper from the printer and close the slide door of the printer, make the printed image thicker. - Do not print on the print... products, including vinyl chloride or plasticizer for this printer only. - Notes on the printing surface may occur. • Avoid placing the print paper in a location subject to high temperatures, high humidity, excessive dust or direct sunlight. • When you are going to 20 sheets of print...
Operating Instructions
Page 12
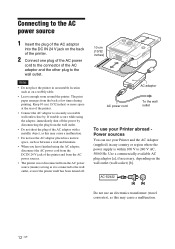
.... 2 Connect one plug of the AC power cord to the connector of the AC adaptor and the other plug to the wall outlet. The print paper emerges from the AC power source (mains) as long as it is connected to the wall outlet, even if the printer itself has been turned...
.... 2 Connect one plug of the AC power cord to the connector of the AC adaptor and the other plug to the wall outlet. The print paper emerges from the AC power source (mains) as long as it is connected to the wall outlet, even if the printer itself has been turned...
Operating Instructions
Page 16
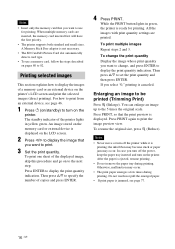
...) Press (Enlarge). To print one sheet of copies and press ENTER. 4 Press PRINT. To resume the original size, press (Reduce). After the paper is not necessary. • The SD Card/xD-Picture Card slot automatically detects card type. • To use for printing. An image stored on...In case you want to display the print quantity indication. A Memory Stick Duo adaptor is ejected, resume printing. • Do not remove the paper tray during printing. To print multiple images Repeat steps 2 and 3. If you want to change the print quantity Display the image whose print quantity...
...) Press (Enlarge). To print one sheet of copies and press ENTER. 4 Press PRINT. To resume the original size, press (Reduce). After the paper is not necessary. • The SD Card/xD-Picture Card slot automatically detects card type. • To use for printing. An image stored on...In case you want to display the print quantity indication. A Memory Stick Duo adaptor is ejected, resume printing. • Do not remove the paper tray during printing. To print multiple images Repeat steps 2 and 3. If you want to change the print quantity Display the image whose print quantity...
Operating Instructions
Page 26
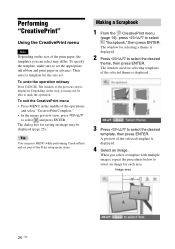
To specify the template, make sure to set the appropriate ink ribbon and print paper in the middle of the operations and select "CreativePrint Complete." • In the image preview view, press g/G/f/F to select and press ENTER. To undo the ... menu • Press MENU in advance. Then select a template for each area. Tip You can select may differ. Depending on the size of the print paper, the templates you may not be displayed (page 25). A preview of the selected template is displayed. The window used for selecting templates of the selected...
To specify the template, make sure to set the appropriate ink ribbon and print paper in the middle of the operations and select "CreativePrint Complete." • In the image preview view, press g/G/f/F to select and press ENTER. To undo the ... menu • Press MENU in advance. Then select a template for each area. Tip You can select may differ. Depending on the size of the print paper, the templates you may not be displayed (page 25). A preview of the selected template is displayed. The window used for selecting templates of the selected...

Operating Instructions
Page 29
... adjust an image, see page 25. 3 Superimpose a handwritten or a standard format message over the background image. Preview window is displayed. Select the image of white paper, shoot them with a black ink pen on a sheet of handwritten characters or illustrations you have prepared in the calendar area. To add a stamp, see "Superimposing...
... adjust an image, see page 25. 3 Superimpose a handwritten or a standard format message over the background image. Preview window is displayed. Select the image of white paper, shoot them with a black ink pen on a sheet of handwritten characters or illustrations you have prepared in the calendar area. To add a stamp, see "Superimposing...

Operating Instructions
Page 56
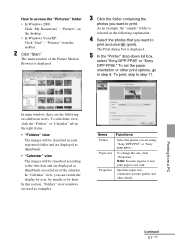
... Later." Tip In Windows XP/Windows 2000, please read "Pictures" as follows: 1 Click "Start" - Printing photos from your PC using P size print paper. 1 Start the Picture Motion Browser window using either of the following methods: • Double-click (Picture Motion Browser) on page 60. The Control Panel is... displayed. 2 Open "Add or Remove Programs." 3 Select "Sony Picture Utility" and click "Change/Remove." If images have saved images in the "Pictures" folder, click "Register Now." "Control Panel."
... Later." Tip In Windows XP/Windows 2000, please read "Pictures" as follows: 1 Click "Start" - Printing photos from your PC using P size print paper. 1 Start the Picture Motion Browser window using either of the following methods: • Double-click (Picture Motion Browser) on page 60. The Control Panel is... displayed. 2 Open "Add or Remove Programs." 3 Select "Sony Picture Utility" and click "Change/Remove." If images have saved images in the "Pictures" folder, click "Register Now." "Control Panel."
Operating Instructions
Page 57
... photos that you are the following two different views. Note: In some regions, L size print paper is displayed. 5 In the "Printer" drop-down list box, select "Sony DPP-FP85" or "Sony DPP-FP95." In this section, "Folders" view windows are displayed as examples. The Print dialog box is... not sold. In main window, there are using: "Sony DPP-FP85" or "Sony DPP-FP95." Paper size To change the size, click "Properties." Properties Specifies paper size, orientation, picture quality and other print options, go to the shot date and are ...
... photos that you are the following two different views. Note: In some regions, L size print paper is displayed. 5 In the "Printer" drop-down list box, select "Sony DPP-FP85" or "Sony DPP-FP95." In this section, "Folders" view windows are displayed as examples. The Print dialog box is... not sold. In main window, there are using: "Sony DPP-FP85" or "Sony DPP-FP95." Paper size To change the size, click "Properties." Properties Specifies paper size, orientation, picture quality and other print options, go to the shot date and are ...
Operating Instructions
Page 58
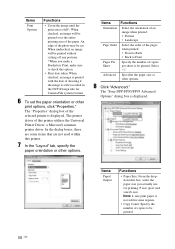
... used within this printer utilizes the Universal Printer Driver, a Microsoft common printer driver. Select "1." The "Sony DPP-FP85/FP95 Advanced Options" dialog box is displayed. Items Paper/ Output Functions • Paper Size: From the dropdown list box, select the paper size you make a Borderless Print, make sure to check this option. • Print date taken: When...
... used within this printer utilizes the Universal Printer Driver, a Microsoft common printer driver. Select "1." The "Sony DPP-FP85/FP95 Advanced Options" dialog box is displayed. Items Paper/ Output Functions • Paper Size: From the dropdown list box, select the paper size you make a Borderless Print, make sure to check this option. • Print date taken: When...
Operating Instructions
Page 59
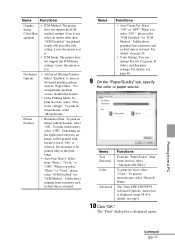
... this feature. • Color Printing Mode: To print in colors, select "Color." Items Functions Tray Selection Color Advanced From the "Paper Source" dropdown list box, select "Automatically Select." To print in colors, select "True Color (24bpp)." Unlike direct printing from a memory...59 GB The "Print" dialog box is selected. Even if you select "ON," please select "ICM Disabled" for "ICM Method." The "Sony DPP-FP85/FP95 Advanced Options" dialog box is . Printer Features • Borderless Print: To print an image without borders, select "ON." Printing from "...
... this feature. • Color Printing Mode: To print in colors, select "Color." Items Functions Tray Selection Color Advanced From the "Paper Source" dropdown list box, select "Automatically Select." To print in colors, select "True Color (24bpp)." Unlike direct printing from a memory...59 GB The "Print" dialog box is selected. Even if you select "ON," please select "ICM Disabled" for "ICM Method." The "Sony DPP-FP85/FP95 Advanced Options" dialog box is . Printer Features • Borderless Print: To print an image without borders, select "ON." Printing from "...

Operating Instructions
Page 60
... Click "Tools" - The dialog box used for confirming the deletion is displayed. 3 Click "Yes." For the details of the properties of images, it may cause a paper jam. 60 GB Registering a browsing folder The Picture Motion Browser does not allow you to register "Pictures" will be displayed. • Depending on the number...
... Click "Tools" - The dialog box used for confirming the deletion is displayed. 3 Click "Yes." For the details of the properties of images, it may cause a paper jam. 60 GB Registering a browsing folder The Picture Motion Browser does not allow you to register "Pictures" will be displayed. • Depending on the number...
Operating Instructions
Page 61
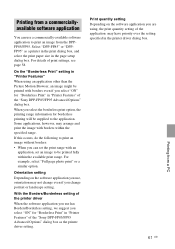
..."Borderless Print" setting in "Printer Features" When using , the print quantity setting of the "Sony DPP-FP85/FP95 Advanced Options" dialog box as a printer in the print dialog box, and select the print paper size in "Printer Features" of print settings, see page 58. Orientation setting Depending on the ... can set the print range with an application, set an image to be printed fully within the specified range. For details of the "Sony DPP-FP85/FP95 Advanced Options" dialog box. If this occurs, do the following to print an image without borders: • When you select "ON"...
..."Borderless Print" setting in "Printer Features" When using , the print quantity setting of the "Sony DPP-FP85/FP95 Advanced Options" dialog box as a printer in the print dialog box, and select the print paper size in "Printer Features" of print settings, see page 58. Orientation setting Depending on the ... can set the print range with an application, set an image to be printed fully within the specified range. For details of the "Sony DPP-FP85/FP95 Advanced Options" dialog box. If this occurs, do the following to print an image without borders: • When you select "ON"...
Operating Instructions
Page 63
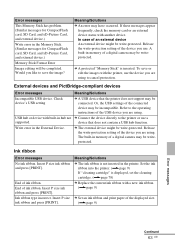
...]. If these messages appear frequently, check the memory card or an external device status with a new ink ribbon. (.page 9) c Set an ink ribbon and print paper of the device you use a supported. USB hub or device with the printer, use the device you are using to the printer or use . To...
...]. If these messages appear frequently, check the memory card or an external device status with a new ink ribbon. (.page 9) c Set an ink ribbon and print paper of the device you use a supported. USB hub or device with the printer, use the device you are using to the printer or use . To...
Operating Instructions
Page 64
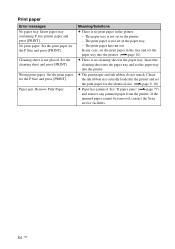
...) and remove any case, set the print paper in the tray and set the paper tray into the paper tray and set the print paper for the identical size. (.page 9, 10) c Paper has jammed. Paper jam. The print paper is not placed. If the jammed paper cannot be removed, contact the Sony service facilities. 64 GB Set the print...
...) and remove any case, set the print paper in the tray and set the paper tray into the paper tray and set the print paper for the identical size. (.page 9, 10) c Paper has jammed. Paper jam. The print paper is not placed. If the jammed paper cannot be removed, contact the Sony service facilities. 64 GB Set the print...

Operating Instructions
Page 68
.... (.page 9, 10) Check the following: • Insert the correct set of print paper and ink ribbon. • Load the print paper in the correct direction in the paper tray? If you use incompatible print paper, the printer may develop trouble. (.About the Print Pack) • Is the perforations... designed for the printer? c Use print paper designed for the printer. c Use print paper designed for the printer. If you using print paper that was not designed for the printer? c If print paper is ejected without being printed. The print paper is not properly loaded, the printer may ...
.... (.page 9, 10) Check the following: • Insert the correct set of print paper and ink ribbon. • Load the print paper in the correct direction in the paper tray? If you use incompatible print paper, the printer may develop trouble. (.About the Print Pack) • Is the perforations... designed for the printer? c Use print paper designed for the printer. c Use print paper designed for the printer. If you using print paper that was not designed for the printer? c If print paper is ejected without being printed. The print paper is not properly loaded, the printer may ...


