Operating Instructions
Page 5
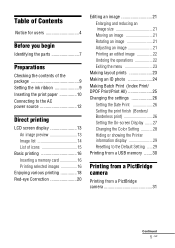
... of Contents Notice for users 4 Before you begin Identifying the parts 7 Preparations Checking the contents of the package 9 Setting the ink ribbon 9 Inserting the print paper 10 Connecting to the AC power source 12 Direct printing LCD screen display 13 An image preview 13 Image list 14 List of icons 15...
... of Contents Notice for users 4 Before you begin Identifying the parts 7 Preparations Checking the contents of the package 9 Setting the ink ribbon 9 Inserting the print paper 10 Connecting to the AC power source 12 Direct printing LCD screen display 13 An image preview 13 Image list 14 List of icons 15...
Operating Instructions
Page 6
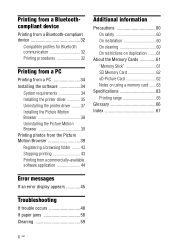
... card .......63 Specifications 63 Printing range 65 Glossary 66 Index 67 Error messages If an error display appears 45 Troubleshooting If trouble occurs 48 If paper jams 58 Cleaning 59 6 GB
... card .......63 Specifications 63 Printing range 65 Glossary 66 Index 67 Error messages If an error display appears 45 Troubleshooting If trouble occurs 48 If paper jams 58 Cleaning 59 6 GB

Operating Instructions
Page 7
... panel A 1 (on/standby) button/(standby) indicator B CANCEL/ (Index View) button C MENU button D LCD screen 2.4 type DPP-FP65 3.5 type DPP-FP75 E ENTER button F Direction (g/G/f/F) buttons G (Red-eye Correction) button (.page 20) H PRINT button/indicator I Paper tray compartment (.page 10) J Paper tray compartment door K "Memory Stick PRO" (Standard/ Duo) slot (.pages16, 61) L xD-Picture Card slot (.pages16...
... panel A 1 (on/standby) button/(standby) indicator B CANCEL/ (Index View) button C MENU button D LCD screen 2.4 type DPP-FP65 3.5 type DPP-FP75 E ENTER button F Direction (g/G/f/F) buttons G (Red-eye Correction) button (.page 20) H PRINT button/indicator I Paper tray compartment (.page 10) J Paper tray compartment door K "Memory Stick PRO" (Standard/ Duo) slot (.pages16, 61) L xD-Picture Card slot (.pages16...

Operating Instructions
Page 8
... use the printer, close the handle to remove memory cards, USB memory, the paper tray, AC adaptor, and other external USB device, connect it via a USB cable to its original position. Otherwise malfunctions may occur. • When using the DPP-FP75, set the LCD panel to this connector. Printer left side panel E USB...
... use the printer, close the handle to remove memory cards, USB memory, the paper tray, AC adaptor, and other external USB device, connect it via a USB cable to its original position. Otherwise malfunctions may occur. • When using the DPP-FP75, set the LCD panel to this connector. Printer left side panel E USB...

Operating Instructions
Page 9
... Packs (not supplied) Please use a Sony optional color print pack designed for the printer. Preparations Preparations Checking the contents of the package Make sure that the following accessories are supplied with your printer. • Paper tray (1) • AC adaptor (1) • AC power cord*1 (1) •... This First (1) • About the Print Packs (1) • Warranty (In some regions, the warranty is not supplied.) • Sony End User Software License Agreement *1 The plug shape and specifications of the arrow until it clicks into place. 3 Close the ink ribbon compartment ...
... Packs (not supplied) Please use a Sony optional color print pack designed for the printer. Preparations Preparations Checking the contents of the package Make sure that the following accessories are supplied with your printer. • Paper tray (1) • AC adaptor (1) • AC power cord*1 (1) •... This First (1) • About the Print Packs (1) • Warranty (In some regions, the warranty is not supplied.) • Sony End User Software License Agreement *1 The plug shape and specifications of the arrow until it clicks into place. 3 Close the ink ribbon compartment ...

Operating Instructions
Page 10
... shown here • Do not disassemble the ink ribbon. • Do not pull out the ribbon from the date of the paper tray cover (shown with arrows) and open the paper tray cover. If the ink ribbon does not click into place, remove it and then re-insert it within a short period... the ink ribbon in a cool and dark place and use the rewound ink ribbon for which we cannot guarantee or compensate. 2 Set the print paper into the paper tray. 10 GB Fingerprints or dust on the ink ribbon may deteriorate. Depending on both sides of production. Notes • Do not touch the...
... shown here • Do not disassemble the ink ribbon. • Do not pull out the ribbon from the date of the paper tray cover (shown with arrows) and open the paper tray cover. If the ink ribbon does not click into place, remove it and then re-insert it within a short period... the ink ribbon in a cool and dark place and use the rewound ink ribbon for which we cannot guarantee or compensate. 2 Set the print paper into the paper tray. 10 GB Fingerprints or dust on the ink ribbon may deteriorate. Depending on both sides of production. Notes • Do not touch the...

Operating Instructions
Page 11
..., excessive dust or direct sunlight. • When you are going to store partially-used print paper. Do not insert different types of print paper. Do not attach a sticker or stamps on the same paper will not make sure of the following before printing. 11 GB color changes or deterioration of the... printed image may result in imperfect printing. • Do not bend the print paper, or cut the print paper from the printer and close the slide door of the paper tray. • Avoid storing the paper with the printed faces touching each other or in its printing surface (the side with...
..., excessive dust or direct sunlight. • When you are going to store partially-used print paper. Do not insert different types of print paper. Do not attach a sticker or stamps on the same paper will not make sure of the following before printing. 11 GB color changes or deterioration of the... printed image may result in imperfect printing. • Do not bend the print paper, or cut the print paper from the printer and close the slide door of the paper tray. • Avoid storing the paper with the printed faces touching each other or in its printing surface (the side with...

Operating Instructions
Page 12
... your Printer and the AC Adaptor (supplied) in an unstable location such as on a wobbly table. • Leave enough room around the printer. The print paper emerges from the back a few times during printing. Use a commercially available AC plug adaptor [a], if necessary, depending on the wall outlet (wall socket) [b]. Notes •...
... your Printer and the AC Adaptor (supplied) in an unstable location such as on a wobbly table. • Leave enough room around the printer. The print paper emerges from the back a few times during printing. Use a commercially available AC plug adaptor [a], if necessary, depending on the wall outlet (wall socket) [b]. Notes •...

Operating Instructions
Page 17
...and 3. You can enlarge an image up to print the previewed image. the ink ribbon or print paper may occur. • The print paper emerges a few times during the printing process. • If print paper is not equipped with f/F. Direct printing 4 Press PRINT. When you turn on the printer again....image is printed. While the PRINT button is ready for printing. If you want to move or turn off the power accidentally, keep the paper tray inserted and turn off the printer while it is printing; Press g/G/f/F to change, and change the print quantity with an input select...
...and 3. You can enlarge an image up to print the previewed image. the ink ribbon or print paper may occur. • The print paper emerges a few times during the printing process. • If print paper is not equipped with f/F. Direct printing 4 Press PRINT. When you turn on the printer again....image is printed. While the PRINT button is ready for printing. If you want to move or turn off the power accidentally, keep the paper tray inserted and turn off the printer while it is printing; Press g/G/f/F to change, and change the print quantity with an input select...
Operating Instructions
Page 39
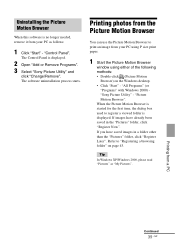
..."Pictures" folder, click "Register Later". "Control Panel". Refer to register a viewed folder is displayed. 2 Open "Add or Remove Programs". 3 Select "Sony Picture Utility" and click "Change/Remove". The Control Panel is displayed. When the Picture Motion Browser is started for the first time, the dialog box...". Uninstalling the Picture Motion Browser When this software is no longer needed, remove it from your PC using P size print paper. 1 Start the Picture Motion Browser window using either of the following methods: • Double-click (Picture Motion Browser) on page 43.
..."Pictures" folder, click "Register Later". "Control Panel". Refer to register a viewed folder is displayed. 2 Open "Add or Remove Programs". 3 Select "Sony Picture Utility" and click "Change/Remove". The Control Panel is displayed. When the Picture Motion Browser is started for the first time, the dialog box...". Uninstalling the Picture Motion Browser When this software is no longer needed, remove it from your PC using P size print paper. 1 Start the Picture Motion Browser window using either of the following methods: • Double-click (Picture Motion Browser) on page 43.

Operating Instructions
Page 40
... example, the "sample" folder is displayed. 5 In the "Printer" drop-down list box, select "Sony DPP-FP65" or "Sony DPP-FP75". To print, skip to step 6. In this section, "Folders" view windows are used as examples. 40 GB Items Printer Paper size Print Options Functions Select the printer you can switch the display by year, by...
... example, the "sample" folder is displayed. 5 In the "Printer" drop-down list box, select "Sony DPP-FP65" or "Sony DPP-FP75". To print, skip to step 6. In this section, "Folders" view windows are used as examples. 40 GB Items Printer Paper size Print Options Functions Select the printer you can switch the display by year, by...

Operating Instructions
Page 41
.... Advanced Specifies the paper size or other print options, click "Properties". Graphic - • ICM Method: The printer does Image not support the ICM method Color Man- The printer driver of copies per sheet to be printed. settings. The "Sony DPP-FP65/75 Advanced Options..." dialog box is . • ICM Intent: The printer does not support the ICM Intent settings. Items Properties Functions Specifies paper size, orientation, picture quality and other details. 6 To set the paper orientation or other options. ...
.... Advanced Specifies the paper size or other print options, click "Properties". Graphic - • ICM Method: The printer does Image not support the ICM method Color Man- The printer driver of copies per sheet to be printed. settings. The "Sony DPP-FP65/75 Advanced Options..." dialog box is . • ICM Intent: The printer does not support the ICM Intent settings. Items Properties Functions Specifies paper size, orientation, picture quality and other details. 6 To set the paper orientation or other options. ...

Operating Instructions
Page 42
..."Monochrome". To print in colors, select "True Color (24bpp)". The "Sony DPP-FP65/75 Advanced Options" dialog box is displayed again. 11 Click "Print". Items Functions Tray Selection Color Advanced From the "Paper Source" dropdown list box, select "Automatically Select". Depending on advanced printing ...image to turn on the software application, an image will be printed fully in the print range. 9 On the "Paper/Quality" tab, specify the color or paper source. Printing starts. If a compatibility problem occurs, disable this feature. • Color Printing Mode: To print in...
..."Monochrome". To print in colors, select "True Color (24bpp)". The "Sony DPP-FP65/75 Advanced Options" dialog box is displayed again. 11 Click "Print". Items Functions Tray Selection Color Advanced From the "Paper Source" dropdown list box, select "Automatically Select". Depending on advanced printing ...image to turn on the software application, an image will be printed fully in the print range. 9 On the "Paper/Quality" tab, specify the color or paper source. Printing starts. If a compatibility problem occurs, disable this feature. • Color Printing Mode: To print in...

Operating Instructions
Page 43
..., and open the "Print" dialog box. 2 Click the document name that you want to view images saved on the number of images, it may cause a paper jam. The dialog box used for confirming the deletion is displayed. 3 Click "Yes". To select multiple still images not in the sub folder will also...
..., and open the "Print" dialog box. 2 Click the document name that you want to view images saved on the number of images, it may cause a paper jam. The dialog box used for confirming the deletion is displayed. 3 Click "Yes". To select multiple still images not in the sub folder will also...
Operating Instructions
Page 44
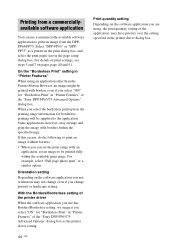
... a commerciallyavailable software application You can set the print range with borders within the available print range. Select "DPP-FP65" or "DPPFP75" as the printer driver setting. 44 GB Print quantity setting Depending on the software...the setting specified in "Printer Features" of the "Sony DPP-FP65/75 Advanced Options" dialog box as a printer in the print dialog box, and select the print paper size in "Printer Features" of the "Sony DPP-FP65/75 Advanced Options" dialog box. With the Borders...40 and 41. If this occurs, do the following to print an image from the DPPFP65/FP75.
... a commerciallyavailable software application You can set the print range with borders within the available print range. Select "DPP-FP65" or "DPPFP75" as the printer driver setting. 44 GB Print quantity setting Depending on the software...the setting specified in "Printer Features" of the "Sony DPP-FP65/75 Advanced Options" dialog box as a printer in the print dialog box, and select the print paper size in "Printer Features" of the "Sony DPP-FP65/75 Advanced Options" dialog box. With the Borders...40 and 41. If this occurs, do the following to print an image from the DPPFP65/FP75.

Operating Instructions
Page 47
... ink ribbon and insert a new ink ribbon. If you cannot remove the ink ribbon, consult with your Sony dealer or Sony service facilities. Set the print paper or cleaning sheet into the paper tray, insert the paper tray into the printer, and then press PRINT. (.page 10) - Set the print... paper of the displayed size as follows in the paper tray, insert the paper tray into the printer, and then press PRINT. (.page...
... ink ribbon and insert a new ink ribbon. If you cannot remove the ink ribbon, consult with your Sony dealer or Sony service facilities. Set the print paper or cleaning sheet into the paper tray, insert the paper tray into the printer, and then press PRINT. (.page 10) - Set the print... paper of the displayed size as follows in the paper tray, insert the paper tray into the printer, and then press PRINT. (.page...
Operating Instructions
Page 50
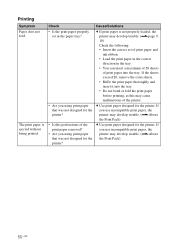
... for the printer? Check Cause/Solutions • Is the print paper properly set of print paper and ink ribbon. • Load the print paper in the correct direction in the paper tray? If you use incompatible print paper, the printer may develop trouble. (.About the Print Pack) •... the Print Pack) 50 GB c Use print paper designed for the printer. Printing Symptom Paper does not feed. c Use print paper designed for the printer. If you using print paper that was not designed for the printer? c If print paper is ejected without being printed. If the sheets exceed...
... for the printer? Check Cause/Solutions • Is the print paper properly set of print paper and ink ribbon. • Load the print paper in the correct direction in the paper tray? If you use incompatible print paper, the printer may develop trouble. (.About the Print Pack) •... the Print Pack) 50 GB c Use print paper designed for the printer. Printing Symptom Paper does not feed. c Use print paper designed for the printer. If you using print paper that was not designed for the printer? c If print paper is ejected without being printed. If the sheets exceed...
Operating Instructions
Page 53
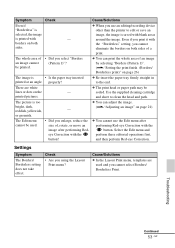
... The Borders/ Borderless setting does not take effect. Check • Are you select "Borders an image cannot (Pattern 1)"? c Re-insert the paper tray firmly straight in to clean the head and path. The picture is saved with blank areas - and then perform Red-eye Correction. Symptom Check... Cause/Solutions Even if "Borderless" is selected, the image is printed with borders on page 26) The image is • Is the paper tray inserted printed at an angle. The whole area of • Did you using the Layout Print menu? soiled. There are used . &#...
... The Borders/ Borderless setting does not take effect. Check • Are you select "Borders an image cannot (Pattern 1)"? c Re-insert the paper tray firmly straight in to clean the head and path. The picture is saved with blank areas - and then perform Red-eye Correction. Symptom Check... Cause/Solutions Even if "Borderless" is selected, the image is printed with borders on page 26) The image is • Is the paper tray inserted printed at an angle. The whole area of • Did you using the Layout Print menu? soiled. There are used . &#...

Operating Instructions
Page 58
Note If you cannot remove the jammed paper, contact your Sony dealer. 58 GB Please wait for the print paper to be ejected automatically. 1 (on again. Check to ensure if there is jammed paper. If paper jams 1 Turn off the power of the printer and then turn it . If there is, remove it on /standby) Print paper 2 Remove the ejected print paper from the printer. 3 Remove the paper tray and ink ribbon from the printer and check to see if there is no jammed print paper inside.
Note If you cannot remove the jammed paper, contact your Sony dealer. 58 GB Please wait for the print paper to be ejected automatically. 1 (on again. Check to ensure if there is jammed paper. If paper jams 1 Turn off the power of the printer and then turn it . If there is, remove it on /standby) Print paper 2 Remove the ejected print paper from the printer. 3 Remove the paper tray and ink ribbon from the printer and check to see if there is no jammed print paper inside.
Operating Instructions
Page 59
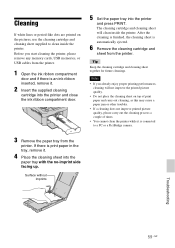
...not place the cleaning sheet on the pictures, use the cleaning cartridge and cleaning sheet supplied to a PC or a PictBridge camera. 3 Remove the paper tray from the printer. Before you already enjoy proper printing performances, cleaning will clean inside the printer. After the cleaning is finished, the cleaning sheet... memory cards, USB memories, or USB cables from the printer. 1 Open the ink ribbon compartment door and if there is print paper in the tray, remove it . 2 Insert the supplied cleaning cartridge into the printer and close the ink ribbon compartment door. 5 Set the...
...not place the cleaning sheet on the pictures, use the cleaning cartridge and cleaning sheet supplied to a PC or a PictBridge camera. 3 Remove the paper tray from the printer. Before you already enjoy proper printing performances, cleaning will clean inside the printer. After the cleaning is finished, the cleaning sheet... memory cards, USB memories, or USB cables from the printer. 1 Open the ink ribbon compartment door and if there is print paper in the tray, remove it . 2 Insert the supplied cleaning cartridge into the printer and close the ink ribbon compartment door. 5 Set the...


