Operating Instructions
Page 5
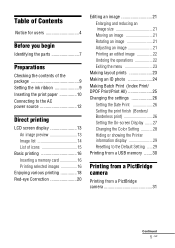
... an image 21 Adjusting an image 21 Printing an edited image 22 Undoing the operations 22 Exiting the menu 23 Making layout prints 23 Making an ID photo 24 Making Batch Print (Index Print/ DPOF Print/Print All 25 Changing the settings 26 Setting the Date Print 26 Setting the print finish (Borders/ Borderless print 26 Setting the On-screen Display ....... 27 Changing the Color Setting 28 Hiding or showing the Printer information display 29 Resetting to the Default Setting ..... 29 Printing from a USB memory .......30 Printing...
... an image 21 Adjusting an image 21 Printing an edited image 22 Undoing the operations 22 Exiting the menu 23 Making layout prints 23 Making an ID photo 24 Making Batch Print (Index Print/ DPOF Print/Print All 25 Changing the settings 26 Setting the Date Print 26 Setting the print finish (Borders/ Borderless print 26 Setting the On-screen Display ....... 27 Changing the Color Setting 28 Hiding or showing the Printer information display 29 Resetting to the Default Setting ..... 29 Printing from a USB memory .......30 Printing...
Operating Instructions
Page 6
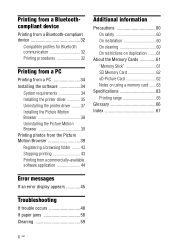
... Stopping printing 43 Printing from a commercially-available software application 44 Additional information Precautions 60 On safety 60 On installation 60 On cleaning 60 On restrictions on duplication ........61 About the Memory Cards 61 "Memory Stick 61 SD Memory Card 62 xD-Picture Card 62 Notes on using a memory card .......63 Specifications 63 Printing range 65 Glossary 66 Index 67 Error messages If an error display appears 45 Troubleshooting If trouble occurs 48 If paper jams...
... Stopping printing 43 Printing from a commercially-available software application 44 Additional information Precautions 60 On safety 60 On installation 60 On cleaning 60 On restrictions on duplication ........61 About the Memory Cards 61 "Memory Stick 61 SD Memory Card 62 xD-Picture Card 62 Notes on using a memory card .......63 Specifications 63 Printing range 65 Glossary 66 Index 67 Error messages If an error display appears 45 Troubleshooting If trouble occurs 48 If paper jams...

Operating Instructions
Page 9
About Sony Print Packs (not supplied) Please use a Sony optional color print pack designed for the printer. Removing the ink ribbon Push up the eject lever, and remove the used ink ribbon. Continued 9 GB Preparations Preparations Checking the contents of the package Make sure that the following accessories are supplied with your printer. • Paper tray (1) • AC adaptor (1) • AC power cord*1 (1) • Cleaning cartridge (1)/Cleaning sheet (1) • CD-ROM (Windows Printer Driver Software Ver.1.0 and...
About Sony Print Packs (not supplied) Please use a Sony optional color print pack designed for the printer. Removing the ink ribbon Push up the eject lever, and remove the used ink ribbon. Continued 9 GB Preparations Preparations Checking the contents of the package Make sure that the following accessories are supplied with your printer. • Paper tray (1) • AC adaptor (1) • AC power cord*1 (1) • Cleaning cartridge (1)/Cleaning sheet (1) • CD-ROM (Windows Printer Driver Software Ver.1.0 and...

Operating Instructions
Page 13
... part of image D Ink ribbon indication : P size : Cleaning cartridge E Image file information (file format, file size, image number (folder- Direct printing Direct printing LCD screen display An image preview On-screen Display: On On-screen Display: Off You can change the image preview view by setting the "On-screen Display" from the menu. (page 27) A Access indication Appears while the printer is displayed, do not remove a memory card or a USB memory, or do not turn off the power. Note While the access indication is accessing a memory card or a USB memory. B Input/setting indications...
... part of image D Ink ribbon indication : P size : Cleaning cartridge E Image file information (file format, file size, image number (folder- Direct printing Direct printing LCD screen display An image preview On-screen Display: On On-screen Display: Off You can change the image preview view by setting the "On-screen Display" from the menu. (page 27) A Access indication Appears while the printer is displayed, do not remove a memory card or a USB memory, or do not turn off the power. Note While the access indication is accessing a memory card or a USB memory. B Input/setting indications...

Operating Instructions
Page 15
... Photo operations. Icons Meaning Edit (21) Layout Print (23) ID Photo (24) Batch Print (25) Print setup (26) Edit/Layout Print/ID Photo Enlarging and reducing an image size (21) Moving an image (21) Rotating an image (21) (Rotates 90° Clockwise.) Adjusting the picture quality of icons The following are displayed.) Print setup Date Print (26) Borders/Borderless (26) On-screen Display (27) Color Setting (28) Printer information display (29) Default Setting (29) (Resets the settings...
... Photo operations. Icons Meaning Edit (21) Layout Print (23) ID Photo (24) Batch Print (25) Print setup (26) Edit/Layout Print/ID Photo Enlarging and reducing an image size (21) Moving an image (21) Rotating an image (21) (Rotates 90° Clockwise.) Adjusting the picture quality of icons The following are displayed.) Print setup Date Print (26) Borders/Borderless (26) On-screen Display (27) Color Setting (28) Printer information display (29) Default Setting (29) (Resets the settings...

Operating Instructions
Page 16
.... Setting the print quantity 1 Press 1 (on/standby) to print. 3 Set the print quantity. For the types of memory cards you want to turn on the printer's LCD screen and print the selected images (direct printing). From the left, with the printer, please see page 30. When multiple memory cards are inserted, the memory card inserted first will have the first priority. • The printer supports both standard and small sizes. A "Memory Stick Duo" adaptor is displayed...
.... Setting the print quantity 1 Press 1 (on/standby) to print. 3 Set the print quantity. For the types of memory cards you want to turn on the printer's LCD screen and print the selected images (direct printing). From the left, with the printer, please see page 30. When multiple memory cards are inserted, the memory card inserted first will have the first priority. • The printer supports both standard and small sizes. A "Memory Stick Duo" adaptor is displayed...

Operating Instructions
Page 17
... 5 times the original scale. Press g/G/f/F to move or turn off the power accidentally, keep the paper tray inserted and turn on the printer with multiple media inserted or connected, the printer detects the media in green, the printer is not equipped with f/F. Notes • Never move an image. If multiple memory cards or a USB memory are displayed automatically. While the PRINT button is lit in the order of "Memory Stick", SD Memory Card, xD-Picture Card, and...
... 5 times the original scale. Press g/G/f/F to move or turn off the power accidentally, keep the paper tray inserted and turn on the printer with multiple media inserted or connected, the printer detects the media in green, the printer is not equipped with f/F. Notes • Never move an image. If multiple memory cards or a USB memory are displayed automatically. While the PRINT button is lit in the order of "Memory Stick", SD Memory Card, xD-Picture Card, and...

Operating Instructions
Page 19
... use a photo for an identification card such as "Print All", "Index Print", and "DPOF Print". 5 Print setup .page 26 You can change the settings during printing, the printer settings, and on split screens to make a print You can make a print with 2-split, 4-split, 9-split, 13-split or 16-split images. 3 ID Photo Print .page 24 You can adjust the size, position, hue or other picture property of the selected image. You can select from batch print...
... use a photo for an identification card such as "Print All", "Index Print", and "DPOF Print". 5 Print setup .page 26 You can change the settings during printing, the printer settings, and on split screens to make a print You can make a print with 2-split, 4-split, 9-split, 13-split or 16-split images. 3 ID Photo Print .page 24 You can adjust the size, position, hue or other picture property of the selected image. You can select from batch print...

Operating Instructions
Page 31
...; You cannot use a USB hub or a digital camera containing a USB hub. • For error messages displayed on the digital camera. If you connect a PictBridge-compliant digital camera to remove memory card(s) and your computer from your digital camera. 31 GB The required settings and operations that must be printed properly. The printer supports the following prints: • Single-image print • All images print • Index Print • DPOF Print • Borders...
...; You cannot use a USB hub or a digital camera containing a USB hub. • For error messages displayed on the digital camera. If you connect a PictBridge-compliant digital camera to remove memory card(s) and your computer from your digital camera. 31 GB The required settings and operations that must be printed properly. The printer supports the following prints: • Single-image print • All images print • Index Print • DPOF Print • Borders...
Operating Instructions
Page 32
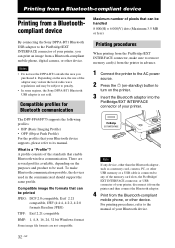
... The DPP-FP65/FP75 supports the following profiles: • BIP (Basic Imaging Profile) • OPP (Object Push Profile) For the profiles that your printer, disconnect it . For printing procedures, refer to its manual. What is connected to any device, other than the Bluetooth adaptor, such as a memory card, camera, PC, or other USB memory or a USB cable is a "Profile"? Maximum number of pixels that enable Bluetooth wireless...
... The DPP-FP65/FP75 supports the following profiles: • BIP (Basic Imaging Profile) • OPP (Object Push Profile) For the profiles that your printer, disconnect it . For printing procedures, refer to its manual. What is connected to any device, other than the Bluetooth adaptor, such as a memory card, camera, PC, or other USB memory or a USB cable is a "Profile"? Maximum number of pixels that enable Bluetooth wireless...

Operating Instructions
Page 35
... operating system. 1 Turn on the CD-ROM. • In Windows Vista, the AutoPlay window may not be performed correctly. • We cannot guarantee operations with all running programs before installing the driver. • Please log on the screen. 2 Click "Installing Printer Driver". The installation window is displayed. Printing from or connect it to the printer during printing.If you can also use the software to write data onto an external memory card...
... operating system. 1 Turn on the CD-ROM. • In Windows Vista, the AutoPlay window may not be performed correctly. • We cannot guarantee operations with all running programs before installing the driver. • Please log on the screen. 2 Click "Installing Printer Driver". The installation window is displayed. Printing from or connect it to the printer during printing.If you can also use the software to write data onto an external memory card...

Operating Instructions
Page 37
... web site for restart is not yet set as the default printer. Set the printer you uninstall or re-install the printer driver. Keep it for possible future use. • Before you use for removing the software is restarted, the relevant files will be deleted and uninstallation is complete. After the computer is displayed. 6 Click "Yes". The "InstallShield Wizard" dialog box is not displayed automatically, double-click the "Setup...
... web site for restart is not yet set as the default printer. Set the printer you uninstall or re-install the printer driver. Keep it for possible future use. • Before you use for removing the software is restarted, the relevant files will be deleted and uninstallation is complete. After the computer is displayed. 6 Click "Yes". The "InstallShield Wizard" dialog box is not displayed automatically, double-click the "Setup...

Operating Instructions
Page 42
... "Page Order". The "Sony DPP-FP65/75 Advanced Options" dialog box is displayed again. 11 Click "Print". Items Functions Document Options • Advanced Printing Features: Select "Enabled" to be printed with borders, select "OFF". Set an image to turn on the software application, an image will be printed fully in the print range. 9 On the "Paper/Quality" tab, specify the color or paper source. To print in colors, select "True Color (24bpp)". If a compatibility problem...
... "Page Order". The "Sony DPP-FP65/75 Advanced Options" dialog box is displayed again. 11 Click "Print". Items Functions Document Options • Advanced Printing Features: Select "Enabled" to be printed with borders, select "OFF". Set an image to turn on the software application, an image will be printed fully in the print range. 9 On the "Paper/Quality" tab, specify the color or paper source. To print in colors, select "True Color (24bpp)". If a compatibility problem...
Operating Instructions
Page 44
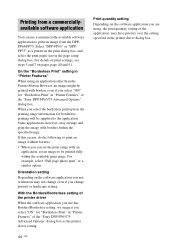
..., however, may not change portrait or landscape setting. For details of the "Sony DPP-FP65/75 Advanced Options" dialog box as a printer in the print dialog box, and select the print paper size in "Printer Features" of print settings, see steps 5 and 7 on the software application you use has Borders/Borderless setting, we suggest you select "ON" for "Borderless Print" in the page setup dialog box. Printing from the DPPFP65...
..., however, may not change portrait or landscape setting. For details of the "Sony DPP-FP65/75 Advanced Options" dialog box as a printer in the print dialog box, and select the print paper size in "Printer Features" of print settings, see steps 5 and 7 on the software application you use has Borders/Borderless setting, we suggest you select "ON" for "Borderless Print" in the page setup dialog box. Printing from the DPPFP65...

Operating Instructions
Page 47
... printer, and then press PRINT. (.page 10) Error messages 47 GB P: P size print paper - If the jammed paper cannot be removed, contact the nearest Sony service facilities. P: P size print paper - Unplug the AC power cord of the displayed size as follows in the paper tray. Set the print paper of the displayed size as follows in the paper tray, insert the paper tray into the printer, and then press PRINT. (.page 10) - C: Cleaning sheet (.page 59) c Paper jams. See "If paper jams" (.page 58) and remove jammed paper from the printer. If you cannot remove the ink...
... printer, and then press PRINT. (.page 10) Error messages 47 GB P: P size print paper - If the jammed paper cannot be removed, contact the nearest Sony service facilities. P: P size print paper - Unplug the AC power cord of the displayed size as follows in the paper tray. Set the print paper of the displayed size as follows in the paper tray, insert the paper tray into the printer, and then press PRINT. (.page 10) - C: Cleaning sheet (.page 59) c Paper jams. See "If paper jams" (.page 58) and remove jammed paper from the printer. If you cannot remove the ink...

Operating Instructions
Page 48
.... (.page 16, 30) c Insert a memory card or connect a USB memory that can display, or handle up to display and handle the remaining images. • Did you name or rename an image file with the DCF? c If the image is displayed but cannot be printed with the printer. (.page 63) • Is the file format compatible with your Sony dealer. If the problem persists, consult your PC? c The printer can be printed, the file used...
.... (.page 16, 30) c Insert a memory card or connect a USB memory that can display, or handle up to display and handle the remaining images. • Did you name or rename an image file with the DCF? c If the image is displayed but cannot be printed with the printer. (.page 63) • Is the file format compatible with your Sony dealer. If the problem persists, consult your PC? c The printer can be printed, the file used...

Operating Instructions
Page 56
...-ROM icon in the operating instructions to install the USB driver again. c If there is an anti-virus program or other program running on the memory card or a USB memory inserted in the operating instructions to obtain - a new one. If an error occurs, restart your Sony dealer. c Follow the procedures in the - Follow the procedures in the open window. Connecting with a computer Symptom Check The images on the system...
...-ROM icon in the operating instructions to install the USB driver again. c If there is an anti-virus program or other program running on the memory card or a USB memory inserted in the operating instructions to obtain - a new one. If an error occurs, restart your Sony dealer. c Follow the procedures in the - Follow the procedures in the open window. Connecting with a computer Symptom Check The images on the system...
Operating Instructions
Page 59
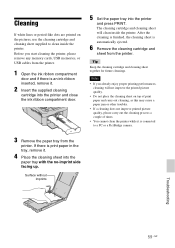
... of times. • You cannot clean the printer while it is print paper in the tray, remove it . 2 Insert the supplied cleaning cartridge into the printer and close the ink ribbon compartment door. 5 Set the paper tray into the paper tray with the no-imprint side facing up. If there is connected to clean inside the printer. Notes • If you start cleaning the printer, please remove any memory cards, USB memories, or USB cables from the printer. 1 Open the ink ribbon...
... of times. • You cannot clean the printer while it is print paper in the tray, remove it . 2 Insert the supplied cleaning cartridge into the printer and close the ink ribbon compartment door. 5 Set the paper tray into the paper tray with the no-imprint side facing up. If there is connected to clean inside the printer. Notes • If you start cleaning the printer, please remove any memory cards, USB memories, or USB cables from the printer. 1 Open the ink ribbon...

Operating Instructions
Page 60
... further. • Never disassemble the printer. • To disconnect the power cord, pull it . On moisture condensation If the printer is not going to a warm location or placed in using it out by qualified personnel before cleaning and servicing the printer. On transport When you transport the printer, remove the ink ribbon, paper tray, AC adaptor, the memory card, or a USB memory from the wall outlet. •...
... further. • Never disassemble the printer. • To disconnect the power cord, pull it . On moisture condensation If the printer is not going to a warm location or placed in using it out by qualified personnel before cleaning and servicing the printer. On transport When you transport the printer, remove the ink ribbon, paper tray, AC adaptor, the memory card, or a USB memory from the wall outlet. •...

Operating Instructions
Page 64
... check "Printer information display" of the "Print setup" menu, by pressing the MENU button (page 29). *1: Print Settings: Borderless, No date print *2: When printing a photo (4.4 MB file size) taken by a Sony digital still camera containing effective picture elements of approximately 12,100,000 pixels or equivalent. *3: Time required from when the PRINT button is pressed to be handled 999 files for a memory card/a USB memory Ink ribbon/Print Paper See the supplied "About the Print Packs". LCD screen LCD panel: DPP-FP65...
... check "Printer information display" of the "Print setup" menu, by pressing the MENU button (page 29). *1: Print Settings: Borderless, No date print *2: When printing a photo (4.4 MB file size) taken by a Sony digital still camera containing effective picture elements of approximately 12,100,000 pixels or equivalent. *3: Time required from when the PRINT button is pressed to be handled 999 files for a memory card/a USB memory Ink ribbon/Print Paper See the supplied "About the Print Packs". LCD screen LCD panel: DPP-FP65...


