
Handycam® Handbook
Page 2
...this Handbook). For operating and handling the camcorder, refer to "Operating Guide" and "Handycam Handbook" (PDF/this Handbook thoroughly, and retain it for future reference. to apply mechanical shock or vibration to the camcorder. • Before connecting your camcorder to insert the "Memory Stick Duo" into...remove the battery pack or AC Adaptor from the camcorder. - to insert the connector plug in your camcorder.) • You cannot use any type of your camcorder. • Disconnect the AC Adaptor from the Handycam Station holding both the camcorder and the DC plug. • Be sure...
...this Handbook). For operating and handling the camcorder, refer to "Operating Guide" and "Handycam Handbook" (PDF/this Handbook thoroughly, and retain it for future reference. to apply mechanical shock or vibration to the camcorder. • Before connecting your camcorder to insert the "Memory Stick Duo" into...remove the battery pack or AC Adaptor from the camcorder. - to insert the connector plug in your camcorder.) • You cannot use any type of your camcorder. • Disconnect the AC Adaptor from the Handycam Station holding both the camcorder and the DC plug. • Be sure...
Handycam® Handbook
Page 3
... MTF measurement system for video cameras and offers a quality typical of the sun only in Germany, and Sony Corporation, and produces superior images. Doing so might cause your camcorder. Change the screen language before using extremely high-precision technology, so over 99.99% of recording media and... other materials may be contrary to the copyright laws. • You cannot play back images recorded with other than the images recorded with a digital still camera, and may be some tiny black points and/or bright points (white, red, blue, or green in any problems. •...
... MTF measurement system for video cameras and offers a quality typical of the sun only in Germany, and Sony Corporation, and produces superior images. Doing so might cause your camcorder. Change the screen language before using extremely high-precision technology, so over 99.99% of recording media and... other materials may be contrary to the copyright laws. • You cannot play back images recorded with other than the images recorded with a digital still camera, and may be some tiny black points and/or bright points (white, red, blue, or green in any problems. •...
Handycam® Handbook
Page 4
... images, perform [ FORMAT] • If you save your image data using a VCR, or a DVD/HDD recorder (p. 45). • It is recommended that you do not apply vibration or shock to the camcorder, while the ACCESS lamp is connected to a computer • Do not try to the protection features of... data • To prevent your image data from the hard disk completely. After recording, do so, your camcorder may be saved or recorded. Notes on using the Hard Disk Drive Handycam Save all your recorded images on external media. Note on operating temperatures • When the temperature of the...
... images, perform [ FORMAT] • If you save your image data using a VCR, or a DVD/HDD recorder (p. 45). • It is recommended that you do not apply vibration or shock to the camcorder, while the ACCESS lamp is connected to a computer • Do not try to the protection features of... data • To prevent your image data from the hard disk completely. After recording, do so, your camcorder may be saved or recorded. Notes on using the Hard Disk Drive Handycam Save all your recorded images on external media. Note on operating temperatures • When the temperature of the...
Handycam® Handbook
Page 5
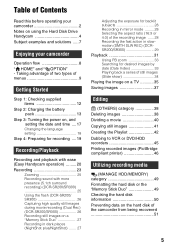
... 45 Printing recorded images (PictBridge compliant printer 46 Utilizing recording media (MANAGE HDD/MEMORY) category 49 Formatting the hard disk or the "Memory Stick Duo 49 Checking the hard disk information 50 Preventing data on using the Hard Disk Drive Handycam 4 Subject examples and solutions ..... 7 Enjoying your camcorder Operation flow 8 " HOME" and " OPTION" -
... 45 Printing recorded images (PictBridge compliant printer 46 Utilizing recording media (MANAGE HDD/MEMORY) category 49 Formatting the hard disk or the "Memory Stick Duo 49 Checking the hard disk information 50 Preventing data on using the Hard Disk Drive Handycam 4 Subject examples and solutions ..... 7 Enjoying your camcorder Operation flow 8 " HOME" and " OPTION" -
Handycam® Handbook
Page 6
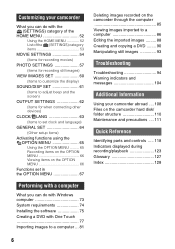
... the software 75 Creating a DVD with One Touch 77 Importing images to a computer ... 81 Deleting images recorded on the camcorder through the computer 85 Viewing images imported to a computer 86 Editing the imported images ......... 88 Creating and copying a DVD ........... 90 Manipulating still images 93 Troubleshooting Troubleshooting 94 Warning indicators and messages 104 Additional Information Using your camcorder abroad .... 108 Files on the camcorder hard disk/ folder structure 110 Maintenance and precautions .... 111 Quick Reference Identifying parts and controls ..... 118 ...
... the software 75 Creating a DVD with One Touch 77 Importing images to a computer ... 81 Deleting images recorded on the camcorder through the computer 85 Viewing images imported to a computer 86 Editing the imported images ......... 88 Creating and copying a DVD ........... 90 Manipulating still images 93 Troubleshooting Troubleshooting 94 Warning indicators and messages 104 Additional Information Using your camcorder abroad .... 108 Files on the camcorder hard disk/ folder structure 110 Maintenance and precautions .... 111 Quick Reference Identifying parts and controls ..... 118 ...
Handycam® Handbook
Page 8
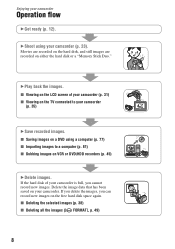
...you delete the images, you cannot record new images. B Play back the images. Delete the image data that has been saved on your camcorder Operation flow B Get ready (p. 12). Movies are recorded on the hard disk, and still images are recorded on the free hard disk space... either the hard disk or a "Memory Stick Duo." x Viewing on VCR or DVD/HDD recorders (p. 45) B Delete images. If the hard disk of your camcorder (p. 35) B Save recorded images. B Shoot using a computer (p. 77) x Importing images to your camcorder (p. 31) x Viewing on the TV connected to a computer (p. 81) x Dubbing ...
...you delete the images, you cannot record new images. B Play back the images. Delete the image data that has been saved on your camcorder Operation flow B Get ready (p. 12). Movies are recorded on the hard disk, and still images are recorded on the free hard disk space... either the hard disk or a "Memory Stick Duo." x Viewing on VCR or DVD/HDD recorders (p. 45) B Delete images. If the hard disk of your camcorder (p. 35) B Save recorded images. B Shoot using a computer (p. 77) x Importing images to your camcorder (p. 31) x Viewing on the TV connected to a computer (p. 81) x Dubbing ...
Handycam® Handbook
Page 9
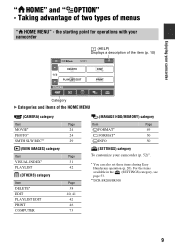
... in the (SETTINGS) category, see page 53. **DCR-SR200/SR300 9 the starting point for operations with your camcorder (HELP) Displays a description of the item (p. 10) Enjoying your camcorder Category B Categories and items of menus " HOME MENU" - Taking advantage of two types of the HOME MENU ... Page 31 42 Page 38 40, 41 42 46 73 (MANAGE HDD/MEMORY) category Item Page FORMAT* 49 FORMAT* 50 INFO 50 (SETTINGS) category To customize your camcorder OPTION" - " HOME" and " Enjoying your camcorder (p. 52)*. * You can also set these items during Easy Handycam operation (p. 20).
... in the (SETTINGS) category, see page 53. **DCR-SR200/SR300 9 the starting point for operations with your camcorder (HELP) Displays a description of the item (p. 10) Enjoying your camcorder Category B Categories and items of menus " HOME MENU" - Taking advantage of two types of the HOME MENU ... Page 31 42 Page 38 40, 41 42 46 73 (MANAGE HDD/MEMORY) category Item Page FORMAT* 49 FORMAT* 50 INFO 50 (SETTINGS) category To customize your camcorder OPTION" - " HOME" and " Enjoying your camcorder (p. 52)*. * You can also set these items during Easy Handycam operation (p. 20).
Handycam® Handbook
Page 11
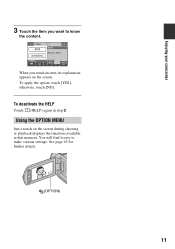
To apply the option, touch [YES], otherwise, touch [NO]. To deactivate the HELP Touch (HELP) again in step 2. When you want to make various settings. See page 65 for further details. (OPTION) 11 You will find it easy to know the content. Using the OPTION MENU Just a touch on the screen. Enjoying your camcorder 3 Touch the item you touch an item, its explanation appears on the screen during shooting or playback displays the functions available at that moment.
To apply the option, touch [YES], otherwise, touch [NO]. To deactivate the HELP Touch (HELP) again in step 2. When you want to make various settings. See page 65 for further details. (OPTION) 11 You will find it easy to know the content. Using the OPTION MENU Just a touch on the screen. Enjoying your camcorder 3 Touch the item you touch an item, its explanation appears on the screen during shooting or playback displays the functions available at that moment.
Handycam® Handbook
Page 12
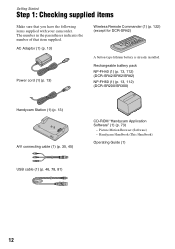
... is already installed. Rechargeable battery pack NP-FH40 (1) (p. 13, 112) (DCR-SR42/SR62/SR82) NP-FH60 (1) (p. 13, 112) (DCR-SR200/SR300) Handycam Station (1) (p. 13) A/V connecting cable (1) (p. 35, 45) CD-ROM "Handycam Application Software" (1) (p. 73) - Picture Motion Browser (Software) - Getting Started Step 1: Checking supplied items Make sure that item supplied. The number in...
... is already installed. Rechargeable battery pack NP-FH40 (1) (p. 13, 112) (DCR-SR42/SR62/SR82) NP-FH60 (1) (p. 13, 112) (DCR-SR200/SR300) Handycam Station (1) (p. 13) A/V connecting cable (1) (p. 35, 45) CD-ROM "Handycam Application Software" (1) (p. 73) - Picture Motion Browser (Software) - Getting Started Step 1: Checking supplied items Make sure that item supplied. The number in...

Handycam® Handbook
Page 13
... clicks. 2 Turn the POWER switch in the direction of the arrow to OFF (CHG) (The default setting). 4 Connect the power cord to your camcorder. b Notes • Your camcorder operates only with an "InfoLITHIUM" battery pack (H series). 1 Attach the battery pack by sliding it in the direction of the arrow until it to... the AC Adaptor and the wall outlet. 5 Set the camcorder onto the Handycam Station securely. The CHG (charge) lamp turns off when the battery pack is fully charged. • When setting the...
... clicks. 2 Turn the POWER switch in the direction of the arrow to OFF (CHG) (The default setting). 4 Connect the power cord to your camcorder. b Notes • Your camcorder operates only with an "InfoLITHIUM" battery pack (H series). 1 Attach the battery pack by sliding it in the direction of the arrow until it to... the AC Adaptor and the wall outlet. 5 Set the camcorder onto the Handycam Station securely. The CHG (charge) lamp turns off when the battery pack is fully charged. • When setting the...
Handycam® Handbook
Page 14
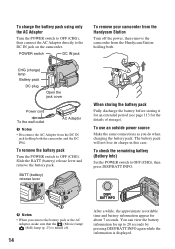
...pack or the AC Adaptor, make sure that the (Movie) lamp/ (Still) lamp (p. 23) is displayed. POWER switch DC IN jack To remove your camcorder from the Handycam Station Turn off . 14 After a while, the approximate recordable time and battery information appear for about 7 seconds. CHG (charge) lamp Battery pack DC ... battery pack Fully discharge the battery before storing it for an extended period (see page 113 for up to the DC IN jack on the camcorder. To charge the battery pack using only the AC Adaptor Turn the POWER switch to OFF (CHG), then connect the AC Adaptor directly to...
...pack or the AC Adaptor, make sure that the (Movie) lamp/ (Still) lamp (p. 23) is displayed. POWER switch DC IN jack To remove your camcorder from the Handycam Station Turn off . 14 After a while, the approximate recordable time and battery information appear for about 7 seconds. CHG (charge) lamp Battery pack DC ... battery pack Fully discharge the battery before storing it for an extended period (see page 113 for up to the DC IN jack on the camcorder. To charge the battery pack using only the AC Adaptor Turn the POWER switch to OFF (CHG), then connect the AC Adaptor directly to...
Handycam® Handbook
Page 16
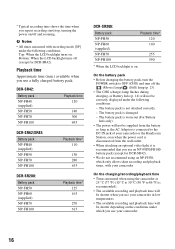
...176;C (50 °F to 86 °F) is recommended). • The available recording and playback time will be shorter when you use your camcorder in low temperatures. • The available recording and playback time will be correctly displayed under the following conditions: - b Notes • All ...times measured with your camcorder. On the charging/recording/playback time • Times measured when using an NP-FH30, which you use your camcorder or the Handycam Station, even when the power cord is disconnected from the battery as ...
...176;C (50 °F to 86 °F) is recommended). • The available recording and playback time will be shorter when you use your camcorder in low temperatures. • The available recording and playback time will be correctly displayed under the following conditions: - b Notes • All ...times measured with your camcorder. On the charging/recording/playback time • Times measured when using an NP-FH30, which you use your camcorder or the Handycam Station, even when the power cord is disconnected from the battery as ...

Handycam® Handbook
Page 17
... record still images The [CLOCK SET] screen appears. 2 Select the desired geographical area with any metallic objects. Lens cover Touch the button on your camcorder is turned off, AC power (house current) is still supplied to it while connected to the wall outlet via the AC Adaptor. Step 3: Turning the... green button, turn on the LCD screen. Disconnect the AC Adaptor from the wall outlet immediately if any malfunction occurs while using your camcorder. • Do not use the AC Adaptor placed in the direction of the AC Adaptor or battery terminal with v/V, then touch [NEXT]. 17...
... record still images The [CLOCK SET] screen appears. 2 Select the desired geographical area with any metallic objects. Lens cover Touch the button on your camcorder is turned off, AC power (house current) is still supplied to it while connected to the wall outlet via the AC Adaptor. Step 3: Turning the... green button, turn on the LCD screen. Disconnect the AC Adaptor from the wall outlet immediately if any malfunction occurs while using your camcorder. • Do not use the AC Adaptor placed in the direction of the AC Adaptor or battery terminal with v/V, then touch [NEXT]. 17...
Handycam® Handbook
Page 18
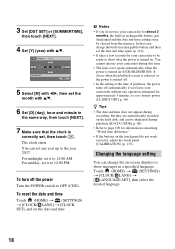
... off the power Turn the POWER switch to OFF (CHG). You can change the on-screen displays to the year 2037. You cannot operate your camcorder without any year up to show messages in a specified language. For midday, set it to page 109 for information concerning "World time difference." &#...8226; If the buttons on the touch panel do not use your camcorder for about 3 months, the built-in rechargeable battery gets discharged and the date and time settings may be cleared from the memory. 3 Set [DST...
... off the power Turn the POWER switch to OFF (CHG). You can change the on-screen displays to the year 2037. You cannot operate your camcorder without any year up to show messages in a specified language. For midday, set it to page 109 for information concerning "World time difference." &#...8226; If the buttons on the touch panel do not use your camcorder for about 3 months, the built-in rechargeable battery gets discharged and the date and time settings may be cleared from the memory. 3 Set [DST...

Handycam® Handbook
Page 19
...or hidden (display y no display) each time you press DISP/ BATT INFO. Fastening the grip belt Fasten the grip belt and hold your camcorder in bright conditions or when you playback images, close the LCD panel with the LCD screen facing out. Getting Started Step 4: Preparing for ...) t [SOUND/DISP SET] t [LCD BRIGHT] (p. 61), and adjust the brightness of the LCD screen. • The information is practical when you use your camcorder correctly. 2180 degrees 190 degrees to the lens side, you open . The recorded image will not be affected by the setting. Adjusting the LCD panel...
...or hidden (display y no display) each time you press DISP/ BATT INFO. Fastening the grip belt Fasten the grip belt and hold your camcorder in bright conditions or when you playback images, close the LCD panel with the LCD screen facing out. Getting Started Step 4: Preparing for ...) t [SOUND/DISP SET] t [LCD BRIGHT] (p. 61), and adjust the brightness of the LCD screen. • The information is practical when you use your camcorder correctly. 2180 degrees 190 degrees to the lens side, you open . The recorded image will not be affected by the setting. Adjusting the LCD panel...
Handycam® Handbook
Page 21
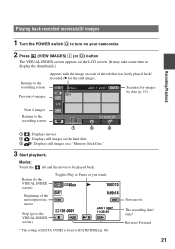
... the movie to [DATE/TIME] (p. 60). Searches for the still image). Playing back recorded movies/still images 1 Turn the POWER switch G to turn on your camcorder. 2 Press (VIEW IMAGES) I (or D) button The VISUAL INDEX screen appears on the LCD screen. (It may take some time to display the thumbnails.) Returns to...
... the movie to [DATE/TIME] (p. 60). Searches for the still image). Playing back recorded movies/still images 1 Turn the POWER switch G to turn on your camcorder. 2 Press (VIEW IMAGES) I (or D) button The VISUAL INDEX screen appears on the LCD screen. (It may take some time to display the thumbnails.) Returns to...
Handycam® Handbook
Page 23
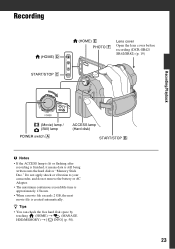
... the ACCESS lamp is lit or flashing after recording is finished, it means data is created automatically. Do not apply shock or vibration to your camcorder, and do not remove the battery or AC Adaptor. • The maximum continuous recordable time is approximately 13 hours. • When a movie file exceeds 2 GB... still being written onto the hard disk or "Memory Stick Duo." z Tips • You can check the free hard disk space by touching (HOME) t (MANAGE HDD/MEMORY) t [ INFO] (p. 50). 23
... the ACCESS lamp is lit or flashing after recording is finished, it means data is created automatically. Do not apply shock or vibration to your camcorder, and do not remove the battery or AC Adaptor. • The maximum continuous recordable time is approximately 13 hours. • When a movie file exceeds 2 GB... still being written onto the hard disk or "Memory Stick Duo." z Tips • You can check the free hard disk space by touching (HOME) t (MANAGE HDD/MEMORY) t [ INFO] (p. 50). 23
Handycam® Handbook
Page 24
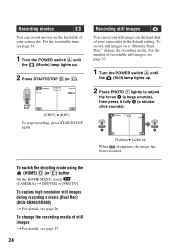
...) (DCR-SR200/SR300) t For details, see page 27. 24 Recording movies You can record still images on the hard disk of your camcorder. For the number of your camcorder in the default setting. Recording still images You can record movies on the hard disk of recordable still images, see page 54. 1 Turn...
...) (DCR-SR200/SR300) t For details, see page 27. 24 Recording movies You can record still images on the hard disk of your camcorder. For the number of your camcorder in the default setting. Recording still images You can record movies on the hard disk of recordable still images, see page 54. 1 Turn...
Handycam® Handbook
Page 25
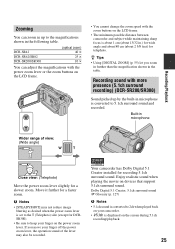
... off the power zoom lever, the operation sound of view: (Wide angle) Close view: (Telephoto) Move the power zoom lever slightly for telephoto. Your camcorder has Dolby Digital 5.1 Creator installed for recording 5.1ch surround sound. If you zoom in further than the magnification shown in the table. Recording sound with the zoom...
... off the power zoom lever, the operation sound of view: (Wide angle) Close view: (Telephoto) Move the power zoom lever slightly for telephoto. Your camcorder has Dolby Digital 5.1 Creator installed for recording 5.1ch surround sound. If you zoom in further than the magnification shown in the table. Recording sound with the zoom...
Handycam® Handbook
Page 26
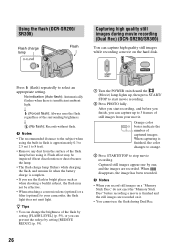
... hard disk. r (Forced flash): Always uses the flash regardless of captured images. b Notes • The recommended distance to 8 feet). • Remove any dust from your camcorder, the flash light does not emit light. Flash effect may not be effective. • When attaching a conversion lens (optional) or a filter (optional) to start recording...
... hard disk. r (Forced flash): Always uses the flash regardless of captured images. b Notes • The recommended distance to 8 feet). • Remove any dust from your camcorder, the flash light does not emit light. Flash effect may not be effective. • When attaching a conversion lens (optional) or a filter (optional) to start recording...


